
(=0$;3OXV
4XLFN6WDUW*XLGH
(=0$;3OXV5HOD\3DQHOV
6RIWZDUH5HYLVLRQDQGDERYH
WEB VERSION

EZ-MAX Plus Quick Start Guide
Page 2
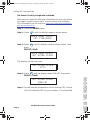
QUICK START
OVERVIEW
Overview
This EZ-MAX Plus Quick Start Guide assumes that you have
already installed your EZ-MAX Plus relay cabinet. This guide also
assumes you have read and familiarized yourself with the EZ-MAX
Plus Programmer Guide.
This guide covers an abbreviated version of the topics listed
below. See the EZ-MAX Plus Programmer Guide for complete
details and instructions on all topics.
• Time and Date—setting the time and date on your relay
cabinet.
• Set All Relays—globally configuring all relays in your
cabinet.
• Blink Warn Timer—configuring the blink warn timer
settings.
• Scheduler—creating a schedule of events.
• Configuring Inputs—configuring low voltage inputs
(occ
upancy sensors, photocells and switches) and digital
inputs.
EZ-MAX Plus QuickStart.book Page 2 Thursday, January 22, 2009 1:55 PM
WEB VERSION

EZ-MAX Plus Quick Start Guide
Page 3
EZ-MAX Plus QuickStart.book Page 3 Thursday, January 22, 2009 1:55 PM
WEB VERSION

EZ-MAX Plus Quick Start Guide
Page 4
Setting the Time and Date
SET TIME
You can change the following fields in the Time display:
• 12 or 24-hour clock
• Hours
• Minutes
• AM or PM
• Daylight Savings Time Mode:
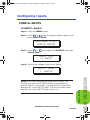
Step 1: Press the MENU button.
Step 2: Press until the display reads as shown below,
then press SELECT/SAVE.
Step 3: Press SELECT/SAVE.
The display will show the current setting for the time.
Step 4: Use to navigate through the fields. Use to
change the settings for each field. For example, use
to change the clock from a 12-hour clock to a 24-hour
clock:
MAIN MENU SELECT
SET TIME/DATE
MAIN MENU SELECT
SET TIME
SET TIME 12 HOUR
4:46PM D: OFF
SET TIME 24 HOUR
16:46S D: US
EZ-MAX Plus QuickStart.book Page 4 Thursday, January 22, 2009 1:55 PM
TIME/DATE
WEB VERSION

Setting the Time and Date
EZ-MAX Plus Quick Start Guide
Page 5
Step 5: Press SELECT/SAVE when you have finished editing the
fields.
SET DATE
Step 1: Press the MENU button.
Step 2: Press until the display reads as below, then press
SELECT/SAVE.
Step 3: Press until the display reads SET DATE, then press
SELECT/SAVE
The display will show the current setting for the date, and the
active field will blink.
Step 4: Use to navigate through the fields. Use the
numeric keypad to change the settings for each field.
Step 5: Press SELECT/SAVE when you have finished editing the
fields.
SET ASTRO CLOCK
Set Astro Clock by City
Follow the steps below to set the Astro Clock by using a quick city
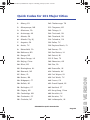
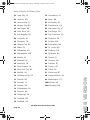
code. See “Quick Codes for 101 Major Cities” on page 32 to see if
your city or a city near you is listed.
MAIN MENU SELECT
SET TIME/DATE
MAIN MENU SELECT
SET DATE
SET DATE MON
12/22/2008
EZ-MAX Plus QuickStart.book Page 5 Thursday, January 22, 2009 1:55 PM
WEB VERSION

EZ-MAX Plus Quick Start Guide
Page 6
Step 1: Press the MENU button.
Step 2: Press until the display reads as below, then press
SELECT/SAVE.
Step 3: Press until the display reads as below, then press
SELECT/SAVE.
Step 4: The display should now read as below. Press SELECT/
SAVE.
Step 5: Use the numeric keypad to enter the number that is
listed next to your city name (i.e. 55 for Las Vegas, NV),
and then press SELECT/SAVE.
MAIN MENU SELECT
SET TIME/DATE
MAIN MENU SELECT
SET ASTRO CLOCK
SET ASTRO CLOCK
CITY
LAS VEGAS
NV
EZ-MAX Plus QuickStart.book Page 6 Thursday, January 22, 2009 1:55 PM
TIME/DATE
WEB VERSION

Setting the Time and Date
EZ-MAX Plus Quick Start Guide
Page 7
Set Astro Clock by Longitude/Latitude
Make sure you have the following information for your city before
you begin: current sunrise time, current sunset time, latitude.
This information can be found at www.srrb.noaa.gov/highlights/
sunrise/sunrise.html.
Step 1: Press the MENU button.
Step 2: Press until the display reads as shown below
Step 3: Press until the display reads as shown below, then
press
SELECT/SAVE.
The display should now read:
Step 4: Press until the display reads SUN/LAT, then press
SELECT/SAVE.
Step 5: You will now be prompted to set the Sunrise (SR), Sunset
(SS) and Latitude (LAT) for your location. The active field
MAIN MENU SELECT
SET TIME/DATE
MAIN MENU SELECT
SET ASTRO CLOCK
SET ASTRO CLOCK
CITY
SET ASTRO CLOCK
SUN/LAT
EZ-MAX Plus QuickStart.book Page 7 Thursday, January 22, 2009 1:55 PM
WEB VERSION

EZ-MAX Plus Quick Start Guide
Page 8
will flash. Use the key to navigate between fields.
Use the numeric keypad to enter in the values.
Step 6: Press the SELECT/SAVE button when you have finished
editing the fields.
SR=07:01A
SS=08:25P LAT=45
EZ-MAX Plus QuickStart.book Page 8 Thursday, January 22, 2009 1:55 PM
TIME/DATE
WEB VERSION

Setting the Time and Date
EZ-MAX Plus Quick Start Guide
Page 9
EZ-MAX Plus QuickStart.book Page 9 Thursday, January 22, 2009 1:55 PM
WEB VERSION

EZ-MAX Plus Quick Start Guide
Page 10
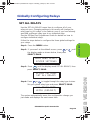
Globally Configuring Relays
SET ALL RELAYS
Use the SET ALL RELAYS menu item to configure all of your
relays at once. Changing settings in this menu will change the
relay type for ALL relays in the cabinet, even if you have already
specified a different relay type to an individual relay.
See the EZ-Max Plus Programmer Guide for details on how to
configure individual relays.
Follow the steps below to configure the three global settings for
your relays.
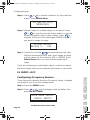
Step 1: Press the MENU button.
Step 2: If you aren’t at the default screen, press or until
the display reads as shown below, then press
SELECT/SAVE.
Step 3: Press until the display reads SET ALL RELAYS, then
press SELECT/SAVE.
Step 4: Press or to toggle through the relay type choices.
Set your global relay type and press SELECT/SAVE.
The system automatically saves the configuration change you
just made and displays the next menu item.
MAIN MENU SELECT
SYSTEM SETTINGS
SYSTEM SETTINGS
SET ALL RELAYS
ALL RELAY TYPE
LATCH (DEFAULT)
EZ-MAX Plus QuickStart.book Page 10 Thursday, January 22, 2009 1:55 PM
SET ALL RELAYS
WEB VERSION

Globally Configuring Relays
EZ-MAX Plus Quick Start Guide
Page 11
Step 5: Press or to toggle BLINK WARN to Y or N. Press
SELECT/SAVE.
Step 6: Press or to toggle EMERGENCY to OFF, ON or
NC. Press SELECT/SAVE.
Your global relay configuration settings have now been saved.
ALL RELAYS
BLINK WARN? Y
ALL RELAYS
EMERGENCY? OFF
EZ-MAX Plus QuickStart.book Page 11 Thursday, January 22, 2009 1:55 PM
WEB VERSION

EZ-MAX Plus Quick Start Guide
Page 12
QUICK START
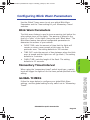
Configuring Blink Warn Parameters
Use the Global Timers menu to set your global Blink Warn
Parameters and the Timer setting for your Momentary Timed
switches.
Blink Warn Parameters
The blink warn feature is used to issue a warning just before the
relay cabinet turns off the lights. The warning is issued in the
form of a “blink” of the lights. Hence the term “Blink Warn.” The
Blink Warn feature has several configurable parameters to
determine the actions of your cabinet.
• OVRD TIME—sets the amount of time that the lights will
remain on when a user cancels a blink warn for their
particular zone. The setting defaults to 120 minutes.
• TIME OUT—sets the amount of time between when the blink
warn is issued and
the lights turn off (go black.) The setting
defaults to 5 minutes.
• FLASH TIME—sets the length of the flash. The setting
defaults to 0.5 seconds.
Momentary Timed interval
When using the “momentary timed” switch input type, a switch
input will trigger the lights on for the timer period specified in this
setting.
GLOBAL TIMERS
Follow the steps below to configure your global Blink Warn
settings, and the global setting for any switch set to “Momentary
Timed.”
EZ-MAX Plus QuickStart.book Page 12 Thursday, January 22, 2009 1:55 PM
GLOBAL TIMERS
WEB VERSION

Configuring Blink Warn Parameters
EZ-MAX Plus Quick Start Guide
Page 13
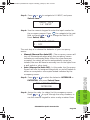
Step 1: Press the MENU button.
Step 2: If you aren’t at the default screen, press or until
the display reads as shown below, then press
SELECT/SAVE.
Step 3: Press until the display reads GLOBAL TIMERS, then
press SELECT/SAVE.
Step 4: Press or to adjust the FLASH TIME. or use the
keypad to enter a specific time. Press SELECT/SAVE.
Step 5: Press or to adjust the TIME OUT setting for Blink
Warn, or use the keypad to enter a specific time. Press
SELECT/SAVE.
Step 6: Press or to adjust the Override Time (OVRD
TIME). or use the keypad to enter a specific time. Press
SELECT/SAVE.
MAIN MENU SELECT
SYSTEM SETTINGS
SYSTEM SETTINGS
GLOBAL TIMERS
BLINK WARN
FLASH TIME: 0.3 S
BLINK WARN
TIME OUT: 5M
BLINK WARN
OVRD TIME: 120M
EZ-MAX Plus QuickStart.book Page 13 Thursday, January 22, 2009 1:55 PM
WEB VERSION

GLOBAL TIMERS
EZ-MAX Plus Quick Start Guide
Page 14
QUICK START
Step 7: Press or to adjust the TIMER setting for
Momentary Timed switches, or use the keypad to enter a
specific time. Press SELECT/SAVE.
All other programming functions will now use the above global
settings when setting a Blink Warn or a Momentary Timed switch.
TIME SWITCH
TIMER: 30M
EZ-MAX Plus QuickStart.book Page 14 Thursday, January 22, 2009 1:55 PM
WEB VERSION

Configuring Blink Warn Parameters
EZ-MAX Plus Quick Start Guide
Page 15
EZ-MAX Plus QuickStart.book Page 15 Thursday, January 22, 2009 1:55 PM
WEB VERSION

EZ-MAX Plus Quick Start Guide
Page 16
QUICK START
The Scheduler
SCHEDULER
Use the SCHEDULER menu to create, edit, or delete an event. An
“event” is defined as any action that occurs at a specific time.
NEW EVENT
You can control your lighting based on an event schedule that
you create. For example, you may want to create an event that
turns all lobby lights on at 7am Monday thru Friday, and another
event that turns all lobby lights off at 7pm Monday thru Friday.
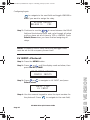
Step 1: Press the MENU button.
Step 2: Press or until the display reads as below, then
press SELECT/SAVE.
Step 3: Press until the display reads NEW EVENT, then
press SELECT/SAVE.
Step 4: Use the numeric keypad to enter an event number (001-
999) and press SELECT/SAVE.
The display will then prompt you to enter a “Time Type.” You can
set your event for a specific time of day, or according to sunrise
and sunset. The example below shows how to set an event time
based on the time of five minutes before sunrise.
MAIN MENU SELECT
SCHEDULER
SCHEDULER
NEW EVENT
ENTER EVENT #
E022:
EZ-MAX Plus QuickStart.book Page 16 Thursday, January 22, 2009 1:55 PM
SCHEDULER
WEB VERSION

The Scheduler
EZ-MAX Plus Quick Start Guide
Page 17
Step 5: Press or to toggle between TIME OF DAY and
SUNRISE/SUNSET, then press SELECT/SAVE.
Step 6: Press or to toggle between SR+ and SS-. Use the
numeric keypad to enter the time of the event, and press
SELECT/SAVE when you have finished editing the
fields.
Step 7: Press to move through the days of the week. The
active field (day of the week) will flash. Press zero (0) to
disable a day of the week (displays as a slash), or press
an alpha key to enable a day of the week. Press
SELECT/SAVE when you have finished editing the
fields.
Step 8: Define whether or not this event will run on holidays.
Press or to toggle between the three Holiday
Mode choices. Press SELECT/SAVE.
Now define the Event Type and behavior.
ENTER TIME TYPE
SUNRISE/SUNSET
ENTER SR/SS TIME
SR-0:05
ENTER DAYS OF WK
MTWTF--
HOLIDAY MODE
HOLIDAY ENABLED
EZ-MAX Plus QuickStart.book Page 17 Thursday, January 22, 2009 1:55 PM
WEB VERSION

EZ-MAX Plus Quick Start Guide
Page 18
QUICK START
Step 9: The example below is for a relay. Press or to
toggle between the three choices until you get to RELAY,
and press SELECT/SAVE.
Assign the relays that will be associated with this event. If there
are 16 relays in your cabinet you will have to set each one to YES
or IGNORE, depending on whether or not you want the relay to
respond.
Step 10: Use the alphanumeric keys to input the relay number.
Press to navigate to the IGNORE/YES field. Press
or to toggle between YES and IGNORE and set
any relays you want to be a
ffected by this event to YES.
Press SELECT/SAVE when you have finished setting all
relays.
CHANGE EVNT TIME
Step 1: Press the MENU button.
Step 2: Press or until the display reads as below, then
press
SELECT/SAVE.
SELECT RLY MODE
RELAY ON
ASSIGN RELAYS
RELAY #01 YES
MAIN MENU SELECT
SCHEDULER
EZ-MAX Plus QuickStart.book Page 18 Thursday, January 22, 2009 1:55 PM
SCHEDULER
WEB VERSION

The Scheduler
EZ-MAX Plus Quick Start Guide
Page 19
Step 3: Press until the display reads CHANGE EVNT TIME,
then press SELECT/SAVE.
Step 4: Use the numeric keypad to enter the event number you
want to modify. Once you actually enter the event
number the event time will display. Press SELECT/
SAVE.
Step 5: You will then be prompted to choose a Time Type. Press
or to toggle between the two time types (TIME
OF DAY and SUNRISE/SUNSET). Press SELECT/SAVE.
Step 6: Use the numeric keypad to enter a new time. Press
to navigate the fields. Press SELECT/SAVE.
Step 7: Press SELECT/SAVE when you have finished editing the
fields.
DELETE EVENT
You might find out down the line that you don’t need all of the
events that you originally programmed into your EZ-MAX Plus
system. It’s a very simple process to delete an event.
SCHEDULER
CHANGE EVNT TIME
SELECT EVENT #
E022: 7:00AM
EDIT TIME TYPE
TIME OF DAY
EDIT TIME
7:00AM
EZ-MAX Plus QuickStart.book Page 19 Thursday, January 22, 2009 1:55 PM
WEB VERSION

EZ-MAX Plus Quick Start Guide
Page 20
QUICK START
Step 1: Press the MENU button.
Step 2: Press or until the display reads as below, then
press SELECT/SAVE.
Step 3: Press until the display reads DELETE EVENT, then
press SELECT/SAVE.
Step 4: Use the numeric keypad to enter the event number you
want to delete. Once you actually enter the event
number the event time will display. Press SELECT/
SAVE.
Step 5: Press or to toggle to “Y,” and press SELECT/
SAVE.
Your event has been deleted.
MAIN MENU SELECT
SCHEDULER
SCHEDULER
DELETE EVENT
SELECT EVENT
E022: 7:00AM
DELETE EVENT: Y
E022: 7:00AM
EZ-MAX Plus QuickStart.book Page 20 Thursday, January 22, 2009 1:55 PM
SCHEDULER
WEB VERSION
Page is loading ...
Page is loading ...
Page is loading ...
Page is loading ...
Page is loading ...
Page is loading ...
Page is loading ...
Page is loading ...
Page is loading ...
Page is loading ...
Page is loading ...
Page is loading ...
Page is loading ...
Page is loading ...
Page is loading ...
Page is loading ...
Page is loading ...
Page is loading ...
Page is loading ...
Page is loading ...
Page is loading ...
Page is loading ...
Page is loading ...
Page is loading ...
Page is loading ...
Page is loading ...
Page is loading ...
Page is loading ...
Page is loading ...
Page is loading ...
-
 1
1
-
 2
2
-
 3
3
-
 4
4
-
 5
5
-
 6
6
-
 7
7
-
 8
8
-
 9
9
-
 10
10
-
 11
11
-
 12
12
-
 13
13
-
 14
14
-
 15
15
-
 16
16
-
 17
17
-
 18
18
-
 19
19
-
 20
20
-
 21
21
-
 22
22
-
 23
23
-
 24
24
-
 25
25
-
 26
26
-
 27
27
-
 28
28
-
 29
29
-
 30
30
-
 31
31
-
 32
32
-
 33
33
-
 34
34
-
 35
35
-
 36
36
-
 37
37
-
 38
38
-
 39
39
-
 40
40
-
 41
41
-
 42
42
-
 43
43
-
 44
44
-
 45
45
-
 46
46
-
 47
47
-
 48
48
-
 49
49
-
 50
50


Leviton R08BD-208 Quick start guide
- Type
- Quick start guide
Ask a question and I''ll find the answer in the document
Finding information in a document is now easier with AI
Related papers
Other documents
-
Legrand WinControl User guide
-
-
EverFocus 22HH1144 User manual
-
Motion ECOR264-4X1 500GB User manual
-
-
Intermatic ET70415CR User manual
-
Dedicated Micros DV-IP Express Installation & Operation Guide
-
Samsung SGH-T528G User manual
-
-