Ginnys 4-In-1 Multicooker Owner's manual
- Category
- Small kitchen appliances
- Type
- Owner's manual

BRAND
4-IN-1 SLOW COOKER
User Guide
Item: 742476
Ginnys.com • 800-544-1590
Facebook.com/GinnysBrand
Pinterest.com/GinnysBrand
Ginnys.com/Blog

TABLE OF CONTENTS
Important Safeguards 3
Electrical Safety and Specicaons 4
Get to Know Your Appliance 5-6
How to Operate 7-10
Cleaning & Care 11
Trouble Shoong 11
Recipes 12-15
Warranty 16
____________________________________________________________
____________________________________________________________
Thank you for purchasing a Ginny’s Brand
4-in-1 Slow Cooker! This appliance is a slow
cooker, oven, stovetop and steamer. The
simple-to-use controls give you the
exibility you need for one-pot cooking, and
the 6 quart pot is ideal for cooking family-size
meals. Enjoy!
President, Ginny’s
2
Ginnys.com 800-544-1590
____________________________________________________________
____________________________________________________________

President, Ginny’s
IMPORTANT SAFEGUARDS
READ CAREFULLY BEFORE USING AND SAVE THESE INSTRUCTIONS!
• FOR HOUSEHOLD USE ONLY. Do not use this appliance for other than its
intended use.
• REMOVE all packaging materials and labels before rst use.
• WASH all removable parts before rst use. See Cleaning & Care.
• A SHORT CORD is provided to reduce the hazards resulng from
entanglement or tripping. Do not drape the cord over the counter or
tabletop, where it can be pulled on or tripped over. Never wrap the cord
ghtly around the appliance, as this could cause the cord to fray or
break.
• We do not recommend using an extension cord with this appliance.
However, IF AN EXTENSION CORD IS USED, the marked electrical rang
should be at least as great as the electrical rang of this appliance.
• CLOSE SUPERVISION is necessary when using this appliance near
CHILDREN.
• A re may occur if this appliance is used near FLAMMABLE MATERIALS,
including curtains, towels, walls, etc. Do not place any paper, plasc, or
other non-food items in the appliance. Do not place the appliance or its
cord on or near a heated surface, or in a heated oven.
• This appliance should always be used on a STABLE, DRY, HEAT-RESISTANT
SURFACE. Do not use near water.
• Do not use an accessory or aachment not recommended by Ginny’s, as
this may cause injury, or damage the appliance.
• Always use OVEN MITTS when handling hot food or appliances. Do not
aempt to move an appliance when it is hot, or has hot contents.
• Do not use this appliance for deep frying.
• Always use plasc or wooden utensils to avoid damaging the nonsck
surface.
• Do not use outdoors.
• Turn OFF AND UNPLUG this appliance when not in use.
• NO SERVICEABLE PARTS INSIDE THIS APPLIANCE.
• DO NOT USE AN APPLIANCE WITH A DAMAGED CORD OR PLUG, OR
AFTER THE APPLIANCE MALFUNCTIONS, OR HAS BEEN DAMAGED IN ANY
MANNER.
3
Facebook.com/GinnysBrand

ELECTRICAL SAFETY
SPECIFICATIONS
POWER RATING 120V 60HZ 1350W
CAPACITY 6 QUART
CORD LENGTH 27”
DIMENSIONS 18”L x 12 1/2”W x 11”H
MODEL ES-MC-600D
4
Pinterest.com/GinnysBrand
This appliance is equipped with a polarized plug in which one prong is wider
than the other. This is a safety feature to reduce the risk of electrical shock.
The plug should be aached to the appliance before connecng to an
electrical outlet. The plug will t into a polarized outlet only one way. If you
are unable to insert the plug into the outlet, try reversing the plug. If it sll
does not t, contact a qualied electrician. Do not aempt to modify the
plug in any way. Ginny’s cannot accept any liability for damage or injury
resulng from failure to observe these safety procedures.

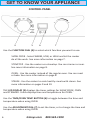
GET TO KNOW YOUR APPLIANCE
5
Ginnys.com/Blog
1. Lid with Handle and Vent
2. Cooking Pot
3. Cool Touch Handle of Cooking Pot (2)
4. Funcon Dial
5. LED Display
6. Time/Oven Temp Buon
7. Adjustment Dial
8. Housing
9. Handle of Housing (2)
10. Roasng Rack (not shown)
(connued on page 6)
7
6
1
2
5
9
8
3
4

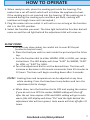
GET TO KNOW YOUR APPLIANCE
6
Ginnys.com 800-544-1590
Use the FUNCTION DIAL (4) to select which funcon you want to use:
SLOW COOK - Select WARM, LOW, or HIGH and let the cooker
do all the work. See more informaon on page 7.
STOVETOP - Use the cooker as a stovetop. You can simmer or sear.
See more informaon on page 8.
OVEN - Use the cooker instead of the regular oven. You can roast
or bake. See more informaon on page 8.
STEAM - Use the cooker to cook healthy meals with steam. See
more informaon on pages 9 and 10.
THE LED DISPLAY (5) displays the mer sengs for SLOW COOK, OVEN
and STEAMER. It also displays me and temperature for OVEN.
Use the TIME/OVEN TEMP BUTTON (6) to toggle between the me and
temperature when using OVEN.
Use the ADJUSTMENT DIAL (7) to set the mer, or to change the me and
temperature when using OVEN.
CONTROL PANEL
4 765

HOW TO OPERATE
7
Facebook.com/GinnysBrand
1. When ready to cook, place the cooking pot inside the housing. This
cooker has a cut o switch which will not allow the appliance to heat
if the cooking pot is not inserted into the housing. (If the cooking pot is
removed during the cooking cycle and then put back, cooking will
connue as though it was not interrupted.)
2. Plug the cooker into an outlet. It will not turn on as long as the funcon
dial is in the OFF posion.
3. Select the funcon you want. The blue light behind the funcon dial will
come on and the red light behind the adjustment dial will come on.
SLOW COOK:
a. As with any slow cooker, be careful not to over-ll the pot
(contents may boil over).
b. Place the food you wish to cook inside the pot and put the lid on
top.
c. Turn the funcon dial to either WARM, LOW, or HIGH, per recipe
instrucons. The LED display will show “6:00” for WARM, “8:00”
for LOW, or “4:00” for HIGH.
d. Turn the adjustment dial to set the desired me. The me will
increase or decrease in 30 minute increments from 30 minutes to
12 hours. The mer will begin counng down aer 3 seconds.
Cooking me and temperature can be adjusted at any me
while cooking. Press the me/oven temp buon and turn the
adjustment dial to change.
e. When done, turn the funcon dial to OFF and unplug the cooker.
If you do not turn OFF the cooker, WARM seng will shut o
aer the set me expires. LOW and HIGH seng will go to auto
warm (the LED display will show “On” and the light behind the
adjustment dial will turn green). Auto warm will shut o aer 12
hours.

8
Pinterest.com/GinnysBrand
HOW TO OPERATE
STOVETOP:
a. Place the food you wish to cook inside the pot. Use the lid per
recipe instrucons.
b. Choose STOVETOP LOW (to simmer) or HIGH (to brown or sear).
c. When done, turn the funcon dial to OFF and unplug the cooker.
If you do not turn OFF, LOW will shut o aer 4 hours and HIGH
will shut o aer 1 hour.
Use the stovetop funcon on HIGH to brown or sear meats and
vegetables before slow cooking to enhance avors.
OVEN:
a. Choose OVEN. The LED display will show “350°F”. Turn the
adjustment dial to set the temperature per recipe instrucons. The
temperature will adjust in 25° increments from 250° to 425°F.
b. Press the me/oven temp buon once, and then turn the
adjustment dial to set the cooking me per recipe instrucons. The
me will increase in 5-minute increments from 5 minutes to 6
hours.
c. When nished preheang, place the rack inside the pot and put
the food you wish to cook on the rack. Reset the me and
temperature per recipe instrucons.
Cooking me and temperature can be adjusted at any me while
cooking. Press the me/oven temp buon and turn the
adjustment dial to change.
d. The mer will begin counng down aer 3 seconds.
e. When done, the cooker will beep 3 mes and the LED display will
blink for 2 minutes. At the end of the 2 minutes, the cooker will
shut o. Turn the funcon dial to OFF and unplug the cooker.
Food cooked on OVEN will not brown or crisp on top as much as
in a convenonal oven, as there is no upper heang element.
Cooking mes or temperatures from a tradional recipe may
need to be adjusted.

9
Ginnys.com/Blog
HOW TO OPERATE
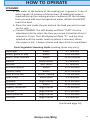
STEAMER:
a. Add water to the boom of the cooking pot. In general, 1 cup of
water equals 10 minutes of steam me. (If addional water is
required during the cooking process, cauously li the lid away
from you and add room temperature water.) Water should NOT
touch the food.
b. Place the rack inside the pot and put the food you wish to cook
on the rack.
c. Choose STEAMER. The LED display will ash “0:00”. Use the
adjustment dial to select the me per recipe instrucons from 1
minute to 1 hour. The LED display will ash “P:” and the me
selected unl the cooker heats up (about 5 minutes). When
the cooker is hot, it beeps 3 mes and then starts to countdown.
Fresh Vegetable Steaming Guide (cooking mes may vary):
Asparagus whole 3-7 minutes
Beans, green or wax whole 6-10 minutes
Beets, small-medium whole 35-40 minutes
Greens whole leaves 3-9 minutes
Broccoli split stalks 5-7 minutes
Brussels sprouts whole 8-15 minutes
Carrots, baby whole 10-12 minutes
Corn on the cob whole, husked 7-10 minutes
Peas, snap whole pods 5-6 minutes
Potatoes large chunks 8-12 minutes
Potatoes, new whole 15-20 minutes
Squash, buernut large chunks 7-10 minutes
Turnips large chunks 8-12 minutes
Sweet potatoes large chunks 8-12 minutes
Zucchini large chunks 4-8 minutes
(connued page 10)

10
Ginnys.com 800-544-1590
HOW TO OPERATE
WARNING: Do not obstruct the lid vent during use. To avoid possible steam
damage, place the cooker away from walls and cabinets during
use.
• Add chopped fresh herbs, before or aer steaming.
• Toss steamed vegetables with onion or garlic sauteed in
olive oil.
• Add soy sauce, ginger, onions, garlic or herbs to your
steam water.
• Drizzle steamed vegetables with lemon juice.
• Toss vegetables with vinegar before steaming.
Easy ways to add avor to your steamed vegetables:
d. When the me is done, the cooker will beep 5 mes, and go to
auto warm. The LED diplay will show “0:00” and the light behind
the adjustment dial will turn green. Auto warm will shut o aer 1
hour.
e. When done, turn OFF and unplug the cooker.

11
Facebook.com/GinnysBrand
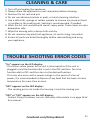
CLEANING & CARE
1. Turn o and unplug the appliance.
2. Always allow the appliance to cool completely before cleaning.
3. Remove the lid, rack and pot.
4. Do not use abrasive brushes or pads, or harsh cleaning soluons.
5. Use a so cloth, sponge or rubber spatula to remove any stuck-on food
or residue in the cooking pot. Soaking is recommended, if needed.
6. Wash the lid, rack and pot with warm, soapy water. These items are also
dishwasher safe.
7. Wipe the housing with a damp cloth and dry.
8. Do not immerse any electrical appliance, its cord or plug, into water.
9. Ensure all parts are dried thoroughly before reassembling and using
your appliance.
TROUBLE SHOOTING ERROR CODES
“Err” appears on the LED display:
- This occurs when power to the unit is interrupted or if the unit is
plugged in and the funcon dial is not in the OFF posion. Turn the
funcon dial to OFF and then turn to the desired funcon.
- This may also occur with a power outage. In the event of a loss of
power, it is recommended to dispose of any food that has been at room
temperature for more than an hour.
“E01” appears on the LED display:
- The cooking pot is not inside the housing. Insert the cooking pot.
“E02” or “E03” appears on the LED display:
- Contact Ginnys customer service. Warranty informaon is on page 16 of
this manual.

12
Pinterest.com/GinnysBrand
RECIPES
Cooking mes may vary, depending on your slow cooker. You may rst want
to try this recipe on a day when you are home to monitor – who doesn’t
love breakfast for dinner?
30 oz. bag frozen hash browns ½ red bell pepper, chopped
1 lb. sausage 12 eggs
8 oz. cheddar cheese, shredded 1 c. milk
6 green onions, sliced ½ t. salt
1 c. fresh spinach, chopped ¼ teaspoon pepper
1. Brown the sausage on STOVETOP HIGH. Remove from the pot and drain.
Place half the hash browns into the boom of the pot. Layer in half the
cooked sausage, half the cheese, and half the veggies. Repeat layers.
2. In a large bowl, whisk together eggs, milk, salt, and pepper, then pour over
the top of the other ingredients.
3. Cook on SLOW COOK HIGH for 2-3 hours, or LOW 4-6 hours (unl eggs are
set). If eggs are done, but too moist, remove the lid for 30 minutes or so
to let the moisture evaporate.
Serves 6-8
This recipe is best with fresh garden tomatoes (or fresh farmers market
tomatoes) for maximum avor. Top the baked tomatoes with chopped fresh
herbs, capers, olives or mushrooms, and serve with a spoon and crackers.
Enjoy!
3 medium tomatoes, cut in half salt & pepper
olive oil ¼ - ½ c. grated Parmesan cheese
1. Preheat OVEN to 400 °F. Place the rack in the pot. Add a piece of
aluminum foil to the rack to minimize clean-up.
(connued on page 13)

RECIPES
13
Ginnys.com/Blog
2. Using a spoon, scoop out and discard the tomato seeds that are easy to
get to. Using a pastry brush, generously spread the cut part of the tomato
with olive oil.
3. Sprinkle each tomato half with salt and pepper, and place, cut side up, on
the foil. Bake for 45 minutes (the tomato skin should be slipping away).
4. Turn o the oven and remove the lid, but let the tomato halves sit on the
rack to cool for about 5 minutes.
5. Sprinkle with Parmesan and any other desired toppings.
Serves 6
1 - 1½ lbs. beef 1 lg. sweet onion, sliced
2 T. our 3 T. brown sugar
¾ t. salt 5 T. soy sauce
¼ t. pepper 2 T. toasted sesame oil
3 T. vegetable oil 1 t. sesame seeds
4 cloves garlic, minced red pepper akes
3 bell peppers, seeded & sliced
1. Heat the cooker on STOVETOP HIGH.
2. Slice beef into thin pieces (¼”- ½” thick) and toss in a bowl with the our,
salt and pepper.
3. When the cooker is hot, add 2 T. oil and the meat to the pot. Cook and
sr for 6-7 minutes unl the meat is browned. Add the garlic, and cook
and sr for another minute.
4. Add the peppers and onion to the pot, along with 1 T. oil. Sr in with the
beef and cook for 2-3 minutes. Cover with the lid and let cook another 5
minutes.
5. In a small bowl, whisk together the sauce: brown sugar, soy sauce and
sesame oil.
6. Turn o the heat and pour the sauce onto the beef/pepper mixture. Sr
in the sesame seeds and a couple shakes of hot pepper akes (to taste).
7. Serve with rice.
Serves 4-6

RECIPES
14
Ginnys.com 800-544-1590
2 lb. corned beef brisket w/ seasoning packet ½ large onion, sliced
½ c. water ½ head cabbage
aluminum foil parsley, chopped
6 medium red potatoes, cut in half salt & pepper
1. Put the brisket in the pot. Add the water, and top the brisket with the
seasoning packet.
2. Loosely crumble pieces of aluminum foil to surround the brisket (this will
keep the potatoes from geng greasy).
3. Add potatoes on foil and onion on top of the brisket.
4. Cook on SLOW COOK LOW for 8 hours or HIGH for 3 ½ - 4 hours. Meat is
done when internal temperature reaches 160°. Chop the cabbage into
wedges and add on top of the meat and potatoes. Connue cooking unl
cabbage is tender.
5. When serving, sprinkle the potatoes with parsley. Make sure your guests
have salt & pepper and a variety of mustards to choose from.
Serves 6
6 large baking apples (we used Jonathan) ½ c. brown sugar
⅔ c. walnuts, chopped ¼ t. ground cloves
½ c. raisins pinch salt
5 T. so buer 1 c. orange juice
1. Core the apples starng from the stem side – leave ½” intact on the
blossom side to hold the stung.
2. In a medium bowl, combine walnuts, raisins, buer, brown sugar, cloves
and salt. Mix well. Stu apples with this stung and place in slow
cooker pot.
3. Add orange juice to the pot. Cook on SLOW COOK LOW for 2 hours.
Check for tenderness of apples and allow more me if needed.
Serves 6

RECIPES
15
Facebook.com/GinnysBrand
This is a delicious, Asian-style dish that is WAY healthier than take-out. It’s
quick, easy and inexpensive, too!
2 c. water 2 heads broccoli
3 cloves garlic, smashed and broken ¼ c. soy sauce
2“ ginger, sliced 2 T. vinegar
4 chicken thighs, skinned 1 t. sesame oil
salt & pepper 1 can (20 oz.) pineapple chunks,
in pineapple juice
1. Put the water, garlic and ginger in the boom of the pot. Put in the rack.
2. Cover and set to STEAMER unl the water boils.
3. Sprinkle the chicken with salt and pepper (both sides) and place the
chicken on the rack. Steam for 15 minutes. When done, slice the broccoli
stalks into 2, and place these on top of the chicken in the pot. Steam for
another 5 minutes unl the broccoli is bright green.
4. While the chicken/broccoli is steaming, warm the soy sauce, vinegar, oil
and pineapple (and juice), over medium heat in a sauce pan on the
stovetop. Sr occasionally.
5. Remove the broccoli from the steamer and chop. Remove the chicken and
shred with 2 forks. Toss all together with the pineapple mixture and serve
hot.
Serves 2- 4

WARRANTY
Ginny’s warrants this product free from defects in material and
workmanship for one year from provable date of purchase.
Within this warranty period, Ginny’s will repair or replace, at its opon,
defecve parts at no charge, provided the product is returned, freight
prepaid with proof of purchase to Ginny’s. Allow 2-4 weeks for return
shipping.
This warranty does not cover improper installaon, misuse, abuse or neglect
on part of the owner. Warranty is also invalid in any case that the product is
taken apart or serviced by an unauthorized service staon.
This warranty gives you specic legal rights and they may vary from
state to state.
THE FOREGOING WARRANTIES ARE IN LIEU OF ALL OTHER WARRANTIES AND
CONDITIONS, EXPRESS OR IMPLIED, INCLUDING BUT NOT LIMITED TO THOSE
OF MERCHANTIBILITY OR FITNESS FOR A PARTICULAR PURPOSE.
Ginny’s, Inc.
1112 7th Avenue
Monroe, WI 53566
Customer Service: 800-544-1590
8:00 a.m. to Midnight CST, Monday through Friday
16
Ginnys.com 800-544-1590
-
 1
1
-
 2
2
-
 3
3
-
 4
4
-
 5
5
-
 6
6
-
 7
7
-
 8
8
-
 9
9
-
 10
10
-
 11
11
-
 12
12
-
 13
13
-
 14
14
-
 15
15
-
 16
16


Ginnys 4-In-1 Multicooker Owner's manual
- Category
- Small kitchen appliances
- Type
- Owner's manual
Ask a question and I''ll find the answer in the document
Finding information in a document is now easier with AI
Related papers
-
 GINNY’S NSCDA-650 User manual
-
 Ginnys Divided Slow Cooker Owner's manual
-
 Ginnys .9 Cubic Foot Microwave Owner's manual
-
 Ginnys 6-Qt. Slow Cooker Owner's manual
-
 Ginnys 6-Qt. Oval Multi Cooker Owner's manual
-
 Ginnys Double Decker Toaster Oven Owner's manual
-
 Ginnys 60677 User manual
-
 GINNY’S 762246 User manual
-
 Ginnys Food Steamer Owner's manual
-
 GINNY’S Copper Electric Skillet User manual