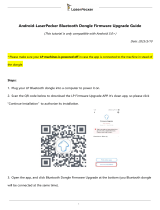
Page is loading ...

Quick-Start Guide
Connect the supplied Wi-Fi dongle, insert the power lead and
switch on mains power. Press the Standby button on the front
of the Minx Xi to switch the unit on.
Your Minx Xi will now automatically scan for wireless
networks within range.
Be sure not to unplug the Wi-Fi dongle when
your Minx Xi is switched on. The Wi-Fi dongle
must be connected before you power
on.
The Minx Xi will then find
any nearby networks,
select your home network
by scrolling and then
pressing the rotary dial.
If the screen displays “Enter WEP key” or “Enter WPA key”, use
the rotary dial to select each character of your password in
turn, pressing the rotary dial in to select each character.
Note: The WEP and WPA codes are case sensitive, so you
must enter them exactly.
Don’t know you
r Wi-Fi password key?
It’s commonly found on a label on your
internet modem/router.
If you make a mistake, you can delete
characters by pressing the button.
After entering the final character, use the rotary dial to select
and press the character at the end of the character list.
The Minx Xi will now connect to the network.
Using an Ethernet cable, connect your Minx Xi to a free
Ethernet port on your router.
Co
nnect the power lead and switch on mains power. Press
the Standby button on the front of the Minx Xi to switch the
unit on. The Minx Xi will automatically connect to your home
network.
Congratulations!
Now that you have successfully connected your Minx Xi to your home
network, you are ready to enjoy network music playback and listen to
internet radio or streaming services.
Upon connection to your hom
e network, your Minx Xi will check for any
firmware updates that may be available. If prompted, select YES to
upgrade the firmware to the latest version.
Speaker terminals can be
removed to allow insertion
of banana plugs
Network music playback
To stream music over your network from a computer or NAS
drive with a UPnP/DLNA function, ensure that your UPnP server is set
up and switched on – you may need to c
onsult your UPnP/DLNA
server/NAS drive instruction manual for details.
Navigate to the Media menu, then the UPnP Servers menu and
press the rotary dial to select your server – this will appear as
you have named it in the server setup (eg. Twonky Media,
Ben’s Music Library, etc).
The Minx Xi will now load the appropriate menus from the
selected server, allowing you to browse and play back music
from
that server by scrolling and then pressing the rotary dial.
You can also browse and play using the Stream Magic app or
supplied remote control.
Help and Troubleshooting
For help and FAQs visit:
www.cambridgeaudio.com/MinxXiSupport
Consult the online user manual for more detailed information.
1
1
2
1
2
3
4
Wireless network connection
Network setup
To enjoy network music playback, internet radio and streaming
services, you must first connect your Minx Xi to your home network
following the instructions below.
This simple quick-start guide should be enough for most users to
get started, however, for more detailed step-by-step instructions,
please consult the Minx Xi user manual available at
www.cambridgeaudio.com/MinxXiSupport
Wired network connection
Minx Xi
Page 1
OR
ENGLISH
Standby
Connect speakers
and an optional
subwoofer if desired.
Power AC
A1 A2
Ethernet
USB
Audio In
D2D1
Sub Out
HD/Local media
BT100
WiFi Dongle
Loudspeaker Terminals
Right Left
4-8
www.cambridge-audio.com
Rated Power Consumption: 300W
Designed and engineered in London, England
Minx Xi
Digital Music System
R
L
R
L
Power AC
A1 A2
Ethernet
USB
Audio In
D2D1
Sub Out
HD/Local media
BT100
WiFi Dongle
Loudspeaker Terminals
Right Left
4-8
www.cambridge-audio.com
Rated Power Consumption: 300W
Designed and engineered in London, England
Minx Xi
Digital Music System
R
L
R
L
Broadband Router/Modem
Internet
Ethernet cable

Bluetooth
The Minx Xi is supplied with a BT100 Bluetooth adaptor. This allows
the Minx Xi to receive wireless Bluetooth audio from suitable
phones/tablets and laptops.
To send Bluetooth audio to the BT100 you must first pair your
phone/tablet or laptop with the BT100.
Connect the BT100 to the BT100 USB socket on the
rear of the Minx Xi.
Put the BT100 in pairing mode by pre
ssing and holding the
Bluetooth button on the remote control for 4-5 seconds, or by
double pressing the button on the BT100 itself (note it is on the
underside).
Now pair with your phone/tablet/computer (you may need to
consult your Bluetooth device’s user manual for details). You
only need to do this the once, as the BT100 will remember
your Bluetooth device the next time you
wish to use it.
With a BT100 installed, ‘Bluetooth’ will appear as a menu item
in the home menu. Use the rotary dial to select and play from
this input.
Audio inputs
The Minx Xi has two Analogue audio inputs, two Digital audio
inputs and a front 3.5mm ‘MP3’ input for the headphone output
of portable players.
Connect any analogue or digital sources to the Minx Xi
1
2
3
4
1
The different Audio Inputs can be selected and played in
three different ways:
●
By pressing the input buttons on the remote control
●
By navigating to the Audio inputs menu in the main menu.
●
Using the app
2
Get the free StreamMagic App
Stream Magic Remote is a free app for Apple and Android devices
that allows full control of the Minx Xi including Internet Radio,
Network Music playback, Streaming Services, Presets, Queuing
and more, all from the comfort of your armchair.
Download the free Stream Magic app from the iTunes app store or
Google Play store (requires iOS 4.3 or later/Android 2.3 or later).
Minx Air
Minx Air Minx Air
Minx Air
FREE App
Digital inputs
Audio player/recorder
(Tape/MD/CD-R)
CD player
Out
Out
Analogue inputs
X2
Internet Radio
Select Internet Radio from the
Minx Xi’s Home Menu by
scrolling and then pressing the
rotary dial.
Use the rotary dial to choose
how you wish to browse and
play internet radio – for
example, by Location or Genre.
If you choose to Search for internet radio stations, enter the
full name or first part of the station name by scrolling and
then pressin
g the rotary dial.
When the desired station is displayed, press the rotary dial to
select and play it.
You can also browse, play and store presets using
the button or via the Stream Magic app.
1
2
3
OR
Requires an active internet connection
See overleaf for network setup
Quick-Start Guide
Minx Xi
Power AC
A1 A2
Ethernet
USB
Audio In
D2D1
Sub Out
HD/Local media
BT100
WiFi Dongle
Loudspeaker Terminals
Right Left
4-8
www.cambridge-audio.com
Rated Power Consumption: 300W
Designed and engineered in London, England
Minx Xi
Digital Music System
R
L
R
L
Page 2
/