Page is loading ...

...... 9
.... 18
.... 12
......7
D
......1
NL
PL
GB
S
UAE
F
DK
GR
E
N
CZ
I
FIN
H
......2
......3
......4
......5
......6
......8
.... 10
.... 11
....13
....14
....15
P
....16
.... 17
TR
SK
SLO
HR
.... 19
.... 20
....22
....21
BG
EST
LV
LT
....23
....24
.... 26
.... 25
RO
CN
RUS
.... 27
Design & Quality Engineering GROHE Germany
Aquatower 1000
94.553.131/ÄM 202828/12.04
Aquatower 1000
27 015
.... 17
.... 35
.... 23
....13
D
......1
NL
PL
GB
S
UAE
F
DK
GR
E
N
CZ
I
FIN
H
......3
......5
......7
......9
....11
....15
.... 19
.... 21
....25
....27
....29
P
....31
.... 33
TR
RUS
SK
SLO
.... 37
.... 39
....43
....41
HR
BG
EST
LV
....45
....47
.... 51
.... 49
LT
RO
RUS
.... 27

III
19mm / 22mm / 24mm
12 mm
10mm / 17mm
ø 8mm
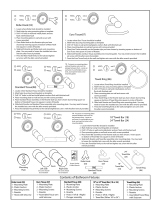
Lieferumfang Leveringsprogram Kézbesítéskör комплектност
Delivery specification Leveringsomfang Quantidade de entrega Tarnekomplekt
Liste de colisage Toimitussisältö Teslimat kapsamı Piegades apjoms
Volumen de suministro Zakres dostawy Объем поставки Tiekiamos irangos specifikacija
Entità di fornitura Obsah dodávky Specificatie de livrare
Levering προδιαγραφές παροχής Obseg dobave
Leveransomfång Rozsah dodávky Opseg isporuke
I
II
VI
III
IV
V
VII

III IV
1 7
C1
C2
C2
C
1
0
m
m
2
1000
±50
max.2050
8
A3
C
A1
A2
A
5
A1
A
A
A1
6
B1
B
B
B2
9
A
D
A
D
E2
E1
E
D1
10
*45 406
F3
F3
F4
F5
F
F1
C
F2
3 4
max.2200
950-1200

3
GB
Application
In order to ensure correct operation, a pressure of at least 0.7 bar is
necessary at the shower system.
Caution:
With sufficient power, electric or gas instantaneous heaters are also
suitable.
All thermostats are adjusted at the factory at a flow pressure on both sides
of 3 bar.
Should temperature deviations exist due to special installation conditions,
the thermostat must be adjusted to the local conditions (see Adjustment).
Specifications
Minimum flow pressure 0.7 bar
Max. operating pressure 10 bar
Recommended flow pressure 1 - 5 bar
Test pressure 16 bar
Flow rate at 3 bar flow pressure
Hand shower approx. 13.0 l/min
Side showers approx. 12.0 l/min
Hand shower and side showers approx. 21.0 l/min
Max. water temperature at hot water inlet 80 °C
Recommended max. flow temperature
(energy saving) 60 °C
Safety check 38 °C
Hot water temperature at supply connection min. 2 °C higher than mixed
water temperature
Cold water connection right
Hot water connection left
If static pressure is greater than 5 bar, fit pressure reducer.
Tools required, see fold-out page I.
Delivery specification, see fold-out page II.
Installation
New installation:
Make up unions.
For union dimensions for cold and hot water connection, see fold-out
page III Fig. [1].
The cold water supply must be connected on the right and the hot water
supply on the left.
The installation dimensions of the fitting relate to the standing level of the
shower stand, see Fig. [2].
The installation height of the showers from the standing level must be
observed in order to comfortably operate the fitting.
Retrofitting:
Union dimensions must correspond to Fig. [3].
The cold water supply must be connected on the right and the hot water
supply on the left.
The installation dimensions of the fitting relate to the standing level of the
shower stand, see Fig. [4].
The installation height of the showers from the standing level must be
observed in order to comfortably operate the fitting.
Connections and fastenings, see fold-out page III and IV, Figs. [1]
to [10].
For individual components, see delivery specification, Figs. [I] to [IV].
1.Drill fixing holes for ø 8mm mounting plugs, see Fig. [1] and [3].
2.Install accompanying elbow unions (A). If S-unions are present, remove
and replace with elbow unions (A), see Fig. [5].
3.Screw in threaded studs (A1) into the elbow unions (A) by approx. one
turn.
Seal the elbow unions (A) at the tiled wall using sealing compound.
Flush pipes thoroughly
4. Remove retaining rings (B) with installation tool (B1),
see Fig. [6].
5. Detach wall plate (B2).
6. Insert mounting plug (C1), see Fig. [7].
7. Guide elbow unions (A) through the area provided in the fitting
assembly (C) and slide rib (A2) from below behind the lug (A3) of the
elbow union, see Fig. [8].
8. Preassemble the fitting assembly (C) with the threaded studs (A1).
9. Secure fitting assembly (C) using fixings (C2) supplied, see Fig. [7].
10.Connect hoses (D) with accompanying seals (D1) and elbow
unions (A), see Fig. [9].
Spray hose, shower rail slider, shower rail and hand spray, see fold-
out page IV and V, Fig. [9], [10] and [11].
For individual components, see delivery specification, Figs. [IV], [V], [VI]
and [VII].
1.Attach spray hose (E) with seal (E1) to elbow unions (E2), see Fig. [9].
2.Slide shower rail slider (F) onto shower rail (F1), see Fig. [10].
3.Insert shower rail (F1) into the fitting assembly (C) and secure using
screw (F2).
4.Insert bracket (F3) onto the shower rail (F1) and secure using
screw (F4).
5.Fit cap (F5).
If there is an offset, wall plate 45 406 special accessory can be ordered.
6.Fit handspray (G) to spray hose (E), see fold-out page V, Fig. [11].
Attach wall plate (B2).
1.Insert seals (B4) into the wall plate (B2), note position of seal, see detail
view in Fig. [12].
2.Slide wall plate (B2) onto the fitting assembly (C), screw on retaining
rings (B) and tighten using installation tool (B1).
Note: Keep installation tool (B1) for possible future maintenance work
on the shower system.
3.Attach rosettes (B3) to the side showers.
Operation
Operation of the shut-off handle (H), see Fig. [13]:
Shut-off handle in central position = closed
Shut-off handle clockwise = discharge from hand shower
Press button (H1) and turn
shut-off handle anti-clockwise = discharge from side shower
Press button (H1) and turn
shut-off handle anti-clockwise fully = discharge from side shower
and hand shower
Temperature limitation
The safety stop limits the temperature range to 38 °C.
If a higher temperature is desired, the 38 °C limit can be overridden by
pressing the button (J3), see Fig. [14].
Flow control for side shower, see Fig. [15].
Please pass these instructions on to the user of the fitting.
The right to make technical modifications is reserved.

4
Adjustment
Temperature adjustment, see Figs. [13] and [14].
• Before the mixer is put into service if the mixed water temperature
measured at the point of discharge varies from the specified
temperature set on the thermostat.
• After any maintenance operation on the thermostatic cartridge.
1.Open cold and hot water supplies.
2.Open the shut-off handle (H) to the hand shower position and measure
the temperature of the running water using a thermometer.
3.Turn the temperature control handle (J) until the water temperature
reaches 38 °C.
4.Lever out cap (J1), see Fig. [14].
5.Hold temperature control handle (J) in this position and remove screw (J2).
6.Pull off temperature control handle (J) and reinstall in such a way that
the 38 °C mark on the wall plate (B2) coincides with the mark on the
handle.
7.Reinstall screw (J2) and refit cap (J1).
Prevention of frost damage
When the domestic water system is drained, thermostats must be drained
separately, since non-return valves are installed in the hot and cold water
connections. For this purpose, the shower system must be removed from
the wall.
Maintenance
For maintenance, see fold-out page V and VI, Figs. [16] to [22].
Inspect and clean all parts, replace if necessary and grease with special
grease (Prod. no. 18 012).
Shut off cold and hot water supply.
I. Side shower with non-return valve (K), see Fig. [16].
1.Remove rosette (B3).
2.Remove screw (K1) using a screwdriver.
3.Completely remove shower face plate (K2).
4.Detach housing (K3).
5.Remove washer (K4) by pressing in the ball (K5).
6.Remove ball (K5).
7.Pull out non-return valve (K) using pliers.
Assemble in reverse order.
When installing the washer (K4) the ball (K5) must be pressed slightly into
the housing.
We guarantee that the SpeedClean nozzles will function unchanged for a
period of 5 years.
Simply rub SpeedClean nozzles in order to remove limescale deposits
from spray jet of hand and side showers.
Shut off cold and hot water supply.
II. Thermostatic cartridge, see fold-out page VI, Fig. [17].
1.Lever out cap (J1).
2.Remove screw (J2).
3.Detach temperature control handle (J).
4.Remove clip (L1).
5.Pull off stop ring (L).
6.Detach regulating nut (M1) with overload unit (M2).
7.Unscrew and remove thermostatic cartridge (M) using a 22mm open-
ended spanner.
Assemble in reverse order. Observe the correct installation position.
Readjustment is necessary after each maintenance operation on the
thermostatic cartridge (see Adjustment).
III. Aquadimmer, see fold-out page VI, Fig. [18].
1.Lever out cap (H2).
2.Remove screw (H3) and detach shut-off handle (H).
3.Remove splined adapter (O1) and stop (O2).
4.With a 19mm open-ended spanner, unscrew and remove
aquadimmer (O).
Assemble in reverse order.
Observe the correct installation position
1.The various pins (O7) and (O8) must project into the relevant apertures
in the race, see Fig. [19].
2.Attach stop (O2) with mark (O3) pointing downwards, mark (O3)
and (O4) coincide, see Fig. [20].
3.Attach splined adapter (O1), the faces (O5) coincide in only one
position.
4.Turn splined adapter (O1) so that the lug (O6) points to the right.
IV. Non-return valve (P), see Fig. [21].
1.Lever out caps (H2) and (J1).
2.Remove screws (H3) and (J2) and detach shut-off handle (H) and
temperature control handle (J).
3.Remove rosettes (B3) and retaining rings (B) using installation tool (B1).
4.Detach wall plate (B2).
5.Remove non-return valve (P) using a 17mm socket spanner.
V. Non-return valve (R)
1.Unscrew shower hose (R1).
2.Remove outlet connection nipple (R2) using a 12mm allen key.
3.Remove non-return valve (R).
Assemble in reverse order.
Replacement parts, see fold-out page VIII (* = special accessories).
Care
For information on the care of this fitting, please refer to the accompanying
Care Instructions.
Please pass these instructions on to the user of the fitting.
The right to make technical modifications is reserved.

V VI
12
C
B
B3
B3
B
B2
B1
B4
14
J1
J
J2
B2
J3
B3
K
K1
K2
K3
K4
K5
16
17
J1
J2
J
L
L1
M1
M2
M
2
2
m
m
H2
H3
O1
O2
O
H
1
9
m
m
18
O3
O5
20
O6
O2
O1
O4
11
E
G
15
19
O8
O7
22
R
R1
R2
21
J1
J2
J
H
H3
H2
B2
B
B1
B3
P
B3
B
1
7
m
m
13
J
H1
H

VII VIII

/