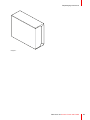
Barco Coronis Fusion 4MP MDCC-4430 User guide
- Type
- User guide

ENABLING BRIGHT OUTCOMES
MDCC-4430
MDCC-6530
User guide
Coronis Fusion 4MP / 6MP

Registered office: Barco NV
President Kennedypark 35, 8500 Kortrijk, Belgium
www.barco.com/en/support
www.barco.com
Barco NV
Beneluxpark 21, 8500 Kortrijk, Belgium
www.barco.com/en/support
www.barco.com

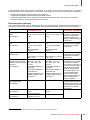
1 Welcome! ................................................................................................................................................................................................................5
1.1 What's in the box..................................................................................................................................................................................6
1.2 Product overview..................................................................................................................................................................................6
2 Installation .............................................................................................................................................................................................................9
2.1 Display position adjustment ........................................................................................................................................................10
2.2 Cable connections............................................................................................................................................................................ 11
2.3 VESA-mount installation...............................................................................................................................................................12
2.4 First time starting up........................................................................................................................................................................14
3 Daily operation.................................................................................................................................................................................................17
3.1 Recommendations for daily operation ..................................................................................................................................18
3.2 Shortcut functions.............................................................................................................................................................................18
3.3 SoftGlow lights....................................................................................................................................................................................19
3.4 Standby switching.............................................................................................................................................................................19
3.5 OSD main menu use.......................................................................................................................................................................19
4 Advanced operation.....................................................................................................................................................................................21
4.1 OSD menu language ......................................................................................................................................................................22
4.2 OSD menu orientation....................................................................................................................................................................22
4.3 OSD menu automatic close function......................................................................................................................................22
4.4 Power lock function..........................................................................................................................................................................22
4.5 SoftGlow Task light ..........................................................................................................................................................................23
4.6 SoftGlow Wall light ...........................................................................................................................................................................23
4.7 DPMS mode.........................................................................................................................................................................................24
4.8 Hibernate...............................................................................................................................................................................................24
4.9 Luminance target ..............................................................................................................................................................................25
4.10 Color presets .......................................................................................................................................................................................25
4.10.1 Color temperature..........................................................................................................................................................25
4.10.2 Color coordinates...........................................................................................................................................................26
4.11 Color space ..........................................................................................................................................................................................26
4.12 Viewing modes...................................................................................................................................................................................26
4.13 Display functions ...............................................................................................................................................................................27
4.14 sRGB .......................................................................................................................................................................................................27
4.15 Ambient Light Compensation (ALC) ......................................................................................................................................28
4.16 Reading rooms...................................................................................................................................................................................28
4.17 Continuous ALC ................................................................................................................................................................................29
4.18 Embedded QA ....................................................................................................................................................................................29
4.18.1 About Embedded QA...................................................................................................................................................29
4.18.2 DICOM status report ....................................................................................................................................................29
4.18.3 DICOM compliance check ........................................................................................................................................30
R5911227 /02 Coronis Fusion 4MP / 6MP
3
Table of contents

R5911227 /02 Coronis Fusion 4MP / 6MP4
4.18.4 DICOM calibration .........................................................................................................................................................30
4.18.5 Reset DICOM calibration...........................................................................................................................................31
4.18.6 DICOM error threshold ...............................................................................................................................................31
4.19 Image scaling ......................................................................................................................................................................................31
4.20 Image source selection..................................................................................................................................................................31
4.21 Grayscale conversion modes.....................................................................................................................................................32
4.22 DisplayPort standard version.....................................................................................................................................................32
4.23 EDID timings........................................................................................................................................................................................33
4.24 Display info ...........................................................................................................................................................................................33
4.25 Display status......................................................................................................................................................................................33
5 Cleaning your display.................................................................................................................................................................................35
5.1 Cleaning instructions ......................................................................................................................................................................36
6 Repackaging instructions........................................................................................................................................................................37
6.1 Repackaging instructions.............................................................................................................................................................38
7 Important information.................................................................................................................................................................................43
7.1 Safety information.............................................................................................................................................................................44
7.2 Environmental information...........................................................................................................................................................45
7.3 Regulatory compliance information........................................................................................................................................47
7.4 EMC notice ...........................................................................................................................................................................................48
7.5 Explanation of symbols..................................................................................................................................................................50
7.6 Legal disclaimer.................................................................................................................................................................................53
7.7 Technical specifications.................................................................................................................................................................53
7.8 Open source license information .............................................................................................................................................58


R5911227 /02 Coronis Fusion 4MP / 6MP6
1.1 What's in the box
Overview
• Coronis Fusion 4MP / 6MP display
• User guide
• System disc
• Documentation disc
• Video cables
• Mains cables
• USB cable
If you ordered a Barco display controller, it is also in the box together with its accessories. A dedicated user
guide is available on the documentation disc.
Keep your original packaging. It is designed for this display and is the ideal protection during
transport and storage.
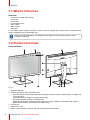
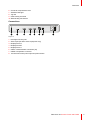
1.2 Product overview
Front and Back
7
7 8
8
11 2
3
109
5
6
4
Image 1-1
1. SoftGlow Wall light
2. Ambient light sensor and Power status LED
• Dimmed: Display not powered (mains cable unplugged or power switch in OFF position), or display is in
normal operation
• Fast blinking amber: Display is entering DPMS mode
• Slow blinking amber: Display is in DPMS mode
• Steady amber: Display manually switched off via the jog dial, or display in hibernate mode (requires
DPMS and Hibernate to be enabled in the OSD menu)
3. Front sensor
4. VESA mount cover
5. USB-A 2.0 downstream connector with high-power charging functionality
Welcome!

R5911227 /02 Coronis Fusion 4MP / 6MP 7
6. Connector compartment cover
7. SoftGlow Task light
8. Jog dial
9. Cable routing channels
10.Stand locking mechanism
Connections
1 2 3 4 6 7 85
Image 1-2
1. Kensington security slot
2. Service port (for Barco service purposes only)
3. DisplayPort IN 2
4. DisplayPort OUT
5. DisplayPort IN 1
6. USB-A 2.0 downstream connectors (2x)
7. USB-B 2.0 upstream connector
8. 100–240 VAC mains power input and power switch
Welcome!


9
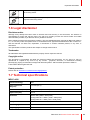
Before installing your display, make sure to have a suitable display controller installed in your
computer. For a list of compatible display controllers, please refer to the compatibility matrix
available on my.barco.com (MyBarco > My Support > Healthcare > Compatibility Matrices > Barco
Systems Compatibility Matrices)
Your Barco display operates best when driven by a Barco MXRT display controller and when
operated together with Barco’s Intuitive Workflow Toolset. To obtain the MXRT driver (including the
Intuitive Workflow Toolset), navigate to www.barco.com/mxrt.
To maximize quality assurance of your display, Barco recommends to install QAWeb. To obtain the
QAWeb installation package navigate to www.barco.com/support/medical qaweb.
R5911227 /02 Coronis Fusion 4MP / 6MP
Installation 2

R5911227 /02 Coronis Fusion 4MP / 6MP10
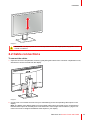
2.1 Display position adjustment
To adjust the display position
You can safely tilt and swivel the display as desired.
Image 2-1
To adjust the height of the display
After unlocking the height-positioning system of your display, you can adjust the height of the display.
1. Set the slider to the unlocked position to unlock the stand locking mechanism at the back of the stand.
Image 2-2
2. You can now safely raise and lower the display as desired.
Installation

R5911227 /02 Coronis Fusion 4MP / 6MP 11
Image 2-3
WARNING: The display must be in its lowest position before the height-positioning system can be
locked or unlocked.
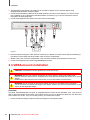
2.2 Cable connections
To connect the cables
1. Open the connector compartment. Do this by gently lifting the bottom of the connector compartment cover,
after which it can be removed from the display.
Image 2-4
2. Connect one or more video sources from your workstation(s) to the corresponding video inputs on the
display.
Note: The MDCC-4430, MDCC-6530 can have multiple video inputs connected at once, and switching
between these inputs can be easily done in the OSD menu. See “Image source selection”, page 31 for
more info on how to configure the different video inputs on your display.
Installation

R5911227 /02 Coronis Fusion 4MP / 6MP12
3. The DisplayPort OUT allows you to daisy chain your Barco display and an external display using
DisplayPort Multi-Stream Transport (MST).
4. Connect the workstation's USB host to the USB upstream connector on the display if you want to make
use of QAWeb or any of the display USB downstream connectors (e.g. to connect a keyboard, mouse,
touchpad or another peripheral).
5. Connect the supplied mains cable to the power input on the display.
2
3 4
4
2
5
DP IN 2
SERVICE
DP OUT DP IN 1
USB DOWN
USB UP
AC IN
Image 2-5
6. Route all cables through the cable duct in the stand of your display. For better strain-relief and shielding of
the cables, use the cable clips at the inside of the connector compartment.
7. Slide the top of the connector compartment cover in position and then push the bottom of the cover.
8. Connect the supplied mains cable to a grounded power outlet.
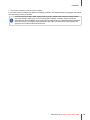
2.3 VESA-mount installation
CAUTION: Use suitable mounting apparatus to avoid risk of injury.
WARNING: Never move a display attached to an arm by pulling or pushing the display itself.
Instead, make sure that the arm is equipped with a VESA approved handle and use this to move the
display.
Please refer to the instruction manual of the arm for more information and instructions.
WARNING: Use an arm that is approved by VESA (according to the VESA 100 mm standard).
Use an arm that can support the weight of the display. Refer to the technical specifications of this
display for the applicable weight.
Overview
The panel, standard attached to a stand, is compatible with the VESA 100 mm standard. Thus, it can be used
with an arm that is approved by VESA. This chapter shows you how to release the panel from the stand and
how to attach it to an arm. If you’re not using an arm, you can skip this chapter.
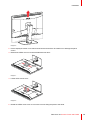
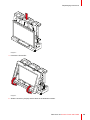
1. Unlock the stand locking mechanism and put the display in the highest position.
Installation

R5911227 /02 Coronis Fusion 4MP / 6MP 13
Image 2-6
2. Put the display face down on a clean and soft horizontal surface. Be careful not to damage the panel
screen.
3. Release the VESA mount cover with a flathead screw driver.
Image 2-7
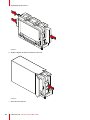
4. Lift the VESA mount cover.
Image 2-8
5. Rotate the VESA mount cover to uncover the screws fixing the panel to the stand.
Installation

R5911227 /02 Coronis Fusion 4MP / 6MP14
Image 2-9
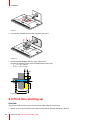
6. Unscrew the 4 fixation screws while supporting the stand.
Image 2-10
7. Attach the panel firmly to the arm using 4 M4 screws.
Respect the following rule to select an appropriate screw length:
• L
min
= T + W + 6.5 mm
• L
max
= T + W + 10 mm
T
W
L
min
L
max
Image 2-11
2.4 First time starting up
Overview
You are now ready to start up your Coronis Fusion 4MP / 6MP for the first time.
1. Switch on your Coronis Fusion 4MP / 6MP as described in “Standby switching”, page 19.
Installation

R5911227 /02 Coronis Fusion 4MP / 6MP 15
2. Turn on the computer connected to your display.
If you have properly installed your display and display controller, the Windows start-up messages will appear
once the boot procedure is finished.
Your Coronis Fusion 4MP / 6MP display will be running in a basic video mode at a default refresh
rate when first time starting up. If you are using a Barco display controller, please consult the
dedicated user guide available on the system CD to install the drivers, software and documentation.
When this is done, your display will automatically detect the connected video input signal(s) and
apply the correct video mode and refresh rate.
Installation


R5911227 /02 Coronis Fusion 4MP / 6MP18
3.1 Recommendations for daily operation
Optimize the lifetime of your display
Enabling the Display Power Management System (DPMS) of your display will optimize its diagnostic lifetime
by automatically switching off the backlight when the display is not used for a specified period of time. By
default, DPMS is enabled on your display, but it also needs to be activated on your workstation. To do this, go
to “Power Options Properties” in the “Control Panel”.
Barco recommends setting DPMS activation after 20 minutes of non-usage.
Use a screen saver to avoid image retention
Prolonged operation of an LCD with the same content on the same screen area may result in a form of image
retention.
You can avoid or significantly reduce the occurrence of this phenomenon by using a screen saver. You can
activate a screen saver in the “Display properties” window of your workstation.
Barco recommends setting screen saver activation after 5 minutes of non-usage. A good screen
saver displays moving content.
In case you are working with the same image or an application with static image elements for several hours
continuously (so that the screen saver is not activated), change the image content regularly to avoid image
retention of the static elements.
Understand pixel technology
LCD displays use technology based on pixels. As a normal tolerance in the manufacturing of the LCD, a
limited number of these pixels may remain either dark or permanently lit, without affecting the diagnostic
performance of the product. To ensure optimal product quality, Barco applies strict selection criteria for its LCD
panels.
To learn more about LCD technology and missing pixels, consult the dedicated white papers
available at www.barco.com/healthcare.
Enhance user comfort
Every Barco multi-head display system is color matched with the highest specifications in the market.
Barco recommends keeping color-matched displays together. Furthermore, it is important to use all
displays of a multi-head configuration at the same rate to preserve color matching throughout the
economic lifetime of the system.
Maximize quality assurance
Barco‘s QAWeb system offers online services for high-grade quality assurance, providing maximum
diagnostic confidence and uptime.
Barco recommends to install QAWeb Agent and apply at least the default policy. This policy
includes calibration on regular intervals.
Learn more about QAWeb at www.barco.com/QAWeb.
3.2 Shortcut functions
About the shortcut functions
The jog dial enables quick access to 3 shortcut functions:
• SoftGlow lights
• Main menu
Daily operation

R5911227 /02 Coronis Fusion 4MP / 6MP 19
• Standby
To use the shortcut functions
1. Shortly push or turn the jog dial during normal operation to activate the shortcut functions. The shortcut
functions appear at the bottom right of the screen.
Image 3-
1
Image 3-
2
Image 3-
3
2. Turn the jog dial left or right to select one of the shortcut functions.
3. Push short to confirm your selection
If no further actions are taken within the next 5 seconds, the shortcut functions will disappear again.
3.3 SoftGlow lights
About the SoftGlow lights
1. Shortly push or turn the jog dial during normal operation to activate the shortcut functions. SoftGlow lights
is selected by default.
2. Push the jog dial repeatedly to toggle the different SoftGlow light modes (different combinations of Task
light and Wall light enabled or disabled, are possible).
Refer to “SoftGlow Task light”, page 23 and “SoftGlow Wall light”, page 23 for more details.
3.4 Standby switching
To switch on your display
To use the display, make sure to put the power switch in ON position.
Shortly push the jog dial to exit standby mode and activate your display.
To switch off your display
1. Shortly push or turn the jog dial to activate the shortcut functions.
2. Turn the jog dial to select Standby.
3. Shortly push the jog dial to confirm the selection.
4. Shortly push the jog dial again to power off the display.
3.5 OSD main menu use
To open the OSD main menu
The OSD main menu allows you to configure different settings to make your Coronis Fusion 4MP / 6MP fit
your needs within your working environment. Also, you can retrieve general information about your display
and its current configuration settings through the OSD menu.
Bringing up the OSD main menu can be done by:
1. Shortly push or turn the jog dial during normal operation to activate the shortcut functions.
2. Turn the jog dial to select Main Menu.
3. Shortly push the jog dial to confirm the selection.
Daily operation

R5911227 /02 Coronis Fusion 4MP / 6MP20
As a result, the OSD main menu comes up. If no further actions are taken within the next 90 seconds, the
OSD menu will disappear again.
The OSD menu auto-exit function can be disabled in the OSD menu. Please refer to “OSD menu
automatic close function”, page 22 for detailed instructions on how to do this.
To navigate through the OSD menus
• Turn the jog dial left or right to scroll through the (sub)menus, to change values or to make selections.
• Shortly push the jog dial to go into a submenu or confirm adjustments and selections.
• Push and hold the jog dial for approximately 3 seconds to cancel adjustments or exit a (sub)menu.
• Continue to hold the jog dial to exit all OSD menus.
Daily operation
Page is loading ...
Page is loading ...
Page is loading ...
Page is loading ...
Page is loading ...
Page is loading ...
Page is loading ...
Page is loading ...
Page is loading ...
Page is loading ...
Page is loading ...
Page is loading ...
Page is loading ...
Page is loading ...
Page is loading ...
Page is loading ...
Page is loading ...
Page is loading ...
Page is loading ...
Page is loading ...
Page is loading ...
Page is loading ...
Page is loading ...
Page is loading ...
Page is loading ...
Page is loading ...
Page is loading ...
Page is loading ...
Page is loading ...
Page is loading ...
Page is loading ...
Page is loading ...
Page is loading ...
Page is loading ...
Page is loading ...
Page is loading ...
Page is loading ...
Page is loading ...
Page is loading ...
Page is loading ...
-
 1
1
-
 2
2
-
 3
3
-
 4
4
-
 5
5
-
 6
6
-
 7
7
-
 8
8
-
 9
9
-
 10
10
-
 11
11
-
 12
12
-
 13
13
-
 14
14
-
 15
15
-
 16
16
-
 17
17
-
 18
18
-
 19
19
-
 20
20
-
 21
21
-
 22
22
-
 23
23
-
 24
24
-
 25
25
-
 26
26
-
 27
27
-
 28
28
-
 29
29
-
 30
30
-
 31
31
-
 32
32
-
 33
33
-
 34
34
-
 35
35
-
 36
36
-
 37
37
-
 38
38
-
 39
39
-
 40
40
-
 41
41
-
 42
42
-
 43
43
-
 44
44
-
 45
45
-
 46
46
-
 47
47
-
 48
48
-
 49
49
-
 50
50
-
 51
51
-
 52
52
-
 53
53
-
 54
54
-
 55
55
-
 56
56
-
 57
57
-
 58
58
-
 59
59
-
 60
60


Barco Coronis Fusion 4MP MDCC-4430 User guide
- Type
- User guide
Ask a question and I''ll find the answer in the document
Finding information in a document is now easier with AI
Related papers
-
Barco Coronis Fusion 6MP MDCC-6430 User guide
-
Barco Coronis Fusion 6MP (MDCC-6530) User guide
-
Barco MDSC-1119 Owner's manual
-
Barco Coronis 3MP (MDCG-3120) User guide
-
-
-
Barco MDRC-2124 TS User manual
-
-
-

