Page is loading ...

INSTRUCTION MANUAL
HI98193
Dissolved Oxygen
BOD/OUR/SOUR Meter

Thank you for choosing a Hanna Instruments product.
Please read this instruction manual carefully before using the instrument.
This manual will provide you with the necessary information for correct use
of the instrument, as well as a precise idea of its versatility.
If you need additional technical information, do not hesitate to e‑mail
us at [email protected] or view our worldwide contact list at
www.hannainst.com.
Dear Customer,
All rights are reserved. Reproduction in whole or in part is prohibited without the written consent of
the copyright owner, Hanna Instruments Inc., Woonsocket, Rhode Island, 02895, USA.

3
PRELIMINARY EXAMINATION ..............................................................................................
GENERAL DESCRIPTION ......................................................................................................
FUNCTIONAL DESCRIPTION .................................................................................................
SPECIFICATIONS ................................................................................................................
PROBE FUNCTIONAL DESCRIPTION ......................................................................................
PROBE CONNECTION AND PREPARATION .............................................................................
OPERATIONAL GUIDE .........................................................................................................
OUR MEASUREMENT ..........................................................................................................
SOUR MEASUREMENT ........................................................................................................
TEMPERATURE MEASUREMENT ...........................................................................................
DO CALIBRATION PROCEDURE .............................................................................................
GOOD LABORATORY PRACTICE (GLP) ....................................................................................
SETUP ...............................................................................................................................
LOGGING ...........................................................................................................................
AutoEnd ............................................................................................................................
PRESSURE CALIBRATION ....................................................................................................
TEMPERATURE CALIBRATION (for technical personnel only) ....................................................
PC INTERFACE ....................................................................................................................
BATTERIES REPLACEMENT ...................................................................................................
PROBE MAINTENANCE ........................................................................................................
TROUBLESHOOTING GUIDE .................................................................................................
ACCESSORIES ....................................................................................................................
4
5
8
10
20
25
29
42
47
52
60
62
6
9
11
22
25
30
46
49
59
61
TABLE OF CONTENTS

4
Remove the instrument from the packing material and examine it carefully to make sure that no
damage has occurred during shipping. If there is any damage, please contact your local Hanna
Instruments Office.
Each instrument is supplied with:
• HI764073 Polarographic probe with built‑in temperature sensor and 4 m (13.1’) cable
• HI76407A Membrane cap (2 pcs.)
• HI7040 Bicomponent Zero Oxygen Solution
• HI7041S Electrolyte solution (30 mL)
• HI920015 Micro USB cable
• DO protective cap
• 0‑Rings (2 pcs.)
• 100 mL Plastic Beaker (2 pcs.)
• 1.5V AA Batteries (4 pcs.)
• Instruction manual and Quick Reference Guide
• Certificate
Note: Save all packing material until you are sure that the instrument functions correctly. All
defective items must be returned in the original packing with the supplied accessories.
PRELIMINARY EXAMINATION

5
The HI98193 is a state of art, microprocessor based, dissolved oxygen instrument with many automated
and specific application features, designed to provide laboratory results and accuracy under harsh
industrial conditions.
All measurements are automatically compensated for temperature. Manual salinity compensation in
water allows direct determination of dissolved oxygen in saline waters. With its internal barometer,
the instrument is able to automatically compensate for changes in barometric pressure so there is no
need for charts, altitude information or external barometric pressure information.
The instrument contains built‑in application software for the calculation of Biochemical Oxygen
Demand (BOD), Oxygen Uptake Rate (OUR) and Specific Oxygen Uptake Rate (SOUR).
HI98193’s calibration has been greatly simplified when compared to other dissolved oxygen
instruments. It is provided with a series of new features which add entirely new dimensions to the
measurement of DO, by allowing the user to dramatically improve the reliability of the measurement:
• One or two points automatic dissolved oxygen calibration.
• One point manual dissolved oxygen calibration using a value in milligrams per liter or percent
saturation entered by the user.
• One or two points user temperature calibration.
• Messages on the graphic LCD for an easy and accurate calibration.
• User‑selectable “calibration time out” to remind when a new calibration is necessary.
Moreover, the meter offers an extended temperature range from ‑20.0 °C to 120.0 °C
(‑4.0 °F to 248.0 °F).
Other features include:
• Log on demand up to 400 samples.
• Auto Hold feature, to freeze first stable reading on the LCD.
• GLP feature, to view last calibration data.
• PC interface.
GENERAL DESCRIPTION

6
1) Liquid Crystal Display (LCD).
2) F1, F2, F3 functional keys.
3) / keys to manually increase/decrease the parameters or to scroll through the menu.
4) ON/OFF ( ) key, to turn the instrument ON and OFF.
5) LIGHT ( ) key, to toggle display backlighting.
6) GLP key, to display Good Laboratory Practice information.
7) CAL key, to enter/exit calibration mode.
8) SETUP key, to enter/exit SETUP mode.
9) RCL key, to enter/exit view logged data mode (RCL means RECALL).
10) MODE key to change DO measuring unit when in DO measurement mode, or to toggle between
standard and pressure in DO calibration.
11) RANGE key, to switch between DO, BOD, OUR AND SOUR.
12) HELP key to enter/exit contextual help.
13) ESC key to leave current mode, exit calibration, setup, help, etc.
FUNCTIONAL DESCRIPTION
FRONT VIEW

7
14) Electrode DIN connector.
15) USB connector.
TOP VIEW
FUNCTIONAL DESCRIPTION

8
Dissolved Oxygen
Range 0.00 to 50.00 mg/L / 0.0 to 600.0 % saturation
Resolution 0.01 mg/L / 0.1 % saturation
Accuracy ±1.5 % of reading ±1 digit
Barometric Pressure
Range 450 to 850 mmHg
Resolution 1 mmHg
Accuracy ±3 mmHg within ±15 % from the calibration point
Temperature Range ‑20.0 to 120.0 °C (‑4.0 to 248.0 °F)
Resolution 0.1 °C (0.1 °F)
Accuracy ±0.2 °C (±0.4 °F) (excluding probe error)
DO Calibration
• One or two points automatic calibration at 100 % (8.26 mg/L)
and 0 % (0 mg/L).
• One point manual using a value entered by the user in %
saturation or mg/L.
Temperature Calibration One or two point at any in range temperature value
Pressure Calibration One point at any in range pressure value
Temperature
Compensation
Automatic from 0.0 to 50.0 °C (32.0 to 122.0 °F)
Pressure Compensation Automatic from 450 to 850 mmHg
Salinity Compensation Automatic from 0 to 70 g/L
DO Probe HI764073 Polarographic Probe
LOG On demand, 400 samples
Battery Type / Life
1.5V AA batteries (4 pcs.) / approx. 200 hours of continuous use
without backlight (50 hours with backlight)
Auto Power Off User selectable: 5, 10, 30, 60 minutes or disabled
PC Connectivity Opto‑isolated USB
Dimensions 185 x 93 x 35.2 mm (7.3 x 3.6 x 1.4”)
Weight 400 g (14.2 oz)
Environment 0 to 50 °C (32 to 122 °F) max. RH 100% IP67
SPECIFICATIONS

9
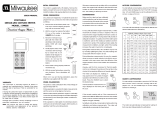
1. DO Probe
2. Protective Cap
3. Watertight Shielded Cable
4. Polypropylene Probe Body
5. Temperature Sensor
6. O‑Ring Seal
7. Silver Chloride Anode
8. Platinum Cathode (sensor)
9. Oxygen Permeable PTFE
®
Membrane
10. Membrane Cap
PROBE FUNCTIONAL DESCRIPTION

10
To take measurements, connect the DO probe to the meter securely by
aligning the pins with the socket located on the top of the meter, pushing
the plug in and tightening the threaded ring.
Probes shipped from Hanna Instruments are dry. To hydrate the probe
and prepare it for use, connect it to the meter and proceed as follows:
1. Remove the red and black plastic cap. This cap is for shipping
purposes and can be thrown away.
2. Wet the sensor by soaking the bottom 2
1
/
2
cm (1’’) of the probe in
electrolyte (HI7041S) for 5 minutes.
3. Rinse the membrane cap (HI76407A) supplied in the kit with the
meter with electrolyte solution while shaking it gently. Refill with
clean electrolyte solution.
4. Tap gently the sides of the membrane cap with your finger tip to
ensure that no air bubbles are trapped. To avoid damaging the
membrane, do not tap it directly on the bottom.
5. Make sure that the rubber O‑Ring sits properly inside the membrane
cap.
6. With the sensor facing down, slowly screw the cap clockwise. Some
electrolyte will overflow.
When not in use and during polarization (see PROBE CONDITIONING
page 11), use the protective transparent cap supplied in the kit with
the meter.
PROBE CONNECTION AND PREPARATION

11
PROBE CONDITIONING
Probe polarization is essential for stable, accurate measurements. Probe polarization ensures the
electrodes are conditioned and any oxygen dissolved in the electrolyte is consumed, so the only oxygen
present will be oxygen diffusing from sample across the PTFE membrane. It is recommended to wait
for at least 15 minutes to ensure precise conditioning of the probe.
When the probe is properly polarized, dissolved oxygen is consumed as it passes through the PTFE
membrane into the electrolyte at the platinum cathode, and an accurate DO reading is displayed.
When the probe is not polarized, oxygen from the test solution as well as oxygen present in the
electrolyte solution are detected, resulting in an incorrect DO reading.
INITIAL PREPARATION
The instrument is supplied complete with batteries. See Batteries Replacement for details, page 59.
To prepare the instrument for field measurements close the USB communication socket and all unused
connector sockets with proper stopper (to ensure waterproof protection).
Connect the DO probe to the 7‑pin connector. Make sure that the probe sleeve is properly inserted
and tighten the threaded ring.
Turn the instrument ON by pressing ON/OFF key.
At start‑up the display will show the Hanna Instruments logo for a few seconds, followed by the
percentage indication of the remaining battery life, then enters the probe conditioning mode. The
probe will be conditioned for one minute, and afterwards the instrument will enter measurement mode.
If the DO probe is not connected or is damaged, the conditioning period is skipped.
To save battery life, the Auto Power Off feature turns the instrument off after a set period (default 30 min)
if no button is pressed. To set another period or to disable this feature, see SETUP menu on page 30.
The Auto Light Off backlight feature turns the backlight off after a set period (default 1 min) with no
buttons pressed. To set another period or to disable this feature, see SETUP on page 30.
OPERATIONAL GUIDE

12
SALINITY COMPENSATION
If the sample contains significant concentration of salinity, the read out values must be corrected, taking
into account the lower degree of oxygen solubility in this situation. Before taking any DO measurements
remember to set the salinity value from the SETUP menu (page 30).
The salinity affects the DO concentration, decreasing its value. The table below shows the maximum
oxygen solubility at various temperatures and salinity levels.
°C
Salinity (g/l) at Sea Level
°F
0 g/l 10 g/l 20 g/l 30 g/l 35 g/l
0 14.60 13.64 12.74 11.90 11.50 32.0
2 13.81 12.91 12.07 11.29 10.91 36.5
4 13.09 12.25 11.47 10.73 10.38 39.2
6 12.44 11.65 10.91 10.22 9.89 42.8
8 11.83 11.09 10.40 9.75 9.44 46.4
10 11.28 10.58 9.93 9.32 9.03 50.0
12 10.77 10.11 9.50 8.92 8.65 53.6
14 10.29 9.68 9.10 8.55 8.30 57.2
16 9.86 9.28 8.73 8.21 7.97 60.8
18 9.45 8.90 8.39 7.90 7.66 64.4
20 9.08 8.56 8.07 7.60 7.38 68.0
22 8.73 8.23 7.77 7.33 7.12 71.6
24 8.40 7.93 7.49 7.07 6.87 75.2
25 8.24 7.79 7.36 6.95 6.75 77.0
26 8.09 7.65 7.23 6.83 6.64 78.8
28 7.81 7.38 6.98 6.61 6.42 82.4
30 7.54 7.14 6.75 6.39 6.22 86.0
32 7.29 6.90 6.54 6.19 6.03 89.6
34 7.05 6.68 6.33 6.01 5.85 93.2
36 6.82 6.47 6.14 5.83 5.68 96.8
38 6.61 6.28 5.96 5.66 5.51 100.4
40 6.41 6.09 5.79 5.50 5.36 104.0
42 6.22 5.93 5.63 5.35 5.22 107.6
44 6.04 5.77 5.48 5.21 5.09 111.2
46 5.87 5.61 5.33 5.07 4.97 114.8
48 5.70 5.47 5.20 4.95 4.85 118.4
50 5.54 5.33 5.07 4.83 4.75 122.0
OPERATIONAL GUIDE

13
BAROMETRIC PRESSURE COMPENSATION
The dissolved oxygen saturation value varies with pressure, so it is important to compensate the effect
that pressure has on DO measurements.
°C
Altitude, Meters above Sea Level
°F
0
m
300
m
600
m
900
m
1200
m
1500
m
1800
m
2100
m
2400
m
2700
m
3000
m
3300
m
3600
m
3900
m
4000
m
0 14.6 14.1 13.6 13.1 12.6 12.1 11.7 11.2 10.8 10.4 10.0 9.7 9.3 9.0 8.9 32.0
2 13.8 13.3 12.8 12.4 11.9 11.5 11.0 10.6 10.2 9.9 9.5 9.2 8.8 8.5 8.4 35.6
4 13.1 12.6 12.2 11.7 11.3 10.9 10.5 10.1 9.7 9.3 9.0 8.7 8.4 8.0 7.9 39.2
6 12.4 12.0 11.5 11.1 10.7 10.3 9.9 9.6 9.2 8.9 8.6 8.2 7.9 7.6 7.5 42.8
8 11.8 11.4 11.0 10.6 10.2 9.8 9.5 9.1 8.8 8.4 8.1 7.8 7.5 7.3 7.2 46.4
10 11.3 10.9 10.5 10.1 9.7 9.4 9.0 8.7 8.4 8.1 7.8 7.5 7.2 6.9 6.8 50.0
12 10.8 10.4 10.0 9.6 9.3 8.9 8.6 8.3 8.0 7.7 7.4 7.1 6.9 6.6 6.5 53.6
14 10.3 9.9 9.6 9.2 8.9 8.5 8.2 7.9 7.6 7.4 7.1 6.8 6.6 6.3 6.2 57.2
16 9.9 9.5 9.2 8.8 8.5 8.2 7.9 7.6 7.3 7.0 6.8 6.5 6.3 6.1 6.0 60.8
18 9.5 9.1 8.8 8.5 8.1 7.8 7.6 7.3 7.0 6.8 6.5 6.3 6.0 5.8 5.7 64.4
20 9.1 8.8 8.4 8.1 7.8 7.5 7.3 7.0 6.7 6.5 6.2 6.0 5.8 5.6 5.5 68.0
22 8.7 8.4 8.1 7.8 7.5 7.2 7.0 6.7 6.5 6.2 6.0 5.8 5.6 5.4 5.3 71.6
24 8.4 8.1 7.8 7.5 7.2 7.0 6.7 6.5 6.2 6.0 5.8 5.6 5.4 5.2 5.1 75.2
25 8.3 8.0 7.7 7.4 7.1 6.8 6.6 6.4 6.1 5.9 5.7 5.5 5.3 5.1 5.0 77.0
26 8.1 7.8 7.5 7.2 7.0 6.7 6.5 6.2 6.0 5.8 5.6 5.4 5.2 5.0 4.9 78.8
28 7.8 7.5 7.3 7.0 6.7 6.5 6.2 6.0 5.8 5.6 5.4 5.2 5.0 4.8 4.7 82.4
30 7.6 7.3 7.0 6.8 6.5 6.3 6.0 5.8 5.6 5.4 5.2 5.0 4.8 4.6 4.6 86.0
32 7.3 7.0 6.8 6.5 6.3 6.1 5.8 5.6 5.4 5.2 5.0 4.8 4.7 4.5 4.4 89.6
34 7.1 6.8 6.6 6.3 6.1 5.9 5.6 5.4 5.2 5.0 4.9 4.7 4.5 4.3 4.3 93.2
36 6.8 6.6 6.3 6.1 5.9 5.7 5.5 5.3 5.1 4.9 4.7 4.5 4.4 4.2 4.1 96.8
38 6.6 6.4 6.1 5.9 5.7 5.5 5.3 5.1 4.9 4.7 4.5 4.4 4.2 4.1 4.0 100.4
40 6.4 6.2 5.9 5.7 5.5 5.3 5.1 4.9 4.7 4.6 4.4 4.2 4.1 3.9 3.9 104.4
42 6.2 6.0 5.8 5.6 5.3 5.2 5.0 4.8 4.6 4.4 4.3 4.1 4.0 3.8 3.8 107.6
44 6.0 5.8 5.6 5.4 5.2 5.0 4.8 4.6 4.5 4.3 4.1 4.0 3.8 3.7 3.7 111.2
46 5.8 5.6 5.4 5.2 5.0 4.8 4.7 4.5 4.3 4.2 4.0 3.9 3.7 3.6 3.5 114.8
48 5.7 5.5 5.3 5.1 4.9 4.7 4.5 4.4 4.2 4.0 3.9 3.7 3.6 3.5 3.4 118.4
50 5.5 5.3 5.1 4.9 4.7 4.6 4.4 4.2 4.1 3.9 3.8 3.6 3.5 3.4 3.3 122.0
Note: The relationship between salinity and chlorinity for seawater is given by the equation
below: Salinity (g/l) = 1.80655 Chlorinity (g/l)
OPERATIONAL GUIDE

14
The HI98193 meter contains a built‑in barometer, and it is able to automatically compensate for
changes in barometric pressure. If another pressure value than the barometer’s reading is to be used,
then the manual pressure feature must be enabled from the SETUP menu (see page 30), and afterwards
the pressure value can be set using the / keys.
The table below contains a conversion altitude (m) to pressure (mmHg) for the altitude values from
the previous table.
DO MEASUREMENTS
Make sure the probe’s protective cap has been removed.
In order to take accurate dissolved oxygen measurements make sure that the instrument has been
calibrated (see page 25 for details).
Press RANGE to access the DO measure screen. If necessary press MODE to change the measuring unit.
Immerse the tip of the probe into the sample to be tested. Allow approximately one minute for the
reading to stabilize (hourglass symbol turns off).
On the screen are displayed:
• Dissolved Oxygen reading in the selected unit (% saturation or mg/L)
• Temperature reading in the selected unit (°C or °F)
• Pressure reading in the selected unit (mmHg, inHg, atm, psi, kPa, mbar). If the Manual Pressure
option is enabled (
displayed in front of the pressure value) the pressure value can be changed
using the / keys.
For accurate dissolved oxygen measurements, a water movement of 0.3 m/s is required. This is to
ensure that the oxygen‑depleted membrane surface is constantly replenished. A moving stream will
provide adequate circulation.
Altitude
0 300 600 900 1200 1500 1800 2100 2400 2700 3000 3300 3600 3900 4000
Pressure
760 732 705 679 654 630 607 584 563 542 522 503 484 467 461
Altitude (m)Pressure (mmHg)
OPERATIONAL GUIDE

15
BOD MEASUREMENTS
Biochemical oxygen demand (BOD) is an indicator for the concentration of biodegradable organic
matter present in a sample of water. It can be used to infer the general quality of the water and its
degree of pollution. BOD measures the rate of oxygen uptake by microorganisms in a sample of water
at a fixed temperature and over a given period of time. To ensure that all other conditions are equal, a
very small amount of microorganism seed is added to each sample being tested. This seed is typically
generated by diluting activated sludge with deionized water. The samples are kept at 20 °C in the
dark and tested for dissolved oxygen (DO) after five days. The loss of dissolved oxygen in the sample,
once corrections have been made for the degree of dilution, is called the BOD
5
.
Before measuring BOD, remember to set the BOD configuration from the SETUP menu (see page 30).
Press RANGE to access the BOD measurement screen.
Press BOD Data to view the BOD initial data management screen.
Press Compute to evaluate the BOD for a specified sample (available only when the measurement
is stable and at least one initial BOD data record has been memorized).
BOD initial data management screen
BOD Data is pressed while in BOD measurement screen.
Press Add new to add a new BOD initial data record (the key is available only when the measurement
is stable). A 200 records memory space is available for BOD initial data.
Press View ID to view the saved BOD initial values (the key is available only when at least one initial
BOD data record has been memorized).
By pressing Add New the BOD Parameters screen will be displayed:
OPERATIONAL GUIDE

16
BOD Parameters:
• Bottle ID: a number used to identify a specific bottle.
Range: 0000 to 9999.
• The type of the Sample: Sample or Seed.
• Bottle Volume: the total volume of the BOD bottle.
Range: 0.1 to 300.0 mL.
• Sample Volume: the volume of sample in the BOD bottle.
Range: 0.1 to 300.0 mL (for a seed sample this value is 0.0 mL and cannot be set).
• Seed Volume: the volume of seed in the BOD bottle.
Range: 0.0 to 300.0 mL.
Press Prev/Next to select a different parameter on the screen.
Press / keys to modify the selected parameter’s value.
Press Save to save the BOD parameters and the initial DO, temperature, pressure and salinity values
for the specified bottle.
If a bottle with the same ID already exists, the instrument will ask for replacement confirmation.
Press Replace to replace the existing record, or ESC to return to the previous screen without replacing.
When a new record is saved the meter will display a message indicating the remaining free BOD
initial data space in %.
By pressing View ID a list of all the saved BOD initial data records will be displayed. The seed records
will have the symbol “*” displayed after the bottle ID.
OPERATIONAL GUIDE

17
Use the / keys to scroll the list of BOD initial data records.
Press More to view detailed information for the selected record.
Press Pg Up/Pg Down to view the next/previous screen of information.
Use the / keys to view the detailed information about the next/previous record.
If Delete is pressed, use the / keys to highlight the record to be deleted and then press CFM.
Press ESC to exit.
If Delete All is pressed the instrument asks for confirmation. Press CFM to confirm or ESC to exit
without deleting.
BOD evaluation
From the BOD measure screen press Compute to evaluate the BOD for a specified sample. The
following screen will be displayed.
If the date of the current measurement is previous to the date of the selected measurement then the
Eval. BOD key will not be displayed.
Press MORE to view detailed information for the selected record.
Use / keys to select the bottle for BOD evaluation.
OPERATIONAL GUIDE

18
Press Eval. BOD to compute the BOD for the selected bottle. If the time difference between the current
reading and the selected reading is less than 1 day the instrument will ask for record replacement
confirmation, and the BOD can’t be evaluated.
Press CFM to replace the selected records DO, temperature, pressure and salinity values with the
current values.
Press ESC to return to the previous screen without replacing.
If the conditions regarding the time difference are met, after pressing the Eval. BOD key, the instrument
will display the computed BOD value.
Press LOG to save the BOD result.
Press ESC to return to the BOD measure screen.
If the final DO reading or DO loss doesn’t meet the criteria for BOD measurements set from the
instrument’s setup, a warning message will be displayed.
Press any key to clear the warning message from the display or press HELP to view detailed infor‑
mation about the warning.
OPERATIONAL GUIDE

19
Note: If the Autodelete BOD start data option is enabled in SETUP (see page 30), when the
BOD result is saved (LOG key is pressed) the corresponding BOD initial data record will be
automatically deleted from the instrument’s memory.
Seed Correction
In case that the BOD was evaluated for a seeded sample and the list of the saved seed BOD values
is not empty, the Correct functional key will be displayed.
Press Correct to view the list of the saved seed BOD values.
Select the desired seed BOD and then press Correct to compute the corrected BOD value. The
instrument will display the corrected BOD value.
If the information about the BOD of a certain seed doesn’t exist at the moment of the BOD
evaluation for a seeded sample, the sample’s BOD can be corrected at a later time from the BOD
recall menu (view logged BOD data).
In order to perform a seed correction from the BOD recall, press RCL key from the BOD
measurement screen to enter BOD recall, select the desired BOD record and press More.
The instrument will display a complete set of information about the selected record.
Press Correct to view the list of the seed values.
Select the desired seed BOD and then press Correct to compute the corrected BOD value.
The new
BOD value will be displayed.
Note: If the final DO value is greater than the initial DO value an error message will be
displayed
.
OPERATIONAL GUIDE

20
The OUR is used to determine the oxygen consumption or respiration rate in water. It is defined as
the mg/L of oxygen consumed per hour.
The following equation is used for OUR determination:
where:
DO
START
= Dissolved oxygen level at start of test
DO
END
= Dissolved oxygen level at end of test
t
ELAPSED
= Elapsed time of test in seconds
total volume/sample volume = Dilution factor of sample
Before starting an OUR test remember to set the OUR configuration from the SETUP menu (page 30).
OUR measurement screen:
Press Start to begin a new OUR test.
If the DO value is less than the minimum start DO value the meter will display an error message, and
the test cannot be started.
If the minimum start DO condition is met the instrument will display the instantaneous oxygen
consumption rate and the amount of time that has passed from the beginning of the test.
If the DO reading is less than the minimum end DO value set during OUR configuration a warning icon
will be displayed and a beep will be heard every two seconds. Press Stop to stop the test and the beeper.
OUR MEASUREMENT
/