
DVB-T HDD/DVD
RECORDER
OWNER’S MANUAL
MODEL: RHT297H
RHT298H
Before connecting, operating or adjusting this product,
please read this instruction booklet carefully and completely.
RH2T7.2T8-P2L-AAACLLS-ENG

2
This lightning flash with arrowhead symbol within
an equilateral triangle is intended to alert the user
to the presence of uninsulated dangerous voltage
within the product’s enclosure that may be of
sufficient magnitude to constitute a risk of electric
shock to persons.
The exclamation point within an equilateral
triangle is intended to alert the user to the
presence of important operating and maintenance
(servicing) instructions in the literature
accompanying the product.
WARNING: Do not install this equipment in a confined space
such as a book case or similar unit.
CAUTION:
Do not block any ventilation openings. Install in accordance
with the manufacturer's instructions.
Slots and openings in the cabinet are provided for ventilation
and to ensure reliable operation of the product and to protect
it from over heating.
The openings should be never be blocked by placing the
product on a bed, sofa, rug or other similar surface.This
product should not be placed in a built-in installation such as
a bookcase or rack unless proper ventilation is provided or
the manufacturer's instruction have been adhered to.
CAUTION:
CLASS 3B VISIBLE AND INVISIBLE LASER RADIATION
WHEN OPEN AND INTERLOCKS DEFEATED AVOID
EXPOSURE TO THE BEAM.
CAUTION:
This product employs a Laser System.
To ensure proper use of this product, please read this
owner’s manual carefully and retain it for future reference.
Should the unit require maintenance, contact an authorized
service center.
Performing controls, adjustments, or carrying out procedures
other than those specified herein may result in hazardous
radiation exposure.
To prevent direct exposure to laser beam, do not try to open
the enclosure. Visible laser radiation when open. DO NOT
STARE INTO BEAM.
CAUTION: The apparatus should not be exposed to water
(dripping or splashing) and no objects filled with liquids, such
as vases, should be placed on the apparatus.
CAUTION concerning the Power Cord
Most appliances recommend they be placed upon a
dedicated circuit;
That is, a single outlet circuit which powers only that
appliance and has no additional outlets or branch circuits.
Check the specification page of this owner's manual to be
certain.
Do not overload wall outlets. Overloaded wall outlets, loose
or damaged wall outlets, extension cords, frayed power
cords, or damaged or cracked wire insulation are dangerous.
Any of these conditions could result in electric shock or fire.
Periodically examine the cord of your appliance, and if its
appearance indicates damage or deterioration, unplug it,
discontinue use of the appliance, and have the cord replaced
with an exact replacement part by an authorized servicer.
Protect the power cord from physical or mechanical abuse,
such as being twisted, kinked, pinched, closed in a door, or
walked upon. Pay particular attention to plugs, wall outlets,
and the point where the cord exits the appliance.
To disconnect power from the mains, pull out the mains cord
plug. When installing the product, ensure that the plug is
easily accessible.
Disposal of your old appliance
1. When this crossed-out wheeled bin symbol is
attached to a product it means the product is
covered by the European Directive 2002/96/EC.
2. All electrical and electronic products should be
disposed of separately from the municipal
waste stream via designated collection facilities
appointed by the government or the local
authorities.
3. The correct disposal of your old appliance will
help prevent potential negative consequences
for the environment and human health.
4. For more detailed information about disposal of
your old appliance, please contact your city
office, waste disposal service or the shop
where you purchased the product.
This product is manufactured to comply with
the EEC DIRECTIVE 2004/108/EC and
2006/95/EC.
CAUTION
RISK OF ELECTRIC SHOCK
DO NOT OPEN
WARNING: TO PREVENT FIRE OR ELECTRIC SHOCK
HAZARD, DO NOT EXPOSE THIS PRODUCT TO RAIN
OR MOISTURE.
CAUTION: TO REDUCE THE RISK
OF ELECTRIC SHOCK
DO NOT REMOVE COVER (OR BACK)
NO USER-SERVICEABLE PARTS INSIDE
REFER SERVICING TO QUALIFIED SERVICE
PERSONNEL
.

Contents
Introduction . . . . . . . . . . . . . . . . . . . . . . . . . . . . . . . . . .4-9
About the symbol display . . . . . . . . . . . . . . . . . . . . .4
Symbol Used in this Manual . . . . . . . . . . . . . . . . . . . . .4
Notes on Discs . . . . . . . . . . . . . . . . . . . . . . . . . . . . . . .4
Recordable and Playable Discs . . . . . . . . . . . . . . . . . .5
Playable Discs . . . . . . . . . . . . . . . . . . . . . . . . . . . . . . .6
Regional Code . . . . . . . . . . . . . . . . . . . . . . . . . . . . . .6
Availability of copying or moving feature . . . . . . . . . . . .6
About the internal hard disk drive . . . . . . . . . . . . . . . . .7
Remote Control Operation . . . . . . . . . . . . . . . . . . . . . .7
Front Panel . . . . . . . . . . . . . . . . . . . . . . . . . . . . . . . . .8
Remote Control . . . . . . . . . . . . . . . . . . . . . . . . . . . . . .9
Hookup and Settings . . . . . . . . . . . . . . . . . . . . . . . . .10-27
Rear Panel . . . . . . . . . . . . . . . . . . . . . . . . . . . . . . . .10
General about connection . . . . . . . . . . . . . . . . . . . . . .11
Connecting to the Antenna . . . . . . . . . . . . . . . . . . . . .11
Connections to Your TV . . . . . . . . . . . . . . . . . . . . . . .12
HDMI connection . . . . . . . . . . . . . . . . . . . . . . . . . . . .13
Connecting to an Amplifier . . . . . . . . . . . . . . . . . . . . .14
Accessory Audio/Video (A/V) Connections . . . . . . .15-16
Auto Setup . . . . . . . . . . . . . . . . . . . . . . . . . . . . . . . . .16
Using the Home Menu . . . . . . . . . . . . . . . . . . . . . . . .17
Initial Settings . . . . . . . . . . . . . . . . . . . . . . . . . . . . . . .17
General Operation . . . . . . . . . . . . . . . . . . . . . . . .17
General Settings . . . . . . . . . . . . . . . . . . . . . . . . . .18-21
Auto Programming . . . . . . . . . . . . . . . . . . . . . . . .18
Manual Channel Add . . . . . . . . . . . . . . . . . . . . . .18
Program Edit . . . . . . . . . . . . . . . . . . . . . . . . . .19-20
Auto Clock Set / Manual Clock Set . . . . . . . . . . .20
TV Aspect / AV2 Connection . . . . . . . . . . . . . . . . .20
Power Save Mode . . . . . . . . . . . . . . . . . . . . . . . .21
Antenna feed 5V / Initialization . . . . . . . . . . . . . . .21
Language Settings . . . . . . . . . . . . . . . . . . . . . . . . . . .21
Display Menu . . . . . . . . . . . . . . . . . . . . . . . . . . . .21
Disc Menu/Audio/Subtitle . . . . . . . . . . . . . . . . . . .21
DTV Audio / DTV Subtitle / DivX Subtitle . . . . . . .21
Audio Settings . . . . . . . . . . . . . . . . . . . . . . . . . . . . . .22
Dolby Digital / DTS / MPEG . . . . . . . . . . . . . . . . .22
Sampling Frequency . . . . . . . . . . . . . . . . . . . . . . .22
DRC (Dynamic Range Control) . . . . . . . . . . . . . .22
Vocal . . . . . . . . . . . . . . . . . . . . . . . . . . . . . . . . . .22
Lock (Parental Control) Settings . . . . . . . . . . . . . .22-23
Lock System . . . . . . . . . . . . . . . . . . . . . . . . . . . .22
DVD Rating . . . . . . . . . . . . . . . . . . . . . . . . . . . . .22
DTV Rating . . . . . . . . . . . . . . . . . . . . . . . . . . . . .23
Set Password . . . . . . . . . . . . . . . . . . . . . . . . . . . .23
Area Code . . . . . . . . . . . . . . . . . . . . . . . . . . . . . .23
DivX Registration Code . . . . . . . . . . . . . . . . . . . .23
Recording Settings . . . . . . . . . . . . . . . . . . . . . . . . . . .24
Record Mode Set / Record Aspect . . . . . . . . . . . .24
DV Recording Audio / TV Recording Audio . . . . . .24
Auto Chapter / AV2 Recording . . . . . . . . . . . . . . .24
Timeshift / MPEG4 . . . . . . . . . . . . . . . . . . . . . . . .24
Video Output Format . . . . . . . . . . . . . . . . . . . . . .24
Disc Settings . . . . . . . . . . . . . . . . . . . . . . . . . . . . .25-26
Disc Format . . . . . . . . . . . . . . . . . . . . . . . . . . . . .25
Finalize . . . . . . . . . . . . . . . . . . . . . . . . . . . . . . . .25
Disc Label / Disc Protect / PBC . . . . . . . . . . . . . .26
Displaying Information . . . . . . . . . . . . . . . . . . . . . . . .27
Displaying Information while TV viewing . . . . . . . .27
Displaying Disc Information on-screen . . . . . . . . .27
TV Viewing . . . . . . . . . . . . . . . . . . . . . . . . . . . . . . . . .28-30
Program Guide (Digital program only) . . . . . . . . . . . . .28
Program Selection . . . . . . . . . . . . . . . . . . . . . . . . . . .29
Program List . . . . . . . . . . . . . . . . . . . . . . . . . . . . . . . .29
Teletext Operation . . . . . . . . . . . . . . . . . . . . . . . . . . .30
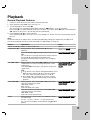
Playback . . . . . . . . . . . . . . . . . . . . . . . . . . . . . . . . . .31-41
General Playback Features . . . . . . . . . . . . . . . . . .31-34
Playing a DivX Movie File . . . . . . . . . . . . . . . . . . . . . .35
Playing an Audio CD or MP3/WMA file . . . . . . . . . . . .36
Program Playback with Audio CD and MP3/WMA file .37
Viewing a JPEG File . . . . . . . . . . . . . . . . . . . . . . .38-39
Editing a MP3/WMA, JPEG, DivX file . . . . . . . . . . .40-41
Recording . . . . . . . . . . . . . . . . . . . . . . . . . . . . . . . . .42-49
About DVD recording . . . . . . . . . . . . . . . . . . . . . . . . .42
About HDD recording . . . . . . . . . . . . . . . . . . . . . . . . .42
Timeshift . . . . . . . . . . . . . . . . . . . . . . . . . . . . . . . . . .43
Basic Recording from a TV . . . . . . . . . . . . . . . . . . . . .44
Instant Timer Recording . . . . . . . . . . . . . . . . . . . . . . .44
Timer Recording . . . . . . . . . . . . . . . . . . . . . . . . . . . . .45
Checking Timer Recording Details . . . . . . . . . . . . . . .46
Recording from an External Input . . . . . . . . . . . . . . . .47
Simultaneous recording and playback . . . . . . . . . . . . .47
Playback another title during recording . . . . . . . . .47
Time Slip . . . . . . . . . . . . . . . . . . . . . . . . . . . . . . .47
MPEG4 Recording . . . . . . . . . . . . . . . . . . . . . . . . . . .48
Recording from DV Input . . . . . . . . . . . . . . . . . . . . . .49
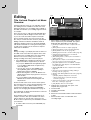
Editing . . . . . . . . . . . . . . . . . . . . . . . . . . . . . . . . . . . .50-57
Title List and Chapter List Menu Overview . . . . . . . . .50
HDD, VR Mode: Original and Playlist Editing . . . . . . .51
Adding Chapter Markers . . . . . . . . . . . . . . . . . . . . . .51
Changing the Title Thumbnails . . . . . . . . . . . . . . . . . .51
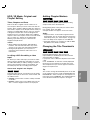
Making a New Playlist . . . . . . . . . . . . . . . . . . . . . . . .52
Adding Additional Title/Chapters to the Playlist . . . . . .52
Deleting an Original or Playlist Title/Chapter . . . . . . . .53
Deleting a Part . . . . . . . . . . . . . . . . . . . . . . . . . . . . . .53
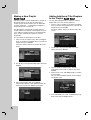
Naming a Title . . . . . . . . . . . . . . . . . . . . . . . . . . . . . .54
Time Search . . . . . . . . . . . . . . . . . . . . . . . . . . . . . . .54
Sort . . . . . . . . . . . . . . . . . . . . . . . . . . . . . . . . . . . . . .55
Combining Two Titles Into One . . . . . . . . . . . . . . . . . .55
Combining Two Chapters Into One . . . . . . . . . . . . . . .55
Divide One Titles Into Two . . . . . . . . . . . . . . . . . . . . .56
Moving a Playlist Chapter . . . . . . . . . . . . . . . . . . . . . .56
Hide a Chapter/Title . . . . . . . . . . . . . . . . . . . . . . . . . .57
Protect a Title . . . . . . . . . . . . . . . . . . . . . . . . . . . . . . .57
Additional functions for the recordable DVD discs . . . .57
Dubbing . . . . . . . . . . . . . . . . . . . . . . . . . . . . . . . . . . .58-60
Before Dubbing . . . . . . . . . . . . . . . . . . . . . . . . . . . . .58
Dubbing from HDD to DVD . . . . . . . . . . . . . . . . . . . .59
Dubbing from DVD to HDD . . . . . . . . . . . . . . . . . . . . .59
One Touch Copy (HDD to DVD) . . . . . . . . . . . . . . . . .60
One Touch Copy (DVD to HDD) . . . . . . . . . . . . . . . . .60
Reference . . . . . . . . . . . . . . . . . . . . . . . . . . . . . . . . . .61-66
Additional Information . . . . . . . . . . . . . . . . . . . . . . . . .61
Viewing Title List menu displayed on other
DVD Recorders or Players . . . . . . . . . . . . . . . . .61
Playing Your Recordings on Other DVD
Players (Finalizing a Disc) . . . . . . . . . . . . . . . . . .61
Language Codes . . . . . . . . . . . . . . . . . . . . . . . . . . . .62
Area Codes . . . . . . . . . . . . . . . . . . . . . . . . . . . . . . . .62
Controlling Your TV with the Supplied
Remote Control . . . . . . . . . . . . . . . . . . . . . . . . . . . . .63
Troubleshooting . . . . . . . . . . . . . . . . . . . . . . . . . . .64-65
Specifications . . . . . . . . . . . . . . . . . . . . . . . . . . . . . . .66
3
Introduction

4
Introduction
To ensure proper use of this product, please read this
owner’s manual carefully and retain for future reference.
This manual provides information on the operation
and maintenance of your recorder. Should the unit
require service, contact an authorized service location.
About the Symbol Display
“ ” may appear on your TV display during operation
and indicates that the function explained in this
owner’s manual is not available on that specific media.
Symbol Used in this Manual
Note:
Indicates special notes and operating features.
Tip:
Indicates tips and hints for making the task easier.
A section whose title has one of the following symbols
are applicable only to the disc represented by the
symbol.
Titles recorded on the HDD
All DVD discs listed below.
DVD-RAM disc
DVD-RW with VR recording mode
DVD-RW with Video recording mode
DVD+RW disc
DVD-R disc
DVD+R (DL) disc
DVD-Video disc
Video CDs
Audio CDs
DivX files
MP3 files
WMA files
JPEG files
Notes on Discs
Handling Discs
Do not touch the playback side of the disc. Hold the
disc by the edges so that fingerprints do not get on
the surface. Never stick paper or tape on the disc.
Storing Discs
After playing, store the disc in its case. Do not expose
the disc to direct sunlight or sources of heat and never
leave it in a parked car exposed to direct sunlight.
Cleaning Discs
Fingerprints and dust on the disc can cause poor
picture quality and sound distortion. Before playing,
clean the disc with a clean cloth. Wipe the disc from
the center out.
Do not use strong solvents such as alcohol, benzine,
thinner, commercially available cleaners, or anti-static
spray intended for older vinyl records.
JPEG
WMA
MP3
DivX
ACD
VCD
DVD
+R
-R
+RW
-RW
Video
-RW
VR
RAM
DVD ALL
HDD
Moisture Condensation
Never operate this product immediately after
moving it from a cold location to a warm location.
Leave it for two or three hours without operating it.
If you use this product in such a situation, it may
damage discs and internal parts.
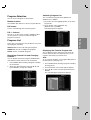
What is SIMPLINK?
Some functions of this unit are controlled by TV’s remote control when this unit and LG TV with
SIMPLINK are connected through HDMI connection.
• Controllable functions by LG TV’s remote control; Play, Pause, Scan, Skip, Stop, Power Off, etc.
• Refer to the TV owner’s manual for the details of SIMPLINK function.
• LG TV with SIMPLINK function has the logo as shown above.

5
Recordable and Playable Discs
DVD-RW (Digital Video Disc - ReWritable):
DVD-RW discs can be formatted for VR mode recording or Video mode recording.
These Discs can be recorded on repeatedly. Recordings can be erased, then you can record again
on the same Disc.
[VR mode]
Recordings can be extensively edited
Playable only on VR mode compatible players (after finalization)
[Video mode]
Playable on regular DVD players (after finalization)
Limited editing features
DVD-R (Digital Video Disc - Recordable)
These Discs can be recorded only once. After you finalize a DVD-R, you cannot record on it or edit it.
DVD-R discs can be only formatted to Video mode.
Playable on regular DVD players (after finalization)
Limited editing features
DVD-RAM (DVD - Random Access Memory)
DVD-RAM discs can be formatted for VR mode recording.
These Discs can be recorded on repeatedly. Recordings can be erased, then you can record again on
the same Disc.
Playable on DVD-RAM compatible players.
Recordings can be extensively edited.
Only DVD-RAM standard Version 2.0, 2.1 and 2.2 discs can be used in this unit.
You cannot use the cartridge-type DVD-RAM disc in this unit.
DVD+RW (Digital Video Disc + ReWritable)
These Discs can be recorded on repeatedly. Recordings can be erased, then you can record again
on the same Disc.
Playable on DVD+RW compatible players (automatically finalization)
The edited contents are playable on DVD+RW compatible players only after finalization
Recordings can be edited the title/chapter
DVD+R (Digital Video Disc + Recordable)
These Discs can be recorded only once. After you finalize a DVD+R, you cannot record on it or edit
it any more.
Playable on DVD+R compatible players (after finalization)
Any edited contents are not be compatible on DVD+R compatible players. (Hide, chapter combine,
added chapter mark, etc.)
Limited title/chapter editing features.
DVD+R DL (Digital Video Disc + Recordable; Double Layer)
These Discs can be recorded only once. After you finalize a DVD+R DL, you cannot record on it or
edit it any more.
Storage space is nearly doubled with double layer DVD+R media, allowing consumers to record up
to 8.5GB of video on a single DVD+R disc.
Playable on DVD+R DL compatible players (after finalization)
Any edited contents are not be compatible on DVD+R DL compatible players. (Hide, chapter
combine, added chapter mark, etc.)
Limited title/chapter editing features.
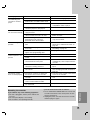
Recommended recordable DVD discs
DVD-R DVD+R DVD-RW DVD+RW DVD+R(DL) DVD-RAM
Mitsubishi (8x, 16x) Mitsubishi (8x, 16x) Mitsubishi (4x) Mitsubishi (4x) Mitsubishi (2.4x) Fujifilm (2x)
That’s (8x, 16x) Ricoh (8x, 16x) Verbatim (4x) SONY (2.4x) Maxell (2.4x) Mitsubishi (3x)
SONY (16x) SONY (16x) JVC (4x) Verbatim (2.4x) - -
- - Victor (4x) Ricoh (2.4x, 4x) - -
- - Maxell (4x) - - -
Note: If a DVD-RW/DVD+RW discs is recorded using a personal computer or other DVD recorder, you cannot
format the disc using this recorder. So if you want to use the disc on this recorder, you must format the disc
using the original recorder.
Introduction

6
Playable Discs
DVD (8 cm / 12 cm disc)
Discs such as movies that can be purchased or rented
Video CD (VCD) (8 cm / 12 cm disc)
VIDEO CDs or CD-Rs/CD-RWs in VIDEO CD/Super VIDEO CD format
Audio CD (8 cm / 12 cm disc)
Music CDs or CD-Rs/CD-RWs in music CD format that can be purchased
CD-R/CD-RW (8 cm / 12 cm disc)
CD-R/CD-RW discs that contain audio titles, DivX, MP3, WMA, or JPEG files.
Notes:
Depending on the conditions of the recording equipment or the CD-R/RW (or DVD±R/RW) disc itself, some
CD-R/RW (or DVD±R/RW) discs cannot be played on the unit.
Do not attach any seal or label to either side (the labeled side or the recorded side) of a disc.
Do not use irregularly shaped CDs (e.g., heart-shaped or octagonal). Doing so may result in malfunctions.
Depending on the recording software & the finalization, some recorded discs (CD-R/RW or DVD±R/RW) may
not be playable.
DVD-R/RW, DVD+R/RW and CD-R/RW discs recorded using a personal computer or a DVD or CD Recorder
may not play if the disc is damaged or dirty, or if there is dirt or condensation on the Recorder’s lens.
If you record a disc using a personal computer, even if it is recorded in a compatible format, there are cases
in which it may not play because of the settings of the application software used to create the disc. (Check
with the software publisher for more detailed information.)
This recorder requires discs and recordings to meet certain technical standards in order to achieve optimal
playback quality. Pre-recorded DVDs are automatically set to these standards. There are many different types
of recordable disc formats (including CD-R containing MP3 or WMA files) and these require certain pre-
existing conditions (see above) to ensure compatible playback.
Customers should note that permission is required in order to download MP3 / WMA files and music from the
Internet. Our company has no right to grant such permission. Permission should always be sought from the
copyright owner.
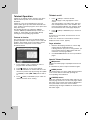
Regional Code
This unit has a regional code printed on the rear of the unit. This unit can play only DVD discs labeled same as
the rear of the unit or “ALL”.
Notes on Regional Codes
Most DVD discs have a globe with one or more numbers in it clearly visible on the cover. This number must
match your unit’s regional code or the disc cannot play.
If you try to play a DVD with a different regional code from the unit, the message “Incorrect region code. Can’t
play back” appears on the TV screen.
Availability of copying or moving feature
From To MP3/WMA JPEG DivX Audio CD Video CD Title*
1
HDD DISC No No No No No Yes
DISC HDD Yes Yes Yes No No Yes
*1 The title is recorded from this unit.

7
About the internal hard disk
drive
The internal hard disk drive (HDD) is a fragile piece of
equipment. Please use the recorder following the
guidelines below to protect against possible HDD
failure.
We recommend that you back up your important
recordings onto DVD discs in order to protect against
accidental loss.
Do not move the recorder while it is on.
Install and use the recorder on a stable, level
surface.
Do not block the rear vent/cooling fan.
Do not use the recorder in excessively hot or humid
places, or in places that may be subject to sudden
changes in temperature. Sudden changes in
temperature can cause condensation to form inside
the recorder. This can be a cause of HDD failure.
While the recorder is switched on, do not unplug
from the wall socket or switch the electricity off from
the breaker switch.
Do not move the recorder immediately after
switching it off. If you need to move the recorder,
please follow the steps below:
1. After the message POWER OFF is shown in the
display, wait at least two minutes.
2. Unplug from the wall socket.
3. Move the recorder.
If there’s a power failure while the recorder is on
there is a chance that some data on the HDD will
be lost.
The HDD is very delicate. If used improperly or in
an unsuitable environment, it is possible that the
HDD will fail after a few years of use. Signs of
problems include playback unexpectedly freezing
and noticeable block noise (mosaic) in the picture.
However, sometimes there will be no warning signs
of HDD failure.
If the HDD fails, no playback of recorded material
will be possible. In this case it will be necessary to
replace the HDD unit.
Remote Control Operation
Point the Remote Control at the remote sensor and
press the buttons.
Caution
Do not mix old and new batteries. Never mix different
types of batteries (standard, alkaline, etc.).
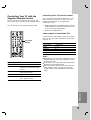
Remote Control Battery Installation
Remove the battery cover on the
rear of the Remote Control, and
insert two R03 (size AAA)
batteries with and matched
correctly.
Introduction

8
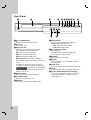
a
11
/ I (POWER button)
Switches the recorder ON or OFF.
b Disc Tray
Insert a disc here.
c Display window
Shows the current status of the recorder.
T/S: Indicates the timeshifting mode.
REC: The recorder is recording.
HDD: The recorder is HDD mode.
DVD: The recorder is DVD mode.
HDD bBDVD: The recorder is dubbing.
TV: Indicates when the recorder is in TV tuner
mode.
: Indicates when the recorder is in timer
recording or a timer recording is programmed.
: Indicates clock, total playing
time, elapsed time, title number, chapter/track
number, channel, etc.
d Remote Sensor
Point the recorder remote control here.
e Z (OPEN/CLOSE)
Opens or closes the disc tray.
f HDD/DVD
Set the recorder’s mode to HDD or DVD.
g RESOLUTION
Sets the output resolution for HDMI and
COMPONENT OUTPUT jacks.
- HDMI: 576i, 576p, 720p, 1080i
- COMPONENT: 576i, 576p
h N / X (PLAY / PAUSE)
Starts playback.
Pause playback or recording temporarily,
press again to exit pause mode.
i x (STOP)
Stops playback or recording.
j z (REC)
Starts recording. Press repeatedly to set the
recording time.
k PROG. (V/v)
Scans up or down through memorized channels.
l DV IN
Connect the DV output of a digital camcorder.
m AV IN 3 (VIDEO IN/AUDIO IN (Left/Right))
Connect the audio/video output of an external
source (Audio system, TV/ Monitor, VCR,
Camcorder, etc.).
Front Panel
ab cdefghijk
lm

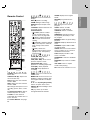
9
a
POWER: Switches the recorder
ON or OFF.
OPEN/CLOSE (Z): Opens and
closes the disc tray.
DVD: Selects the unit’s function
mode to DVD.
HDD: Selects the unit’s function
mode to HDD.
AV: Changes the input to use for
recording (Tuner, AV1-3, or DV
IN).
0-9 numerical buttons: Selects
numbered options in a menu.
TV/DVD: To view channels
selected by the recorder tuner or
by the TV tuner.
TV Control Buttons: See page
63.
b
DISPLAY: Accesses On-Screen
Display.
REC (z): Starts recording.
ZOOM: Enlarges video image.
REPEAT: Repeat chapter, track,
title, all.
TV/RADIO: Switches between TV
and Radio modes.
Teletext Buttons
- (INDEX): Moves to Index
screen. If Index page is not
present, moves to page 100.
- (TEXT): Switches between
teletext mode and normal TV
viewing.
- (FREEZE): Holds the teletext
display and stops the automatic
page change in the teletext
mode.
- (MIX): Selects the
background for teletext screen
(Opaque, User Transparency,
Transparency).
c
SCAN (m / M): Search
backward or forward.
SKIP (. / >): Go to next or
previous chapter or track.
PAUSE/STEP (X) : Pause
playback or recording temporarily.
PLAY (N): Starts playback.
STOP (x): Stops playback or
recording.
d
HOME: Accesses or removes the
HOME menu.
MENU/LIST: Accesses menu on a
DVD disc. Switches between Title
List-Original and Title List-Playlist
menu.
b / B / v / V (left/right/up/down):
Selects an option in the menu.
ENTER ( ): Acknowledges menu
selection.
PR (+/-): Scans up or down
through memorized channels.
GUIDE: Displays the Program
Guide.
RETURN (O): Removes the
menu.
e
FAV: Changes to the favorite
program.
AUDIO: Selects an audio
language or audio channel.
SUBTITLE: Selects a subtitle
language.
TIMESHIFT: Activates pause live
TV/playback (timeshift) for a live
TV program.
MARKER: Marks any point during
playback.
SEARCH: Displays Marker Search
menu.
DUBBING: Copies DVD to HDD
(or HDD to DVD).
CLEAR: Removes a track number
on the Program List or a mark on
the Marker Search menu.
TITLE: Displays the disc’s Title
menu, if available.
THUMBNAIL: Selects a thumbnail
picture.
RANDOM: Plays tracks in random
order.
CHP. ADD: Inserts a chapter
marker when playing.
PIP: Selects PIP function on or off.
Remote Control
a
b
c
d
e
Introduction

10
a ANTENNA IN
Connect the antenna to this terminal.
b COMPONENT OUTPUT (Y P
B PR)
Connect to a TV with Y P
B PR inputs.
c AV 2 (DECODER)
Connect the audio/video output of an external
source (Pay-TV decoder, Set Top Box, VCR, etc.).
d Cooling fan
e AC IN ~
Plug into the power source.
f ANTENNA OUT
Passes the signal from the ANTENNA IN to your
TV/monitor
g OPTICAL (Digital audio out jack)
Connect to digital (optical) audio equipment.
h COAXIAL (Digital audio out jack)
Connect to digital (coaxial) audio equipment.
i S-VIDEO OUTPUT
Connect to a S-Video Input on TV.
j AUDIO OUTPUT (Left/Right)
Connect to a TV with audio inputs.
k AV 1
Connect to a TV with SCART jack.
l HDMI Connector (Type A)
HDMI output providing a high quality interface for
digital audio and video.
abc d e
fghij k l
Rear Panel
Hookup and Settings

11
General about connection
Picture and sound
Digital TV is a transmission technology that replaces
the traditional analogue technique.
This means that several TV channels, radio channels
and other digital services can be transmitted on the
same space as just one channel took up before. As a
consumer you get access to many more channels and
services than before at the same time as they are
received with perfect picture and audio quality.
The recorder converts the digital signal into a format
that is suitable for your TV and sound system.
Connecting your recorder is just as simple as
connecting for example a video recorder. You get the
best picture quality by using a HDMI cable for
connection to your TV-set. The best audio experience
is obtained by connecting an optical cable to your
sound system.
Coverage
Before buying this product it is anticipated that you
have made sure that there are digital transmissions
covering your region.
Antenna / Signal source
Depending on the reception your recorder may be
connected to a simple indoor antenna or to an existing
outdoor antenna system. If you live in a flat you should
make sure that the digital terrestrial signals are
distributed to your wall antenna outlet. If you have
your own antenna system you must make sure that it
is equipped with antennas, filter and/or amplifier that
can handle those frequencies that the digital channels
are transmitted on.
Cable-TV
Please observe that this recorder is not designed for
the reception of regular digital cable-TV signals (QAM-
signal). Despite this, operators of smaller cable
networks may have chosen to distribute the digital
terrestrial signals (COFDM-signal) in the network. In
this case this recorder may well be used.
Check with your landlord if you are insecure about
what type of TV-signal that is provided in the wall
antenna outlet.
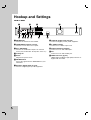
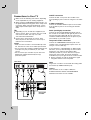
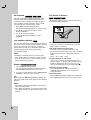
Connecting to the antenna
Remove the antenna cable plug from your TV set and
insert it into the antenna socket at the back of the
recorder. Plug one end of the antenna cable into the
TV socket on the recorder and the other end into the
antenna input socket on your TV set.
Caution
The ANTENNA IN jack supply the antenna feed (DC
5V/100mA) and the antenna feed is switchable via
setup menu. If your digital antenna is not an active
antenna, you must set the [Antenna feed 5V] option to
[OFF] (page 21).
RF coaxial connection
Connect the ANTENNA OUT jack on the recorder to
the antenna input jack on the TV using the 75-ohm
Coaxial Cable supplied (R). The ANTENNA OUT jack
passes the signal through from the ANTENNA IN jack.
Hookup and
Settings
ANTENNA
INPUT
Rear of the recorder
Rear of TV
and/or
L
R
AUDIO INPUT
VIDEO
INPUT
R
Antenna
(Digital)
Antenna
(Analog)

12
Connections to Your TV
Make one of the following connections, depending
on the capabilities of your existing equipment.
When using the COMPONENT OUTPUT jacks, set
the [Video Output Format] option in the setup menu
to [YP
BPR]. When using the SCART jack, set the
Video Output Format option in the setup menu to
RGB.
Tips
Depending on your TV and other equipment you
wish to connect, there are various ways you could
connect the recorder. Use only one of the
connections described below.
Please refer to the manuals of your TV, VCR,
Stereo System or other devices as necessary to
make the best connections.
Caution
– Make sure the recorder is connected directly to the
TV. Tune the TV to the correct video input channel.
– Do not connect the recorder’s AUDIO OUTPUT jack
to the phono in jack (record deck) of your audio
system.
– Do not connect your recorder via your VCR. The
DVD image could be distorted by the copy
protection system.
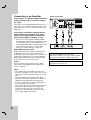
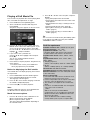
SCART connection
Connect the AV1 scart jack on the recorder to the
corresponding in jacks on the TV using the scart cable
(T).
S-Video connection
Connect the S-VIDEO OUTPUT jack on the recorder
to the S-Video in jack on the TV using the S-Video
cable (S).
Audio (Left/Right) Connection
Connect the left and right AUDIO OUTPUT jacks of
the recorder to the audio left and right IN jacks on the
TV using the audio cables (A). Do not connect the
recorder’s AUDIO OUTPUT jack to the phono in jack
(record deck) of your audio system.
Component Video connection
Connect the COMPONENT OUTPUT jacks on the
recorder to the corresponding input jacks on the TV
using an Y P
B PR cable (C).
If your television is a high-definition or “digital ready”
television, you may take advantage of the recorder’s
progressive scan output for the highest video
resolution possible. If your TV does not accept the
Progressive Scan format, the picture will appear
scrambled if you try Progressive Scan on the recorder.
Set the resolution to 576p for progressive signal
using RES. button on the front panel.
Note:
Progressive scan does not work with the analog video
connections (S-VIDEO OUTPUT jack).
Caution:
If the resolution is set to 720p or 1080i, the
S-VIDEO OUTPUT, SCART and COMPONENT
OUTPUT connections are not available.
Rear of the
recorder
L
R
AUDIO INPUT
SCART INPUT
Pr
Pb
Y
COMPONENT VIDEO INPUT
Rear of TV
A
T
C
S-VIDEO
INPUT
S

13
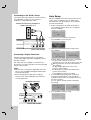
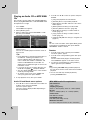
HDMI connection
If you have an HDMI TV or monitor, you can connect it
to this recorder using an HDMI cable.
1. Connect the HDMI OUTPUT jack on the recorder
to the HDMI INPUT jack on a HDMI compatible TV
or monitor (H).
2. Set the TV’s source to HDMI (refer to TV’s Owner’s
manual).
Notes:
If your TV is NOT capable of handling 96 kHz
sampling frequency, set the [Sampling Freq.] option
to [48 kHz] on the setup menu (See page 22).
When this choice is made, this unit will
automatically convert any 96 kHz signals to 48 kHz
so your system can decode them.
If your TV is not equipped with Dolby Digital and
MPEG decoder, set the [Dolby Digital] and [MPEG]
options to [PCM] on the setup menu (See page 22).
If your TV is not equipped with DTS decoder, set
the [DTS] options to [OFF] on the setup menu (See
page 22). To enjoy DTS multi channel surround, you
must connect this recorder to a DTS compatible
receiver via one of this recorder’s digital audio
outputs.
The arrow on the cable connector body should face
up for correct alignment with the connector on the
recorder.
If there is noise or lines on the screen, please check
the HDMI cable.
Tip :
When you use the HDMI connection, you can change
the resolution (576i, 576p, 720p, or 1080i) for the
HDMI output using RES. button on the front panel.
Caution:
Changing the resolution when the recorder is
connected with HDMI connector may result in
malfunctions. To solve the problem, turn off the
recorder and then turn it on again.
About HDMI
HDMI (High Definition Multimedia Interface) supports
both video and audio on a single digital connection for
use with DVD Players, Set-Top Boxes, and other AV
devices.
HDMI was developed to provide the technologies of
HDCP (High Definition Contents Protection). HDCP is
used to protect digital content transmitted and
received.
HDMI has the capability to support standard, enhanced,
or high-definition video plus standard to multi-channel
surround-sound audio, HDMI features include
uncompressed digital video, a bandwidth of up to 5
gigabytes per second, one connector (instead of several
cables and connectors), and communication between the
AV source and AV devices such as DTVs.
HDMI, the HDMI logo and High-Definition Multimedia
Interface are trademarks or registered trademarks of
HDMI licensing LLC.
Additional Information for HDMI
When you connect an HDMI or DVI compatible
device make sure of the followings:
- Try switching off the HDMI/DVI device and this
recorder. Next, switch on the HDMI/DVI device
and leave it for around 30 seconds, then switch
on this recorder.
- The connected device’s video input is set
correctly for this unit.
- The connected device is compatible with
720(1440)x576i, 720x576p, 1280x720p, or
1920x1080i video input.
Not all HDCP-compatible DVI devices will work with
this recorder.
- The picture will not be displayed properly with
non-HDCP device.
HDMI
HDMI compatible TV
H
Rear of the recorder
(Type A)
Hookup and
Settings

14
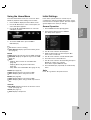
Connecting to an Amplifier
Connecting to an amplifier equipped with two
channel analog stereo or Dolby Pro Logic ll/
Pro Logic
Connect the Left and Right AUDIO OUTPUT jacks on
the recorder to the audio left and right in jacks on your
amplifier, receiver, or stereo system, using the audio
cables (A).
Connecting to an amplifier equipped with two
channel digital stereo (PCM) or to an Audio/
Video receiver equipped with a multi-channel
decoder (Dolby Digital™, MPEG 2, or DTS)
1. Connect one of the recorder’s DIGITAL AUDIO
OUTPUT jacks (OPTICAL O or COAXIAL X) to the
corresponding in jack on your amplifier. Use an
optional digital (optical O or coaxial X) audio cable.
2. You will need to activate the recorder’s digital
output. (See “Audio Settings” on page 22).
Digital Multi-channel sound
A digital multi-channel connection provides the best
sound quality. For this you need a multi-channel
Audio/Video receiver that supports one or more of the
audio formats supported by your recorder (MPEG 2,
Dolby Digital and DTS). Check the receiver manual
and the logos on the front of the receiver.
Caution:
Due to the DTS Licensing agreement, the digital
output will be in DTS digital out when DTS audio
stream is selected.
Notes:
– If the audio format of the digital output does not
match the capabilities of your receiver, the receiver
will produce a strong, distorted sound or no sound
at all.
– Six Channel Digital Surround Sound via digital
connection can only be obtained if your receiver is
equipped with a Digital Multi-channel decoder.
– To see the audio format of the current DVD in the
on-screen display, press AUDIO.
– This recorder does not perform internal (2 channel)
decoding of a DTS sound track. To enjoy DTS
multi channel surround, you must connect this
recorder to a DTS compatible receiver via one of
this recorder’s digital audio outputs.
R
L
AUDIO INPUTDIGITAL INPUT
COAXIAL
DIGITAL INPUT
OPTICAL
Amplifier (Receiver)
Rear of the recorder
AXO
Manufactured under license from Dolby
Laboratories. “Dolby”, “Pro Logic”, and the double-
D symbol are trademarks of Dolby Laboratories.
“DTS” and “DTS Digital Out” are trademarks of
Digital Theater Systems, Inc.

15
Accessory Audio/Video (A/V)
Connections
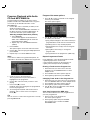
Connecting a PAY-TV/Canal Plus Decoder
You can watch or record PAY-TV/Canal Plus programs
if you connect a decoder (not supplied) to the
recorder. Disconnect the recorder’s mains lead from
the mains when connecting the decoder.
To watch or record PAY-TV/Canal Plus programs, set
[AV2 Connection] option to [Decoder] (see page 20)
and set the program’s [CANAL] option to [On] on the
Setup menu (page 20).
Tip:
You do not need to turn on the recorder to view the
signals from the connected tuner on your TV.
Note:
If you disconnect the recorder’s mains lead, you will
not be able to view the signals from the connected
decoder.
Connecting to the AV 2 (DECODER) jack
Connect a VCR or similar recording device to the
AV 2 (DECODER) jack of this recorder.
To watch or record the source from AV 2 (DECODER)
jack, set [AV2 Connection] option to [Others] (see
page 20) and set [AV2 Recording] option to [Auto],
[CVBS] or [RGB] as required (see page 24).
Tip:
You do not need to turn on the recorder to view the
signals from the connected tuner on your TV.
Notes:
Pictures containing copy protection signals that
prohibit any copying cannot be recorded.
If you pass the recorder signals via the VCR, you
may not receive a clear image on your TV screen.
Be sure to connect your VCR to the recorder and
your TV in the order shown below. To watch video
tapes, watch the tapes through a second line input
on your TV.
When you record to a VCR from this recorder, do
not switch the input source to TV by pressing the
TV/DVD button on the remote.
If you are using a B Sky B tuner, be sure to connect
the tuner’s VCR SCART jack to the
AV 2 (DECODER) jack.
If you disconnect the recorder’s mains lead, you will
not be able to view the signals from the connected
VCR or tuner.
TV
VCR RECORDER
Line input 1
Line input 2
TV
SCART AV
Rear of the recorder
PAY-TV/Canal Plus
Decorder
Rear of the recorder
VCR, Cable Box, or
Satellite Tuner, etc.
TV
Hookup and
Settings

16
Connecting to the AV IN 3 Jacks
Connect the input jacks (AV IN 3) on the recorder to
the audio/video out jacks on your accessory
component, using audio/video cables.
Connecting a Digital Camcorder
Using the front panel DV IN jack, it is possible to
connect a DV digital camcorder and digitally transfer
DV tapes to DVD.
Use a DV cable (not supplied) to connect the DV
in/out jack of your DV camcorder to the front panel DV
IN jack of this recorder.
Notes:
This jack is for connection to DV digital camcorder
only. It is not compatible with digital satellite tuners
or D-VHS video decks.
Disconnecting the DV cable while recording a
contents of the connected digital camcorder may
result in malfunction.
Auto Setup
After the POWER is pressed for the first time to turn
on the unit or resetting the unit, the Initial Setup
Wizard function sets the language, clock and tuner
channels automatically.
1. Select a language for the Setup menu and on-
screen display. Use v / V to select a language
then press ENTER.
2. Please check your antenna connections.
Press ENTER to move next step.
3. Use v / V to select the Clock Set option then
press ENTER.
[
Auto]: When Channel auto search is completed
the actual Time and Date are also set
automatically. (See “Auto Clock Set” on page 20.)
[
Manual]:
Enter the necessary information for
date and time.
b / B (left/right): Moves the cursor to the
previous or next column.
v / V (up/down): Changes the setting at the
current cursor position.
Press ENTER to confirm your setting.
4. Press ENTER while [Start] option is selected.
The tuner will automatically cycle through all
available channels in the area and place them in
the tuner’s memory.
You can skip the analog channel scanning by
pressing B.
5. Press ENTER to finish the setup.
L
R
VIDEO
OUTPUT
AUDIO
OUTPUT
Jack panel of Accessory Component
(VCR, Camcorder, etc.)
Front of the recorder
DV Digital Camcorder
Front of the recorder
DV
IN/OUT

17
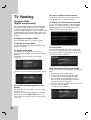
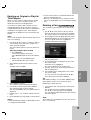
Using the Home Menu
From the Home Menu screen you can access all the
Media for playback and recording of the recorder.
1. Press HOME to display the Home Menu screen.
2. Use the b / B buttons to select a main option you
want. Sub options appears.
3. Use the v / V and ENTER buttons to select the
sub option you want.
4. To exit the HOME menu, press HOME or
RETURN (O).
TV
TV: Returns to live TV viewing.
Timer Record: Displays [Timer Record List] menu.
(See page 45)
MOVIE
HDD: Displays the Title List menu for HDD. (
page
50)
HDD DivX: Displays the [Movie List] menu for HDD.
(page 35)
DISC:
- Displays Title List menu for recordable disc
(page 50)
- Displays [Movie List] menu for DivX disc.
(page 35)
- Plays Video CD or DVD-Video disc (page 31-34).
PHOTO (See page 38)
HDD: Displays [Photo List] menu for HDD.
DISC: Displays [Photo List] menu for disc.
MUSIC (See page 36)
HDD: Displays [Music List] menu for HDD.
DISC: Displays [Music List] (or Audio CD) menu for
disc.
SPECIAL
Rec Mode: Displays the menu to select the record
mode. (See page 24)
SETUP (See page 17)
Start: Displays Setup menu.
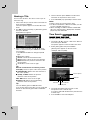
Initial Settings
In this menu system, there are several ways to
customize the settings provided. Most menus consist
of three levels to set up the options, but some require
greater depth for the variety of settings.
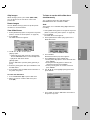
General Operation
1. Press HOME and select [Setup] option.
2. Select [Start] option then press ENTER.
The Setup menu appears.
3. Use v / V to select the desired option.
4. While the desired item is selected, press B to
move to the second level.
5. Use v / V to select the second desired option.
6. Press B to move to the third level.
7. Use v / V to select the desired setting then press
ENTER to confirm your selection.
Some items require additional steps.
8. Press RETURN (O) repeatedly to exit the Setup
menu.
Note:
Press b to go back to the previous level.
Hookup and
Settings

18
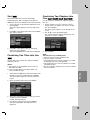
General Settings
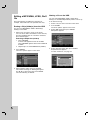
Auto Programming
This recorder is equipped with a frequency
synthesized tuner capable of receiving up to 88
analog channels and 500 digital channels.
Preparation:
Connect the recorder to the desired type of antenna,
as shown in Connecting to the Antenna on page 11.
Note:
Password is needed to access the [Auto Programming]
option if [Lock System] option is set to [On].
1. Select the [Auto Programming] option.
2. Press B to move to the third level.
[Start] icon is highlighted.
3. Press ENTER to begin the channel search.
The tuner will automatically cycle through all
available channels in the area and place them in
the tuner’s memory.
You can skip the analog channel scanning by
pressing B.
Note:
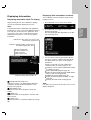
If you skip the Auto Setup menu and access the
Setup menu for the first time, you can only set the
[Auto Programming] option. You can set the other
options after finishing [Auto Programming].
Manual Channel Add
This feature manually adds channels.
Note:
Password is needed to access the [Add Channel]
option if [Lock System] option is set to [On].
1. Select the [Program Edit] option then press B .
2. Use v / V to select the [Add Channel] option then
press ENTER.
3. Use v / V to select [Analog] for analog channel or
[Digital] for digital channel then press B.
4. Use v / V to select a channel number.
Searches for a channel automatically.
Searching stops when the recorder tunes in a
channel.
5. Press ENTER to add the channel.

19
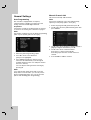
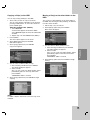
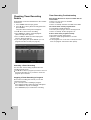
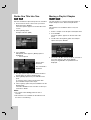
Program Edit
You can edit a channel manually (name, move, etc.).
Note:
Password is needed to access the [Program Edit]
option if [Lock System] option is set to [On].
1. Select the [Program Edit] option then press B .
2. Use v / V to select the [Edit] option then press
ENTER.
The Program List menu appears.
3. Use v / V to select a PR number then press
ENTER.
4. Use v / V to select the program option then press
ENTER.
[Favorite] Set the program to favorite channel.
[Delete] Disables a program position you do not
need.
[Move] (Analog channel only) Sorts the program
positions on the Program List.
[Block] Blocks the program.
[Station Rename] Changes the station name.
The display for entering characters appears.
To enter characters, see page 54.
[Program Edit] (Analog channel only) Sets the
analog channel manually.
5. Press RETURN (O) repeatedly to exit Program
List menu.
Switching the program list to DIGITAL TV,
ANALOG TV, or RADIO
1. Press v to move the highlight position to top of the
program list.
2. Press b / B to select a [DIGITAL TV],
[ANALOG TV], or [RADIO].
Selected program list appears.
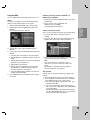
Setting a favorite program
You can set a program to favorite channel with genre.
1. Press v / V to select a program then press
ENTER.
2. Press v / V to select [Favorite] option then press
ENTER. The genre choice menu will appear.
3. Select a genre then press ENTER. The program is
set to the favorite program with genre.
Tip:
You can modify User 1 and User 2 genre.
Select User 1 or User 2 then press red color
button.
The display for entering characters appears.
To enter characters, see page 54.
AV1 Decoder
Sets the AV1 scart jack for inputting encoded video
signals.
1. Press AV while the Program List menu appears.
2. Press ENTER so [Canal+] appears on the display.
Press ENTER again to turn off the setting.
Off: Inputs the signals from the AV1 scart jack.
Normally select this.
On: The encoded video signal input from the
AV1 scart jack is output to the AV 2 (DECODER)
jack for decoding.
The decoded signal is then input back through
the AV 2 (DECODER) jack so you can record or
view PAY-TV/Canal Plus programs.
Hookup and
Settings

20
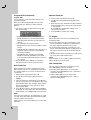
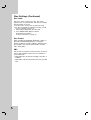
Program Edit (Continued)
Program Edit
You can perform a search to select and store TV
channels manually.
When you select [Program Edit] in step 4 on the
previous page, the display for setting channels
appears.
1. Use b / B to select the item and press v / V to
change the setting.
[PR] indicates the selected program position.
[Seek] Searches for a channel automatically.
Searching stops when the recorder tunes in a
channel.
[Ch.] Changes the channel number.
[MFT] Fine tunes the channel to obtain a clearer
picture.
[CANAL] Sets the channels for the decoder. You
need this setting to watch or record PAY-TV/
Canal Plus programs.
[NICAM] Sets the channels for the NICAM
broadcast. Normally, [NICAM] is set to [ON].
If the sound from NICAM broadcast is not clear,
set to [OFF].
2. Choose OK then press ENTER to confirm the
setting and returns to the Program List menu.
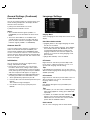
Auto Clock Set
When Channel auto search is completed the actual
Time and Date are also set automatically. If the time in
the recorder display is not correct, the clock must be
set manually.
1. Select [Clock set] option then press B.
2. Use v / V to select [Auto] option then press
ENTER.
3. If the clock that has automatically set is different
with your local clock, you can add more time using
[Time Offset] option. (For example, when summer
time is started in local area.) Press B to select
[Time Offset] option.
4. Press v / V to select a value then press ENTER
(0, 30, 60, 90, 120). Select “0” if the clock that has
automatically set is identified with your local clock.
Note:
There are cases where the TV station does not send,
or sends wrong date and/or time information and the
recorder sets the incorrect time.
If this happens, we recommend that you set the clock
manually.
Manual Clock Set
1. Select [Clock set] option then press B.
2. Use v / V to select [Manual] option then press
ENTER.
3. Enter the necessary information for date and time.
b / B (left/right): Moves the cursor to the previous
or next column.
v / V (up/down): Changes the setting at the
current cursor position.
4. Press ENTER to confirm your setting.
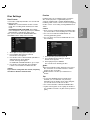
TV Aspect
Selects the aspect ratio of the connected TV (4:3
standard or wide).
[Letter Box] Select this when connecting to a 4:3
screen TV. Displays a wide picture with bands on
the upper and lower portions of the screen.
[Pan Scan] Select this when connecting to a 4:3
screen TV. Automatically displays a wide picture on
the entire screen and cuts off the portions that do
not fit.
[16:9] Select this when connecting to a wide-screen
TV or TV with a wide mode function.
Note:
If the resolution is set to 720p or 1080i, [TV Aspect]
will be disable in the setup menu.
AV2 Connection
You can connect a decoder or other device to the
AV 2 (DECODER) socket on the back.
[Decoder] Select [Decoder] if you connect the
recorder’s AV 2 (DECODER) jack to a PAY-TV or
Canal Plus decoder.
[Others] Select [Others] if you connect the
recorder’s AV 2 (DECODER) jack to a VCR or
similar recording device.
Page is loading ...
Page is loading ...
Page is loading ...
Page is loading ...
Page is loading ...
Page is loading ...
Page is loading ...
Page is loading ...
Page is loading ...
Page is loading ...
Page is loading ...
Page is loading ...
Page is loading ...
Page is loading ...
Page is loading ...
Page is loading ...
Page is loading ...
Page is loading ...
Page is loading ...
Page is loading ...
Page is loading ...
Page is loading ...
Page is loading ...
Page is loading ...
Page is loading ...
Page is loading ...
Page is loading ...
Page is loading ...
Page is loading ...
Page is loading ...
Page is loading ...
Page is loading ...
Page is loading ...
Page is loading ...
Page is loading ...
Page is loading ...
Page is loading ...
Page is loading ...
Page is loading ...
Page is loading ...
Page is loading ...
Page is loading ...
Page is loading ...
Page is loading ...
Page is loading ...
Page is loading ...
Page is loading ...
-
 1
1
-
 2
2
-
 3
3
-
 4
4
-
 5
5
-
 6
6
-
 7
7
-
 8
8
-
 9
9
-
 10
10
-
 11
11
-
 12
12
-
 13
13
-
 14
14
-
 15
15
-
 16
16
-
 17
17
-
 18
18
-
 19
19
-
 20
20
-
 21
21
-
 22
22
-
 23
23
-
 24
24
-
 25
25
-
 26
26
-
 27
27
-
 28
28
-
 29
29
-
 30
30
-
 31
31
-
 32
32
-
 33
33
-
 34
34
-
 35
35
-
 36
36
-
 37
37
-
 38
38
-
 39
39
-
 40
40
-
 41
41
-
 42
42
-
 43
43
-
 44
44
-
 45
45
-
 46
46
-
 47
47
-
 48
48
-
 49
49
-
 50
50
-
 51
51
-
 52
52
-
 53
53
-
 54
54
-
 55
55
-
 56
56
-
 57
57
-
 58
58
-
 59
59
-
 60
60
-
 61
61
-
 62
62
-
 63
63
-
 64
64
-
 65
65
-
 66
66
-
 67
67


Ask a question and I''ll find the answer in the document
Finding information in a document is now easier with AI
Related papers
Other documents
-
LG Electronics RH2T80 User manual
-
Philips DVDR520H/37 User manual
-
-
-
-
Sanyo DVR-H200UK User manual
-
Toshiba RD-XS32SU Owner's manual
-
-
Akai ALED2202 User manual
-
Funai HD-B2785 Owner's manual