Page is loading ...

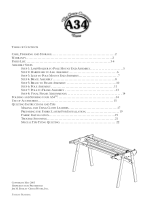
The A3-TFK
TM
The 3-rail, no-baste GraceFrame
TM
that Tilts, Folds–and you build it yourself
Materials Needed:
HARDWARE:
Mat

erials Needed (con’t):
LUMBER:
We suggest using 1 x 4 pine or Douglas Fir. However, if you have a planer and a table saw any wood
may be used. Review that pattern before purchase wood to make sure you get wood that is wide and long enough for
the parts needed. If using dimensioned wood (1x4) you will need approximately six 8-ft. lengths. If using
hardwood, you will need approximately 20 board feet (based on a 96" width frame–exact board feet and maximum
length needed depends on length of brace). Choose the straightest material available by looking down the length of
the wood. (NOTE: 1x4 wood actually measures 3/4" x 3 ½")
RAILS:
You may select stair railing for rails and simply cut them to length. For material less likely to warp, you
may select additional 1x4 wood ripped in half, and glue them together (allow at least 1 hour dry time). You may
also use 2x4 ripped in half for rails.
NOTE:
For your added convenience, the complete packet of hardware is available at the Grace Company. To order,
you can go online to www.graceframe.com.
Tools Needed (remember to always use safety glasses; consult the manuals of all machinery you use):
BASIC FRAME (approx. assembly time 4-6 hours:)
Saw–Hand, Power (Suggested) or Table (Preferred)
Drill–Hand, Power (Suggested) or Stationary (Preferred)
Drill Bits: 5/16" and 3/8"
Phillips Screw Driver
Pliers
Wood Glue
WOOD JOINTER FRAME (Advanced) (approx. assembly time 5-8):
Plate Jointer
All the above mentioned Tools
Stain/Finish Tip
:
You may choose to use your frame finished or unfinished. If you choose to stain or finish the wood, it is best to do
so after cutting and sanding but before assembling. Danish oil or Tung oil are good sealing agents that don’t come
off on fabric when given enough time to dry.
A3-TFK
TM
Assembly Instructions
Step 1: Determine Style of Frame
Determine which style of frame to build (Basic or Wood Jointer version). The pattern shows dotted or
dashed lines for Wood Jointer/Biscuit cuts.
Step 2: Cut Out the Pattern
Cut out the patterns provided and either tape them to the 1x4's using double-sided tape, or trace them
onto the wood and mark the center of the drill points.
Step 3: Cut Parts
Carefully cut all the parts except for the brace. This will be cut once the frame is assembled.
Step 4
: Making and Sizing the Rails
Choose the size of quilt that your frame will accommodate and cut rails to the corresponding length. If
you have chosen to use stair railing you only need to cut them to length. If you have chosen to glue two
pieces of wood together, you can use a 1x4 ripped in half. This method reduces the chance of the rail
warping. A 2x4 ripped in half is another source for a square rail.
Step 5: Cut Rail Tenons
Cut the tenons on the rails. Trace the tenon pattern (See diagrams on Pattern) onto the end of the rail.
Make a ¾” deep cut at each traced line. Then make a perpendicular cut to remove the unneeded pieces
of wood leaving only the tenon.
Step 6
: Drill Through-Holes
Drill all the through holes in the frame parts.
Step 7: Drill Wood Insert Holes
Drill the ½” deep holes in the frame parts.
Note: To ensure you are drilling the correct depth, measure ½”
from the tip of the drill bit and wrap a piece of tape around the bit. Only drill until the tapeline meets the surface
of the wood.

Step 8: Drill Rail Holes
Drill the ends of the rails. The
holes should be at least 1 ½"
deep. Note: Rotating the rail as
you drill can help you keep the
bit straight as it goes into the
wood. The straighter the hanger
bolts the better the rails roll once mounted on the
frame. Put a few drops of glue in the hole and install
the hanger bolts in with pliers (twist them in until all bigger threads are in
the hole).
Step 9: Cog Wheels to Rails
Line up the rails as if you were at the front of the
frame (wheels are on the right end of rail). Slide on
the cog wheels so that the rail closest to you has the
cog wheel teeth going away from you. The back
two rails will have the teeth going toward you.
Step 10: Cog Stop Inserts and Stops
Screw in (or knock in) the cog stop inserts into the
three ½" holes drilled into the Right Rail Mount
End.
Step
11: Joining frame parts
Basic Frame: Line up the frame legs, Top
Sections, and Bottom Sections and screw
them together. Note: We suggest you pre-
drill and counter sink the holes for the
grabber screws. Wood Jointer Frame: Make
biscuit cuts and insert biscuits and parts
together.
Step 12: Legs to Sides
Line up and connect the Pivot Boards to the Top Sections.
Pre-drill and countersink the wood screws on hinges (see
below).

Step 13: Hinge to Legs
Remove the bolts from the other set of hinges. Mount half of the hinge on each
leg as pictured.
Note: The hinge pin’s shaft should be ground near the head (about 1" down) so it
can easy be removed by hand. This will allow the brace to be removed easily so
the frame can be folded and stored (see top next page).
Step 14: Pole Assembly
Assemble the poles to the pole mount
ends. Put the rail hanger bolts through the sides and put on the
lock nuts (see right).
Step 15: Pole
Assembly to
Frame
Join the pole
assembly to the frame sides with the two
carriage bolts. Bolt on the pivot stop to the
desired tilt setting.
Step16
: Brace Measurement
Straighten legs and measure the distance
between the hinges on the legs for the brace.
Step 17: Cut brace.
Step 18: Mount Brace Hinges
Mount the remaining halves of the hinges to either end of the brace.
Step 19: Install Brace
Put the brace on by inserting
the hinge bolt after it has been
ground.
Your frame should now be
complete!
/