Tripp Lite Single-Phase Online Rack UPS Owner's manual

Category
Uninterruptible power supplies (UPSs)
Type
Owner's manual

This manual is also suitable for

SU750RTXLCD2U
SU1000RTXLCD2U
SU1500RTXLCD2U
SU2200RTXLCD2U
SU3000RTXLCD3U
Quick
Start Guide—
Page 10
1
Owner’s Manual
SmartOnline
Single-Phase Rackmount Online UPS Systems
with Built-in LCD Monitoring & Control Screen
Not suitable for mobile applications.
1111 W. 35th Street, Chicago, IL 60609 USA www.tripplite.com/support
Copyright ©2013 Tripp Lite. All rights reserved. SmartOnline™ is a trademark of Tripp Lite. For latest updates, please visit www.tripplite.com
1. Overview 2
Parts List 2
Additional Accessory Options 2
Model Specific Accessories 2
2. Important Safety Instructions 3
3. Installation 4
Rack Mounting 4
Tower Mounting 6
4. Features 7
Front Panel Controls 7
Rear Panel Features 8
5. Basic Connection and Start-Up 10
Quick Start Guide 10
Optional Connections 11
6. Operation 13
Modes of Operation 13
LCD Informational Screens 16
UPS Setup Overview 18
Using PowerAlert 18
Using Front Panel LCD Interface 18
7. Troubleshooting 25
8. Internal Battery Replacement 26
9. Storage and Service 30
10. Warranty Registration 30
Español 31
Français 61
Warranty
Registration:
register online today for a
chance to win a FREE Tripp Lite
product—www.tripplite.com/warranty
NOTE: External battery pack options require configuration using front panel LCD interface or via Tripp Lite’s EXTERNAL BATTERY CONFIGURATION software.
See page 23 for more information if you are connecting external batteries to this UPS.
13-11-176-93-3156.indb 1 11/27/2013 4:24:32 PM
2
Overview
Tripp Lite SmartOnline Rackmount UPS Systems with interactive LCD interface feature online, double-conversion UPS protection with full-
time sine wave output and zero transfer time suitable for all advanced networking applications. Each system provides long running
battery support with optional extended-run and SNMP/Web communications ability. Built-in interfaces include USB, DB9 serial and
Emergency Power Off (EPO). The interactive front panel LCD screen provides detailed UPS status, preset and control options. An optional
economy mode setting reduces power consumption and BTU heat output.
Parts List
UPS System Bolt-on mounting ears (2) 4-post rail kit* PowerAlert CD
USB Cable EPO (RJ11) Cable RS-232 Cable Owner’s manual
*Note: 3kVA (3U) models will include a different 4-post rail kit than the one shown.
Additional Accessories (All Models; Optional)
•SNMPWEBCARD:InternalnetworkinterfacecardforSNMP/Webcontrolandmonitoring
•ENVIROSENSE:Temperature/HumiditysensorforusewithSNMPWEBCARD
•SRSWITCH:RackdoorsensorforusewithENVIROSENSEandSNMPWEBCARD
•RELAYIOCARD:ProgrammableRelayI/OCardforremoteUPSmonitoring
•2-9USTAND:SupportsrackmountUPSandbatterypacksinuprighttowerconfiguration(notforSU3000RTXLCD3U)
Model Specific Accessories (Optional)*
UPS Model SU750RTXLCD2U SU1000RTXLCD2U SU1500RTXLCD2U SU2200RTXLCD2U SU3000RTXLCD3U
External Battery Packs
(LIMIT 1)**
BP24V15RT2U BP24V15RT2U BP48V24-2U BP48V24-2U BP72V15-2U
External Battery Packs
(NO LIMIT)**
BP24V70RT3U BP24V70RT3U BP48V60RT3U BP48V60RT3U BP72V28RT3U
Hot-swap PDU System
PDUB15 PDUB15 PDUB15 PDUB20 PDUB30
2 Post Rackmount Kit
2POSTRMKITWM 2POSTRMKITWM 2POSTRMKITWM 2POSTRMKITWM 2POSTRMKITHD
5 Year Extended
Warranty
WEXT5-500-1500 WEXT5-500-1500 WEXT5-500-1500 WEXT5-2200-3000 WEXT5-2200-3000
*Visit the specification page for your UPS system at www.tripplite.com for detailed extended runtime data and additional accessory options.
** Note: External battery pack options require configuration using front panel LCD interface or via Tripp Lite’s EXTERNAL BATTERY CONFIGURATION software. See page 23 for
more information if you are connecting external batteries to this UPS.
13-11-176-93-3156.indb 2 11/27/2013 4:24:33 PM
3
Important Safety Instructions
SAVE THESE INSTRUCTIONS
This manual contains instructions and warnings that should be followed during the installation, operation and storage of all
Tripp Lite UPS Systems. Failure to heed these warnings may affect your warranty.
UPS Location Warnings
•InstallyourUPSindoors,awayfromexcessmoistureorheat,conductivecontaminants,dustordirectsunlight.
•Forbestperformance,keeptheindoortemperaturebetween32ºFand104ºF(0ºCand40ºC).
•LeaveadequatespacearoundallsidesoftheUPSforproperventilation.
Do not mount unit with its front or rear panel facing down (at any angle). Mounting in this manner will seriously inhibit the
unit’s internal cooling, eventually causing product damage not covered under warranty.
UPS Connection Warnings
•ConnectyourUPSdirectlytoaproperlygroundedACpoweroutlet.DonotplugtheUPSintoitself;thiswilldamagetheUPS.
•DonotmodifytheUPS'splug,anddonotuseanadapterthatwouldeliminatetheUPS’sgroundconnection.
•DonotuseextensioncordstoconnecttheUPStoanACoutlet.YourwarrantywillbevoidedifanythingotherthanTrippLitesurge
suppressors are used to connect your UPS to an outlet.
•IftheUPSreceivespowerfromamotor-poweredACgenerator,thegeneratormust
provide clean, filtered, computer-grade output.
•ThemainssocketoutletthatsuppliestheUPSshouldbeneartheUPSandbeeasilyaccessible.
•ToremoveACvoltagefromtheUPS,pulltheplugfromthesocketoutlet.
Equipment Connection Warnings
•Useofthisequipmentinlifesupportapplicationswherefailureofthisequipmentcanreasonablybeexpectedtocausethefailureof
the life support equipment or to significantly affect its safety or effectiveness is not recommended. Do not use this equipment in the
presence of a flammable anesthetic mixture with air, oxygen or nitrous oxide.
•DonotconnectsurgesuppressorsorextensioncordstotheoutputofyourUPS.ThismightdamagetheUPSandmayaffectthesurge
suppressor and UPS warranties.
•ConnecttheUPStoanoutletthatisadequatelyprotectedagainstexcesscurrents,shortcircuitsandearthfaults,aspartofthe
building installation. The outlet protection for the UPS should be in series with the mains input.
Battery Warnings
• Batteriescanpresentariskofelectricalshockandburnfromhighshort-circuitcurrent.Observeproperprecautions.Donotdisposeofthe
batteries in a fire. Do not open the UPS or batteries. Do not short or bridge the battery terminals with any object. Unplug and turn off the
UPS before performing battery replacement. Use tools with insulated handles. There are no user-serviceable parts inside the UPS. Battery
replacement should be performed only by authorized service personnel using the same number and type of batteries (Sealed Lead-Acid). The
batteries are recyclable. Refer to your local codes for disposal requirements or visit www.tripplite.com/UPSbatteryrecycling for recycling
information. Tripp Lite offers a complete line of UPS System Replacement Battery Cartridges (R.B.C.).Visit Tripp Lite on the Web at www.
tripplite.com/support/battery/index.cfm to locate the specific replacement battery for your UPS.
•Note:ExternalbatterypackoptionsrequireconfigurationusingfrontpanelLCDinterfaceorviaTrippLite’sEXTERNALBATTERY
CONFIGURATION software. See page 23 for more information if you are connecting external batteries to this UPS.
13-11-176-93-3156.indb 3 11/27/2013 4:24:33 PM
A
B
C
D
F
E
B
B
1
4
3
2
G
4
Installation
Rack Mounting
Mount your equipment in either a 4-post or 2-post rack or rack enclosure (see next page for 2-post mounting). The user must determine
the fitness of hardware and procedures before mounting. If hardware and procedures are not suitable for your application, contact the
manufacturer of your rack or rack enclosure. The procedures described in this manual are for common rack and rack enclosure types
and may not be appropriate for all applications.
4-Post Mounting (3U Units)
All UPS models include hardware required to mount in a 4-post square-hole rack. All models include an adjustable rackmount shelf kit to
provide support.
1
Connect the two segments of each shelf
A
using the included
screws and nuts
B
. Leave the screws slightly loose so that the
shelves can be adjusted in the next step.
2
Adjust each shelf to fit your rack, then mount them in the
lowest available space of your rack with the screws, nuts and
washers provided
C
. Note that the support ledges should face
inward. Tighten the screws that connect the shelf segments
B
.
3
Attach mounting ears
D
to the front mounting holes of your
UPS
E
using the screws provided
F
. The ears should face
forward.
4
Using an assistant if necessary, lift your UPS and slide it onto
the mounting shelves. Attach your UPS to the rack by using the
appropriate hardware
G
through its mounting ears and into the
rack rails. (For 3U installation, user-supplied cage nuts are also
required.) Tighten all screws securely.
13-11-176-93-3156.indb 4 11/27/2013 4:24:36 PM
E
D
G
G
F
1
2
3
4
A
B
B
A
C
C
5
Installation
4-Post Mounting (2U Units)
1
The included plastic pegs
A
will temporarily support the empty
rackmount shelves
B
while you install the permanent
mounting hardware. Insert a peg into the third hole from the
top on the front end of each bracket. On the rear end, insert a
peg into the center hole. (Each front bracket has 6 holes and
each rear bracket has 5 holes.) The pegs will snap into place.
After installing the pegs, expand each shelf to match the depth
of your rack rails. The pegs will fit through the square holes in
the rack rails to support the shelves. Refer to the rack unit
labels to confirm that the shelves are level in all directions.
Note: The support ledge of each shelf must face inward.
2
Remove the pegs at the front end of each bracket. Secure the
shelves
B
to the mounting rails permanently using the
included screws and cup washers
C
as shown. Place 2 screws
at the front of each rail (4 total) and 2 screws at the back of
each rail (4 total). Tighten all screws before proceeding. Note:
The rear pegs can be left in for installation, but the front ones
must be removed before the bracket is secured by screws.
WARNING!
Do not attempt to install your UPS until you have
inserted and tightened the required screws. The plastic
pegs will not support the weight of your UPS.
3
Attach your UPS’s mounting brackets
D
to the forward
mounting holes
E
of the UPS using the included hardware
F
.
The mounting bracket “ears” should face forward.
4
With the aid of an assistant (if necessary), lift your UPS and
slide it into the shelves. Attach the UPS mounting brackets to
the forward mounting rails with user-supplied screws and
washers
G
. Tighten all screws securely.
13-11-176-93-3156.indb 5 11/27/2013 4:24:39 PM
6
Installation
2-Post Mounting
If you mount 2U UPS models in 2-post racks, they require the addition of a Tripp Lite 2-Post Rackmount Installation Kit (model:
2POSTRMKITWM,soldseparately).3UUPSmodelscanalsobemountedin2-postracks,butrequiretheadditionof2POSTRMKITHD
(sold separately). See Installation Kit owner’s manual for installation procedure.
Tower Mounting (750-2200VA Models Only)
Your UPS can be mounted in an upright tower position with
optional base stands sold separately by Tripp Lite (Model #
2-9USTAND). When mounting the UPS on adjustable base stands,
make sure that the control panel is toward the top. The control
panel may be rotated to make it easier to read. Insert a small
screwdriver or similar tool in the slots on either side of the panel,
pop it out, rotate it, and pop it back into place as shown. Front
panel setup should be operated by service personnel only.
WARNING!
All UPS systems are extremely heavy. Use caution when
lifting and mounting. User must properly stabilize the UPS
when lifting and mounting.
Note: SU3000RTXLCD3U cannot be tower-mounted. Doing so will inhibit the UPS
system’s internal cooling.
Model
SU750RTXLCD2U,
SU1000RTXLCD2U SU1500RTXLCD2U SU2200RTXLCD2U SU3000RTXLCD3U
UPSDimensions(HxWxDin.) 3.5 x 17.5 x 13.5 3.5 x 17.5 x 19 3.5 x 17.5 x 19 5.25 x 17.75 x 26
UPSDimensions(HxWxDcm.) 8.8 x 44.4 x 34.3 8.8 x 44.4 x 48.3 8.8 x 44.4 x 48.3 13.3 x 45 x 66
Operating Altitude: 0 to 3000 m (0 to 10,000 ft.)
EXTERNAL BATTERY CONFIGURATION NOTE
If external battery packs are to be used with this UPS, install them following the mounting/installation documentation included with each
battery pack. External battery pack installation requires the UPS be configured one of two ways:
1. Via the UPS front panel LCD interface
2. Via Tripp Lite’s EXTERNAL BATTERY CONFIGURATION software
This UPS is factory programmed with discharge curves and charging profiles for two basic external battery pack configurations accessible
using the UPS front panel LCD interface. Additional battery pack options using larger or multiple external battery packs are also
supported, but require configuration using Tripp Lite’s EXTERNAL BATTERY CONFIGURATION software and a serial port connection to the
UPS. See page 23 to determine which method applies to your external battery pack configuration.
13-11-176-93-3156.indb 6 11/27/2013 4:24:40 PM
10
12
1
2
3
4
5
7
6
8
9
11
7
Features
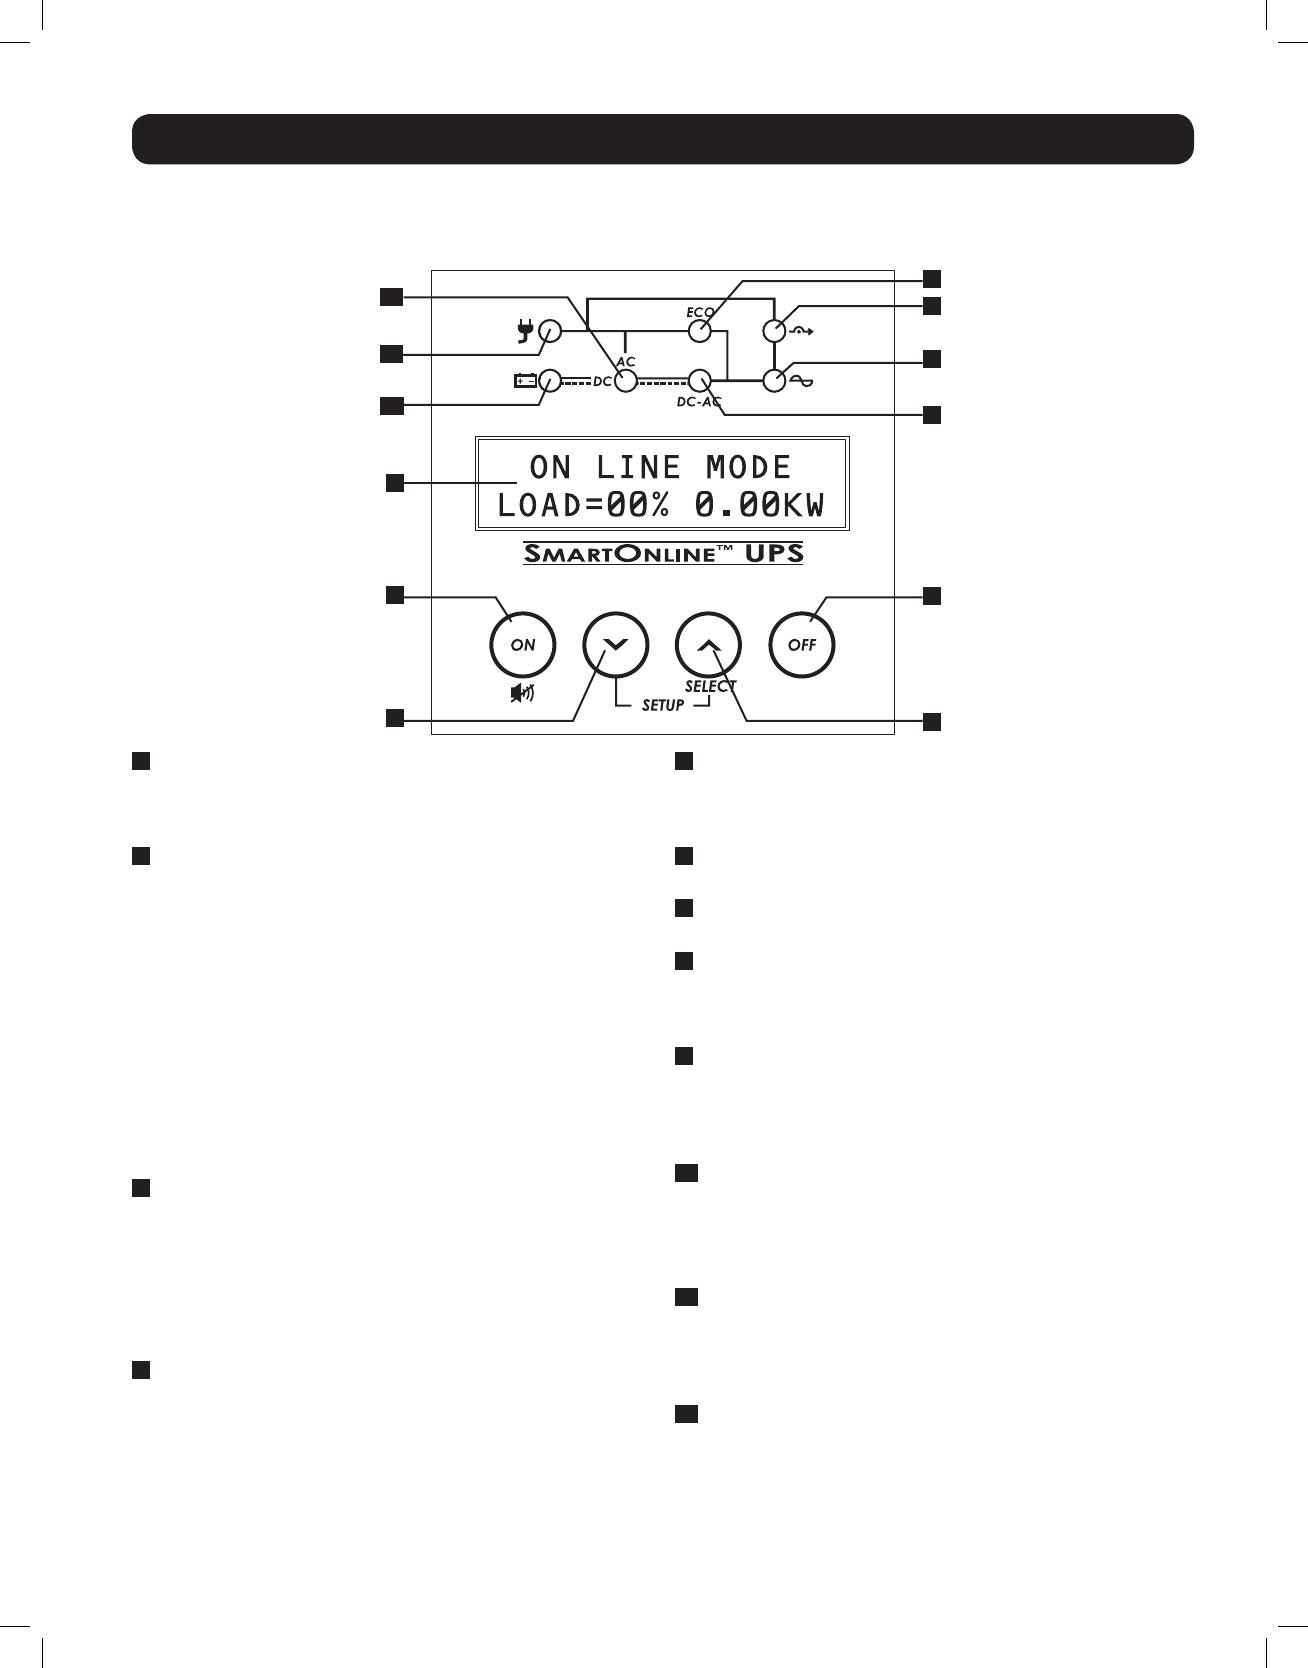
Before installing and operating your UPS, familiarize yourself with the locations and function of the features of each component.
Front Panel Controls, LEDs and LCD Screen
1
LCD Screen: This backlit (16x2 character) dot matrix display
indicates a wide range of UPS operating conditions and
diagnostic data. It also displays UPS settings and options when
viewing the UPS Setup screens.
2
ON/MUTE/TEST Button: This button offers 3 main functions
depending on the state of the UPS when it’s pressed: Power-on
control, alarm-cancel and self-test.
•ToturntheUPSoninONLINEMODE,pressandholdthis
button as the UPS is connected to a live outlet until a beep
is heard, then release.
•To“coldstart”theUPSoninONBATTERYMODEduringa
utility power failure, press and hold this button as the UPS is
off until a beep is heard, then release.
•PressthisbuttonduringapowerfailuretoMUTEtheaudible
alarm. Alarm will re-sound to indicate low-battery.
•ToperformaSELFTEST,astheUPSisoperatingnormallyin
on-line or economy mode, press and hold this button until a
beep is heard, then release.
3
Scroll Down/Exit Setup Button: This button allows you to
browse through different operating conditions and options on
the LCD display. Momentarily pressing it causes the LCD screen
to display a different operating condition (see Operation section
for details). Pressing this button and the SCROLL UP button
simultaneously for 3 seconds will launch a series of setup
screens. During setup operation, this button is used to scroll
through setup options and select setup options.
4
Scroll Up/SELECT Button: This button allows you to browse
through different operating conditions and options on the LCD
display. Momentarily pressing it causes the LCD screen to
display a different operating condition (see Operation section
for details). Pressing this button and the SCROLL DOWN button
simultaneously for 3 seconds will launch a series of setup
screens. During setup operation, this button is used to scroll
through setup options and select setup options.
5
OFF Button: Press this button until you hear a beep and see
the confirmation message on the LCD display (“Turn OFF UPS:
Y/N”). Then, press the SCROLL UP button to turn the UPS
system’s inverter OFF.
6
Output LED: This green LED will illuminate to indicate that
your UPS is supplying AC power to connected equipment.
7
DC/AC (Inverter) LED: This green LED will illuminate to
indicate that the UPS’s DC/AC inverter is activated.
8
Bypass LED: This yellow LED will flash when the UPS is
providing filtered mains power without engaging its converter or
inverter. If this LED is flashing, connected equipment will not
receive battery power in the event of a blackout.
9
ECO (Economy Mode) LED: This green LED will illuminate to
indicate that your UPS is operating in Economy Mode. If this
LED is lit, the equipment is supplied by filtered main power. The
inverter will be active during a blackout or brownout and will
supply continuous AC power to the equipment.
10
AC/DC (Converter) LED: This green LED will illuminate to
indicate that the UPS’s AC/DC converter is activated while AC
power is available.
Note: This LED will also illuminate to indicate that the UPS’s DC/DC converter is
activated while battery is discharged to provide connected equipment with AC
power.
11
Battery LED: This green LED will illuminate when the UPS is
discharging the battery to provide connected equipment with
AC power. When lit, an alarm will sound which can be silenced
by pressing the ON/MUTE button. This LED will remain lit after
the alarm is silenced.
12
Input LED: This green LED will illuminate to indicate AC input
supply is present and in good condition. It will flash if the AC
input supply is out of acceptable bypass range.
13-11-176-93-3156.indb 7 11/27/2013 4:24:40 PM
1
2
3
4
5
6
7
89
1
2
3
4
5
6
89
1
3
4
5
6
89
13
4
5
6
8
9
7
7
7
2
10
2
8
Features
Rear Panel Features
Note: The descriptions for these images are on the following page.
SU750RTXLCD2U and SU1000RTXLCD2U
SU1500RTXLCD2U
SU2200RTXLCD2U
SU3000RTXLCD3U
13-11-176-93-3156.indb 8 11/27/2013 4:24:41 PM
9
Features
1
Input Cord: This permanently attached power cord connects your UPS to a power outlet.
2
AC Receptacles (Varies by Model): These output receptacles provide connected equipment with pure sine-wave AC output during
normal operation and battery power during blackouts and severe brownouts. Power provided at these outlets is filtered to protect
connected equipment against damaging surges and line noise. The receptacles are divided into numbered load banks, as labeled on
the unit. Using PowerAlert software and cabling, load banks one and two may be individually turned off and on from a remote
location, allowing users to reset or reboot connected equipment.
3
Telephone or Telephone/Network Protection Jacks: These jacks protect your equipment against surges over a telephone line or
telephone/network data line, depending on model. Connecting your equipment to these jacks is optional. Your UPS will work properly
without this connection. Note: Not compatible with PoE (Power Over Ethernet) applications.
4
Communications Ports (USB or RS-232): These ports connect your UPS to any workstation or server. Use with Tripp Lite’s
PowerAlert Software and included cables to enable your computer to automatically save open files and shut down equipment during
a blackout. Also use PowerAlert Software to monitor a wide variety of AC line power and UPS operating conditions. Consult your
PowerAlert Software manual or contact Tripp Lite Customer Support for more information. The 9-pin RS-232 port also supports dry-
contact communications. See USB & RS-232 Serial Communications in the Optional Connections section for installation instructions.
5
EPO (Emergency Power Off) Port: Your UPS features an EPO port that may be used to connect the UPS to a contact closure
switch to enable emergency inverter shutdown. See Optional Installation section for details.
6
Accessory Slot: Remove the small cover panel from this slot to use optional accessories to remotely monitor and control your UPS.
Visit www.tripplite.com to see a full list of accessories, including the SNMPWEBCARD for remote control and UPS monitoring, as well
as a wide variety of network management and connectivity products.
7
Input Circuit Breaker: This resettable breaker prevents high input current from damaging the UPS or the attached load. If this
breaker trips, verify your UPS load before resetting the breaker switch in.
8
External Battery Pack Connector (configuration varies by model): Your UPS supports the use of optional Tripp Lite external
battery packs for additional runtime. See Unit Specific Accessories section under Overview for compatible models and limitations and
LCD Set-Up section under Operation for configuration instructions.
Note: External battery pack options require configuration using front panel LCD interface or via Tripp Lite’s EXTERNAL BATTERY CONFIGURATION software. See page 23 for
more information if you are connecting external batteries to this UPS.
9
Ground Screw: Use this to connect any equipment that requires a chassis ground.
10
Output Circuit Breakers Switches (Select Models Only): These resettable circuit breakers protect your UPS from output
overload. If one or both breakers trip, remove some of the load on the circuit(s) and allow the UPS to cool before pressing the
breaker switch(es) in to reset.
13-11-176-93-3156.indb 9 11/27/2013 4:24:41 PM
  
  
3
Your model may differ.
1
2
 
  
  
  
10
Basic Connection and Start-Up
1
Plug your UPS’s line cord into an electrical outlet.
Your UPS must be connected to a dedicated circuit of sufficient
amperage. Note, however, that select models may be fitted with
different plug types. Refer to the rating table on top of your UPS
for more details on each selectable operating voltage.
Once your UPS is plugged in, all indicator LEDs will flash on
momentarily and the fan will turn on. The LCD display will scroll
two message screens for 2 seconds each:
Note: Until the UPS is connected to a powered AC outlet for the first time, COLD
START (startup in battery mode during a power failure) is not available. See
COLD START LCD setup section (pg. 22) for more information.
Power is not supplied to the UPS outlets in STANDBY mode in
the factory configuration. Bypass output can be enabled in
standby mode via the built-in LCD configuration screens.
2
Plug your equipment into your UPS.
Your UPS is designed to support computer equipment only. You
will overload your UPS if you connect household appliances or
laserprinterstotheUPS'soutlets.
3
Turn your UPS ON:
•Pressthe“ON/MUTE”button
•Holditforseveralsecondsuntilyouhearabeep
•Releaseit
After successful completion of startup diagnostics, your UPS will
begin providing power to its outlets. The INPUT, AC/DC
(converter), DC/AC (inverter) and OUTPUT LEDs will illuminate
and the LCD screen will display:
ON LINE MODE
LOAD= 00% 0.00KW
If you're having trouble turning the UPS on, you may be
pressing the ON button too long. Release the button
"during" the beep (not after it stops).
Note: UPS system will function properly upon initial startup; however, maximum
runtime for the unit’s battery will only be accessible after it has been charged for
24 hours.
Quick Start Guide
Note: External battery pack options require configuration using front panel LCD interface or via Tripp Lite’s EXTERNAL BATTERY CONFIGURATION software. See page 23
for more information if you are connecting external batteries to this UPS.
13-11-176-93-3156.indb 10 11/27/2013 4:24:43 PM
1
Your model may differ.
2a
2b
2c
Your model may differ.
11
Basic Connection and Start-Up
Optional Connections
Your UPS will function properly without these connections.
1
Phone Line or Phone/Network Line Surge Suppression
Your UPS has jacks which protect against surges on a phone
line. Select models feature jacks which also protect against
surges on a network line.* Using appropriate telephone or
network cords connect your wall jack to the UPS jack marked
“IN.” Connect your equipment to the UPS jack marked “OUT.”
MakesuretheequipmentyouconnecttotheUPS'sjacksisalso
protected against surges on the AC line.
* Not compatible with PoE (Power Over Ethernet) applications.
Note: Use the same type of connector for the phone line surge suppression input
and output ports.
2
USB and RS-232 Serial Communications
Use the included USB cable (see
2a
) and/or DB9 serial cable
(see
2b
) to connect the communication port of your computer
to the communication port of your UPS. Install on your
computer the Tripp Lite PowerAlert Software appropriate to your
computer'soperatingsystem.YourUPSmayfeatureadditional
communicationsports;theseportsmaybeconnectedto
additional computers that have PowerAlert Software installed.
Consult your PowerAlert manual for more information.
2c
Dry contact communications are simple, but some
knowledge of electronics is necessary to configure them. The
DB9 port’s pin assignments are shown in the diagram. If the
UPS battery is low, the UPS sends a signal by bridging pins 1
and 5. If utility power fails, the UPS sends a signal by bridging
pins 8 and 5. To shut the UPS down remotely, short pin 3 to
pin 9 for at least 60 seconds.
13-11-176-93-3156.indb 11 11/27/2013 4:24:45 PM
Your model may differ.
4
4-5
3a
3b
Your model may differ.
12
Basic Connection and Start-Up
3
EPO Port Connection
This optional feature is only for those applications that require
connection to a facility’s Emergency Power Off (EPO) circuit.
When the UPS is connected to this circuit, it enables
emergency shutdown of the UPS’s inverter and inhibits transfer
to internal bypass. Using the cable provided, connect the EPO
port of your UPS (see
3a
) to a user-supplied normally closed or
normally open switch according to the circuit diagram (see
3b
).
Note:
1. If using a cable other than what is supplied, the cable should not exceed
350 feet or have a resistance of greater than 10 ohms.
2. If a non-latching EPO switch is used, the EPO must be held for a minimum of
1 second. This does not apply to a latching EPO switch.
CAUTION: The EPO port is not a phone line surge
suppressor; do not connect a phone line to this port.
UPS Unit State when asserting EPO with AC line present:
LEDs Output Fans Serial SNMP USB LCD Screen
OFF OFF ON ON ON ON
“EMERGENCY
POWER OFF”
To restart the UPS unit after asserting EPO with AC line present:
Option 1:
1. Verify that the EPO assertion has been removed or cleared.
2. Press ON button until unit beeps, then release.
3. UPS output will turn back on after it completes diagnostics.
Option 2:
1. Verify that the EPO assertion has been removed or cleared.
2. Remove AC line power to the UPS unit, wait until the LCD is
completely off.
CAUTION: Do not open or mutilate batteries. Released material is harmful to the skin and eyes. It may be toxic. The following
precautions should be observed when working on batteries: Determine if the battery is inadvertently grounded. If inadvertently
grounded, remove the source from ground connection. Contact with any part of a grounded battery can result in electrical shock. The
likelihood of such a shock can be reduced if grounds are removed during installation and maintenance. (This is applicable to
equipment and remote battery supplies that do not have a grounded supply circuit.)
3. Reapply AC line power. Now the UPS will start back up in normal operation mode.
UPS Unit State when asserting EPO without AC line power:
LEDs Output Fans Serial SNMP USB LCD Screen
OFF OFF OFF OFF OFF OFF “EMERGENCY POWER OFF”
To restart the UPS unit after asserting EPO without AC line present:
1. Verify that the EPO assertion has been removed or cleared.
2. Reapply AC line power to the UPS unit. Now the UPS will start back up in normal operation mode.
4
External Battery Connection
Check the Unit Specific Accessories section under Overview for
compatible battery packs and maximum quantities for your UPS
system. Ensure that your battery pack matches the voltage
listed on your UPS battery connector. Adding external batteries
will increase recharge time as well as runtime. See the battery
pack owner’s manual for complete installation and setup
instructions. Make sure cables are fully inserted into their
connectors.Smallsparksmayresultduringbatteryconnection;
this is normal. Do not connect or disconnect battery packs when
the UPS is running on battery power.
IMPORTANT! To calibrate your UPS so that the runtime-
remaining LCD and software information screens
accurately predict runtime with external battery packs
connected, see page 23 for more information if connecting
external batteries to this UPS.
13-11-176-93-3156.indb 12 11/27/2013 4:24:46 PM
  
 
 
 
(FLASHING)
13
Operation
Modes of Operation
ON LINE MODE:
This is the standard operating mode for your UPS. In On-line mode, the UPS provides continuously regulated AC output and recharges
the battery system as needed. If input power becomes unstable, the UPS will automatically maintain sine wave output from battery
reserves.
ON LINE MODE LEDs: AC INPUT, AC/DC, DC/AC & OUTPUT LEDs on. ON LINE MODE LCD SCREEN: Operating mode and UPS load
information
Note: A flashing INPUT LED indicates that input power is available, but is either not stable enough or of the wrong frequency to utilize in a bypass capacity.
ON LINE MODE LCD VIEWING OPTIONS:
When first entering On Line mode, the LCD screen will display load information in percentage and kilowatt units. To display additional
information screens, tap the SCROLL DOWN (“v”) button repeatedly. Additional screens include: Kilowatt hour usage, Kilowatt capacity
remaining, Runtime-remaining in minutes, Battery voltage and charge percentage, Output voltage and frequency, Input voltage and
frequency, Load Power Factor and Load percentage plus kVA capacity.
ON BATTERY MODE:
In this mode, the UPS is providing battery-derived sine wave AC output to connected equipment. Battery mode is an automatic response
to power failure or extreme voltage fluctuation while the UPS is running in on-line or economy modes The UPS can also be cold-started
into Battery mode manually during a power failure by pressing and holding the ON/TEST button (see how-to section). The UPS will
automatically return to on-line or economy modes once mains power is restored and stable. To silence the audible alarm, press the ON/
MUTE button. The alarm will re-sound to warn of low battery conditions. As batteries become fully depleted, the UPS alarm will sound for
5 seconds continuously and AC output will turn off. The front panel LCD will display “OUTPUT OFF/BATTERY LOW” for up to 5 minutes
before automatically turning off.
ON BATTERY MODE LEDs: BATTERY, AC/DC, DC/AC & OUTPUT
LEDs on.
ON BATTERY MODE LCD SCREEN: Operating mode and UPS load
information
ON BATTERY MODE LCD VIEWING OPTIONS:
When first entering ON BATTERY mode, the LCD screen will display load information in percentage and kilowatt units. To display additional
information screens, tap the SCROLL DOWN (“v”) button repeatedly. Additional screens include: Kilowatt hour usage, Kilowatt capacity
remaining, Runtime-remaining in minutes, Battery voltage and charge percentage, Output voltage and frequency, Input voltage and
frequency, Load Power Factor and Load percentage plus kVA capacity.
BYPASS MODE:
BYPASS is an operating mode where the UPS is passing unprocessed input power directly through to the output. BYPASS MODE can
engage on an automatic basis (AUTO-BYPASS) or as an emergency UPS operating mode that maintains output to connected equipment
in case of UPS overload or internal component failure that would otherwise cause connected equipment to lose power. AUTO-BYPASS
MODE operation resulting from sudden UPS overload as the UPS is running in ON LINE MODE will automatically reset, once the output
load is reduced. BYPASS MODE resulting from internal UPS failure may not automatically reset, and if the message persists, users
should contact Tripp Lite for troubleshooting or repair options. Regardless of the cause, the UPS will not provide battery backup anytime
the LCD screen reports BYPASS MODE.
BYPASS MODE is also displayed on the LCD display when the UPS is configured via the LCD STANDBY MODE screen to ENABLE BYPASS
OUTPUT. Once this preference is set, the UPS will scroll BYPASS MODE with loading information and PRESS ON KEY TO TURN UPS ON.
In this mode, the UPS is providing standby mode operation with power at the outputs and the charger is operational, but the UPS will not
provide backup if power fails in this mode.
13-11-176-93-3156.indb 13 11/27/2013 4:24:47 PM
 
 
 
 
(FLASHING)
 
 
14
Operation
BYPASS MODE LEDs: INPUT, BYPASS (flashing) & OUTPUT
LEDs on.
BYPASS MODE LCD SCREEN: Operating mode and UPS load
information*
*Note: When bypass mode is set as a preference in the STANDBY MODE LCD screen, the BYPASS mode screen will alternate between BYPASS MODE with loading information
and PRESS ON KEY TO TURN UPS ON.
STANDBY MODE:
When first connected to a live power source, the UPS will automatically energize in Standby mode. The LCD panel will scroll “STANDBY
MODE / PRESS ON KEY TO START UPS” and the charger will activate as necessary, but there is no UPS output or battery backup support
availableinthismode.ToturntheUPSonfornormaloperation,pressandholdtheONbuttonuntilabeepisheard;theUPSwill
energize after a series of diagnostic tests are completed. To turn the UPS completely off from standby mode, just unplug the UPS from
itspowersource;theUPSwillreportOFFWAITINGandthefanandLCDscreenwillturnoffafterapproximately30seconds.
STANDBY MODE LEDs: INPUT LED on. STANDBY MODE LCD SCREEN (2 messages, 2 sec. each):
•STANDBYMODEandUPSloadinformation
•PRESSONKEYTOTURNONUPS(NotShown)
Note: A flashing INPUT LED indicates that input power is available, but is not stable enough to utilize. Pressing the ON button in standby mode while this LED is
blinking will “cold start” the UPS into battery mode.
STANDBY MODE LCD VIEWING OPTIONS:
When first entering STANDBY mode, the LCD screen will display load information in percentage and kilowatt units. To display additional
information screens, tap the SCROLL DOWN (“v”) button repeatedly. Additional screens include: Kilowatt hour usage, Kilowatt capacity
remaining, Runtime-remaining in minutes, Battery voltage and charge percentage, Output voltage and frequency, Input voltage and
frequency, Load Power Factor and Load percentage plus kVA capacity.
ECONOMY MODE:
Economy mode refers to an optional UPS configuration for reduced power consumption and heat output. A UPS in economy mode
reduces power consumption by suspending the double conversion [AC-to-DC / DC-to-AC] process whenever input power is already of high
enough quality to pass through to connected equipment unchanged. The UPS will automatically switch back to on-line mode if input
power quality deteriorates to ensure that connected equipment receives high quality power under all conditions. See LCD Set-Up section
under Operation for configuration info.
ECONOMY MODE LEDs: INPUT, AC/DC, ECO, OUTPUT LEDs on. ECONOMY MODE LCD SCREEN: Operating mode and UPS load
information
ECONOMY MODE LCD VIEWING OPTIONS:
When first entering ECONOMY mode, the LCD screen will display load information in percentage and kilowatt units. To display additional
information screens, tap the SCROLL DOWN (“v”) button repeatedly. Additional screens include: Kilowatt hour usage, Kilowatt capacity
remaining, Runtime-remaining in minutes, Battery voltage and charge percentage, Output voltage and frequency, Input voltage and
frequency, Load Power Factor and Load percentage plus kVA capacity.
13-11-176-93-3156.indb 14 11/27/2013 4:24:48 PM
 
 
 
 
15
Operation
BATTERY TEST MODE:
To verify battery backup operation of your UPS, you can periodically perform a manual or programmed self-test of the UPS system. To
manually initiate a self-test while the UPS is operating in On-Line or Economy mode, press the ON/MUTE switch until a beep is heard,
then release. The UPS can be configured via the front panel LCD interface for no test, weekly or monthly self-test (factory default
configuration: monthly). Self-test can also be initiated via PowerAlert software at user determined intervals (see PowerAlert software
documentation for more information). When a self-test is run, the UPS will cycle to battery power for approximately 10 seconds and
automatically switch back to AC mode. If a failure mode or low battery condition is encountered, UPS will report “BATTERY FAULT” alarm
message and beep briefly once every two seconds. If the battery is okay, the display will return to the previous menu.
BATTERY MODE LEDs: INPUT, BATTERY, AC/DC, OUTPUT LEDs on. BATTERY MODE LCD SCREEN: BATTERY TEST and UPS load
information
BATTERY TEST MODE LCD VIEWING OPTIONS:
None—for the duration of the battery test the display will report output loading information.
FREQ (FREQUENCY) CONVERTER MODE:
YourUPSiscompatiblewith100-127Vnominalinputvoltageateither50or60Hz.TheUPSwillautomaticallyself-configurefor50Hzor
60Hzoperationbasedonutilitypowerconditionsatstart-upandregulatesoutputpowerwithin±0.05Hzoftheselectedfrequency.The
UPSsystemalsohasanadvancedsettingthatallowscontinuousfrequencyconversionfrom50Hzto60Hzorfrom60Hzto50Hz.
The advanced frequency conversion setting is accessible through the LCD, the included PowerAlert software or the optional
SNMPWEBCARD internal accessory card. When continuous frequency conversion is enabled, the maximum output capacity of the UPS
system is derated by 30%. To set the UPS for frequency conversion, you’ll need to adjust settings on two separate LCD configuration
screens:OUTPUTFREQUENCY(select50or60Hz)andFREQCONVERTER(selectenableordisable).SeeUPSSET-UPMENUoperation
section for instructions on setting these two options. When the UPS is running in FREQ CONVERTER mode, the INPUT LED will blink to
indicate that both AUTOMATIC BYPASS and MANUAL BYPASS operations are not available (since bypass would allow the wrong frequency
to pass through to connected equipment).
FREQUENCY CONVERTER MODE LEDs: INPUT (blinking), AC/DC,
DC/AC and OUTPUT LEDs on.
FREQ CONVERTER MODE LCD SCREEN: “FREQ CONVERTER”
and UPS load information
FREQ CONVERTER MODE LCD VIEWING OPTIONS:
When first entering FREQUENCY CONVERTER MODE, the LCD screen will display load information in percentage and kilowatt units. To
display additional information screens, tap the SCROLL DOWN (“v”) button repeatedly. Additional screens include: Kilowatt hour usage,
Kilowatt capacity remaining, Runtime-remaining in minutes, Battery voltage and charge percentage, Output voltage and frequency, Input
voltage and frequency, Load Power Factor and Load percentage plus kVA capacity.
13-11-176-93-3156.indb 15 11/27/2013 4:24:48 PM
16
Operation
LCD Informational Screens
This UPS is configured with a two-row, 32-character LCD screen to offer detailed UPS status, control and configuration options.
In most display modes, the upper row of text continuously identifies the current operational mode. Supported modes are BYPASS, ON
LINE, ON BATTERY, ECONOMY, FREQ (FREQUENCY) CONVERTER & STANDBY (See OPERATIONAL MODES section for more information on
each operating mode).
The lower row of text identifies particular measurement values. To scroll between the seven available measurement screens, press the
SELECT button repeatedly. The display can be “parked” on a particular value for full-time display while the UPS is running in that mode.
All nine data screens are available to be monitored from each of the six operating modes:
Operating Modes (Top Line)
1. ON LINE MODE
2. ON BATTERY MODE
3. ECONOMY MODE
4. STANDBY MODE
5. BYPASS MODE
6. FREQ CONVERTER
Data Screens (Second Line)
1. LOAD PERCENTAGE & LOAD KILOWATTS
2. OUTPUT LOAD PERCENTAGE & LOAD (KVA)
3. OUTPUT LOAD POWER FACTOR
4. INPUT VOLTAGE & FREQUENCY
5. OUTPUT VOLTAGE & FREQUENCY
6. BATTERY VOLTAGE & CAPACITY PERCENTAGE
7. ESTIMATED BATTERY RUNTIME (MINUTES)
8. REMAINING WATTS/CAPACITY
9.DEMANDENERGYFORLASTHOUR(KILOWATT/HOURS)
13-11-176-93-3156.indb 16 11/27/2013 4:24:49 PM
  
 
PRESS TO ADVANCE
PRESS TO ADVANCE
PRESS TO ADVANCE
PRESS TO ADVANCE
PRESS TO ADVANCE
PRESS TO ADVANCE
PRESS TO ADVANCE
PRESS TO ADVANCE
PRESS TO ADVANCE
  
 
  
 
  
 
  
  
  
  
  
  
  
  
  
 
17
Operation
The LOAD data screen specifies the amount of power that
connected equipment is currently using in terms of percentage and
kW / kilowatts (1kW = 1000 watts / 0.5kW = 500 watts, etc.).
4th screen
The DEMAND ENERGY screen offers continuous data on the KWh
(kilowatt-hours) that connected equipment has consumed in the
last one-hour period.
5th screen
The REMAIN WATTS screen tracks the remaining capacity of the
UPS in kilowatts. (1kW = 1000 watts / 0.5kW = 500 watts, etc.).
6th screen
The RUNTIME remaining screen tracks the approximate minutes
of runtime available under the current loading and battery pack
configuration. The runtime value will automatically re-calculate as
connected equipment power consumption changes.
7th screen
The BATTERY voltage screen tracks the charge level of your
connected battery bank in terms of voltage and charge percentage.
8th screen
The OUTPUT VOLTAGE & FREQUENCY screen displays current data.
9th screen
The INPUT VOLTAGE & FREQUENCY screen displays current data.
* Set of 9 information screens are shown in ON LINE MODE, but can also be viewed from all 6 operating modes.
LCD Status & Supported Measurements
1st screen
2nd Screen
The OUTPUT LOAD LEVEL screen indicates the load percentage and
kVA output load level.
3rd Screen
The OUTPUT LOAD POWER FACTOR screen indicates the power
factor of connected equipment.
13-11-176-93-3156.indb 17 11/27/2013 4:24:52 PM
18
Operation
UPS Setup Overview
Your UPS supports a variety of advanced configuration options that can be set up via PowerAlert software, the front panel LCD screen
and the External Battery Configuration software. Many of the configurations can be adjusted using more than one of these methods.
1. Using PowerAlert Software
PowerAlert software (included on CD or available as a free Web download on www.tripplite.com) can be used to configure Economy
Mode ON and OFF. The software also supports Economy Mode Operation scheduling, allowing you to set timers to engage and disengage
Economy Mode.
2. Using the LCD Interface
This UPS supports a variety of user setup options and custom configurations that can be accessed via the front panel LCD screen.
Configuration and information items include:
1. Output Voltage
2. Output Frequency
3. Bypass Range
4. Overload Alarm
5. Shutdown After
6. Battery Save
7. Standby Mode
8. Frequency Converter
9. Economy Mode
10. Cold Start
11. Battery Test
12. External Batt
13. Audible Alarm
14. Factory Default
15.AlarmHistory
16. Information
To access these user options, enter the UPS SET-UP menu by pressing the SCROLL UP & SCROLL DOWN buttons simultaneously for
at least 3 seconds. The screen will report UPS SET-UP on the upper row and EXIT ENTER on the bottom row. Enter the setup menu by
pressing the button directly under the word “ENTER” in the LCD (the SCROLL UP button). In Set-Up mode, the second row will always
identify the function of the two scroll buttons (“
v
” & “
^
”). When a value is “set” via the LCD, the display will show a “*” immediately
following the new value.
Many LCD configuration items cannot be accessed in ON LINE, ON BATTERY, ECONOMY or FREQ CONVERTER mode. Turn
off connected equipment and set the UPS to STANDBY MODE prior to entering the UPS SET-UP menu to gain access to all
configuration items.
Any time the UPS SET-UP menu is entered, you will need to scroll through all 16 functions until you see the UPS SET-UP ENTER / EXIT
menu screen again and EXIT (
^
) is pressed. You can then power-on the UPS and all changed menu items will take effect. Below, we will
show the order of operations in the UPS Setup menu with a brief description of each configuration screen.
If you feel you may have enabled, disabled or specified advanced set-up values that may not be ideal for your configuration,
just reset to FACTORY DEFAULT to return all set-up items to the original factory configuration.
Note: Values in the LCD with an adjacent “*” symbol reflect the current SET value for that attribute.
13-11-176-93-3156.indb 18 11/27/2013 4:24:52 PM
 
 
120V*
SCROLL SELECT
 
 
60HZ*
SCROLL SELECT
 
 
WIDE*
SCROLL SELECT
Continued on page 20.
19
Operation
UPS Setup Order of Operations
To access the UPS Setup screens, press both the SCROLL (
v
) and SELECT (^) buttons simultaneously and hold for 3 seconds.
1
The OUTPUT VOLTAGE selection screen will appear.
OUTPUT VOLTAGE refers to the nominal output voltage of the UPS. This value is most
commonly set to match the prevailing country or region-specific nominal voltage. In general,
use 120V for USA and Canada, 127V for Mexico and 100V for Japan. Additional values of
110 & 115V are also available. Note: Certain voltage settings will cause automatic de-rating.
See specifications on unit label for de-rating info.
Press “SELECT” (
^
) to SET this value.
Press “SCROLL” (
v
) to advance to the next option.
Available values are: 100, 110, 115, 120 &
127V
Press SCROLL (
v
) to browse options
and press SELECT (
^
) to SET.
Factory default = 120V
2
The OUTPUT FREQUENCY selection screen will appear.
OUTPUTFREQUENCYreferstothecycles-per-second(Hz)ofUPSoutputpower.Thisvalueis
most commonly set to match the prevailing country or region-specific frequency. In general,
intheUSA,CanadaandMexicousethe60Hzfactorysetting.In100-127V50Hzlocations,
suchasJamaica,AntiguaandpartsofJapan,settheUPSto50Hz.Tosuccessfullyconfigure
yourUPStoconvertfrequencyfrom50-to-60Hzor60-to-50Hz,setBOTHtheOUTPUT
FREQUENCY to the desired setting and enable this function by setting the FREQ
CONVERSION to ENABLE.
To Change This
Setting:
Press “SELECT” (
^
)
To Advance to
the Next Screen:
Press SCROLL (
v
)
To Change This
Setting:
Press “SELECT” (
^
)
Press “SELECT” (
^
) to SET this value.
Press “SCROLL” (
v
) to advance to the next option.
Availablevaluesare:60Hz,50Hz
Scroll through available values and press
SELECT (
^
) to SET.
Factorydefault=60Hz
To Advance to
the Next Screen:
Press SCROLL (
v
)
3
The BYPASS RANGE selection screen will appear.
BYPASS RANGE: When ECONOMY MODE is enabled, this UPS will allow line voltage that’s
already of sufficient quality pass through to connected equipment unchanged. The BYPASS
RANGE control gives users the ability to control the amount of deviation from the selected
nominal voltage before automatically turning back to on-line mode. The factory setting of
WIDE is compatible with the vast majority of networking equipment. Using this control, users
of even the most sensitive equipment can utilize the UPS in economy mode by selecting
alternate preset values. Regardless of the “plus or minus” value entered, the highest bypass
voltage available is 135V. The lowest bypass voltage available is 90V (full load) and 70V
(<70% load). The “Wide” range reflects these same values (full load 90 to 135V / <70%
load 70 to 135V).
To Change This
Setting:
Press “SELECT” (
^
)
Press “SELECT” (
^
) to SET this value.
Press “SCROLL” (
v
) to advance to the next option.
Available values are: +/-5, 6, 7, 8, 9, 10, 11,
12, 13, 14, 15% & wide
Scroll through available values and press
SELECT (
^
) to SET.
Factory default = WIDE
To Advance to
the Next Screen:
Press SCROLL (
v
)
Note: The UPS must be
in Standby Mode to
change this setting.
Note: The UPS must be
in Standby Mode to
change this setting.
13-11-176-93-3156.indb 19 11/27/2013 4:24:54 PM
 
 
105%*
SCROLL SELECT
 
 
DISABLE*
SCROLL SELECT
 
 
DISABLE*
SCROLL SELECT
Continued on page 21.
20
Operation
4
The OVERLOAD ALARM selection screen will appear.
OVERLOAD ALARM refers to the point at which the UPS will sound its’ overload alarm. The
factory setting of 105% will provide adequate overload warnings for most applications, but
alternative values from 5% to the 105% default (in 5% intervals) are available for custom
configurations.
5
The SHUTDOWN AFTER selection screen will appear.
SHUTDOWNAFTERreferstotheamountofruntimetheUPSwillprovideinapowerfailure
before turning off. The factory configuration of DISABLE is suitable for applications where the
longest possible runtime is desired. In cases where a specific amount of runtime is needed
(and no more), you can set the shutdown-after value to a specific number between 5 and
90 minutes (in 5 min. intervals), using this control.
6
The BATTERY SAVE selection screen will appear.
BATTERY SAVE option enables automatic UPS power-off in battery mode when there is no
need for continued operation. This option prevents unnecessary battery discharge by shutting
off UPS power once the load level falls below a user-selectable percentage for 10 continuous
minutes. Settings are available to enable shutdown at load levels between 5% and 95% (in
5% increments). This feature is ideal for non-monitored UPS configurations where connected
equipment consumes a significant amount of UPS capacity but is subsequently shutdown, or
when devices are connected to a UPS but are not powered on to begin with, and thus
require no battery backup. Users may determine the ideal percentage setpoint by monitoring
the UPS LCD load level screen for typical power consumption in both operating and
shutdown modes. For example, if your equipment normally consumes 40-100% UPS
capacity while operational, but drops to 3% once it’s shutdown, a BATTERY SAVE percentage
setting of 5% would be ideal. Once connected equipment power consumption falls below the
selected percentage for 10 continuous minutes, the UPS will turn off automatically,
preventing unnecessary battery discharge. The factory default for this option is DISABLE.
To Change This
Setting:
Press “SELECT” (
^
)
Press “SELECT” (
^
) to SET this value.
Press “SCROLL” (
v
) to advance to the next option.
Available values are: 5% to 105%
(in 5% intervals)
Scroll through available values and press
SELECT (
^
) to SET.
Factory default = 105%
To Advance to
the Next Screen:
Press SCROLL (
v
)
To Change This
Setting:
Press “SELECT” (
^
)
Press “SELECT” (
^
) to SET this value.
Press “SCROLL” (
v
) to advance to the next option.
Available values are: 5 to 90 minutes
(in 5 min. intervals)
Scroll through available values and press
SELECT (
^
) to SET.
Factory default = DISABLE
To Advance to
the Next Screen:
Press SCROLL (
v
)
To Change This
Setting:
Press “SELECT” (
^
)
Press “SELECT” (
^
) to SET this value.
Press “SCROLL” (
v
) to advance to the next option.
Available values are: 5% to 95% (in 5% intervals)
Scroll through available values and press
SELECT (
^
) to SET.
Factory default = DISABLE
To Advance to
the Next Screen:
Press SCROLL (
v
)
13-11-176-93-3156.indb 20 11/27/2013 4:24:56 PM
  • Page 1 1
  • Page 2 2
  • Page 3 3
  • Page 4 4
  • Page 5 5
  • Page 6 6
  • Page 7 7
  • Page 8 8
  • Page 9 9
  • Page 10 10
  • Page 11 11
  • Page 12 12
  • Page 13 13
  • Page 14 14
  • Page 15 15
  • Page 16 16
  • Page 17 17
  • Page 18 18
  • Page 19 19
  • Page 20 20
  • Page 21 21
  • Page 22 22
  • Page 23 23
  • Page 24 24
  • Page 25 25
  • Page 26 26
  • Page 27 27
  • Page 28 28
  • Page 29 29
  • Page 30 30
  • Page 31 31
  • Page 32 32
  • Page 33 33
  • Page 34 34
  • Page 35 35
  • Page 36 36
  • Page 37 37
  • Page 38 38
  • Page 39 39
  • Page 40 40
  • Page 41 41
  • Page 42 42
  • Page 43 43
  • Page 44 44
  • Page 45 45
  • Page 46 46
  • Page 47 47
  • Page 48 48
  • Page 49 49
  • Page 50 50
  • Page 51 51
  • Page 52 52
  • Page 53 53
  • Page 54 54
  • Page 55 55
  • Page 56 56
  • Page 57 57
  • Page 58 58
  • Page 59 59
  • Page 60 60
  • Page 61 61
  • Page 62 62
  • Page 63 63
  • Page 64 64
  • Page 65 65
  • Page 66 66
  • Page 67 67
  • Page 68 68
  • Page 69 69
  • Page 70 70
  • Page 71 71
  • Page 72 72
  • Page 73 73
  • Page 74 74
  • Page 75 75
  • Page 76 76
  • Page 77 77
  • Page 78 78
  • Page 79 79
  • Page 80 80
  • Page 81 81
  • Page 82 82
  • Page 83 83
  • Page 84 84
  • Page 85 85
  • Page 86 86
  • Page 87 87
  • Page 88 88
  • Page 89 89
  • Page 90 90
  • Page 91 91
  • Page 92 92

Tripp Lite Single-Phase Online Rack UPS Owner's manual

Category
Uninterruptible power supplies (UPSs)
Type
Owner's manual
This manual is also suitable for

Ask a question and I''ll find the answer in the document

Finding information in a document is now easier with AI