Page is loading ...

Tools/Outils/Herramientas
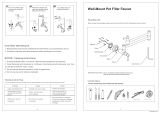
Before You Begin
Observe all local plumbing and building codes.
Shut off the main water supply.
Kohler Co. reserves the right to make revisions in the design of faucets without
notice, as specified in the Price Book.
Avant de commencer
Respecter tous les codes de plomberie et de bâtiment locaux.
Couper l’alimentation d’eau principale.
Kohler Co. se réserve le droit d’apporter toutes modifications au design des
robinets et ceci sans préavis, comme spécifié dans le catalogue des prix.
Antes de comenzar
Cumpla con todos los códigos locales de plomería y construcción.
Cierre el suministro principal de agua.
Kohler Co. se reserva el derecho de modificar el diseño de la grifería sin previo
aviso, tal como se especifica en la lista de precios.
Hex Wrenches
Clés hexagonales
Llaves hexagonales
Plumbers Putty
Mastic de plombier
Masilla de plomería
Level
Niveau à bulle
Nivel
1132653-2-A 2 Kohler Co.

1. Install the Adapter
Insert the faucet adapter into the faucet outlet port.
Secure using the three provided screws.
Installer l’adaptateur
Insérer l’adaptateur du robinet dans l’orifice de sortie du robinet.
Fixer en place en utilisant les trois vis fournies.
Instale el adaptador
Inserte el adaptador de la grifería en el puerto de salida de la grifería.
Fije con los tres tornillos provistos.
Screws
Vis
Tornillos
Adapter
Adaptateur
Adaptador
Kohler Co. 3 1132653-2-A

2. Install the Spout
Slide the escutcheon onto the adapter.
Slide the spout assembly onto the adapter.
Using a level, confirm that the spout is perpendicular to the vanity deck.
Tighten the setscrews. Do not overtighten.
Apply plumbers putty to the back of the escutcheon.
Slide the escutcheon back against the finished wall and onto the wall flange.
With the setscrew hole at the 6 o’clock position, secure the escutcheon with a
setscrew. Do not overtighten.
Installer le bec
Faire glisser l’applique sur l’adaptateur.
Faire glisser le bec sur l’adaptateur.
Utiliser un niveau pour confirmer que le bec est perpendiculaire au dessus du
meuble.
Serrer les vis de retenue. Ne pas trop serrer.
Appliquer du mastic de plombier sur l’arrière de l’applique.
Reglisser l’applique contre le mur fini et sur la bride du mur.
Avec l’orifice de vis de retenue en position de 6 heures, sécuriser l’applique avec
une vis de retenue. Ne pas trop serrer.
Spout
Bec
Surtidor
Setscrews
Vis de retenue
Tornillos de fijación
Adapter
Adaptateur
Adaptador
Escutcheon/Applique/Chapetón
Apply plumbers putty.
Appliquer du mastic
de plombier.
Aplique masilla de
plomería.
1132653-2-A 4 Kohler Co.

Instale el surtidor
Deslice el chapetón en el adaptador.
Deslice el montaje del surtidor en el adaptador.
Con un nivel, verifique que el surtidor esté perpendicular a la cubierta del
tocador.
Apriete los tornillos de fijación. No apriete demasiado.
Aplique masilla de plomería al dorso del chapetón.
Deslice el chapetón contra la pared acabada y sobre la brida mural.
Con el orificio para el tornillo de fijación de las seis en punto, fije el chapetón con
el tornillo de fijación. No apriete demasiado.
3. Install the Handles
Dry fit the handles.
Adjust the handles so the lever faces horizontal when closed.
To adjust the handles, remove the handle assembly and remove and turn the
spline adapter 1/4 turn. Reinstall the spline adapter. Reposition the handles. If the
handles are not horizontal, repeat the procedure until it is positioned properly.
Remove the handles.
Apply plumbers putty or other sealant to the back of each escutcheon according to
the putty manufacturer’s instructions.
Carefully slide the escutcheon over the handle bonnet.
Securely hand tighten the handle assembly onto the valve body.
Apply plumbers putty.
Appliquer du mastic
de plombier.
Aplique masilla de
plomería.
Kohler Co. 5 1132653-2-A

4. Complete the Installation
Ensure that both faucet handles are turned off (hot = counterclockwise to close,
cold = clockwise to close).
Turn on the water supplies and check the installation for leaks. Repair as needed.
Remove the aerator using the supplied key.
Open the valves and run water through the spout for about a minute to remove
any debris. Check for leaks.
Remove all debris from the aerator.
Turn the valves off, and reinstall the aerator.
Terminer l’installation
S’assurer de fermer les deux poignées, (chaud = vers la gauche, froid = vers la
droite).
Ouvrir les robinets d’alimentation d’eau et vérifier s’ilyadesfuites. Réparer au
besoin.
Retirer l’aérateur en utilisant la clé fournie.
Ouvrir les valves, et faire couler l’eau à travers le bec pendant environ une minute
pour retirer tous débris. Vérifier s’ilyadesfuites.
Retirer tous les débris de l’aérateur.
Fermer les valves, et ré-installer l’aérateur.
Termine la instalación
Verifique que las manijas de la grifería estén cerradas (agua caliente = se cierra
girando a la izquierda) (agua fría = se cierra girando a la derecha).
Abra el suministro de agua y verifique que no haya fugas. Repare según sea
necesario.
Retire el aireador utilizando la llave provista.
Key/Clé/Llave
Screen Washer
Rondelle à grille
Arandela de rejilla
Aerator
Aérateur
Aireador
Kohler Co. 7 1132653-2-A

Termine la instalación (cont.)
Abra las válvulas y deje correr el agua por el surtidor durante un minuto
aproximadamente para eliminar los residuos. Verifique que no haya fugas.
Elimine las impurezas del aireador.
Cierre las válvulas y vuelva a instalar el aireador.
Care and Cleaning
For best results, keep the following in mind when caring for your KOHLER product:
•
Use a mild detergent such as liquid dishwashing soap and warm water for
cleaning. Do not use abrasive cleaners that may scratch or dull the surface.
•
Carefully read the cleaner product label to ensure the cleaner is safe for use on the
material.
•
Always test your cleaning solution on an inconspicuous area before applying to
the entire surface.
•
Do not allow cleaners to sit or soak on the surface.
•
Wipe surfaces clean and rinse completely with water immediately after cleaner
application. Rinse and dry any overspray that lands on nearby surfaces.
•
Use a soft, dampened sponge or cloth. Never use an abrasive material such as a
brush or scouring pad to clean surfaces.
For detailed cleaning information and products to consider, visit www.kohler.com/clean.
To order Care & Cleaning information, call 1-800-456-4537.
Entretien et nettoyage
Pour de meilleurs résultats, prendre ce qui suit en considération lors de l’entretien de
votre produit KOHLER:
•
Utiliser un détergent doux tel que liquide pour vaisselle et de l’eau chaude pour
nettoyer. Ne pas utiliser de nettoyants abrasifs car ils pourraient rayer ou abîmer
la surface.
•
Lire attentivement l’étiquette du produit de nettoyage pour vérifier qu’il soit
adéquat à utiliser sur le matériau.
•
Toujours tester la solution de nettoyage sur une surface la moins évidente avant
de l’appliquer sur la totalité de la surface.
•
Ne pas permettre aux nettoyants de reposer sur la surface.
•
Essuyer les surfaces et rincer complètement avec de l’eau immédiatement après
l’application du nettoyant. Rincer et sécher tout éclaboussement sur les surfaces
avoisinantes.
•
Utiliser une éponge ou un chiffon doux et humide. Ne jamais utiliser de matériau
abrasif tel qu’une brosse ou une éponge à récurer pour nettoyer les surfaces.
Pour l’information détaillée de nettoyage et des produits à considérer, visiter
www.kohler.com/clean. Pour commander des informations d’entretien et de nettoyage,
composer le 1-800-456-4537.
Cuidado y limpieza
Para obtener los mejores resultados, tenga presente lo siguiente al limpiar su producto
KOHLER:
•
Para la limpieza, utilice solamente un detergente suave como el jabón líquido para
lavar platos y agua tibia. No utilice limpiadores abrasivos que puedan rayar u
opacar la superficie.
•
Lea atentamente la etiqueta del producto de limpieza para asegurar que no
presente riesgos al usarse en el material.
1132653-2-A 8 Kohler Co.

Cuidado y limpieza (cont.)
•
Siempre pruebe la solución de limpieza en un área oculta antes de aplicarla a toda
la superficie.
•
No deje por tiempo prolongado los limpiadores en la superficie.
•
Limpie con un trapo y enjuague completa e inmediatamente con agua después de
aplicar limpiadores. Enjuague y seque las superficies cercanas que se hayan
rociado.
•
Utilice una esponja o trapo suave y húmedo. Para limpiar las superficies nunca
utilice materiales abrasivos como cepillos o estropajos de tallar.
Para obtener información detallada de limpieza y los limpiadores a considerar, visite
www.kohler.com/clean. Para solicitar información sobre el cuidado y la limpieza, llame
al 1-800-456-4537.
Warranty
KOHLER
®
Faucet Lifetime Limited Warranty
Kohler Co. warrants its Faucets* manufactured after January 1, 1997, to be leak and drip
free during normal residential use for as long as the original consumer purchaser owns
his or her home. If the Faucet should leak or drip during normal use, Kohler Co. will,
free of charge, mail to the purchaser the cartridge necessary to put the Faucet in good
working condition. This warranty applies only to Kohler Faucets installed in the United
States of America, Canada or Mexico (″North America″).
Kohler Co. also warrants all other aspects of the faucet or accessories (″Faucet″)*, (except
gold, non-Vibrant
®
, non-chrome finishes) to be free of defects in material and
workmanship during normal residential use for as long as the original consumer
purchaser owns his or her home. This warranty applies only to Kohler Faucets installed
in North America. If a defect is found in normal residential use, Kohler Co. will, at its
election, repair, provide a replacement part or product, or make appropriate adjustment.
Damage to a product caused by accident, misuse, or abuse is not covered by this
warranty. Improper care and cleaning will void the warranty**. Proof of purchase
(original sales receipt) must be provided to Kohler Co. with all warranty claims. Kohler
Co. is not responsible for labor charges, installation, or other incidental or consequential
costs. In no event shall the liability of Kohler Co. exceed the purchase price of the
Faucet.
If the Faucet is used commercially or is installed outside of North America, or if the
finish is gold, non-Vibrant or a painted or powder coated color finish, Kohler Co.
warrants the Faucet to be free from defects in material and workmanship for one (1) year
from the date the product is installed, under Kohler Co.’s standard one-year limited
warranty.
If you believe that you have a warranty claim, contact Kohler Co., either through your
Dealer, Plumbing Contractor, Home Center or E-tailer, or by writing Kohler Co., Attn.:
Customer Care Center, 444 Highland Drive, Kohler, WI 53044, USA. Please be sure to
provide all pertinent information regarding your claim, including a complete description
of the problem, the product, model number, color, finish, the date the product was
purchased and from whom the product was purchased. Also include your original
invoice. For other information, or to obtain the name and address of the service and
repair facility nearest you, call 1-800-4-KOHLER (1-800-456-4537) from within the USA
and Canada, and 001-800-456-4537 from within Mexico, or visit www.kohler.com within
the USA, www.ca.kohler.com from within Canada, or www.mx.kohler.com in Mexico.
KOHLER CO. AND/OR SELLER ARE PROVIDING THESE WARRANTIES IN LIEU
OF ALL OTHER WARRANTIES, EXPRESSED OR IMPLIED, INCLUDING BUT NOT
LIMITED TO THE IMPLIED WARRANTIES OF MERCHANTABILITY AND
FITNESS FOR A PARTICULAR PURPOSE. KOHLER CO. AND/OR SELLER
DISCLAIM ALL LIABILITY FOR SPECIAL, INCIDENTAL OR CONSEQUENTIAL
DAMAGES. Some states/provinces do not allow limitations of how long an implied
Kohler Co. 9 1132653-2-A
/