Page is loading ...

Tools/Outils/Herramientas
Before You Begin
CAUTION: Risk of product damage. Long screws, for installing trim, can damage
the K-2971-KS valve. When using this valve and trim in a fiberglass or acrylic
installation, use the 88526 Thin Wall Installation Kit.
Observe all local plumbing and building codes.
The finished wall or bath/shower unit must be installed prior to installing this
trim.
Before installing the trim, determine if the maximum water temperature is
acceptable to the user. If temperature adjustment is needed, refer to the ″Optional
Temperature Limiting Adjustment″ section of this guide.
The valve shuts off by water pressure. Do not force the handle in any direction. To
turn the valve off, gently turn it to the ″OFF″ position.
Avant de commencer
ATTENTION: Risque d’endommagement du produit. Les vis longues, pour
l’installation de la garniture, peuvent endommager la valve K-2971-KS. Lorsque
cette valve et la garniture sont utilisées dans une installation en fibres de verre ou
acrylique, utiliser le kit d’installation de mur fin 88526.
Respecter tous les codes de plomberie et de bâtiment locaux.
Le mur fini ou la baignoire/douche doit être installé avant d’installer cette
garniture.
Avant d’installer la garniture, déterminer si la température maximum de l’eau est
acceptable. S’il un réglage de température est nécessaire, se référer à la section
″Réglage optionnel de limitation de température″ de ce guide.
La valve s’arrête par pression d’eau. Ne forcer la poignée dans aucune direction.
Pour fermer la valve, la tourner doucement sur la position ″OFF″.
Antes de comenzar
PRECAUCIÓN: Riesgo de daños al producto. Los tornillos largos, para instalar la
guarnición, pueden dañar la válvula K-2971-KS. Al emplear esta válvula y
guarnición en una instalación de fibra de vidrio o acrílica, utilice el Kit de
instalación en paredes delgadas 88526.
Cumpla con todos los códigos locales de plomería y construcción.
Hex Wrench
Clé hexagonale
Llave hexagonal
Plumbers Putty
Mastic de plombier
Masilla de plomería
Strap Wrench
Clé à sangle
Llave de correa
Thread Sealant Tape
Joint d'étanchéité pour filetage
Cinta selladora de roscas
Thermometer
Thermomètre
Termómetro
1088008-2-B 2 Kohler Co.

Antes de comenzar (cont.)
La pared acabada o la unidad de la bañera/ducha debe instalarse antes que la
guarnición.
Antes de instalar la guarnición, determine si la temperatura máxima del agua es
aceptable para el usuario. Si es necesario ajustar la temperatura, consulte la
sección ″Ajuste opcional del límite de temperatura″ en este guía.
La presión del agua cierra la válvula. No fuerce la manija en ninguna dirección.
Para cerrar la válvula, gire suavemente a la posición cerrada.
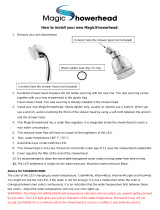
1. Install the Spout
Remove the temporary nipple.
For the 4-7/8″ (12.4 cm) diverter spout: Apply thread sealant to a 1/2″ NPT nipple
and install it to the bath elbow so it extends 7/16″ (1.1 cm) beyond the finished
wall.
For the 7-3/4″ (19.7 cm) diverter spout: Apply thread sealant to a 1/2″ NPT nipple
and install it to the bath elbow so it extends 1/2″ (1.3 cm) beyond the finished
wall.
For the 7-3/4″ (19.7 cm) non-diverter spout: Apply thread sealant to a 1/2″ NPT
nipple and install it to the bath elbow so it extends 6-1/4″ (15.9 cm) beyond the
finished wall.
Apply a bead of plumbers putty or other sealant around the inlet end of the spout
according to the manufacturer’s instructions.
Apply thread sealant to the nipple, and install the spout to the nipple.
Carefully tighten with a clean strap wrench.
Remove excess putty.
1/2" Nipple
Mamelon de 1/2"
Niple de 1/2"
1/2" Nipple
Mamelon de 1/2"
Niple de 1/2"
1/2" Nipple
Mamelon de 1/2"
Niple de 1/2"
Apply plumbers putty.
Appliquer du mastic de plomberie.
Aplique masilla de plomería.
Apply plumbers putty.
Appliquer du mastic de plomberie.
Aplique masilla de plomería.
Apply plumbers putty.
Appliquer du mastic de plomberie.
Aplique masilla de plomería.
4-7/8" (12.4 cm) Spout
Bec 4-7/8" (12,4 cm)
Surtidor de 4-7/8" (12,4 cm)
7-3/4" (19.7 cm) Non-Diverter Spout
Bec non-inverseur de 7-3/4" (19,7 cm)
Surtidor sin desviador de 7-3/4" (19,7 cm)
1/2" (1.3 cm)
7/16" (1.1 cm)
6-1/4"
(15.9 cm)
7-3/4" (19.7 cm)
Diverter Spout
Bec inverseur
de 7-3/4" (19,7 cm)
Surtidor con
desviador de
7-3/4" (19,7 cm)
Kohler Co. 3 1088008-2-B

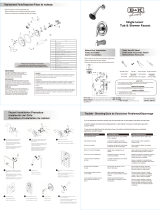
2. Install the Showerhead
Remove the temporary nipple from the shower elbow.
Apply a bead of plumbers putty or other sealant to the back of the escutcheon
according to the putty manufacturer’s instructions.
Install the O-ring and sleeve to the escutcheon.
Slide the collar, sleeve, and escutcheon onto the shower arm.
Apply thread sealant tape and install the shower arm to the shower elbow.
Carefully tighten with a clean strap wrench.
Press the escutcheon and sleeve against the finished wall.
Slide the collar tight against the sleeve and escutcheon, and secure with the
setscrew.
Remove all excess putty.
Turn the main water supply on.
Run hot and cold water through the shower arm to flush out dirt and debris.
Apply thread sealant tape to the shower arm and thread the showerhead to the
shower arm.
Installer la pomme de douche
Retirer le mamelon temporaire du coude de la douche.
Appliquer un boudin de mastic de plombier ou un autre produit d’étanchéité sur
l’arrière de l’applique selon les instructions du fabricant du mastic.
Installer le joint torique et le manchon sur l’applique.
Glisser le collier, le manchon et l’applique sur le bras de douche.
Appliquer du ruban d’étanchéité et installer le bras de douche au coude de
douche.
Serrer doucement à l’aide d’une clé à sangle propre.
Presser l’applique et le manchon contre le mur fini.
Shower Elbow
Coude de douche
Codo de ducha
Shower Arm
Bras de douche
Brazo de ducha
Collar/Collier/Collarín
Sleeve/Manche/Manga
Setscrew
Vis de retenue
Tornillo de fijación
Escutcheon
Applique
Chapetón
O-Ring
Joint torique
Arosello
Showerhead
Pomme de douche
Cabeza de ducha
Apply plumbers putty to escutcheon.
Appliquer du mastic de plombier sur l'applique.
Aplique masilla de plomería al chapetón.
Kohler Co. 5 1088008-2-B

3. Water Temperature Adjustment
CAUTION: Risk of personal injury. To eliminate the risk of scalding, the water
temperature should never be set above 120°F (49°C).
NOTE: Do not remove the O-ring and collar at this time. Removing the O-ring and
collar will change the factory setting for the maximum water temperature.
Turn the valve clockwise to the full open position and let the hot water run for
several minutes. Position a thermometer in the water stream and check the
temperature.
For minor water temperature changes, adjust the setscrew, and recheck the water
temperature.
For major water temperature changes, remove the O-ring and collar from the
valve stem. Slowly rotate the valve stem until the desired maximum water
temperature is reached.
Reinstall the collar on the valve stem with the setscrew against the side of the tab.
Reinstall the O-ring, rotate the valve stem counterclockwise to shut the water off.
Recheck the water temperature.
Complete the information on the valve label (if supplied).
Réglage de la température d’eau
ATTENTION: Risque de blessures corporelles. Pour éliminer les risques de
brûlures, la température ne devrait pas être réglée au-dessus de 120°F (49°C).
REMARQUE: Ne pas retirer le joint torique ou le collier pour le moment. Retirer le
joint torique changerait le réglage d’usine de la température maximale de l’eau.
Tourner la valve vers la droite à la position ouverte et laisser couler l’eau chaude
pendant quelques minutes. Placer un thermomètre dans le courant d’eau et
vérifier la température.
Pourde petits changements de température, ajuster la vis de serrage, et re-vérifier
la température d’eau.
O-Ring
Joint torique
Arosello
Setscrew
Vis de retenue
Tornillo de fijación
Tab/Languette/Lengüeta
Tab
Languette
Lengüeta
Collar
Collier
Collarín
Collar
Collier
Collarín
Setscrew
Vis de retenue
Tornillo de fijación
High Flow Valve
Valve haut débit
Válvula de alto flujo
Standard Valve
Valve standard
Válvula estándar
Valve Label
Etiquette de valve
Etiqueta de la válvula
Valve Stem
Tige de valve
Espiga de válvula
Valve Stem
Tige de valve
Espiga de válvula
Kohler Co. 7 1088008-2-B

4. Install the Faceplate and Lever Handle
NOTICE: For K-2971-KS valve: The thin wall installation kit (88526) is required for
fiberglass or acrylic installations.
Remove and discard the plaster guard and/or dome, if installed.
Fit the faceplate and centering washer over the valve, and secure with two screws.
Rotate the valve stem fully counterclockwise to the ″OFF″ position.
NOTE: If the handle is not a lever handle, go to the next section.
Lever Handle
NOTE: If the handle comes assembled, remove the end cap, and short sleeve. Then
remove the handle arm from bonnet and cap.
Fit a sleeve and bonnet over each stem adapter.
Thread the bonnet to the valve until it is tight against the escutcheon.
Position the center cap on the bonnet with the holes aligned.
Slide the long sleeve and O-ring onto the handle arm.
Insert the handle arm through the center cap and bonnet.
Install a short sleeve and washer onto each handle arm.
Thread the end cap onto the handle arm and hand tighten.
Installer le couvercle et la poignée de levage
NOTICE: Pour la valve K-2971-KS: Le kit d’installation de mur fin (88526) est requis
pour installations en fibre de verre ou acrylique.
Retirer et jeter le renfort en plâtre et/ou dôme, s’il est installé.
Installer le couvercle et la rondelle de centrage sur la valve, puis sécuriser au
moyen de deux vis.
Pivoter la tige de la valve complètement vers la gauche à la position fermée
″OFF″.
Valve Stem
Tige de la valve
Espiga de válvula
Faceplate
Couvercle
Placa circular
Screws
Vis
Tornillos
Centering Washer
Rondelle de centrage
Arandela de centrar
Sleeve
Manchon
Manga
Screw/Vis/Tornillo
Washer/Rondelle/Arandela
End Cap
Bouchon d'extrémité
Tapa terminal
Center Cap
Capuchon central
Tapón central
Bonnet/Chapeau/Bonete
O-Ring/Joint torique/Arosello
Handle Arm
Bras de poignée
Brazo de la manija
Long Sleeve
Manchon long
Manga larga
Valve Stem
Tige de la valve
Espiga de válvula
Short Sleeve
Manchon court
Manga pequeña
Discard plaster
guard with dome.
Jeter le renfort en
plâtre avec dôme.
Deseche el protector
de yeso con cúpula.
Kohler Co. 9 1088008-2-B

5. Installing Cross Handles
Cross Handle
Install the sleeve and bonnet to the valve stem.
Align the bonnet and secure to the valve stem with the screw.
Fit the center cap to the bonnet so the holes align.
Insert the long arm into the large holes in the center cap so the holes align.
Insert the long and short studs into the remaining center cap holes and securely
thread together.
Insert the O-rings, sleeves, washers, and end caps to the handle ends.
Installer les poignées cruciformes
Poignée cruciforme
Installer le manchon et le chapeau sur la tige de la valve.
Aligner le chapeau et sécuriser à la tige de la valve avec la vis.
Placer le bouchon central sur le chapeau en alignant les trous.
Insérer le bras long dans les trous larges du bouchon central tout en les alignant.
Insérer les montants longs et courts dans les orifices restants du bouchon central
et sécuriser en vissant ensemble.
Insérer les joints toriques, manchons, rondelles, et bouchons d’extrémité dans les
extrémités de poignée.
Sleeve
Manchon
Manga
Sleeve/Manchon/Manga
Sleeve
Manchon
Manga
Washer
Rondelle
Arandela
Washer
Rondelle
Arandela
Washer
Rondelle
Arandela
End Cap
Bouchon d'extrémité
Tapón terminal
End Cap
Bouchon d'extrémité
Tapón terminal
End Cap
Bouchon d'extrémité
Tapón terminal
Sleeve/Manchon/Manga
Bonnet/Chapeau/Bonete
Screw/Vis/Tornillo
Center Cap
Capuchon central
Tapón central
Long Arm
Bras long
Brazo largo
Valve Stem
Tige de la valve
Espiga de válvula
O-Ring (4 Places)
Joint torique (4 Places)
Arosello (4 lugares)
Long Stud
Montant long
Perno largo
Short Stud
Montant court
Perno pequeño
Kohler Co. 11 1088008-2-B

Instalación de las manijas de cruz
Manija de cruz
Instale la manga y el bonete en la espiga de la válvula.
Alinee el bonete y fíjelo a la espiga de la válvula con el tornillo.
Coloque la tapa central en el bonete de modo que los orificios queden alineados.
Inserte el brazo largo en los orificios grandes de la tapa central, de modo que los
orificios queden alineados.
Inserte las varillas roscadas cortas y largas en los orificios restantes de la tapa
central y enrósquelas bien.
Inserte los arosellos (O-ring), las mangas, las arandelas y los tapones terminales en
los extremos de las manijas.
Care and Cleaning
For best results, keep the following in mind when caring for your KOHLER product:
•
Use a mild detergent such as liquid dishwashing soap and warm water for
cleaning. Do not use abrasive cleaners that may scratch or dull the surface.
•
Carefully read the cleaner product label to ensure the cleaner is safe for use on the
material.
•
Always test your cleaning solution on an inconspicuous area before applying to
the entire surface.
•
Do not allow cleaners to sit or soak on the surface.
•
Wipe surfaces clean and rinse completely with water immediately after cleaner
application. Rinse and dry any overspray that lands on nearby surfaces.
•
Use a soft, dampened sponge or cloth. Never use an abrasive material such as a
brush or scouring pad to clean surfaces.
For detailed cleaning information and products to consider, visit www.kohler.com/clean.
To order Care & Cleaning information, call 1-800-456-4537.
Entretien et nettoyage
Pour obtenir les meilleurs résultats possibles, prendre ce qui suit en considération lors de
l’entretien de votre produit KOHLER:
•
Utiliser un détergent doux tel que liquide pour vaisselle et de l’eau chaude pour
nettoyer. Ne pas utiliser de nettoyants abrasifs car ils pourraient rayer ou abîmer
la surface.
•
Lire attentivement l’étiquette du produit de nettoyage pour vérifier qu’il soit
adéquat à utiliser sur le matériau.
•
Toujours tester la solution de nettoyage sur une surface non visible avant de
l’appliquer sur l’ensemble de la surface.
•
Ne pas permettre aux nettoyants de reposer sur la surface.
•
Essuyer les surfaces et rincer complètement avec de l’eau immédiatement après
l’application du nettoyant. Rincer et sécher tout éclaboussement sur les surfaces
avoisinantes.
•
Utiliser une éponge ou un chiffon doux et humide. Ne jamais utiliser de matériau
abrasif tel qu’une brosse ou une éponge à récurer pour nettoyer les surfaces.
Pour obtenir des informations détaillées sur le nettoyage et les produits à considérer,
consulter le site www.kohler.com/clean. Pour commander des informations sur
l’entretien & le nettoyage, appeler le 1-800-456-4537.
1088008-2-B 12 Kohler Co.

Cuidado y limpieza
Para obtener los mejores resultados, tenga presente lo siguiente al limpiar su producto
KOHLER:
•
Para la limpieza, utilice solamente un detergente suave como el jabón líquido para
lavar platos y agua tibia. No utilice limpiadores abrasivos que puedan rayar u
opacar la superficie.
•
Lea atentamente la etiqueta del producto de limpieza para asegurar que no
presente riesgos al usarse en el material.
•
Siempre pruebe la solución de limpieza en un área oculta antes de aplicarla a toda
la superficie.
•
No deje por tiempo prolongado los limpiadores en la superficie.
•
Limpie con un trapo y enjuague completa e inmediatamente con agua después de
aplicar limpiadores. Enjuague y seque las superficies cercanas que se hayan
rociado.
•
Utilice una esponja o trapo suave y húmedo. Para limpiar las superficies nunca
utilice materiales abrasivos como cepillos o estropajos de tallar.
Para obtener información detallada de limpieza y los limpiadores a considerar, visite
www.kohler.com/clean. Para solicitar información sobre el cuidado y la limpieza, llame
al 1-800-456-4537.
Warranty
KOHLER
®
Faucet Lifetime Limited Warranty
Kohler Co. warrants its Faucets* manufactured after January 1, 1997, to be leak and drip
free during normal residential use for as long as the original consumer purchaser owns
his or her home. If the Faucet should leak or drip during normal use, Kohler Co. will,
free of charge, mail to the purchaser the cartridge necessary to put the Faucet in good
working condition. This warranty applies only to Kohler Faucets installed in the United
States of America, Canada or Mexico (″North America″).
Kohler Co. also warrants all other aspects of the faucet or accessories (″Faucet″)*, (except
gold, non-Vibrant
®
, non-chrome finishes) to be free of defects in material and
workmanship during normal residential use for as long as the original consumer
purchaser owns his or her home. This warranty applies only to Kohler Faucets installed
in North America. If a defect is found in normal residential use, Kohler Co. will, at its
election, repair, provide a replacement part or product, or make appropriate adjustment.
Damage to a product caused by accident, misuse, or abuse is not covered by this
warranty. Improper care and cleaning will void the warranty**. Proof of purchase
(original sales receipt) must be provided to Kohler Co. with all warranty claims. Kohler
Co. is not responsible for labor charges, installation, or other incidental or consequential
costs. In no event shall the liability of Kohler Co. exceed the purchase price of the
Faucet.
If the Faucet is used commercially or is installed outside of North America, or if the
finish is gold, non-Vibrant or a painted or powder coated color finish, Kohler Co.
warrants the Faucet to be free from defects in material and workmanship for one (1) year
from the date the product is installed, under Kohler Co.’s standard one-year limited
warranty.
If you believe that you have a warranty claim, contact Kohler Co., either through your
Dealer, Plumbing Contractor, Home Center or E-tailer, or by writing Kohler Co., Attn.:
Customer Care Center, 444 Highland Drive, Kohler, WI 53044, USA. Please be sure to
provide all pertinent information regarding your claim, including a complete description
of the problem, the product, model number, color, finish, the date the product was
purchased and from whom the product was purchased. Also include your original
invoice. For other information, or to obtain the name and address of the service and
repair facility nearest you, call 1-800-4-KOHLER (1-800-456-4537) from within the USA
and Canada, and 001-800-456-4537 from within Mexico, or visit www.kohler.com within
Kohler Co. 13 1088008-2-B

Warranty (cont.)
the USA, www.ca.kohler.com from within Canada, or www.mx.kohler.com in Mexico.
KOHLER CO. AND/OR SELLER ARE PROVIDING THESE WARRANTIES IN LIEU
OF ALL OTHER WARRANTIES, EXPRESSED OR IMPLIED, INCLUDING BUT NOT
LIMITED TO THE IMPLIED WARRANTIES OF MERCHANTABILITY AND
FITNESS FOR A PARTICULAR PURPOSE. KOHLER CO. AND/OR SELLER
DISCLAIM ALL LIABILITY FOR SPECIAL, INCIDENTAL OR CONSEQUENTIAL
DAMAGES. Some states/provinces do not allow limitations of how long an implied
warranty lasts or the exclusion or limitation of such damages, so these limitations and
exclusions may not apply to you. This warranty gives the consumer specific legal
rights. You may also have other rights that vary from state/province to state/province.
This is Kohler Co.’s exclusive written warranty.
*Trend
®
faucets, MasterShowerTM tower, BodySpaTM systems and components;
WaterHavenTM tower, systems and components; TripointTM faucets, Polished Gold,
non-Vibrant and painted or powder coated finishes, fittings; all items within the ″Fixture
Related″ section of the Kohler Faucets Price Book, drains, Duostrainer
®
sink strainers,
soap/lotion dispensers; and faucets used in commercial settings, and outside North
America, are covered by Kohler Co.’s one-year limited warranty.
**Never use cleaners containing abrasive cleansers, ammonia, bleach, acids, waxes,
alcohol, solvents or other products not recommended for chrome. This will void the
warranty.
Garantie
Garantie limitée à vie du robinet KOHLER®
Kohler Co. garantit que ses Robinets* fabriqués après le 1 Janvier 1997 ne fuient pas et
ne gouttent pas pendant une utilisation normale à domicile, aussi longtemps que
l’acquéreur initial est le propriétaire de la maison. Si le Robinet goutte ou présente des
fuites en cours d’utilisation normale, Kohler Co. vous enverra par courrier, sans frais, la
cartouche nécessaire pour réparer le Robinet. Cette garantie s’applique uniquement aux
robinets Kohler installés aux É.-U., au Canada ou au Mexique (″Amérique du Nord″).
Kohler garantit aussi que toutes les autres caractéristiques du robinet ou accessoires
(″Robinet″)*, (à l’exception des finitions dorées, Vibrants
®
, non-chrome) sont exemptes de
défauts de matériau et de fabrication durant l’utilisation résidentielle normale, tant que
l’acquéreur initial est propriétaire de son domicile. Cette garantie s’applique uniquement
aux Robinets Kohler installés aux Amérique du Nord. Si un défaut est décelé en cours
d’usage normal domestique, Kohler Co. décidera à sa discrétion, de réparer, de
remplacer ou d’effectuer les réglages appropriés. Cette garantie n’offre pas de protection
contre les dommages causés par accident, mauvais usage ou mauvais traitement. Un
entretien et un nettoyage non-appropriés annuleront la garantie**. Une preuve d’achat
(ticket de caisse original) doit être présentée à Kohler Co. avec tous les recours en
garantie. Kohler Co. n’est pas responsable des coûts de main-d’œuvre, d’installation ou
d’autres frais particuliers, accessoires ou indirects. La responsabilité de Kohler Co.
n’excédera en aucun cas le prix d’achat du robinet.
Si le robinet est utilisé commercialement ou s’il est installé hors d’Amérique du Nord, ou
si la finition est dorée, non-Vibrant, peinte ou revêtue d’une poudre, Kohler Co. garantit
le robinet contre toute défectuosité de matériel et de fabrication pour un (1) an à partir
de la date d’installation du produit, sous les termes de la garantie limitée standard d’un
an de Kohler Co.
Pour vous prévaloir d’une indemnisation en vertu de cette garantie, veuillez contacter
Kohler Co. par l’intermédiaire de votre vendeur, plombier, centre de rénovation ou
revendeur par internet, ou bien par écrit à l’adresse suivante Kohler Co., Attn.: Customer
Care Center, 444 Highland Drive, Kohler, WI 53044, USA. Veuillez vous assurer de
fournir tous les renseignements pertinents à votre demande d’indemnité, y compris une
1088008-2-B 14 Kohler Co.

Service Parts/Pièces de rechange/Piezas de repuesto
**Finish/color code must be specified when ordering.
**Vous devez spécifier les codes de la finition et/ou de la couleur
quand vous passez votre commande.
**Se debe especificar el código del acabado/color con el pedido.
75372
42290
Gasket
Joint
Empaque
75460**
Escutcheon
Applique
Chapetón
36644**
Escutcheon
Applique
Chapetón
76010**
Sleeve
Manchon
Manga
52705**
Screw
Vis
Tornillo
36645**
Washer
Rondelle
Arandela
48694
O-Ring
Joint torique
Arosello
36635**
Cap/Capuchon
Tapón
77876
Washer/Rondelle/Arandela
36639**
Sleeve/Manchon/Manga
58891
Screw
Vis
Tornillo
36631**
Cap/Capuchon
Tapón
36646**
Bonnet
Chapeau
Bonete
75372
O-Ring
Joint torique
Arosello
36640**
Sleeve
Manchon
Manga
36622**
Handle
Poignée
Manija
55739**
Arm/Bras/
Braso
O-Ring/Joint torique/Arosello
55740**
Sleeve/Manchon/Manga
36635**
Cap/Capuchon/Tapón
77876
Washer/Rondelle
Arandela
55852**
Stud/Montant/Varilla
roscada
58891
Screw/Vis
Tornillo
55774**
Bonnet
Chapeau
Bonete
55734**
Cap
Capuchon
Tapón
55738**
Stud
Montant
Varilla
roscada
20536**
Lift Rod
Tige de levage
Tirador
38808
Stream
Breaker
Brise jet
Rompedor
de flujo
50713
Washer
Rondelle
Arandela
73646
Bushing/Bague/Buje
1059027
Spring
Ressort
Resorte
59391
Washer/Rondelle
Arandela
51290
Gasket/Joint
Empaque
59347
Seal Plate
Plaque d'étanchéité
Placa de sellado
41517
Nut/Écrou/
Tuerca
38676
O-Ring
Joint torique
Arosello
38711
Cap
Capuchon/Tapón
73744**
Spout
Bec
Surtidor
Kohler Co. 17 1088008-2-B

Service Parts/Pièces de rechange/Piezas de repuesto (cont.)
57346**
58314**
1078427**
52843
29266
29497
Spring/Ressort/Resorte
24981
Packing/Emballage/Empaque
29520
35719
29548**
29476**
29508**
20960
29426**
29420
29424
Ring/Anneau/Anillo
29428**
29422
Tube/Tuyau/Tubo
1078429**
29429
58003**
29418**
29501
Nut/Écrou/Tuerca
Nut
Écrou
Tuerca
Washer/Rondelle/Arandela
Washer/Rondelle/Arandela
Washer/Rondelle/Arandela
Washer/Rondelle/Arandela
**Finish/color code must be specified when ordering.
**Vous devez spécifier les codes de la finition et/ou de la couleur
quand vous passez votre commande.
**Se debe especificar el código del acabado/color con el pedido.
Screw
Vis
Tornillo
Screw
Vis
Tornillo
Washer
Rondelle
Arandela
Washer
Rondelle
Arandela
O-Ring
Joint torique
Arosello
Crank
Bielle
Manivela
Plunger
Plongeur
Émbolo
Handle
Poignée
Manija
O-Ring
Joint
torique
Arosello
Face
Face
Placa
Ball Joint
Rotule
Articulación de bola
Showerhead
Pomme de douche
Cabeza de ducha
Showerhead
Pomme de douche
Cabeza de ducha
36728**
41364
O-Ring/Joint torique/Arosello
Sleeve/Manchon/Manga
Collar/Collier/Collarín
36638**
36662**
32966**
1020007**
Shower Arm
Bras de douche
Brazo de ducha
Setscrew
Vis de retenue
Tornillo de fijación
Escutcheon
Applique
Chapetón
1088008-2-B 18 Kohler Co.
/