Sony NEX 7 User manual

Category
Camcorders
Type
User manual

This manual is also suitable for

NEX-7
Interchangeable Lens
Digital Camera
Operations
Instruction Manual
E-mount
Parts and controls
Triple-dial-control
Custom key assignment
AF/MF button/AEL button
Others
GB
2
Table of contents
Parts and controls
Recording........................................................................... 5
Playback............................................................................. 7
Setup .................................................................................. 8
Triple-dial-control
Triple-dial-control operation ............................................. 10
Functions of the control dials ........................................... 12
Settings modes available ................................................. 13
Custom key assignment
Assigning the functions to the custom keys..................... 22
Functions that can be assigned ....................................... 23
AF/MF button/AEL button
Switching the focusing mode with the AF/MF button ....... 27
Locking the AE with AEL button ....................................... 28
This [Operations] describes basic operation of the camera, and some advanced
operations using the major functions. See [Getting Started] for information on
how to set up the camera, and the [Handbook] on the CD-ROM (supplied) for
more detailed functions and operations.
Operations
Getting Started Handbook
(This manual)
GB
3
Others
Menu list............................................................................ 30
The unique digital shooting functions............................... 39
α Handbook...................................................................... 42
Restriction of the functions ............................................... 43
Number of recordable images.......................................... 46
List of icons on the screen................................................ 49
Troubleshooting................................................................ 52
Specifications ................................................................... 53
Index................................................................................. 56
Parts and controls
All the major parts of your camera, and controls and
buttons that are used for recording, playback, and
setups are described here.
Parts and controls
GB
5
Recording
Navigation button
Selects the adjustment settings for the
Triple-dial-control operation.
Control dial R
Sets the items that appear at the top right of the screen.
Control dial L
Sets the items that appear at the top left of the screen.
Shutter button
Shoots still images.
Allows you to focus on the
subject when it is pressed half
way down.
Zoom ring
Zooms in or out the subject (when
a zoom lens is used).
ON/OFF (Power) switch
Turns on the camera at ON, off
the camera at OFF.
GB
6
* Be careful as the flash pops up when you press the button. Retract the flash when
you are not using it. Be careful not to pinch your finger when you push the flash
down.
(Flash pop-up) button*
Pops up the built-in flash.
Press the button when you want to fire the flash.
Push the flash down to retract it when you do not
want to fire the flash (page 44).
MOVIE button
Records movies.
Pressing this button again
stops recording (page 41).
DISP button
Switches the screen display.
button
Selects the drive
mode.
AF/MF button/AEL button
At AF/MF, the focusing mode
switches between auto and
manual while the button is held
down (page 27).
At AEL, AE is locked while the
button is held down (page 28).
Control wheel
Sets the items that appear to
the right of the screen. Turn
the control wheel.
button
Compensates for the exposure.
Parts and controls
GB
7
Playback
(Playback) button
Switches between the
shooting mode and the
playback mode.
DISP button
Switches the screen
display.
(Delete) button
Deletes the image when is
displayed at the lower right
corner of the screen.
Control wheel
Selects the image.
button
Displays the image
index.
(Enlarge Image) button
Enlarges the image on the
screen when it is pressed
while is displayed at the
center on the right side of the
screen.
Turning the control wheel
adjusts the scaling.
GB
8
Setup
Navigation button
Selects the adjustment
settings for the Triple-dial-
control operation.
Soft key A
Activates the
function displayed at
the upper right
corner of the screen.
Control wheel
Sets the items that appear to
the right of the screen. Turn
the control wheel.
Control dial R
Sets the items that appear at
the top right of the screen.
Control dial L
Sets the items that appear at
the top left of the screen.
Soft key C
Activates the
function displayed at
the center on the
right side of the
screen.
Soft key B
Activates the function
displayed at the lower right
corner of the screen.
Triple-dial-control
The Triple-dial-control allows you to adjust the
various shooting settings quickly and intuitively,
using the 3 dials and the Navigation button.
GB
10
Triple-dial-control operation
The Triple-dial-control allows you to adjust or set various shooting adjustment
items, simultaneously, on a single screen.
Even though you can set these functions separately on the menu screen, using
the Triple-dial-control, you can adjust these functions interactively on the
same screen.
1
Press the center of the control
wheel, and turn it to select a
shooting mode from P, A, S,
or M.
When [Soft key C Setting] is set to
[Custom], select a shooting mode by
MENU t [Shoot Mode].
2
Press the Navigation button to select the desired settings.
Navigation button
Items to be set by turning the control
wheel
Items to be set by turning the control dial
R
Items to be set by turning the control dial
L
GB
11
Triple-dial-control
You can lock the control dials L/R and the control wheel.
3
Set each settings by turning the control dials L/R and the
control wheel.
Preventing the dials from operating incorrectly
1
Hold the Navigation button down.
To unlock them, hold the Navigation button down again.
You can set to lock the control wheel only, or not to lock any of them by
selecting MENU t [Setup] t [Dial/Wheel Lock].
z Navigation button
Each time you press the button, the item toggles as follows.
Exposure Settings
Focus Settings
White Balance Settings
D-Range Settings
Creative Style Settings
r
r
r
r
In addition, [Picture Effect Settings] and
[Custom Settings] are available. You can
select the settings you want to use by
selecting MENU t [Setup] t [Function
Settings].
The Exposure Settings is permanent and
cannot be altered.
GB
12
Functions of the control dials
The control dials and the control wheel have different tasks, depending on the
“Settings” currently in effect.
See “Settings modes available” (pages 13 to 20) for more details.
* Permanent item
** This item cannot be selected in the default setting. You can add it by MENU t
[Setup] t [Function Settings].
Control dial L Control dial R Control wheel
Exposure Settings* Shutter speed/
Aperture/Program
shift
Aperture/
Exposure
compensation
ISO
Focus Settings (AF
mode)
Focus area Flexible spot
position (right/
left)
Flexible spot
position (up/
down)
Focus Settings (MF
mode)
Enlarging position
(up/down)
Enlarging position
(right/left)
Enlarging position
(up/down)
White Balance
Settings
Mode/Color
temperature
Color temperature
(B-A)
Color temperature
(G-M)
D-Range Settings DRO level/HDR
level
Exposure
compensation
Mode
Creative Style
Settings
Mode Option Option
Picture Effect
Settings**
Mode Option
Custom Settings** Custom Settings 1
mode
Custom Settings 2
mode
Custom Settings 3
mode
GB
13
Triple-dial-control
Settings modes available
What you can set with each Settings mode are described here.
indicates the default setting.
You can set the exposure compensation by turning the control dial R when [Anti
Motion Blur], [Sweep Panorama], or [3D Sweep Panorama] is selected.
Exposure Settings
Shooting mode Control dial L Control dial R Control wheel
Manual Exposure Shutter speed Aperture ISO
Shutter Priority Shutter speed Exposure
compensation
ISO
Aperture Priority Aperture Exposure
compensation
ISO
Program Auto Program shift Exposure
compensation
ISO
Focus Settings (AF mode)
Set [Autofocus Area].
In [Flexible Spot], move the area
right or left.
In [Flexible Spot], turn it to move
the area up or down, and press
the top/bottom/right/left to finely
adjust the area.
GB
14
You can set the enlarged position for manual focusing.
You can adjust the scaling with soft key B or C.
Control dial L
(Multi) The camera uses the 25 AF areas and focuses
automatically.
When the Face Detection function is active, AF
operates with priority on faces.
(Center) The camera uses the AF area located in the center
area exclusively.
(Flexible Spot) Moves the focusing area to focus on a small subject
or narrow area. Press soft key B to bring the
focusing area back to the center.
Focus Settings (MF mode)
White Balance Settings
Move the enlarged position up or
down.
Move the enlarged position right
or left.
Move the enlarged position up or
down.
Press the top/bottom/right/left to
finely adjust the position.
Set the mode.
Adjust the color between B (blue)
and A (amber).
Adjust the color between G
(green) and M (magenta).
GB
15
Triple-dial-control
Control dial L
AWB (Auto WB) The camera automatically detects a light source and
adjusts the color temperature.
(Daylight) If you select an option to suit a specific light source,
the color temperature is adjusted for the light source
(preset white balance).
(Shade)
(Cloudy)
(Incandescent)
(Fluor.: Warm
White)
(Fluor.: Cool
White)
(Fluor.: Day
White)
(Fluor.:
Daylight)
(Flash)
(C.Temp./Filter) Adjusts the color temperature depending on the light
source. Achieves the effect of CC (Color
Compensation) filters for photography. To select a
color temperature, press soft key B followed by
turning the control dial L.
(Custom) Allows to use the white balance setting retained by
[Custom Setup].
z Setting the custom white balance
Selecting [Custom] with the control dial L and pressing soft key B will display
the [Custom Setup] screen. Hold the camera so that the white area fully covers
the AF area located in the center, and then press the shutter button down. The
calibrated values are stored for later use.
GB
16
D-Range Settings
Control wheel
(Off) Does not use [DRO/Auto HDR].
(D-Range
Opt.)
By dividing the image into small areas, the camera
analyzes the contrast of light and shadow between
the subject and the background, producing the
image with the optimal brightness and gradation.
(Auto HDR) Shoots 3 images with different exposures, and then
overlays the bright area of the under exposed image
and the dark area of the over exposed image to
create an image with rich gradation. 1 image with
proper exposure and 1 overlaid image are recorded.
Control dial L
AUTO, Lv1 – Lv5
(D-Range Opt.)
Using the D-Range Optimizer, optimizes the
gradations of a recorded image in each area of the
image. Select the optimal level between Lv1 (weak)
and Lv5 (strong). Automatically adjusted at
[AUTO].
AUTO, 1.0 EV – 6.0
EV (Auto HDR)
Using the Auto HDR, sets the exposure difference,
based on the contrast of the subject. Select the
optimal level between 1.0 EV (weak) and 6.0 EV
(strong). Automatically adjusted at [AUTO].
Set the optimum level.
Set the exposure compensation
value (–5.0 EV to +5.0 EV).
Set the mode.
This figure shows the histogram before
the D-Range Optimizer or the Auto HDR
was applied, not that of the image that will
actually be shot.
GB
17
Triple-dial-control
Creative Style Settings
Control dial L
(Standard) For shooting various scenes with rich gradation and
beautiful colors.
(Vivid) The saturation and contrast are heightened for
shooting striking images of colorful scenes and
subjects such as flowers, spring greenery, blue sky,
or ocean views.
(Neutral) The saturation and sharpness are lowered for
capturing images in a quiet tone. This is also
suitable for capturing image material to be modified
with a computer.
z To use the D-Range Settings effectively
By combining the DRO/Auto HDR manual setting (exposure difference/
DRO-Level) and the exposure compensation, you can control the range of the
contrast of light and shadow (gradations) to be reproduced.
With DRO, set a DRO-Level to reproduce the shadow side, and set a minus
value of exposure compensation to reproduce the light side. A large minus
compensation and DRO-Level setting may cause noise. It is recommended that
you check the result first, by enlarging the playback image, etc.
With Auto HDR, set the exposure difference to adjust the overall reproduction
range, and shift the range towards light side (minus compensation) or shadow
side (plus compensation) with the exposure compensation.
Set the mode.
Adjust the contrast, saturation, or
sharpness.
Select the contrast, saturation, or
sharpness.
GB
18
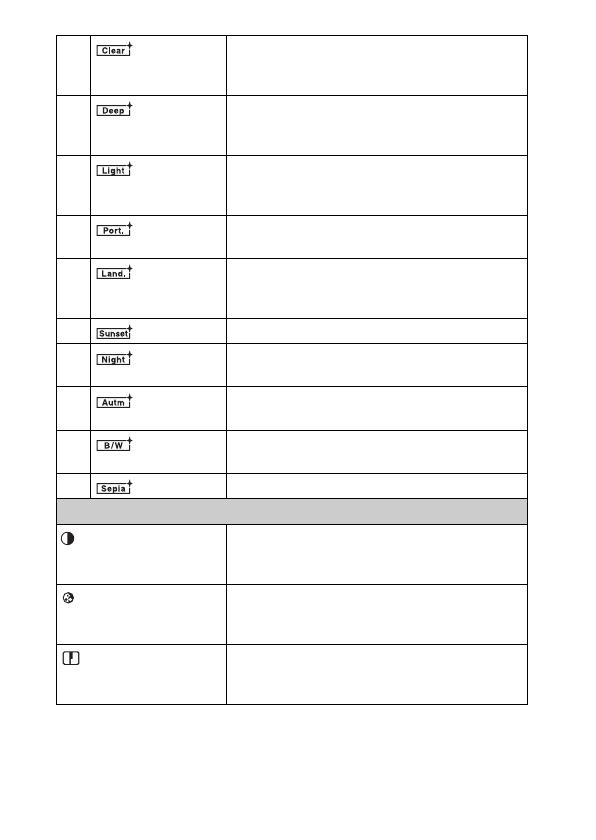
(Clear) For capturing images in a clear tone with limpid
colors in the highlighted area, suitable for capturing
radiant light.
(Deep) For capturing images with deep and dense color
expressions, suited to capturing the solid presence
of the subject.
(Light) For capturing images with bright and uncomplicated
color expressions, suited to capturing refreshingly
light ambience.
(Portrait) For shooting the skin color in a soft tone, ideally
suited for shooting portraits.
(Landscape) The saturation, contrast, and sharpness are
heightened for shooting vivid and crisp scenery.
Distant landscapes also stand out more.
(Sunset) For shooting the beautiful red of the setting sun.
(Night
Scene)
The contrast is attenuated for capturing a nightscape
that is more faithful to the real view.
(Autumn
leaves)
For capturing autumn scenes, vividly highlighting
the red and yellow of coloring leaves.
(Black &
White)
For shooting images in black and white monotone.
(Sepia) For capturing images in sepia monotone.
Control wheel
(Contrast) The higher the value selected, the more the
difference of light and shadow is accentuated, thus
making an impact on an image.
(Saturation) The higher the value selected, the more vivid the
color. When a lower value is selected, the color of
the image is restrained and subdued.
(Sharpness) The higher the value selected, the more the contours
are accentuated, and the lower the value selected,
the more the contours are softened.
GB
19
Triple-dial-control
Picture Effect Settings
Control dial L
(Off) Does not use the Picture Effect function.
(Toy Camera) Creates the look of a Toy Camera photo with shaded
corners and pronounced colors.
You can set the color tone with the control dial R.
(Pop Color) Creates a vivid look by emphasizing color tones.
(Posterization) Creates a high contrast, abstract look by heavily
emphasizing primary colors, or in black and white.
You can select primary colors or black and white
with the control dial R.
(Retro Photo) Creates the look of an aged photo with sepia color
tones and faded contrast.
(Soft High-key) Creates an image with the indicated atmosphere:
bright, transparent, ethereal, tender, soft.
(Partial Color) Creates an image which retains a specific color, but
converts others to black and white.
You can select a color with the control dial R.
(High Contrast
Mono.)
Creates a high-contrast image in black and white.
(Soft Focus) Creates an image filled with a soft lighting effect.
You can set the intensity of the effect with the
control dial R.
Set the mode.
Set the option.
GB
20
You can change the mode of the function assigned to [Custom Settings 1, 2, 3].
Assign the function by selecting MENU t [Setup] t [Function Settings] t
[Custom Settings 1, 2, 3].
When [Creative Style] or [White Balance] is assigned to [Custom Settings 3],
you can make a fine adjustment with soft key B.
(HDR Painting) Creates the look of a painting, enhancing the colors
and details.
The camera releases the shutter 3 times.
You can set the intensity of the effect with the
control dial R.
(Rich-tone
Mono.)
Creates an image in black and white with rich
gradation and reproduction of details. The camera
releases the shutter 3 times.
(Miniature) Creates an image which enhances the subject
vividly, with the background defocused
considerably. This effect may often be found in
pictures of miniature models.
You can select the area to be in focus with the
control dial R. The focus on other areas is greatly
reduced.
Custom Settings
Change the mode of the function
assigned to [Custom Settings 1].
The default setting is [White
Balance].
Change the mode of the function
assigned to [Custom Settings 2].
The default setting is [DRO/Auto
HDR].
Change the mode of the function
assigned to [Custom Settings 3].
The default setting is [Creative
Style].
  • Page 1 1
  • Page 2 2
  • Page 3 3
  • Page 4 4
  • Page 5 5
  • Page 6 6
  • Page 7 7
  • Page 8 8
  • Page 9 9
  • Page 10 10
  • Page 11 11
  • Page 12 12
  • Page 13 13
  • Page 14 14
  • Page 15 15
  • Page 16 16
  • Page 17 17
  • Page 18 18
  • Page 19 19
  • Page 20 20
  • Page 21 21
  • Page 22 22
  • Page 23 23
  • Page 24 24
  • Page 25 25
  • Page 26 26
  • Page 27 27
  • Page 28 28
  • Page 29 29
  • Page 30 30
  • Page 31 31
  • Page 32 32
  • Page 33 33
  • Page 34 34
  • Page 35 35
  • Page 36 36
  • Page 37 37
  • Page 38 38
  • Page 39 39
  • Page 40 40
  • Page 41 41
  • Page 42 42
  • Page 43 43
  • Page 44 44
  • Page 45 45
  • Page 46 46
  • Page 47 47
  • Page 48 48
  • Page 49 49
  • Page 50 50
  • Page 51 51
  • Page 52 52
  • Page 53 53
  • Page 54 54
  • Page 55 55
  • Page 56 56
  • Page 57 57
  • Page 58 58
  • Page 59 59
  • Page 60 60
  • Page 61 61
  • Page 62 62
  • Page 63 63
  • Page 64 64

Sony NEX 7 User manual

Category
Camcorders
Type
User manual
This manual is also suitable for

Ask a question and I''ll find the answer in the document

Finding information in a document is now easier with AI