Page is loading ...

support.R82.org
EN 12182
2020-09 - rev.12
90 - -15°
<80 kg 176.4 lb)
Gazelle PS User Guide
Gazelle PS User Guide

support.R82.org
3
ENGLISH
DEUTSCH
10–19
20–29
3
NEDERLANDS
DANSK
30–39
40–49
4
NORSK
SVENSKA
50–59
60–69
mm (inch)
5
SUOMI
ESPAÑOL
70–79
80–89
www.support.R82.com
999609xxxx - 2013.03
XXXXXXX/01
2.
3.
5. 6.
4.
1.
www.support.R82.com
999609xxxx - 2013.03
XXXXXXX/01
2.
3.
5. 6.
4.
1.
6
FRANÇAIS
ITALIANO
90–99
100–109
7 - 9
PORTUGUÊS
ČESKY
110–119
120–129

4
support.R82.org

5
support.R82.org
mm (inch)
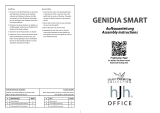
1
2
3
Overall width
480 (19”) 580 (23”) 650 (26”)
Length
760 (30”) 880 (35”) 990 (35”)
Overall height, horizontal
760 (30”) 800 (35”) 900 (35”)
User height, floor to axil
450 - 950mm
(18 - 37”)
600 - 1050 mm
(24 - 41”)
700 - 1250 mm
(28 - 49”)
Angle board
90 - -15º 90 - -15º 90 - -15º
Max load
40 kg
(88.2 lb)
60 kg
(132.3 lb)
80 kg
(176.4 lb)
Total mass
20 kg
(44 lb)
22 kg
(48 lb)
24 kg
(53 lb)
Max rated load
62 kg
(136.6 lb)
84 kg
(185.1 lb)
106 kg
(233.6 lb)
mm
(inch)

6
support.R82.org
www.support.R82.com
999609xxxx - 2013.03
XXXXXXX/01
2.
3.
5. 6.
4.
1.
9996097100
www.support.R82.com
999609xxxx - 2013.03
XXXXXXX/01
2.
3.
5. 6.
4.
1.
9996097119
www.support.R82.com
999609xxxx - 2013.03
XXXXXXX/01
2.
3.
5. 6.
4.
1.
9996097120
www.support.R82.com
999609xxxx - 2013.03
XXXXXXX/01
2.
3.
5. 6.
4.
1.
www.support.R82.com
999609xxxx - 2013.03
XXXXXXX/01
2.
3.
5. 6.
4.
1.

7
support.R82.org
EN Correct lifting point DE: Korrekter Hebepunkt NL: Correcte techniek van
optillen
DK: Korrekt løftepunkt
NO: Riktig løftpunkt SV: Korrekt lyftpunkt FIN: Oikea nostopiste ES: Punto de elevación
correcto
FR: Point de levée approprié IT: Punto di sollevamento
corretto
PT: Corrija o ponto de elevação BR: Ponto de elevação correto
RU: Надлежащая точка
подъема
PL: Prawidłowy punkt podno-
szenia
CZ: Správný zvedací bod
SN: 请调整吊点
JP: リフティング・ポイン
トの修正
GR: Σωστό σημείο λαβής
EN: For indoor use DE: Für den Innengebrauch NL: Voor binnenhuis gebruik DK: Til indendørs brug
NO: For innendørs bruk SV: För inomhusbruk FIN: Sisäkäyttöön ES: Para uso en interiores
FR: Utilisation intérieur IT: Per uso interno PT: Para utilização em
interiores
BR: Para uso interno
RU: Для использования в
помещении
PL: Do użytku wewnątrz CZ: Pro vnitřní používání
SN: 适用于室内使用
JP: 屋内使用
GR: Κατάλληλο για εσωτερική
χρήση
EN: Consult instructions. The
latest version of the instruc-
tions is always available on
the R82 website and can be
printed in larger sizes
DE: Bedienungsanleitung.
Die neueste Version der
User Guide ist auf der R82
Internetseite verfügbar und
steht zum Download bzw.
Ausdruck zur Verfügung
NL: Raadpleeg de instruc-
ties. De meest recente
versie van alle instructies
zijn altijd beschikbaar en
kunnen worden afgedrukt in
de groter formaat vanaf de
R82 website
DK: Se vejledning. Den
seneste version af denne
vejledning er altid tilgængelig
og kan udskrives i større
størrelser fra R82 hjem-
meside
NO: Sjekk bruksanvisning
på nett. Nyeste versjon av
bruksanvisningen er alltid
tilgjengelig, og kan skrives ut
fra R82 nettsted
SV: Se anvisningarna.
Den senaste versionen av
anvisningarna nns alltid
tillgänglig och kan skrivas
ut i större storlek från R82:s
webbplats
FIN: Lisäohjeet. Viimeisin
versio kaikista ohjeista on
aina saatavilla ja tulostetta-
vissa R82 nettisivustolta
ES: Consulte las instruc-
ciones. La última versión
de todas las instrucciones
está siempre disponible y se
puede imprimir en tamaños
superiores desde la página
web de R82
FR: Se reporter aux instruc-
tions / consulter les instruc-
tions. La version la plus ré-
cente est toujours disponible
et peut être imprimée dans
un grand format à partir du
site internet de R82
IT: Leggere le istruzioni. Le
ultime versioni dei manuali
di istruzione sono sempre
disponibili sul sito web R82 e
possono essere stampate in
dimensioni maggiori
PT: Leia as instruções.
As últimas versões das
instruções estão sempre
disponíveis na página da
R82 na internet e podem
ser impressas em tamanhos
maiores
BR: Leia as instruções.
As versões mais recentes
das instruções sempre
encontram-se disponíveis
no site da R82 e podem ser
impressas em tamanhos
maiores
RU: Прочитайте инструкции.
Новейшая версия
инструкций всегда доступна
на веб-сайте компании R82
и может быть распечатана в
увеличенном размере
PL: Zapoznanie się z
instrukcją. Najnowsze
wersje instrukcji obsługi
są dostępne na stronie
internetowej R82 i można
je wydrukować w większych
formatach
CZ: Poradenství a instrukce.
Nejaktuálnější verze všech
instrukcí je vždy dostupná
na webu R82, odkud se dá
stáhnout a i vytisknout
SN: 参考说明. 所有说明的
最新版本都能够在R82网络
上下载或打印
JP: 説明をお読みくださ
い. この説明の最新バージ
ョンは、R82 の Webサイト
からいつでもご利用いただ
けます。大きなサイズで印
刷することができます
GR: Διαβάστε τις οδηγίες.
Οι τελευταίες εκδόσεις
των οδηγιών είναι πάντοτε
διαθέσιμες στην ιστοσελίδα
της R82 και μπορούν να
εκτυπωθούν σε μεγαλύτερα
μεγέθη

9
support.R82.org
EN: Warewashing machine DE: Spezialwaschmaschine (für
Rehaprodukte)
NL: VVaatwasser DK: Industri-vaskemaskine
NO: Desinseringsmaskin SV: Rengöring av produkten
i maskin
FIN: Ei saa pestä pesu-
koneessa
ES: Máquina de lavado
FR: Machine à laver IT: Lavastoviglie industriale PT: Máquina de lavar loiça BR: Máquina de lavar loiça
RU: Посудомоечная машина PL: Zmywarka CZ: Myčka na zdravotní
pomůcky
SN: 请勿使用洗碗机清洗
JP: 器具洗浄機
GR: Πλυντήριο εξοπλισμού
EN: Prohibition: Incorrect
lifting points, especially on
stairs
DE: Achtung: Ziehen oder
heben Sie den Rollstuhl,
insbesondere auf Treppen,
nicht mit dem Schiebebügel
bzw. den Schiebegriffen
NL: Waarschuwing: Onjuiste
optilpunten, vooral op de
trap.
DK: Forbud: Forkerte
løftepunkter, især ved løft
på trapper
NO: Forbudt! Ikke dra/løft
stolen i kjørehåndtakene,
spesielt ikke i trapper
SV: Förbud: Dra/lyft inte
stolen genom att hålla i
körbygeln, framför allt inte
i trappor
FIN: Kielletty: Älä vedä/
nosta tuolia työntötangosta,
etenkään portaissa
ES: Prohibición: No tire
hacia arriba ni levante la
silla sujetándola del asa de
empuje, especialmente en
las escalesras
FR: Interdiction: N’utilisez
pas la barre de poussée
pour tirer/soulever le
fauteuil, notamment dans les
escaliers
IT: Attenzione: Non tirare o
sollevare la carrozzina con il
maniglione di spinta, soprat-
tutto sulle scale
PT: Proibição: Não puxe ou
levante a cadeira pelo push
de impulso, especialmente
em escadas
BR: Proibido: Não puxe ou
levante a cadeira pela alça
de condução, especialmente
em escadas
RU: Запрещено!: Не тяните/
поднимайте кресло-коляску
за ручку, особенно на
ступеньках
PL: Zakaz: Nie ciągnąć/
podnosić wózka za
uchwyt do prowadzenia, w
szczególności na schodach
CZ: Zákaz: Netahejte a nez-
vedejte podvozek za vzpěru,
zvláště ne na schodech
SN: 禁止: 不要用推杆拉
或提升椅子,尤其在阶梯
上时。
JP: 禁止: プッシュブレス
を持って、シートを引っ張
ったり、持上げたりしない
でください。(特に階段
使用時)
GR:Απαγόρευση: Μην
τραβάτε/ανασηκώνετε
το αμαξίδιο μέσω της
χειρολαβής ώθησης, ειδικά
σε σκάλες
EN: Correct use DE: Richtig NL: Juist gebruik DK: Korrekt brug
NO: Korrekt bruk SV: Korrekt användning FIN: Oikea käyttö ES: Uso correcto
FR: Utilisation correcte IT: Uso corretto PT: Uso correto BR: Uso correto
RU: Правильное
использование
PL: Prawidłowe użytkowanie. CZ: Správne používanie
SN: 正确使用
JP: 全適切な使用
GR: Ορθή χρήση
EN: Incorrect use DE: Falsch NL: Onjuist gebruik DK: Forkert brug
NO: Feil bruk SV: Felaktig användning FIN: Virheellinen käyttö ES: Uso incorrecto
FR: Utilisation incorrecte IT: Uso errato PT: Uso incorreto BR: Uso incorreto
RU: Неправильное
использование
PL: Nieprawidłowe
użytkowanie.
CZ: Nesprávne používanie
SN: 错误使用
JP: 適不適切な使用
GR: Λανθασμένη χρήση

10
support.R82.org
A
B
Ready for use
The Gazelle PS is folded when delivered,
to obtain as little space as possible, during
transportation. Follow the description below, to
unfold your Gazelle PS:
1. Make sure that the four wheels are locked.
2. Press against the oor frame with your
foot, as the Gazelle PS is raised to vertical
position. Make sure the Gazelle PS ts
exactly into the tting on the oor frame.
3. With the Gazelle PS a in vertical position,
use the enclosed 6 mm Allen key to fasten
the screw (A). The Allen key is placed on
the Gazelle PS (B) and is always nearby for
adjustments.
Head support with facial aperture
Mounting of Head support with facial aperture:
A. The two retaining bars go through the
adjustable trunk support after removal of
two plastic plugs.
B. Positioning knobs can be screwed into place
after making cut-outs in the adjustable
trunk support.
It can be helpful to mount the head support with
facial aperature before placing the child on the
table in horizontal position. Remove the head
support when the table is raised into vertical
position.
Trunk support and extension
Height adjustable trunk support and extension
can be mounted onthe Gazelle PS (A).
Fasten the screws on the back (B).sie wieder,
wenn Sie die richtige Höhe eingestellt haben.
A
A
B
B
ENGLISH
EN

11
support.R82.org
B
A
Angling
Degree indicator (A)
Adjust the angel of the Gazelle PS from vertical
to 15° under horizontal by pressing the foot
pedal (B).
As security, the foot pedal can be locked at the
wanted angle position. Turn the button at the
lower end of the gasspring and the Gazelle PS
locks (C).
- 05 Squeezing Hazard
Independent abduction
Adjusting the abduction 0° - 30° by turning the
handle in both sides (A).
Retractable handle for tilt adjustment (B).
- 05 Squeezing hazard
- 05 Squeezing hazard
A
B
EN

12
support.R82.org
A
C
B
Angling of lower leg
Mount the bar for the lower leg angling on the
abduction bar, as follows:
1. Loosen the handle (A) to remove the
support.
2. Loosen the Allen screw (B) to remove the
knee supports.
3. Mount the knee support on the bar for the
lower leg angling and tighten the handle (A).
4. Mount the foot support on the bar for the
lower leg angling.
Adjust the hight of the lower leg angling by
turning the handle (B) and adjust the angling by
turning the handle (C). To adjust the foot support
see page 16.
Knee support
As standard, the Gazelle PS is delivered with knee
supports mounted to be used by front-standing
children. Turn around the knee supports, to be
able to use it for backstanding children:
1. Loosen the handle (A) to remove the foot
supports.
2. Loosen the handle (B) to remove the
complete knee support unit.
3. Mount the complete knee support unit
on the opposite side and fasten with the
handle.
4. Turn the tting for the knee support 180o,
by loosening the screws (C) and (D).
5. Loosen the screw (E) and turn around the
knee support, for backstanding children.
Adjust the knee support with the enclosed 6 mm
Allen key. Loosen the screws (C) and (D) and the
knee supports are depthadjustable. By loosening
the screw (E) the knee supports adjust in width
and angles. Use the handle (B) to adjust the
height of the complete knee support unit.
A
C
D
E
B
EN

13
support.R82.org
Foot support
For use of back standing:
When the knee support is turned, the foot
supports must be mounted in the same side as
they were demounted.
1. Mount the foot supports and tighten the
handle. (A).
2. Loosen the screw (B) and adjust the depth
of the foot support.
3. Loosen the screws (C) and turn the foot
support 180°.
4. Tighten the screws in the requested
position.
The foot plate mounting is mounted on the joint.
By means of this, the footplate can be adjusted
in different angles by loosening the screws (C) .
The plate can be adjusted in the depth by
loosening the handle (D), or the unbracho screw
(B).
EN
A
B
C
D

14
support.R82.org
A
B
A
B
C
D
Strap
Mount the strap on the trunk support or on the
basic plate considering where the support is
needed.
The strap is mounted on the back (A) and fastend
i front with velcro and a snap-lock tting (B).
Back support
The back support is adjustable in height (A) and
in depth (B).
Before placing the child:
1. Remove the back support (C)
2. Fold down the tting for back support by
pulling the release chain (D).
Fasten with the handles.
The child may not sit on the mounting for the
back support. There must always be a couple of
centimetres between the child and the mounting.
05 Sqeezing hazard!
Take care when retting the back support.
EN

15
support.R82.org
B
C
A
Tray with / without bowl
Loosen the big handles (A) and (B) completely,
and place the tray-mounting in the two tubes
on the back. Fasten the big handles (A) and (B)
again.
Loosen the big handle (A) and the tray-mounting
can be turned through 180 degree's for either
prone or supine use.
Place the tray in the tray-mounting tubes. When
the required position is achieved, fasten the big
handles (C)
Loosen the handles (B) to adjust the height of
the tray. Loosen the handle (A) to adjust the
angle for the tray.
The tray with bowl is delivered with an extra
cover plate, so it can be used as a normal tray.
A
Side support
Mount the side supports on the trunk support
to give the rightsupport to the upper part of the
body or on the basic plate to support the body
and hips.The side supports are adjustable in
height and in width (A).
EN

16
support.R82.org
Adjusting the gas spring
Gazelle PS is equipped with a gas spring for
angle adjustment. After a while it might need
adjustment. The adjustment is necessary when:
The gas spring is releasing itself
The gas spring can not be released
If the gas spring releases itself, loosen the nut
(B) with and 17 mm wrench. Turn the bar (A) anti-
clock-wise to loosen. Tighten the nut (B) again.
If the gas spring will not release, loosen the nut
(B) with a 17 mm wrench. Turn the bar (A) clock-
wise to tighten. Tighten the nut (B) again.
EN
A
B

17
support.R82.org
EN
We appreciate your choice of a new product
from R82 - a worldwide supplier of technical aids
and appliances for children and teenagers with
special needs. To fully benet from the options
offered by this product please read this User
Guide before use and save it for future reference.
Intended purpose
The product is primarily for prone standing,
however, supine standing is also possible. It tilts
innitely from vertical to 15° past horizontal. The
product is available in 3 sizes and is for indoor
use only.
The target group for this device is disabled
children with cerebral palsy (CP) at ages from 1
to 14 years, GMFCS level III - IV. The consequence
of CP is either spasticity, reduced walking or
standing skills and/or impairments in addition
to their motor disability. Other effects with no
relation to this device is intellectual, vision and
hearing impairment. Also children with muscular
dystrophy, spina bida, spinal cord injuries and
neurological impairments can be subject to the
device.
Enclosed tools:
• 6 mm Allen key
Declaration of Conformity
This product conforms to the requirements of
the Medical Devices Regulation (2017/745).
The CE mark must be removed when rebuilding
the product, when used in combination with a
product from another manufacturer or when
using other than original R82 spare parts and
ttings. Further, this product conforms to the
requirements according to:
• EN 12182
Disposal
When a product reaches the end of its lifetime,
it should be separated by material type so that
the parts can be recycled or disposed of properly.
If required, please contact your local dealer for
a precise description of each material. Please
contact your local authorities to be informed
of the options available for recycling in an
environmentally-friendly way.
Accessories and spare parts
The products from R82 can be supplied with a
variety of accessories which comply with the
needs of the individual user. Spare parts can be
ordered on request. Find the specic accessories
on our website or contact your local dealer for
further information.
R82 Warranty
R82 offers a 2-year warranty against defects
in workmanship and materials and a 5-year
warranty on breakage of the metal frame
caused by defects in welds. The warranty
would be adversely affected if the customer’s
responsibility of servicing and/or maintenance
is not carried out according to the guidelines
and intervals prescribed by the supplier and/or
stated in the User Guide. For further information,
we refer to the R82 homepage/download.
The warranty is only granted in the country
where the product was purchased and if the
product can be identied by the serial number.
The warranty does not cover accidental damage,
including damage caused by misuse or neglect.
The warranty does not extend to consumable
items e.g. tires or upholstery, which are subject
to normal wear and tear and need periodic
replacement.
The warranty is null and void if other than
original parts/accessories are used, or if the
product has not been maintained, repaired or
altered according to the guidelines and intervals
prescribed by the supplier and/or stated in the
User Guide. R82 reserves the right to inspect
the product being claimed for and the relevant
documentation before agreeing to the warranty
claim, and to decide upon whether to replace or
repair the defective product. It is the customer’s
responsibility to return the item being claimed for
under warranty to the address of purchase.
Presales information
• support.r82.org

18
support.R82.org
Safety
Signs, symbols and instructions placed on this product must never be covered or removed and must
remain present and clearly legible throughout the entire lifetime of the product. Immediately replace or
repair illegible or damaged signs, symbols and instructions. Contact your local dealer for instructions.
In case of an adverse event occurred in relation to the device, incidents should be reported to your local
dealer and the national competent authority in a timely manner. The local dealer will forward information
to manufacturer.
Caregiver
• Read the “User Guide” carefully before use
and keep it for future reference. Incorrect
use of this product may cause serious injury
to the user
• This product contains small parts which
could present a choking hazard if removed
from their intended placing
• Always use the correct lifting techniques and
aids for this purpose
• Never leave the user unattended in this
product. Ensure permanent supervision by
an adult
• Repair/replacements must only be made
using new original R82 spare parts and
ttings and carried out in accordance
with the guidelines and service intervals
prescribed by the supplier
• If there is any doubt as to the continued
safe use of your R82 product or if any
parts should fail, stop using the product
immediately and contact your local dealer
as soon as possible
• Ensure that moving parts does not squeeze
or trap body parts when adjusting them
• Transportation of the product whilst the user
is in it is not allowed.
Environment
• Observe the surface temperature on the
product, before placing an user in it. This
goes especially for users with insensitive
skin as they cannot feel the heat. If the
surface temperature is above 41°C then
allow the product to cool before use
• Use this product on a level surface without
any obstacles. Be aware of reduced
maneuverability on slippery surfaces
• When using on inclines, please refer to
measurements
User
• If the user is close to the max. load limit
and/or has a lot of involuntary movements,
e.g. rocking, a larger size with a higher max.
load or a different R82 product should be
considered
Product
• Carry out all positional adjustments on the
product and accessories and ensure that
all knobs, screws and buckles are securely
fastened before use. Keep all tools out of
the reach of children
• Activate the brakes before placing the user
into the product
• Ensure the stability of the product is
maintained before placing the user in it
• Ensure the castors are fully-functional and
secure before use
• Inspect the product and all of its accessories
and replace any worn out parts before use
• Do not expose the gas spring to pressure or
high temperatures. DO NOT puncture
• Do not expose the piston rod to scratches
etc. It is important to use a cloth or the like,
if tools are used to adjust the gas spring
• The footplate is for support only! The foot
support does not have a weight bearing
function
• This product is tested for resistance to
ignition at level non-ignition in accordance
with EN 1021-1 and EN 1021-2
• The product might lose its ame resistant
characteristics if using other than original
R82 cushioning
• This product is not to be occupied in a motor
vehicle. The user must be positioned in a
vehicle seat and the product must be stored
in a luggage compartment
• The user must not occupy the product
while it is being transported into or out of a
vehicle by a lift
EN

19
support.R82.org
Service information
Maintenance of a medical device is wholly the responsibility of the owner of that device. Failure to
maintain a device in accordance with the instructions may invalidate the device’s warranty. Furthermore,
failure to maintain a device may compromise the clinical condition or safety of users and/or their
caregivers. Do not perform service and maintenance while the user is in the product.
1st Day
• Read the User Guide carefully before
use and store it in a safe place for future
reference
Daily
• Use a dry cloth to clean the product
• Visual inspection. Repair or replace any
damaged or worn-out parts
• Ensure that all fasteners are in place and
tted correctly
• Check all ttings and buckles for signs of
worn out parts
• Be aware of any MAX mark indications
before adjustment
Weekly
• Check that all castors are moving freely
and that all wheel locks/brakes are easily
activated
• Wipe off any residue and dirt from the
product using a cloth with warm water and a
mild detergent/soap and dry before use
• Disinfect the product. please check the
disinfection section in this User Guide for
more information
Monthly
• All nuts and bolts on this product must be
checked and tightened to avoid unnecessary
failures
• Oil the swing-away parts. We recommend
you use a professional lubricant system
Annually
• Inspect the frame for cracks or signs for
worn-out parts and carry out annual service.
Never use a product which appears to be
substandard or faulty
Warewashing machine
This product can be washed at 60° using a mild
detergent for 10 minutes in a washing machine
designed for medical devices. Use the machine’s
drying function to dry the product.
Disinfection
The product can be disinfected with a 70%
disinfectant IPA solution. It is recommended to
wipe off any residue and dirt from the product,
using a cloth with warm water and a mild
detergent/soap without chlorine and let it dry
before disinfection.
Service interval
A detailed inspection of the product must be
made every 12 months (every 6 months for heavy
users) and every time the product is reissued for
use. The inspection should be carried out by a
technically competent person who has been
trained in the use of the product.
The lifetime of this product in normal use is 5
years if all maintenance and servicing is carried
out in accordance with the manufacturer’s
instructions and demonstrably recorded.
EN

130
support.R82.org

support.R82.org

Gazelle PS User Guide
M1110
Reserving our rights for printer’s error or discontinued products
Please find an updated edition on our website R82.org
The design and patents are all registered design and patents of R82.
© 2009 R82 A/S All rights reserved The R82 logo and the icons are registered trademarks of R82 A/S
R82 A/S
Parallelvej 3
8751 Gedved
Denmark
Tel +45 79 68 58 88
Fax +45 75 66 51 92
R82.org
facebook.com/R82global/
SUPPLIER INFORMATION: www.r82.org/local-dealer/
/