Page is loading ...

Operating Instructions
METRA HIT 16U
Cable Multimeter for Measurements in
Symmetrical Copper Cable Networks
3-349-228-15
7/7.04

2 GOSSEN METRAWATT GMBH
(17)
(8)(9) (10) (11)
(12)
(19)
(18)
(13)(14)(16) (15)
(1)
(5/5a)
(2)
(3)
(6)
(4/4a)
max. 600 V !
(7a)
(7)

GOSSEN METRAWATT GMBH 3
GB
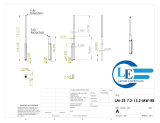
Key to Measuring Instrument Layout
(1) LCD panel
(2) ON|OFF: Key for switching the device, as well as
display illumination, on and off
in the specified order:
→ Press briefly:device on
→ Press briefly:LCD illumination on
→ Press briefly:LCD illumination off
→ Press and hold:device off
(3) DATA|MIN/MAX: key for following saving
measured values and Min-Max values
(4) AUTO|MAN
→ Press briefly: manual range selection
→ Press and hold: automatic range selection
(4a) ISO|ON/OFF: insulation resistance measurement
:
→ Press briefly:switch insulation measurement on and off
(rotary selector switch must be set to MΩ
ISO
)
(5) FUNC: Multifunctional key
→ Press briefly: change to measurement sub-function,
e.g. Hz,
, , ° C (red symbols)
→ Press and hold: current function or return to main
measuring function (white symbols)
(5a) POL|UISO: insulation resistance measurement
:
→ Press and hold key
to reverse polarity of conductors under test
(rotary selector switch must be set to MΩ
ISO
)
(6) Rotary selector switch for measuring function selection
(7) Connector jacks for multimeter measurement
(7a) Connector jacks for insulation resistance measurement
Key to LCD Panel Layout
(8) Symbol for continuous duty
(9) Digital display with decimal point and polarity display
(10) Display for manual measuring rage selection,
and for storage of measured and MIN/MAX values
(11) DC/AC indicator
(12) Unit of measure
(13) Indicates overranging
(14) Pointer for analog display
(15) Scale for analog display
(16) Indicates that the negative analog
display range has been exceeded
(17) Unit of measure °C for temperature measurement
(prerequisite: accessory temperature sensor)
(18) Low battery display
(19) Indicates that acoustic signals are active

4 GOSSEN METRAWATT GMBH
Table of Contents Page
1 Safety Features and Precautions .................................... 5
2 Initial Start-Up ................................................................. 7
3 Selecting Measuring Functions and Ranges ................... 8
3.1 Automatic Measuring Range Selection ................................ 8
3.2 Manual Measuring Range Selection .................................... 8
3.3 Quick Measurements ......................................................... 9
4 LCD .................................................................................. 9
4.1 Digital Display ................................................................... 9
4.2 Analog Display .................................................................. 9
4.3 Background Illumination ..................................................... 9
5 Measured Value Memory – DATA Function. .................. 10
6 Saving Minimum and Maximum Values –
Min-Max Function. ........................................................ 11
7 Voltage Measurements – V Function. ........................... 12
7.1 Socket Jack Connections ................................................. 12
7.2 Transient Overvoltages ..................................................... 13
7.3 Voltage Measurements at Above 600 V ............................. 13
8 Resistance Measurement – Ω Function. ...................... 14
9 Alternating Current Measurement with the
WZ12B Clip-On Current Transformer – Clip Function . .. 14
10 Continuity and Diode Testing
– Diode Function and Beeper . ..................................... 15
11 Capacitance Measurement – F Function. ...................... 16
12 Frequency Measurement – Hz Function. ...................... 17
13 Temperature Measurement – °C Function .................... 18
14 Insulation Resistance Measurement
in Telecommunications Networks – MΩ
ISO Function
. ..... 20
14.1 Connecting the Measurement Cables ................................ 20
14.2 Detection of Interference Voltages ................................ 20
14.3 Performing Insulation Resistance Measurements ............... 21
14.4 Ending Measurement and Discharge ................................. 22
15 RS 232 C Interface ........................................................ 23
16 Characteristic Values .................................................... 24
17 Maintenance ................................................................. 30
17.1 Battery ............................................................................ 30
17.2 Housing .......................................................................... 31
18 Repair and Replacement Parts Service
DKD Calibration Lab *
and Rental Instrument Service ...................................... 31
19 Guarantee ...................................................................... 32
20 Product Support ............................................................ 32

GOSSEN METRAWATT GMBH 5
GB
1 Safety Features and Precautions
You have selected an instrument which provides you with a
high level of safety.
This instrument fulfills the requirements of the applicable
European and national EC guidelines. We confirm this with
the CE marking. The relevant declaration of conformity can
be obtained from GOSSEN METRAWATT GMBH.
The cable multimeter is manufactured and tested in accor-
dance with safety regulations IEC 61010–1:2001/
EN 61010–1:2001/VDE 0411–1:2002. When used for its
intended purpose, safety of the operator, as well as that of
the instrument, is assured. Their safety is however not
guaranteed, if the instrument is used improperly or handled
carelessly.
In order to maintain flawless technical safety conditions, and to
assure safe use, it is imperative that you read the operating
instructions thoroughly and carefully before placing your instru-
ment into service, and that you follow all instructions contained
therein.
Observe the following safety precautions:
• The instrument may only be operated by persons who
are capable of recognizing contact hazards and taking
the appropriate safety precautions. Contact hazards
exist anywhere, where voltages of greater than 33 V
(RMS) may occur.
• Avoid working alone when taking measurements which
involve contact hazards. Be certain that a second person
is present.
• Maximum allowable voltage between any of the connector
jacks (7) and earth is 600 V, category II. Overload capacity
values are listed in chapter 16.
• Nominal voltage at the system may not exceed 600 V.
• Voltage measurement may only be performed with the
selector switch set to the V , V or V position.
Measurement of voltages of 150 V and greater may only be
performed with the KS17-2 cable set (personal safety).
Only this cable set is suitable for measuring category
III / 1000 V and IV / 600 V.
• Be prepared for the occurrence of unexpected voltages
at devices under test (e.g. defective devices). For exam-
ple, capacitors may be dangerously charged.
• Make certain that the measurement cables are in flaw-
less condition, e.g. no damage to insulation, no interrup-
tions in cables or plugs etc.
• Special care is required when measurements are made
in HF electrical circuits. Dangerous pulsating voltages
may be present.
• Measurements under moist ambient conditions are not
permitted.
• Be absolutely certain that the measuring ranges are not
overloaded beyond their allowable capacities. Limit values
can be found in the “Measuring Ranges” table in chapter
16, “Characteristic Values”.

6 GOSSEN METRAWATT GMBH
Meanings of symbols on the instrument:
Warning concerning a source of danger
(attention: observe documentation)
Earth terminal
Continuous, doubled or reinforced
insulation
Life endangering for the operator if
instructions identified with this symbol
are not observed
Indicates EC conformity
DKD calibration certificate (red seal):
Repair, Parts Replacement and Balancing
When the instrument is opened, voltage conducting parts
may be exposed. The instrument must be disconnected
from the measuring circuit before executing repairs, replac-
ing parts or balancing. If balancing, maintenance or repair
of a live open instrument is required, this may only be car-
ried out by trained personnel who are familiar with the dan-
gers involved.
Defects and Extraordinary Strains
If it may be assumed that the instrument can no longer be
operated safely, it must be removed from service and
secured against unintentional use.
Safe operation can no longer be relied upon:
• If the device demonstrates visible damage
• If the instrument no longer functions
• After long periods of storage under unfavorable condi-
tions
!
Consecutive number
GOSSEN-METRAWATT calibration laboratory
Date of calibration (year – month)
German calibration service calibration laboratory
B0730
01-07
DKD-K-
19701

GOSSEN METRAWATT GMBH 7
GB
2 Initial Start-Up
Battery
Your instrument is supplied with an installed 9 V flat-cell
battery in accordance with IEC 6 LR 61, and is ready for
operation. Be sure to refer to chapter 17.1, “Battery”, before ini-
tial start-up, or after your device has been in storage for a lengthy
period of time.
Switching the Instrument On
➭ Briefly press the ON|OFF key.
Power-up is acknowledged with an acoustic signal. As
long as the key is held depressed, all of the segments at
the liquid crystal display (LCD) are illuminated. The LCD
is shown in the diagram on page 2. The instrument is
ready for use as soon as the key is released.
After switching the instrument off, it cannot be switched
back on again for a period of 3 seconds.
Switching LCD Illumination On and Off
➭ Briefly press the ON|OFF key after the instrument has
already been switched on.
Illumination is switched off automatically after approxi-
mately 2 minutes.
Note: Electrical discharge and high frequency interference
may cause incorrect displays to appear, and may disrupt
the measuring sequence. In such cases, switch the instru-
ment off and back on again in order to reset. If the problem
persists, briefly dislodge the battery from the connector
contacts.
Disconnect the instrument from the measuring circuit before
opening and refer to chapter 17, “Maintenance”!
Automatic Shutdown
The instrument switches itself off automatically if the mea-
sured value remains constant for a period of approximately
10 minutes (measured value fluctuation ≤±2 digits),
assuming that none of the keys or the rotary selector
switch are activated during this time.
Disabling Automatic Shutdown
The instrument can be set to continuous duty. Press the
multifunction key FUNC and the ON|OFF key simultaneously
when switching the instrument on to this end. Continuous
duty is indicated at the LCD by means of the symbol (8).
Switching the Instrument Off
Press and hold the ON|OFF key.

8 GOSSEN METRAWATT GMBH
3 Selecting Measuring Functions and Ranges
3.1 Automatic Measuring Range Selection
The cable multimeter us equipped with automatic measur-
ing range selection for all ranges except the 30 mV and
the 300 mV ranges. Auto-ranging is active as soon as
the instrument is switched on. The instrument automati-
cally selects the measuring range which allows for highest
possible resolution of the applied quantity.
When the instrument is switched to frequency measure-
ment, the previously selected voltage measuring range
remains active.
The instrument is automatically switched to:
3.2 Manual Measuring Range Selection
Auto-ranging can be deactivated and measuring ranges
can be selected manually in accordance with the following
table.
Manual operation is deactivated by pressing and holding
the AUTO|MAN key (approx. 1 s), by turning the rotary selec-
tor switch or by switching the instrument off and then back
on again.
If the instrument is switched back to auto-ranging in the
30 mV or the 300 mV range, the 3 V range is
selected automatically.
The next highest range
at ± (3099 digits + 1 digit)
The next lowest range
at
±
(240 / 280 digits – 1 digit)
⇓
AUTO/
MAN
(4)
Function
Acknow-
ledgement
Dis-
play
Acoustic
Signal
brief
Manual mode active:
utilized measuring range is fixed
MAN
(10)
1 x
brief
Range switching sequence for:
V :
3V
→
30 V
→
300 V
→
600 V
→
30 mV
→
300 mV
→
3 V..
V/:3V→ 30 V → 300 V → 600 V → 3V→ ...
Ω :30MΩ→ 30 Ω→ 300 Ω→ 3kΩ→
30 kΩ→ 300kΩ→ 3MΩ→ 30 MΩ ...
F : 30 nF → 300 nF →3 µF →30 nF ...
Hz : 300 Hz → 3kHz→ 30 kHz →
100 kHz →300 Hz ...
MAN
(10)
1 x
long Return to automatic range selection — 2 x

GOSSEN METRAWATT GMBH 9
GB
3.3 Quick Measurements
Measurements performed using a suitable fixed measuring
range are executed more quickly than those which utilize
automatic range selection. Quick measurement is made
possible with the following two functions:
• Manual measuring range selection, i.e. selection of the mea-
suring range with best resolution (see chapter 3.2)
or
• DATA function (see chapter 5). In this case, the correct
measuring range is selected automatically after the first
measurement, and the second measurement is exe-
cuted more quickly.
The selected measuring range remains active for the fol-
lowing series of measurements with these two functions.
4LCD
4.1 Digital Display
The measured value with decimal and plus or minus sign
appears at the digital display (9). The selected unit of mea-
sure (12) and the current type (11) are displayed as well. A
minus sign appears to the left of the value during the mea-
surement of zero-frequency quantities, if the plus pole of
the measured quantity is applied to the ⊥ input. If the
upper range limit of 3099 is exceeded (or 1999 in the
range) “OL” is displayed.
The digital display is refreshed twice per second during V
and Ω measurements.
4.2 Analog Display
The analog display, which is equipped with a simulated
pointer and demonstrates the same dynamic performance
as a moving-coil mechanism, is refreshed 20 times per
second during V and Ω measurements. This display is
especially advantageous for observing measured value
fluctuation, and for balancing procedures.
The analog display with linear graduation has its own
polarity indicator. The analog scale (15) has a negative
range of 5 scale divisions for the measurement of zero-fre-
quency quantities, allowing for precise observation of mea-
sured value fluctuation around zero. If the measured value
exceeds the display range, the triangle at the left (16) is
displayed first, and polarity at the analog display is then
switched after approximately 0.7 seconds. Overranging is
indicated by the triangle at the right (13) (> 3099 digits, or
> 1999 in the range).
The analog scale utilizes logarithmic graduation in the insu-
lation resistance measuring range (MΩ
ISO
) and the pointer
is replaced with a bar graph, allowing for improved mea-
sured value observation.
4.3 Background Illumination
➭ Briefly press the ON|OFF key after the instrument has
already been switched on.
Illumination is switched off automatically after approxi-
mately 2 minutes.

10 GOSSEN METRAWATT GMBH
5 Measured Value Memory – DATA Function.
Measured values can be automatically “frozen” with the
DATA function. This is useful, for example, when contact-
ing the measuring points with the test probes requires your
full attention. After the measured value has been applied
and the corresponding “condition” from the table below
has been fulfilled, the measured value is frozen at the digi-
tal display and an acoustic signal is generated. The test
probes can now be removed from the measuring points,
and the measured value can be read from the digital dis-
play. If the measured value is less than the value specified
in the table, the instrument is reactivated for storage of the
next value.
The DATA function has no effect on the analog display, at
which the current measured value continues to appear.
However, when the digital display if “frozen”, the decimal
point is fixed as well. If automatic range selection is acti-
vated, you are thus no longer able to determine which
range the analog display is using. Manual range selection
is not possible as long as the DATA function is active.
1)
Reactivation results from falling short of specified measured value limits.
2)
Except 30 mV and 300 mV ranges
The DATA function is deactivated by pressing and holding
the DATA|MIN/MAX key (approx. 1 s), by turning the rotary
selector switch or by switching the instrument off and then
back on again.
DATA
Function
⇓
DATA
MIN/MAX
(3)
Condition
Response from
Instrument
Mea-
suring
Range
Measured
Value
Limits
(digits)
Display
Acoustic
Signal
Digital
Meas.
Value
DATA
Activate brief blinks 1 x
Save
V
2)
Ω
F, Hz
> 280
<OL
> 280
is
dis-
played
is
dis-
played
1 x
Reactivate
1)
V
2)
Ω
F, Hz
< 280
OL
< 280
stored
mea-
sured
value
blinks
Stop long
is
cleared
is
cleared
2 x

GOSSEN METRAWATT GMBH 11
GB
6 Saving Minimum and Maximum Values –
Min-Max Function.
Minimum and maximum measured values applied to the
measuring instrument’s input after the Min-Max function
has been activated can be “frozen” at the display. The
most important use of this function is the determination of
minimum and maximum values during long-term measured
value observation.
The Min-Max function has no effect on the analog display,
at which the current measured value continues to appear.
Connect the measured quantity to the instrument and
select the appropriate measuring range before activating
the Min-Max function.
Measuring ranges can only be selected manually after the
Min-Max function has been activated. However, saved
minimum and maximum values are cleared if the measur-
ing range is switched.
The Min-Max function is deactivated by pressing and hold-
ing the DATA|MIN/MAX key (approx. 1 s), by turning the rotary
selector switch or by switching the instrument off and then
back on again.
Min-Max
Function
⇓
DATA
MIN/
MAX
(3)
Mea-
suring
Range
Min. and Max.
Measured Val-
ues
Response from Instrument
Display
Acoustic
Signal
Digital
Meas.
Value
MIN
MAX
1.
Activate
and save
2 x short
30 mV/
300 mV
and °C :
1 x short
V
Ω, F,
Hz, °C,
°F
are saved
Current
mea-
sured
value
MIN and
MAX
blink
1 x
2.
Save and
display
brief
V
Ω, F,
Hz, °C,
°F
Storage contin-
ues in back-
ground, new
min. and max.
values are dis-
played.
Saved
min.
value
MIN 1 x
brief
Saved
max.
value
MAX 1 x
3.
Return to
1
brief
Same
as 1
Same as 1,
stored values
are not deleted
Same
as 1
Same
as 1
1 x
Stop long are deleted
is de-
leted
is de-
leted
2 x

12 GOSSEN METRAWATT GMBH
7 Voltage Measurements – V Function.
➭ Depending upon the voltage to be measured, set the
rotary selector switch to V
, V or V .
➭ Connect the measurement cables as shown. The ⊥ con-
nector jack should be grounded.
Measurement of voltages of 150 V and greater may only be
performed with the KS17-2 cable set. Only this cable set
is suitable for measuring category II / 600 V and higher,
III / 1000 V or IV / 600 V.
Note!
☞
The 30 mV and 300 mV measuring ranges
can only be selected manually with the AUTO|MAN
key!
An intermittent acoustic signal warns the opera-
tor if the measured value exceeds the upper
range limit in the 600 V range.
Zero Balancing in the 30 mV Measuring Range
Zero balancing is possible in
the 30 mV measuring
range:
➭ Plug the measuring cables
into the instrument and
connect the free ends to
each other.
➭ After selecting the measur-
ing range, briefly press the
multifunction key FUNC.
The instrument acknowl-
edges zero balancing with an
acoustic signal, and “
00.00 ”
(+ 1 digit) appears at the LCD
with blinking decimal point. The voltage displayed at the
moment the key is pressed serves as a reference value
(max. ± 200 digits). It is automatically subtracted from all
subsequent measured values.
Zero balancing can be deleted:
– By pressing and holding the multifunction key FUNC,
which is acknowledged with two acoustic signals
– By switching the instrument off
7.1 Socket Jack Connections
Important!
!
Jacks a and b may not be connected in order to pre-
vent possible outgoing potential-transfer from
the ⊥ / E jacks.
Voltage Measurement
– (+)
~
+ (–)
~
600V
VF
°
C
ab
E

GOSSEN METRAWATT GMBH 13
GB
7.2 Transient Overvoltages
The cable multimeter’s connector jacks (7) are protected
against transient overvoltages of up to 4 kV with rise times
of 1.2, and decay times of 50 µs. Due to the fact that long
duration overvoltages are likely to occur during measure-
ments performed in power systems, at transformers, at
motors etc., we recommend using our KS30 measuring
adapter in such cases. It provides protection against tran-
sient overvoltages of up to 6 kV with rise times of 10, and
decay times of 1000 µs. It has a continuous load capacity
of 1200 V
RMS
.
Additional measuring error caused by the KS30 measuring
adapter amounts to approximately –2%.
7.3 Voltage Measurements at Above 600 V
Voltages of greater than 600 V can be measured with a
high-voltage probe, e.g. the HV3 or HV30 from GOSSEN
METRAWATT GMBH. It is absolutely essential to ground
the bonding terminal. Observe all applicable safety precau-
tions!
600V
VF
°
C
ab
E
Voltage Measurements
at above 600 V with the
HV3 High Voltage Probe
black
black
red
x1000
x100

14 GOSSEN METRAWATT GMBH
8 Resistance Measurement – Ω Function.
➭ Make sure that the device under test is voltage-free.
Interference voltages distort measurement results!
➭ Set the rotary selector switch to “Ω”.
➭ Connect the device under test as shown.
Zero Balancing in the 30 Ω Measuring Range
Cable and contact resis-
tances can be eliminated for
the measurement of small
resistance values in the 30 Ω
range by means of zero bal-
ancing:
➭ Plug the measuring cables
into the instrument and con-
nect the free ends to each
other.
➭ Briefly press the multifunc-
tion key FUNC. The instru-
ment acknowledges zero
balancing with an acoustic
signal, and “
00.00 ” (+1 digit) appears at the LCD with
blinking decimal point. The resistance value measured at
the moment the key is pressed serves as a reference
value (max. 200 digits). It is automatically subtracted
from all subsequent measured values.
Zero balancing can be deleted:
– By pressing and holding the multifunction key FUNC,
which is acknowledged with two acoustic signals
– By switching the instrument off
See chapter 14 regarding insulation resistance measure-
ment.
Important!
!
If a minus sign (–) is displayed to the left of
“
00.00 ” and if the decimal point blinks, an error
has occurred during zero balancing which may
result in erroneous measurements.
Remedy: In order to execute a reset, briefly
select another type of measurement with the
rotary selector switch, or switch the instrument
off and then back on again. Perform zero balanc-
ing once again.
9 Alternating Current Measurement with the WZ12B
Clip-On Current Transformer – Clip Function .
The rotary selector switch can be set to the V posi-
tion for the performance of measurements with an inter-
connected WZ12B clip-on current transformer, in which
case the measured value is displayed directly in amperes.
➭ Read the operating instructions included with the
WZ12B.
➭ Set the rotary selector switch to V and briefly press
the multifunction key.
Resistance Measurement
R
x
Voltage Drop
600V
VF
°
C
ab
E

GOSSEN METRAWATT GMBH 15
GB
➭ Connect the measurement cables to the ⊥ and jacks.
WZ12B Technical Data, Abbreviated
Measuring range 10 mA ... 100 A
Frequency range 50 ... 500 Hz
Transformation ratio 1 mV / 10 mA
10 Continuity and Diode Testing – Diode Function
and Beeper .
➭ Make sure that the device under test is voltage-free.
Interference voltages distort measurement results!
➭ Set the rotary selector switch to .
➭ Connect the device under test as shown.
Conducting Direction and Short-Circuit
The instrument displays conducting-state voltage in volts.
As long as voltage drop does not exceed the maximum
display value of 1999 V, several series connected compo-
nents or reference diodes can be tested with a small refer-
ence voltage.
Reverse Direction or Interruption
The measuring instrument indicates overflow: “OL”.
Note!
☞
Resistors and semiconductors which are con-
nected in parallel to the diode distort measure-
ment results
!
Continuity and Diode Testing with
Acoustic Signal
If the beeper function has
been activated, the instrument
generates a continuous
acoustic signal for display val-
ues between 0 and 1 V, and
for resistances of < 250 Ω.
Beeper Function ON (default state
after activation)
The beeper function is always
on after the “continuity and
diode testing” function has
been activated with the rotary
selector switch. The symbol
(18) appears at the display as
well. The beeper function can be activated and deactivated
by repeatedly pressing the multifunction key FUNC.
Beeper Function OFF
➭ Briefly press the multifunction key FUNC.
Deactivation is acknowledged with an acoustic signal.
The symbol (18) is cleared from the display. If the key
is pressed and held, the beeper function is activated,
which is acknowledged with two acoustic signals.
Reverse Direction
Diode Test
Conducting Direction
600V
VF
°
C
ab
E

16 GOSSEN METRAWATT GMBH
11 Capacitance Measurement – F Function.
➭ Make sure that the device under test is voltage-free.
Interference voltages distort measurement results!
➭ Set the rotary selector switch to “F”.
➭ Connect the (discharged!) device under test to the “⊥”
and “F” jacks with the measurement cables.
Note!
☞
The minus pole of polarized capacitors must be
connected to the ⊥ jack.
Resistors and semiconductors which are con-
nected in parallel to the capacitor distort mea-
surement results!
Zero Balancing in the 30 nF Measuring Range
Measuring instrument and cable capacitances can be
eliminated for the measurement of low value capacitance
in the 30 nF range by means of zero balancing:
➭ Connect the measurement cables to the instrument
without a device under test.
➭ Briefly press the multifunction key FUNC.
The instrument acknowledges zero balancing with an
acoustic signal, and “
00.00 ” (+1 digit) appears at the
LCD with blinking decimal point. The capacitance value
measured at the moment the key is pressed serves as a
reference value (max. 200 digits). It is automatically sub-
tracted from all subsequent measured values.
Zero balancing can be deleted:
– By pressing and holding the multifunction key FUNC,
which is acknowledged with two acoustic signals
– By switching the instrument off
Important!
!
If a minus sign (–) is displayed to the left of
“
00.00 ” and if the decimal point blinks, an error
has occurred during zero balancing which may
result in erroneous measurements.
Remedy: In order to execute a reset, briefly
select another type of measurement with the
rotary selector switch, or switch the instrument
off and then back on again.
Perform zero balancing once again.

GOSSEN METRAWATT GMBH 17
GB
12 Frequency Measurement – Hz Function.
Frequency measurement is possible in the V and V
measuring ranges.
➭ Set the rotary selector switch to V or V .
➭ Apply the measured quantity as described under voltage
measurement (observe footnote 4 on page 25).
➭ Briefly press the multifunction key FUNC.
The instrument is switched to frequency measurement.
Frequency is displayed at the LCD.
Lowest measurable frequencies and maximum allowable
voltages are included in chapter 16, “Characteristic Val-
ues”.
Switching Between Voltage and Frequency Measurement
Switching back and forth between voltage and frequency
measurement is accomplished by repeatedly pressing the
multifunction key FUNC:
voltage → frequency → voltage → ....
You can switch from frequency measurement directly back
to voltage measurement:
– By pressing and holding the multifunction key FUNC, in
which case switching is acknowledged with an acoustic
signal. The previously selected voltage measuring range
remains active.
– By turning the rotary selector switch.

18 GOSSEN METRAWATT GMBH
13 Temperature Measurement – °C Function
Temperature can be measured in °C or °F with the help of
a Pt 100 or a Pt 1000 temperature sensor.
➭ Set the rotary selector switch to Ω.
➭ Connect the sensor to the two jacks for multimeter mea-
surement (7).
➭ Press the multifunction key FUNC once for °C, twice for °F
and three times in order to compensate for cable resis-
tance.
The instrument is switched to temperature measurement
and automatically recognizes which type of sensor has
been connected (Pt 100 or Pt 1000).
The measured temperature value is displayed, and the
temperature unit of measure is displayed only if °C has
been selected.
Note!
☞
Cable resistances for temperature sensors avail-
able as accessories from GOSSEN METRA-
WATT GMBH are compensated for automatically
during temperature measurement.
Switching to temperature measurement is not
possible if the 30 Ω resistance measuring range
has been selected!
Compensation of Sensor Cable Resistances of up to 20 Ω
Sensor cables with resistance values up to 20 Ω which dif-
fer from those of sensors supplied by GOSSEN METRA-
WATT GMBH can be compensated for as follows:
➭ Press the multifunction key repeatedly until the current
cable resistance value is displayed.
The resistance value which will automatically be taken
into consideration by the instrument after the tempera-
ture measuring range has been selected is now dis-
played at the LCD.
➭ The resistance correction value can be set as follows:
Press the DATA|MIN/MAX key in order to increase the
value, or the AUTO|MAN key in order to reduce the value.
The value is changed by one digit each time the respec-
tive key is pressed. Pressing and holding the respective
key results in rapid scrolling.
➭ Briefly press the multifunction key FUNC once again.
Measured temperature is displayed at the LCD. The
blinking decimal point indicates that a cable resistance
correction value has been entered. The correction value
is retained until the instrument is switched off.
➭ °C, °F and the cable resistance correction value can be
displayed consecutively by repeatedly pressing multi-
function key FUNC.

GOSSEN METRAWATT GMBH 19
GB
The temperature measurement function can be exited:
– By pressing and holding the multifunction key FUNC,
which is acknowledged with two acoustic signals
– By switching the instrument off
Note!
☞
The multimeter which will actually be utilized to
perform temperature measurement must also be
used to determine cable resistance. This is the
only way to assure that measuring error lies
within the guaranteed range.

20 GOSSEN METRAWATT GMBH
14 Insulation Resistance Measurement
in Telecommunications Networks – MΩ
ISO Function
.
Three jacks (a, b and E) are provided for measurements in
symmetrical copper cable networks with two conductors and
shield. The rotary selector switch can be set to determine
whether insulation testing will be performed between
E and a, b and E or a and b.
Interruption of a single core or contact with an unused core
(capacitive asymmetry) can be recognized by switching
rapidly with the FUNC key.
In the event of a good cable, the bar graph must have the
same length in the a-E and b-E selector switch positions
(unconnected cable only!).
Long cable: long bar graph display
Short cable: short bar graph display
The overall length of the bar graph represents a range of
capacitance from 50 nF to 100 nF.
14.1 Connecting the Measurement Cables
➭ Cable connection:
Connect the measurement cables to jacks E, a and b.
Note!
☞
Testing the Measurement Cables
The test probes at the ends of the measurement
cables should be short circuited before perform-
ing insulation resistance measurements, in order
to make sure that a value close to 0 Ω is dis-
played at the instrument. Incorrect connection or
a broken measurement cable can be detected in
this way.
14.2 Detection of Interference Voltages
➭ Turn the rotary selector switch from MΩ
ISO
_E-a, to
MΩ
ISO
_b-E, and finally to MΩ
ISO
_a-b, in order to display
any interference voltages for all three conductor pairs.
600V
VF
°
C
ab
E
Example:
Measurement of insulation
resistance at a 2 conductor
shielded cable
Insulation Resistance Measurem
e
/