Electrolux MULTI-STEAMER Z370 User manual
- Category
- Steam cleaners
- Type
- User manual
This manual is also suitable for

Multi-Steamer
Steam Cleaner
Owner’s Guide
Z370 Series
INDEX
Important Safeguards...................2
Service Information ......................4
Use & Assembly........................5-8
Maintaining...................................9
Problem Solving .........................10
Guarantee..................................11
www.electrolux.com
Household Type
IMPORTANT
For Service, Spares or any advise in the
UK, please contact your Customer Care
line agent at 08706 055 055. For Service,
Spares or any advise in other locations,
please refer to your local telephone
directory for your nearest Electrolux
Service Agent.

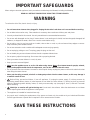
IMPORTANT SAFEGUARDS
When using an electrical appliance, basic precautions should always be followed, including the following:
READ ALL INSTRUCTIONS BEFORE USING THIS STEAM CLEANER.
WARNING
To reduce the risk of fire, electric shock, or injury:
• Do not leave steam cleaner when plugged in. Unplug the electrical cord when not in use and before servicing.
• Do not allow to be used as a toy. Close attention is necessary when used near children, pets and plants.
• Use only as described in this manual. Use only manufacturer’s recommended accessories.
•Do not use with damaged cord or plug. If steam cleaner is not working as it should, has been dropped, damaged, left
outdoors, or dropped into water, return it to a service center before using.
•Do not pull or carry by cord, use cord as a handle, close a door on cord, or pull cord around sharp edges or corners.
Keep cord away from heated surfaces.
• Do not use extension cords or outlets with inadequate current carrying capacity.
• Do not unplug by pulling on cord. To unplug, grasp the plug, not the cord.
• Do not handle plug or steam cleaner with wet hands or operate without shoes.
• Do not put any object into openings. Do not use with any opening blocked.
• Store your steam cleaner indoors in a cool, dry area.
• Keep your work area well lighted.
• Never turn the appliance over or on its side when using steam. Never direct steam towards people, animals,
plants, and equipment with electrical components, such as the interior of electric ovens.
•Do not immerse the steam cleaner into water or other liquids. Always unplug the power cord from the electrical socket
when filling the steam cleaner.
• Never put descaling, aromatic, alcoholic or detergent products into the steam cleaner, as this may damage it
or make it unsafe for use.
• Before filling, proceed as follows: 1) turn off appliance, 2) unplug the power supply, 3) relieve pressure by
depressing steam delivery button, 4) allow steamer to cool down for three minutes, 5) relieve any built up pressure
again by depressing steam delivery button, 6) slowly unscrew safety cap (see page 6, item 5) and wait 5 seconds
before removing.
• Metal tips on nozzles will get hot during use. Do not touch hot surfaces. Allow the attachments to cool down
before replacing them while the appliance is being used.
•This appliance is intended for household use only.
•Any repair work, including the replacement of the power cord must only be carried out by an Authorised Electrolux
Service Agent because a special tool is required. Call for nearest service location.
SAVE THESE INSTRUCTIONS
2

3
BEFORE YOU START
CHECK THE VOLTAGE
First check the voltage shown on the data plate (see rear view) to make sure that the cleaner is of the correct voltage
for your electricity supply. If it is not, do not use the cleaner but refer back to your dealer.
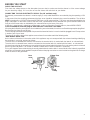
CONNECTING TO YOUR ELECTRICITY SUPPLY (For UK residents only)
Permanently connected to the cleaner is a mains supply (2-core) cable fitted with a non-rewirable plug incorporating a 13A
fuse.
In the event of the fuse requiring replacement the fuse cover should be removed using a small screwdriver. The old fuse
MUST be replaced by a 13A ASTA approved BS1362 fuse or a BSI approved fuse. The cover must be replaced before the
plug is used again. In the event of loss of the fuse cover, replacements can be obtained from your Electrolux retailer and
must be of the same colour as indicated by the coloured insert on the base of the plug.
If difficulty is experienced in obtaining a replacement, contact an Electrolux Service Agent or phone 08706 055055.
In no circumstances must the plug be used without a correct fuse cover fitted.
If the plug that is fitted to your appliance is not suitable for your socket outlet, it must be cut off and the appropriate plug fitted
Remove the fuse from the cut off plug.
The cut off plug should then be disposed of to prevent the hazard of shocks in case it should be plugged into a 13 amp socket
in another part of your home.
The wires in the mains cable of this appliance are coloured in accordance with the following code:
Blue: Neutral. Brown: Live.
As the colours of the wires in the mains cable of this appliance may not correspond with the coloured markings identifying
the terminals in your plug, proceed as follows:
The wire which is coloured blue must be connected to the terminal which is marked with the letter N or coloured black.
The wire which is coloured brown must be connected to the terminal which is marked with the letter L or coloured red.
If using a three-pin plug, do not make any connection to the terminal marked with the letter E or by the earth symbol or coloured
green or green-and-yellow. This cleaner is double insulated and no earth connection is necessary.
It is in your interest to ensure that the plug is correctly attached to the mains cable. In case of doubt, have it done by a qualified
electrician, as Electrolux cannot regard the repair of faults on the plug connection as a service that can be given free of charge
under the terms of the guarantee.
Fuse
cover
Fuse
Blue
Brown
Cord
Clamp
13 Amp Fuse

4
Rating Plate
The model and type are indicated on the rating plate located on the back side of the
cleaner. For prompt and complete service information, always refer to these numbers
when inquiring about service.
Model & Type No. ________________
ELECTROLUX
MODEL TYPE
VOLTS WATTS HERTZ
SERVICE
Should you require service on your Electrolux cleaner, please telephone 08706 055055 if you reside in the UK, otherwise
contact your nearest Service Agent.
Important - in the event of the mains supply cable of this steam cleaner requiring replacement, we recommend that this be
carried out by a Electrolux Service Agent.
Spares
New cloths can be obtained from Authorised Electrolux Dealers and electrical retailers. If difficulty is experienced in obtaining
spares please call us on 08706 055055 if you reside in the UK, otherwise contact your nearest Service Agent.
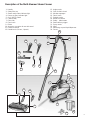
Main Features of the Multi-Steamer Steam Cleaner
Thank you for having chosen our product and allow us to congratulate you for having purchased the Electrolux Multi-
Steamer steam cleaner.
The Electrolux Multi-Steamer steam cleaner achieves a high degree of hygienic and degreasing power on many surfaces. It
turns water into steam in just a few minutes, so when contact is made with surfaces dirt and grime is removed.
Since the Electrolux Multi-Steamer steam cleaner uses the active power of steam without the use of detergents or soap, it is
safe for the environment.
Some surfaces that can be cleaned with the Multi-Steamer steam cleaner are: sealed hard floor surfaces, upholstery, sealed
grout, bathroom and kitchen tile, stove tops, removable exhaust filter over stoves, windows and mirrors.
The fabric tool may be used to steam wrinkles out of clothing, window coverings, etc.
CAUTION: Do not direct steam at the body.
Other Advantages of the Electrolux Multi-Steamer Steam Cleaner
The Electrolux Multi-Steamer steam cleaner can kill dust mites and some types of bacteria, such as salmonella and E-coli
when used properly.
To disinfect a specific area, position the steam cleaner over the area, not more than 2,5 cm away and slowly move across the
surface. This allows the surface under the steam cleaner to reach approximately 77 °C . Use this procedure to disinfect
surfaces in: the bathroom, food preparation areas, pillows and bedding, pet sleeping quarters, etc.

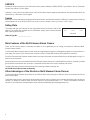
1. Handle
2. Safety filler cap
3. Steam ready amber indicator light
4. Power on green indicator light
5. On (I) Off (O) Switch
6. Cleaner body
7. Floor cloth
8. Floor brush
9. Elbow
10. Accessory connector for use with wand
11. Extension wands
12. Round brush (1 brass, 1 plastic)
Description of the Multi-Steamer Steam Cleaner
5
13. Angle nozzle
14. Cloth for fabric brush
15. Window squeegee
16. Fabric brush
17. Straight nozzle
18. Nozzle connection
19. Safety slider button
20. Steam delivery trigger
21. Spray nozzle
22. Hose
23. Measuring cup and liquid dispenser
24. Funnel
1
2
3
4
5
6
11
13
12
14
15
16
17
18
19
20
21
22
24
23
7
8
9
10

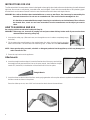
WARNING: After every use, turn unit off, unplug unit and press steam delivery button until all pressure has been
released before removing safety cap.
1.Unscrew the safety cap. (After each use, turn the appliance over in order to completely empty
the boiler.)
2. Fill the measuring cup with water to the marked water line, twice. Use the funnel to pour the
water into the boiler. The boiler takes two measuring cups of water at a time. Do not overfill.
NOTE: Never put descaling, aromatic, alcoholic or detergent products into the appliance, as this may damage it or
make it unsafe for use.
3. Screw the cap back onto the appliance.
Attachments
4. Insert the straight nozzle and push it onto the fixed section of the spray nozzle. Align
the straight nozzle groove with the line on the spray nozzle, then rotate the straight
nozzle 90° (clockwise) in the direction of the arrow until it locks into place.
5.Insert the elbow inside the hole of the floor nozzle, paying attention to line up the reference symbols on the elbow and on
the floor nozzle as shown in the picture.
Press the elbow up to run, turn of 90° and connect the whole item to the wand hose.
HOW TO ASSEMBLE AND USE
6
INSTRUCTIONS FOR USE
The Electrolux Multi-Steamer steam cleaner is designed to thoroughly clean hard surfaces and upholstery that will withstand
high heat. Do not use on soft plastics, unsealed wood, and cold glass. Check with the manufacturer of all upholstery types
that the fabric can be steam cleaned. Particular care should be taken with velour and draylon fabrics.
WARNING:On surfaces that have been treated with wax or some no wax floors, the sheen may be removed by the
heat and steam action. Do not use on unsealed wood. This could cause the woodgrain to rise.
It is therefore recommended that a sample cleansing be carried out on an isolated area of the surface to
be cleaned. Also, check use and care instructions from the manufacturer on the object you want to
clean.
Do not plug unit into an electrical outlet until Step 10.
Straight Nozzle

Attachments
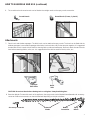
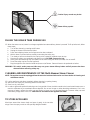
7. Fabric brush and window squeegee. The fabric brush can be attached to spray nozzle. The brush can be fitted with the
window squeegee. Insert window squeegee side hooks into brush tabs and join the two parts together. It is suggested
that the fabric brush is used with the cloth for cleaning fabrics, sofas and mattresses. Be sure to drain all water from the
hose before steaming fabrics, sofas, etc. It is suggested that the cloth be used for fabrics, sofas, etc...
CAUTION: Do not use the window cleaning tool on cold glass. It may break the glass.
8. Extension Wands. To extend the reach of the appliance, the spray nozzle can be fitted with wand/wands and accessory
connector. Different accessories can then be attached depending on the job to be done.
7
HOW TO ASSEMBLE AND USE (continued)
Squeegee
Side Hooks
Spray
Nozzle
Extension
Wands
Accessory Connector
Brush
Tabs
Nozzle
Connection
Curved Nozzle Round Brush (1 brass, 1 plastic)
6. The round brush and curved nozzle can be fitted to the straight nozzle or the spray nozzle connection.

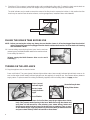
11.Plug the appliance into an electrical outlet.
Press on/off switch. The green (power) indicator light and the amber (steam ready) indicator light will both come on. As
soon as the amber (steam ready) indicator light goes out, the appliance is ready for use. Press steam delivery button to
supply steam. To prevent steam from being accidentally supplied, shift back safety slider to the
●●
position.
CAUTION: When using the steam cleaner for the first time, keep the gun higher than cleaner
body. This prevents water forming in the hose. When first using the cleaner and
every time it is left unused for a few minutes, press steam delivery button and
discharge any water that has formed in the hose into a container. Then, as soon
as the cleaner begins supplying steam only, direct the steam jet towards the floor
and press steam delivery button at least two or three times.
FILLING THE BOILER TANK BEFORE USE
10. Unscrew safety cap and using funnel, pour into the tank two
measuring cup (included) filled with water to the maximum level.
Screw safety cap back on.
(Always empty the Multi-Steamer after use to avoid
overfilling.)
NOTE: Before unscrewing the safety cap, always be sure that the cleaner is off and unplugged from the electrical
outlet. The appliance must be unplugged from the electric outlet and allowed to cool down before all cleaning
and maintenance tasks.
TURNING ON THE APPLIANCE
On/off Switch
Green (power)
Indicator Light
Amber (steam
ready) Indicator
Light
Steam Delivery Button
Safety Slider Button
8
9. Floor Brush. This accessory is used with wands, and is provided with a floor cloth. To attach the cloth, rest the brush on
the center of cloth and then pull the cloth edges one by one under retaining springs as shown below.
The slide indicator may be used to retract the center of the floor brush to expose the bristles. In this position the floor
brush may be used to clean abrasive surfaces, such as garage floors, basement floors and sidewalks.
Retaining Springs
Slide Indicator

CLEANING AND MAINTENANCE OF THE Multi-Steamer Steam Cleaner
13. Let the appliance cool down completely before cleaning it or putting it away.
14. After each use empty any remaining water from the boiler.
15. Store in a dry, cool place.
16.In order to guarantee perfect functioning over a long period of time, the boiler needs to be rinsed out with water once a
month to eliminate any accumulated calcium deposits. Do not use vinegar or other descaling substances. Put in one
measure of water, replace the safety cap and shake to loosen any accumulated deposits. Remove safety cap and
immediately empty water into a sink. CAUTION: Do not immerse the appliance in water.
NOTE: The appliance must be unplugged from the electrical outlet and allowed to cool down before all cleaning and
maintenance tasks.
TO STORE APPLIANCE
Wind hose around the cleaner body and press it gently in the two side
wings. Place the spray nozzle on the specially designed handle.
9
FILLING THE BOILER TANK DURING USE
12. When the water runs out, steam is no longer supplied when steam delivery button is pressed. To fill up boiler tank, follow
these steps:
a. Turn off the cleaner by pressing on/off button.
b. Unplug the cleaner from electrical outlet.
c. Press steam delivery button until all pressure has been released.
d. Wait for about 3 minutes before carefully unscrewing the safety cap.
e. Turn slowly a half turn and wait for the hissing noise created by residual steam to stop.
f. Unscrew the safety cap completely and allow to cool. CAUTION: Cap may be hot.
g. Slowly pour two measuring cups (included) into the boiler using the funnel (included). Do not overfill.
h. Screw the safety cap back on the appliance.
i. Plug the appliance into electrical outlet and press on/off button. Steam will start to be produced as before.
WARNING: This unit is under pressure. After every use, press steam delivery button until all pressure has been
released before removing safety cap.
Caution! Spray nozzle may be hot
Steam delivey symbol

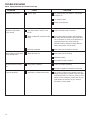
Appliance won’t start. ✓ Electric plug. Push plug securely into outlet. V erify power
on light is on.
Try another outlet.
Check circuit breaker.
Appliance spits water ✓ Too much water in tank. Do not Check the water level in the tank.
out of nozzle. overfill.
✓ Water condensed in wand and the Press steam delivery button and discharge
hose. any water that has formed in wand and hose
into a container. As soon as the appliance is
supplying steam only, direct steam jet
towards the floor and press steam delivery
button at least two or three times.
✓ Not fully preheated. Allow more time for water to heat up.
Water boils out of fill spout ✓ Water tank too hot. Allow more time for cooling.
when adding water.
Add water slowly.
Use special funnel provided.
Accessories will not stay ✓ Not properly installed. Check for proper assembly.
on.
Review this guide for assembly instructions.
General questions. ✓ Assembly or related accessories. For Service, Spares or any advise in the UK,
please contact your Customer Care line agent
at 08706 055 055. For Service, Spares or any
advise in other locations, please refer to your
local telephone directory for your nearest
Electrolux Service Agent.
PROBLEM SOLVING
NOTE: Unplug the electrical cord before servicing.
PROBLEM CAUSE SOLUTION
10

LUTON, BEDFORDSHIRE, LU4 9RJ
Features of the Electrolux vacuum cleaner and accessories supplied with it are protected in Great Britain and abroad by
Patents or Registered Designs.
This appliance conforms with the requirements of the amended E.E.C. directive No. 89/336/EEC relating to electromagnetic
compatibility (EMC) CE.
Electrolux, may introduce modifications to their product from time to time, and consequently the details given in this booklet
are subject to alteration without notice.
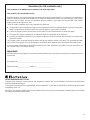
Guarantee (for UK residents only)
This guarantee is in addition to your statutory and other legal rights.
This product is for household use only.
Electrolux products are carefully designed, manufactured, tested and inspected and, in consequence, we undertake to
replace or repair any part found to be defective in material or workmanship, within one year of delivery to the original
purchaser, free of charge. You may be required to take the product to your nearest service provider if the product
requires attention during the first year.
There are certain conditions which may invalidate this guarantee:
a. It is dependent upon the appliance being correctly installed and used in accordance with the Company’s instructions
under normal domestic conditions within the United Kingdom or the Republic of Ireland.
b. Service at all times must be carried out by an Electrolux Service Representative or authorised agent.
c. The guarantee may be invalidated by unauthorised repair or modification of the appliance.
d. You may be charged by Electrolux if you call for an engineer to resolve a problem that we believe is covered in the
instruction booklet.
The Company does not accept liability for defects arising from neglect, misuse or accident. This guarantee excludes
such normal wearing parts as cloths and brushes as the life of these depends upon the amount and nature of use.
Proof of the date of purchase will be required before service under guarantee is provided. For further assistance call
our customer care line on 08706 055055.
Important:
For future reference we suggest you record the following details here, and keep the receipt with the handbook as proof
of purchase.
Purchased from____________________________________________
Date purchased______________ Model no _____________________
11

Part No. 71060 (7/00) Printed in Italy
Cod.5095100400 Rev. 2 del 24/10/01
-
 1
1
-
 2
2
-
 3
3
-
 4
4
-
 5
5
-
 6
6
-
 7
7
-
 8
8
-
 9
9
-
 10
10
-
 11
11
-
 12
12


Electrolux MULTI-STEAMER Z370 User manual
- Category
- Steam cleaners
- Type
- User manual
- This manual is also suitable for
Ask a question and I''ll find the answer in the document
Finding information in a document is now easier with AI
Related papers
Other documents
-
Zanussi ZAN150A User manual
-
Dualit Bean to Go Machine User manual
-
 White Wing WhiteWing II User manual
-
 Anvid Products SSC-0312 Owner's manual
-
United SC-5205 Operating instructions
-
Steamfast SF-246 Owner's manual
-
Oreck STEAM200 User manual
-
Falcon Peregrine 1800 S Operators Use And Care Manual
-
Sharper Image SF-370 User manual
-
 Vytronix HSG1000 User manual


