Page is loading ...

Leica VT1000 A
Vibratome
Operating Manual
Leica VT1000 A
V1.1 English - 01/2010
Always keep this manual with the instrument.
Read carefully before working with the instrument.


3
Leica VT1000 A
NOTE
The information, numerical data, notes and val-
ue judgments contained in this manual repre-
sent the current state of scientific knowledge
and state-of-the-art technology as we under-
stand it following thorough investigation in this
field.
We are under no obligation to update the pres-
ent manual periodically and on an ongoing basis
according to the latest technical developments,
nor to provide our customers with additional
copies, updates etc. of this manual.
To the extent permitted in accordance with the
national legal system as applicable in each indi-
vidual case, we shall not be held liable for erro-
neous statements, drawings, technical illustra-
tions etc. contained in this manual. In particular,
no liability whatsoever shall be accepted for any
financial loss or consequential damage caused
by or related to compliance with statements, in-
structions or other information in this manual.
Statements, drawings, illustrations and other in-
formation regarding the contents or technical
details of the present Operating Manual are not
to be considered warranted characteristics of
our products.
These are determined only by the contract pro-
visions agreed between ourselves and our cus-
tomers.
Leica reserves the right to change technical
specifications as well as manufacturing pro-
cesses without prior notice. Only in this way is
it possible to continuously improve the technol-
ogy and manufacturing techniques used in our
products.
This document is protected under copyright
laws. All copyrights to this documentation are
held by Leica Biosystems Richmond LLC.
Any reproduction of text and illustrations (or
of any parts thereof) by means of print, photo-
copy, microfiche, web cam or other methods—
including any electronic systems and media—
requires express prior permission in writing by
Leica Biosystems Richmond LLC.
For the instrument serial number and year of
manufacture, please refer to the nameplate at
the rear side of the instrument.
© Leica Biosystems Richmond LLC
Published by:
Leica Biosystems Richmond, LLC
5205 Route 12P.O. Box
528 Richmond, IL 60071
United States of Amerika
Telefon: +1 800 225-3035
Fax: +1 815 678-2216
Internet: www.leica-microsystems.com

4
Operating Manual V 1.1 – 01/2010
Contents
1. Important Notes ........................................................................................................................................................ 5
2. Safety .....................................................................................................................................................................................6
2.1 Safety notes ...................................................................................................................................................................... 6
2.2 Warnings ........................................................................................................................................................................... 6
3. Instrument Components and Specifications ....................................................................................................... 9
3.1 Overview — instrument components .......................................................................................................................... 9
3.2 Technical data ............................................................................................................................................................... 10
4. Setup the Instrument .............................................................................................................................................. 12
4.1 Standard delivery .......................................................................................................................................................... 11
4.2 Installation site requirements ...................................................................................................................................... 12
4.3 Unpacking and setting up the instrument ................................................................................................................. 13
4.4 Connection to power supply system .......................................................................................................................... 14
4.4.1 Checking the performance requirements ................................................................................................................. 14
4.4.2 Connecting to the power supply ................................................................................................................................. 15
4.5 Connecting the foot switch .......................................................................................................................................... 16
4.6 Assembling the "deluxe specimen tray" ..................................................................................................................... 17
4.7 Assembling the specimen clamp ................................................................................................................................ 19
4.7.1 Inserting the round specimen tray ............................................................................................................................. 20
4.7.2 Assembling the directional specimen holder fixture ............................................................................................... 21
4.8 Assembling the magnifier ............................................................................................................................................ 22
5. Operation .................................................................................................................................................................. 23
5.1 Operating elements and their functions .................................................................................................................... 23
5.1.1 The control panel ...............................................................................................................................................................
5.1.2 The operating elements ................................................................................................................................................ 23
5.2 Adjustment options on the instrument ....................................................................................................................... 28
5.2.1 Adjusting the blade presentation angle ..................................................................................................................... 28
5.2.2 Adjusting the specimen and blade ............................................................................................................................. 29
5.2.3 Adjustable sectioning window .................................................................................................................................... 31
5.2.4 Adjusting the specimen height .................................................................................................................................... 33
5.3 Sectioning ....................................................................................................................................................................... 34
5.3.1 General instructions ...................................................................................................................................................... 36
5.3.2 Inserting the specimens ............................................................................................................................................... 37
5.3.3 Selecting and inserting the blade ............................................................................................................................... 39
5.4 Specimen preparation .................................................................................................................................................. 41
5.5 Preparing the specimen bath ...................................................................................................................................... 42
5.6 Conventional sectioning ............................................................................................................................................... 43
5.7 Removing the sections ................................................................................................................................................. 44
6. Cleaning and Maintenance .................................................................................................................................. 45
6.1 Cleaning the instrument ............................................................................................................................................... 45
6.2 Maintenance instructions ............................................................................................................................................ 47
6.3 Replacing components ................................................................................................................................................. 48
6.3.1 Fuse .................................................................................................................................................................................. 48
6.3.2 LED Light ......................................................................................................................................................................... 48
7. Optional Accessories ............................................................................................................................................ 49
7.1 Ordering information ..................................................................................................................................................... 49
7.2 Accessories .................................................................................................................................................................... 50
8. Warranty and Service ............................................................................................................................................ 55

5
Leica VT1000 A
Notes,
i.e. important information for the user,
are highlighted in gray and marked by
the symbol.
Dangers, warnings and cautions
appear in a gray box and are marked
by a warning triangle.
Symbols in the text and their meanings
1. Important Notes
(5)
(Fig.3)
Intended use
The Leica VT1000 A is used for sectioning in the
fields of medicine, biology and industry, and is
especially designed for sectioning fixed or un-
fixed fresh tissue in a buffer solution.
The instrument must be installed according to
the directions in this Operating Manual.
Any other use of the instrument is considered
improper!
Instrument Type
All information contained in this Operating Man-
ual applies solely to the instrument type listed
on the cover page.
A nameplate indicating the instrument serial
number is attached to the rear side of the in-
strument.
For all inquiries please specify
Instrument Type
Serial Number
Fig. 1
Qualification of personnel
• The LeicaVT1000 Amaybe operatedby
trained laboratory personnel only.
• Alllaboratorypersonneldesignatedtoop-
erate the Leica instrument must read this
Operating Manual carefully and must be
familiar with all technical features of the in-
strument before attempting to operate it.
Numbers in parentheses refer to item
numbers in illustrations or to the illus-
trations themselves.

6
Operating Manual V 1.1 – 01/2010
The safety and caution notes in this chapter must be observed at all times.
Be sure to read these notes even if you are already familiar with the operation and use of other
Leica products.
2. Safety
2.1 Safety notes
This Operating Manual contains important in-
structions and information regarding the oper-
ational safety and maintenance of the instru-
ment.
The Operating Manual is an important part of
the product, and must be read carefully prior to
startup and use and must always be kept near
the instrument.
The safety precautions listed below are intend-
ed to prevent injuries of the operating person-
nel, damage of the instrument or impairment of
the instrument's performance.
This instrument has been built and inspected
in accordance with the safety regulations for
electrical measuring, control, regulating and
laboratory devices.
To maintain this condition and ensure safe op-
eration, the user must observe all notes and
warnings contained in this Operating Manual.
The protective devices located on the instrument and the accessories must not be removed or
modified. The instrument must only be opened and repaired by service technicians authorized
by Leica.
2.2 Warnings
The safety devices installed in this instrument by the manufacturer only constitute the basis
for accident prevention. Operating the instrument safely is, above all, the responsibility of the
owner, as well as the designated personnel who operate, service or clean the instrument.
To ensure trouble-free operation of the instrument, make sure to comply with the following
instructions and warnings.
If additional requirements on accident
prevention and environmental protec-
tion exceeding the scope of this Op-
erating Manual are imposed by laws/
regulations of the country of opera-
tion, this Operating Manual must be
supplemented by appropriate instruc-
tions to ensure compliance with such
requirements.
For current information on applicable
standards, please refer to the instru-
ment’s CE declaration and visit:
http://www.leica-microsystems.com

7
Leica VT1000 A
2. Safety
Warnings – Markings on the instrument itself
• Warninglabelsontheinstrumentmarkedwithawarningtriangleindicatethatthecorrect
operating instructions (as defined in this Operating Manual) must be followed when operating
or replacing the item marked. Failure to adhere to these instructions may result in an accident,
personal injury, damage to the instrument or accessory equipment.
• Observethewarningmessagesontherearsideoftheinstrument(Fig. 2).
Only the components described in the section on "Replacing components" may be replaced by
the operator.
Warnings – Transport and installation
• Onceunpacked,theinstrumentmaybetransportedonlyinanuprightposition.
• Neverliftortransporttheinstrumentbyholdingitbythebladeholderorsettingwheelforthe
section thickness.
• Theinstrumentmustbesetupsothatthemainpowerswitchontheleftrearsideoftheinstrument
(item 14 in Fig. 2) is easily accessible at any time.
Fig. 2
4
Warnings – Maintenance and cleaning
• Theinstrumentmaybeopenedbyauthorizedservicepersonnelonly.
• Alwaysdisconnectthepowerplugbeforeopeningtheinstrument!
• Turntheinstrumentoffusingthepowerswitchanddisconnectthepowerplugbeforereplacing
the fuses. The use of fuses other than those provided is not permitted.
• Beforeeachcleaning,removethedisposablebladeorknife!
• Donotuseanysolventscontainingacetoneorxyleneforcleaning!Ensurethatliquidsdonot
enter the interior of the instrument during cleaning.
•
Do not clean the magnifier using cleaners that contain solvents, as the lens is made of acrylic.
• Whenusingdetergents,pleasecomplywiththesafetyprecautionsofthemanufacturerandthe
laboratory regulations!
15

8
Operating Manual V 1.1 – 01/2010
2. Safety
Warnings – Operating the instrument
• Takecarewhenhandlingdisposablebladesandsapphireblades.Thecuttingedgeisextremely
sharp and can cause serious injuries!
Always wear work safety shoes and safety gloves!
• AlwaysclampthespecimenblockBEFOREclampingtheblade/knife.
• Ifmakingadjustmentsorconfiguringsettingsinthespecimenarea,takethebladeoutofthe
holder in order to prevent cutting injuries from accidental contact with the blade.
• Caution!Riskofinfectionwhenworkingwithfreshtissueorwithmaterialwhereaninfection
cannot be excluded!
• Thereisafirehazardfromanuncoveredmagnifier!Coverorremovethemagnifierwhenthe
instrument is unsupervised.
• Thecyanoacrylateadhesiveintheaccessoriespackageincludedforthetissuesampleadheres
very quickly to human skin. Avoid contact with fingers when using the adhesive.
Proper handling
• Alwaysbeexceptionallycarefulwhenhandlingthebladesorknife!Alwaysmakesuretohandle
a blade in a way that cannot cause you injury. If possible, grasp the blade using a pincers or
hold it by its blunt ends only.
• Donotleaveopenbladeslyingaroundafterremoval.Whendisposingofusedblades,apply
common "Scotch" tape over the cutting edge or wrap the entire blade with paper.
• Allappropriatesafetyprecautionsmustbemettoavoidtheriskofinfection!
• Wearingsafetygloves,amaskandsafetygoggles—inaccordancewiththe'Workingwith
SubstancesthatPoseaHealthRisk'guidelines—isabsolutelymandatory.
• Caution!Riskofinfectionwhenworkingwithfreshtissueorwithmaterialwhereaninfection
cannot be excluded!
• If,despitethis,youcomeintodirectcontactwiththecyanoacrylateadhesiveprovided,first
allow the adhesive to air dry, then wipe it off with a towel soaked in acetone. When uninten-
tional bonding of skin occurs, separate by a "peeling" (rather than pulling) action after applying
acetone to the bond area.

9
Leica VT1000 A
3. Instrument Components and Specifications
3.1 Overview—instrumentcomponents
Fig. 3
Fuses
Instrument feet
Connection
Power cable
Adjustment knobs
for the sectioning
window
Connection for
footswitch
Foot switch
ON/OFF
Drainage valve
for liquid from the
Vibratome tray
Power switch
Nameplate
Hazard warning
Control panel
Magnifier
Vibratome tray
Section Thickness Knob
LED Light Assembly
Rear view of the instrument
Specimen Bath

10
Operating Manual V 1.1 – 01/2010
3. Instrument Components and Specifications
3.2 Technical data
General
Approvals: The instrument-specific approval marks are
located on the identification label.
Operating temperature range: +10 °C to +35 °C
Relative humidity: max. 80% non-condensing
Operating temperature range during storage: + 5 °C to +55 °C
Storage humidity: < 80 %
Microtome
Max. section travel length: 0 - 40 mm
Sectioning Speed : 0 - 2.0 mm/s continuously adjustable
Cutting head retraction: c 5-7 mm/s non-adjustable
Blade amplitude: 0 - 3mm, +/- 1.5mm continuously adjustable
Total specimen stroke: 15 mm
Maximum specimen size: 33 x 40 mm
Total angle adjustment: 0 ° to 50 ° continuously adjustable
Tilt, specimen holder: -5 ° - +5 ° in one axis
Electrical data
The instrument is supplied for operation with alternating current in two voltage variants and
for two different frequencies (50 Hz and 60 Hz). For the corresponding product number, refer to
the table on page 14.
Voltage: 110 V AC +/- 15 % 220 V AC +/- 15 %
Max. power consumption: 1 A 0.5 A
Frequency: 50 Hz or 60 Hz (for both voltage variants)
Dimensions and weights
Width: 280 mm
Depth: 460 mm
Height: 310 mm
Weight (without accessories): 15.5 kg

11
Leica VT1000 A
4. Setup the Instrument
4.1 Standard delivery
The standard equipment of the Leica VT1000 A is available in 3 variants
and includes the following parts:
1. STARTER PACKAGE
1 Specimen Tray (includes V-block adapter) ................................... 39053744
1 Specimen Blocks, (3 blocks) ............................................................ 39053747
2 Specimen Adhesive........................................................................... 39053986
2 Feather Blades, (20 blades).............................................................. 39053234
1 Instrument Cover ............................................................................... 39053746
1 Blade Angle Indicator ..................................................................... 392043401
1 2x Magnifier ....................................................................392000200MAGREPL
1 Power Cord (110V)* ......................................................................... 392000101
1 Plug Connector, Quick Connect (bath drain) .............................. 393104023
2 Replacement Fuse ........................................................................... 392000109
1 5/32", Short Arm Hex Key .............................................................. 3997000002
1 Manual and DVD ............................................................................ 3996000107
2. PROFESSIONAL PACKAGE
1 Deluxe Specimen Bath ..................................................................... 39053745
1 Rotating Stage Assembly ................................................................. 39053760
1 Specimen Blocks, (3 blocks) ............................................................ 39053747
1 Foot Pedal ........................................................................................... 39053300
1 Sapphire Knife .................................................................................... 39053237
3 Specimen Adhesive........................................................................... 39053986
3 Feather Blades (30 blades)............................................................... 39053234
1 Instrument Cover ............................................................................... 39053746
1 Blade Angle Indicator ..................................................................... 392043401
1 2x Magnifier ....................................................................392000200MAGREPL
1 Power cable (110V)*........................................................................ 392000101
1 Plug Connector, Quick Connect (bath drain) .............................. 393104023
2 Replacement Fuse ........................................................................... 392000109
1 5/32", Short Arm Hex Key .............................................................. 3997000002
1 Manual and DVD ............................................................................ 3996000107

12
Operating Manual V 1.1 – 01/2010
4. Setup the Instrument
4.2 Installation site requirements
• Stable,vibration-freelaboratorybenchwithhorizontal,evenstage
plate; practically vibration-free floor.
• Nootherinstrumentsnearbywhichmightcausevibrations.
• Roomtemperatureconsistentlybetween+10°Cand+35°C.
• Theinstrumentissuitableforoperationinenclosedroomsonly.
The accessories ordered are included in a separate box.
Carefully check the delivery against the packing list and the deliv-
ery note. Should you find any discrepancies, please contact your
Leica sales office without delay.
3. PROFESSIONAL GOLD PACKAGE
1 Rotating Stage Assembly ................................................................. 39053760
1 Foot Pedal ........................................................................................... 39053300
1 Sapphire Knife .................................................................................... 39053237
4 Specimen Adhesive........................................................................... 39053986
5 50 Feather Blades .............................................................................. 39053234
1 Instrument Cover ............................................................................... 39053746
1 Blade Angle Indicator ..................................................................... 392043401
1 2x Magnifier ....................................................................392000200MAGREPL
1 Power Cord (110V) * ........................................................................ 392000101
1 Plug Connector, Quick Connect (bath drain) .............................. 393104023
2 Replacement Fuse ........................................................................... 392000109
1 5/32", Short Arm Hex Key .............................................................. 3997000002
1 Manual and DVD ............................................................................ 3996000107
* only one cord included; determined at time of order
1 Power Cord (220V) ........................................................................... 392130701
1 Power Cord (AU) .............................................................................. 392000122
1 Power Cord (UK) .............................................................................. 392000120

13
Leica VT1000 A
4. Setup the Instrument
Fig. 6
4.3 Unpacking and setting up the instrument
• Firstchecktheshipmentforexternaldamagesuponarrival.
• Ifitisevidentthattheshipmentwasdamagedduringtransport,pleasemakeaclaimtothe
carrier immediately.
• Ensurethattheinstrumentisstandingonaworksurfacethatisasfreeofvibrationsaspossible.
The instrument must be set up the instrument so that the left rear side of the instrument (item
15 in Fig. 7) is easily accessible at any time.
1. Remove the lid (1) of the transport crate by
unscrewing the 4 Phillips head screws (2).
2. Take out the accessory box (3) and remove
the white packing material (5).
3. Remove the other accessory cartons.
4. To lift the instrument from the box, hold it on
the left and right of the housing (Fig. 6), lift it
out of the foam cushion of the package and
place it on a stable lab table.
Never lift the instrument by holding
it by its blade holder (6), the setting
wheel (7) for the section thickness or
adjustment knobs (8) for section cutting
window.
6
8
7
Fig. 4
Fig. 5
2
3
5
1

14
Operating Manual V 1.1 – 01/2010
4. Setup the Instrument
4.4.1 Checking the performance requirements
The Vibratome VT1000 A is available in different versions for operation
with different supply voltage.
Before connecting the instrument to the power supply, check to make
sure that the product number (39 072XXX-X) and the marking for the input
voltage on the rear side of the instrument match in order to ensure that
the correct version for the supply voltage available at the location has
been delivered.
For the assignment of the product number to the respective version, refer
to the following table.
Product number Instrument version
39072018 Leica VT1000 A Starter 110V, 60Hz
39072018-1 LEICA VT1000 A Starter 110V, 50Hz
39072018-2 LEICA VT1000 A Starter, 220V, 50Hz
39072018-3 LEICA VT1000 A Starter 220V, 60Hz
39072020 LEICA VT1000 A Professional 110V, 60Hz
39072020-1 LEICA VT1000 A Professional 110V, 50Hz
39072020-2 LEICA VT1000 A Professional 220V, 50Hz
39072020-3 LEICA VT1000 A Professional 220V, 60Hz
39072022 LEICA VT1000 A Pro Gold 110V, 60Hz
39072022-1 LEICA VT1000 A Pro Gold 110V, 50Hz
39072022-2 LEICA VT1000 A Pro Gold 220V, 50Hz
39072022-3 LEICA VT1000 A Pro Gold 220V, 60Hz
110 V instruments have a max. amperage of 1.0A
220 V instruments have a max. amperage of 0.5 A
4.4 Connection to power supply system
The product number and all corresponding connection values are
located on the nameplate on the rear side of the instrument.
See Fig. 1, page 5

15
Leica VT1000 A
4. Setup the Instrument
Severe damage may occur if the in-
strument is connected to a power sup-
ply voltage other than that to which it
was originally set.
The power supply voltage for the in-
strument is factory preset and CAN-
NOT be altered by the user.
The Leica VT1000 A MUST be connect-
ed to a grounded power socket.
The instrument is supplied with a
power cable that is suitable for the
local power supply (socket). Only this
cable may be used to operate the in-
strument!
Do not use an extension cable!
4.4.2 Connecting to the power supply
All electrical connections are on the left rear
side of the instrument.
Connecting to power supply
• MakesurethattheVibratomeisswitched
off:
The main switch (15) on the rear side must
be in the "0"= OFF position.
• Plugthepowercableprovidedintothein-
put socket (16) of the power supply on the
instrument, then into a socket.
15
16
Fig. 7

16
Operating Manual V 1.1 – 01/2010
Fig. 8
4. Setup the Instrument
4.5 Connecting the foot switch
The standard scope of delivery of the "Profes-
sional" and "Professional Gold" instrument ver-
sions include a foot switch (18, Fig. 8) that can
be connected to the rear side of the instrument.
In SINGLE and AUTO modes, the sectioning pro-
cess can be started and stopped with the foot
switch instead of the DIRECTION switch.
To connect the foot switch, follow these steps:
• Routethecableofthefootswitchsothatthe
switch on the floor can be reached easily
with one foot.
• Inserttheplug(17) of the foot switch into
the socket (19) provided on the rear side of
the instrument. This is possible in one posi-
tion only; it is not possible to connect it the
wrong way.
• Thenscrewtheplugandtheretainingring
(20) securely onto the thread of the socket
(19).
• Beforethefootswitchcanbeused,thesmall
switch (21) must be moved into the "ON" po-
sition, (Fig. 13).
If the foot pedal switch in the “ON”
position, the movement of the blade
can not be initiated by the “DIREC-
TION” switch.
17
18
19
20
Rear side of the
instrument
21

17
Leica VT1000 A
4.6 Assembling the "deluxe specimen tray"
4. Setup the Instrument
Fig. 9
The deluxe specimen bath (22, Fig. 11) is assem-
bled inside the standard black specimen bath
(23, Fig. 10). It enables separation of buffer so-
lution and ice preventing dilution of the buffer
while sectioning.
The deluxe specimen bath can be sterilized and
has round specimen discs on which the speci-
mens can be fastened very easily (Fig. 11, page
17)
The surface of the deluxe specimen bath and
the specimen disks (32) both have an angle
scale so that a repeatable position of the speci-
mens relative to the blade is possible.
Fig. 10
23
27
Fig. 11
22
• Fastentheu-framebracket(24, Fig. 9) for the
deluxe specimen bath in the main specimen
bath with the corresponding countersunk
hexagon screw (26) on the round specimen
stage (27).
32
24
26
25

18
Operating Manual V 1.1 – 01/2010
4. Setup the Instrument
• Insertthedeluxespecimentrayintothein-
stalled u-frame bracket so that the slotted
cam screw (28) for fastening the specimen
disks is at the front left (Fig. 13).
• Thenscrewthespecimenbathsecurelyin
place using the clamping pieces (29) and
knurled screws (30) on both sides of the u-
frame bracket.
• Insertthespecimendisc(32) on the surface
provided and clamp it in place by tightening
the slotted cam screw with a screw driver
(28) (Fig. 14).
Fig. 13
Enlarged detail:
Knurled screw
and clamping
piece for fasten-
ing the deluxe
specimen tray in
the fixture.
Assembly of the "deluxe specimen tray" (continued)
Fig. 12
26
25
• As shown in Fig. 12, attach the u-frame
bracket to the main specimen bath (27, Fig.
10).
• Insertthecountersunkscrew(26) into the
bore and tighten it using a size 3 Allen key
(25). When tightening, ensure that the fix-
ture (24) is parallel to the front edge of the
Vibratome tray (Fig. 12).
28
29
30
Fig. 14
32
28
30
30

19
Leica VT1000 A
4. Setup the Instrument
Fig. 17
4.7 Assembling the specimen vice assembly
• Thespecimenviceassembly(34, Fig. 16) is
assembled inside the main specimen bath
(23, Fig. 15).
• Insertthecheeseheadscrew(35) into the
bore of the specimen stage (27) and tighten
it using a size 5 Allen key (37, included in the
scope of delivery).
• Whentightening,ensurethatthefixture(34)
is parallel to the front edge of the Vibratome
tray (Fig. 17).
• Insertthespecimenblock(36) into the ten-
sion clamp and clamp it into place using the
knurled screw (39) (Fig. 18).
• Thespecimentobesectionedisaffixedto
the specimen block using the cyanoacrylate
adhesive provided.
• Theanteriorknurledscrew,allowsfororien-
tation of the specimen vice assembly, +/- 8
degrees. To change orientation, loosen the
screw and press on either side of the ten-
sion clamp. (refer also to Fig. 22).
Fig. 16
23
27
34
Fig. 15
35
36
37
37
34
Fig. 18
36
38
39
Always remove the blade BEFORE in-
stalling or removing accessories!

20
Operating Manual V 1.1 – 01/2010
4. Setup the Instrument
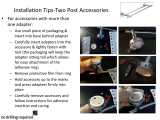
4.7.1 Inserting the round specimen tray
The round specimen tray (45) can be installed
in place of the specimen block. It enables easy
separation of buffer solution and ice that can
accumulate in the main specimen bath.
Always remove the blade BEFORE in-
stalling or removing accessories!
To insert it, follow these steps:
• First,inserttheV-blockadapter(46) into the
tensioning clamp (46) as shown in Fig. 20.
• Positionthelowerpostatthebottomofthe
round specimen tray into the V-block adapt-
er (46) so that it can be clamped into place
using the knurled screw (37) (Fig. 21).
• Holdthe specimen tray horizontallyand
clamp it into place using the knurled screw
(Fig. 22).
Fig. 22
Fig. 20
46
34
Fig. 21
46
45
46
45
Fig. 19
46
39
/