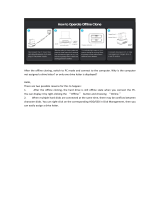
Hard drive installation steps
a. Connect DC power adapter with docking station
b. Connect docking station with computer by USB cable
c. Insert HDD into slot of docking station correctly.
Power on, lower right comer of computer will have a mobile hardware prompt after device
recognized, disk management will also have one.
Systems Compatible
No drivers are required for the disk dock itself as it uses the standard USB Mass Storage class
support already provided in Windows 10 through XP, Mac OS X, and Linux / Unix
Please update your usb 3.0 xHCI host controller drivers before using the device, for best
performance and stability
Windows XP can supports is 2TB and couldn’t be identified by system if over 2TB. It only
supports after upgrading the operating system above Vista (64 bit) version

we suggest changing hard disk into a GPT disk partition, or the operating system will not support
over 2 TB disk partitions.

Please note that new/blank disk drives must be initialized, partitioned, and formatted.
Mac and Windows computers cannot read Linux/Unix formatted hard drives (commonly found in
network attached storage 'NAS' devices) without special software.
Instruction for the removal of drivees
Please note: Before the removal of the data storage device, please stop all data access
and transfer to the device, so that the storage can be normally removed. Forced removal
may lead to damage or loss of crucial data. To prevent any data loss, please strictly follow
the steps for removal below!
a. Removal from Windows systems: Right click on the hardware or USB
device removal symbol in the status bar, click on the periphery to be
removed. When the system notification reading “the device can now be
safely removed.” shows up, you can remove the data storage.
Another way to remove the data storage is through the device manager
(
“
Computer
”
->
“
Device Manager
”
->
“
Drives
”
-> Click on
“
Remove
”
for the drive to be
removed, so that the drive can be detached safely.

b. Removal from Mac systems: Please choose the symbol for
“
Portable

drives / devices”, choose the menu function “Remove” from the drop down menu by
right clicking onto the symbol. You may also drag the
“
Portable device
”
to the rubbish
bin. Now, the device can be safely removed .
Partition and Formatting
If your HDD has been partitioned, please connect directly with docking station to use. It
will be showed
“
New Disk
”
in computer.
If not, in the premise of system can correctly identify HDD, you can use the partition
and formatting program come with system to do it, or third-party software (such as
Fdisk, DM, PQ Magic, etc.) to do it. (The following comes to Win7 system partition and
format for example.)
1. Right-select the computer, select the ‘management’ into Computer Management and
select
‘
Disk Management
’
, then right-click the disk name in the left region, select Initialize
the disk, then right-click in the right area of the disk, select set up new simple volume.

2. In the New Simple Volume Wizard, click Next, according to the desired partition resize
disk partition size, and select Next, specify the disk drive letter, Click Next, select the file
system, enter the volume label, and select Disk formatting way, click Next, click Finish, the
disk will be formatted. Above, the operation can be repeated according to disk size.
3. After operation finished, open My Computer, it will apper the ‘New Disk’ except the
local disk, indicated that it connect computer successfully.
Note:
a. To remove the hard drive, make sure it is currently not being
accessed by the computer then unmount or uninstall the disk drive
from the operating system. Never remove the docking station while the
hard drive is in use. Doing so may corrupt the data on the hard drive or
damage the hard drive, docking station, or computer.
b. Please do not remove your hard drive or insert a new one while
the other hard drive is being accessed, as doing so the other drive
temporarily disconnects and this could damage your hard drive and
result in data loss.
c. The new drives need one more step to make the drive useable.
First open disk management--> on the bottom select the partition that is called unallocated
partition---> right click the unallocated partition and click extended volume and follow the
procedure and remember to select the volume format as NTFS.

Hard Drive Duplicator Function
HDD A----Source HDD HDD B----Target HDD
1.Make sure there are no connection on the USB.
2.Ensure the Power Switch on the rear is in the OFF Position and plugged in properly. 2.
Insert the HDD A in the rear near the power plug and insert the HDD B in the front.
3.Offline clone is from HDD A to HDD B. Make sure your Main Drive is in HDD A and slave in HDD
B. The capacity of HDD B must be equal or bigger than HDD A.
4. Press and hold the offline clone button for 3 seconds, the LED indicator will light up. Then
quickly press the offline clone button and the offline clone operation will start. Each LED
represents 25% completion. It is only when every 25% of HDD A is offline clone to HDD B that
such LED will remain constantly on. When offline clone operation is fully completed, all LEDs will
constant on until the device is power off.
FAQ
a. Unable to clone: Please check if the capacity of Disk B is larger or equivalent to that of Disk A.
Here the capacity means the actual capacity that can be used, instead of the one marked on the
product. For example, the actual capacity of a disk marked 500GB might be 480GB only. The
actual capacity of disks with the same marked capacity differs if they are produced by different
producers. To ensure two disks of the same marked capacity have the same actual capacity, they
should be produced by the same producer in the same batch with the same model number.
b. Indicator light stops flashing up during offline duplicating: it might because of disk bad sectors
so that data couldn’t be cloned as usual. It’s better to change a good disk.
c. After cloning, the rest capacity of B disk is showed and operated via ”Computer management -
Storage - Disk management”.
d. Why over 2TB hard disk couldn
’
t be identified by USB? Because the maximum capacity of hard
disk which Windows XP can supports is 2TB and couldn
’
t be identified by system if over 2TB. It
only supports after upgrading the operating system above Vista (64 bit) version and we suggest
changing hard disk into a GPT disk partition, or the operating system will not support over 2 TB
disk partitions.
e. Please make sure that B hard disk data can be covered before cloning data. Because once you
start cloning, B hard disk partition methods and data are completely cloned as A hard disk. Our
company does NOT undertake any responsibility for data or economy loss which could bring by
damaged data.

f. Please do not remove your hard drive or insert a new one while the other hard drive is being
accessed, as doing so the other drive temporarily disconnects and this could damage your hard
drive and result in data loss.
-
 1
1
-
 2
2
-
 3
3
-
 4
4
-
 5
5
-
 6
6
-
 7
7
-
 8
8
WAVLINK FBA_WL-ST334UC User manual
- Type
- User manual
- This manual is also suitable for
Ask a question and I''ll find the answer in the document
Finding information in a document is now easier with AI
Other documents
-
 ORICO DD-C User manual
-
Renkforce rf-docking-08 USB 3.0 SATA 2 ports HDD docking station Clone function, Erase function Owner's manual
-
DigiTech XC4695 User manual
-
Fantec AluDOCK2X User manual
-
Kanguru Mini Clone Owner's manual
-
Addonics Secure NAS R5 User guide
-
Sans Digital TOWERRAID TR5UT+(B) User manual
-
Digitus DA-71540 Owner's manual
-
 Paragon Drive Drive Copy 11 Professional Operating instructions
-
Seagate Momentus 5400.2 SATA ST96812AS User manual


