Page is loading ...

Ambient Weather SRS100 and SRS100LX Pagoda Temperature and Humidity Radiation Shield
1. Introduction
This instruction manual will take you step-by-step through the process of assembling and mounting Ambient Weather SRS100 and SRS100LX Pagoda
Temperature and Humidity Radiation Shield.
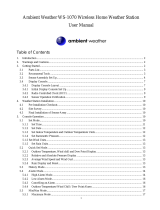
SRS100LX
SRS100
The SRS100 and SRS100LX temperature and humidity radiation shields
are low cost solutions for protecting temperature and relative humidity
sensors. They consist of seven (SRS100) or nine (SRS100LX) molded
plastic plates and mounting arm. The wedge-shaped plates provide
maximum airflow around the sensor while at the same time minimizing
direct exposure to sunlight. The passive shield is shaped to allow natural
air convection around the sensor so that the air temperature inside the
shield is a good representation of the outside air. The shield also provides
protection from rain and
snow.
The SRS100 and SRS100LX radiation shields fit most temperature and
humidity sensors sold by Ambient Weather. Order the SRS100LX for
larger sensor installations.
The SRS100 and SRS100LX are designed with a highly reflective white
surface to reflect the sun's direct radiation. The multi-plate design allows
for maximum airflow. The mounting arm can be mounted to any vertical
surface. U-Bolts are included to mount to any pole.
Version 2.0 ©Copyright 2011, Ambient LLC. All Rights Reserved. Page 1

Version 2.0 ©Copyright 2011, Ambient LLC. All Rights Reserved. Page 2
2. Part’s List
The SRS100 part’s list is shown in Table 1.
Part Quantity Description
A 1 Top Plate
B 3 Solid Plates
C 3 Middle Plates
D 1 Mounting Bracket
E 2 1” U-Bolts
F 4 1/2” Mounting Arm Hex
nuts (large)
G 3 11/32” Stop Hex nuts
(small)
H 2 U-Bolt Washers
I 3 Wing Nuts
J 4 1 5/8” Fence Post
Mounting Screws (large)
K 3 1” Mounting Arm Screws
(small)
L 1 Sensor Mounting Post
M 2 7 ½” Zip Ties
N 3 8” All Thread Screws
Table 1
The SRS100LX part’s list is shown in Table 1.
Part Quantity Description
A 1 Top Plate
B 3 Solid Plates
C 5 Middle Plates
D 1 Mounting Bracket
E 2 1” U-Bolts
F 4 5/16” Mounting Arm Hex
nuts (large)
G 3 11/32” Stop Hex nuts
(small)
H 2 U-Bolt Washers
I 3 Wing Nuts
J 4 1 5/8” Fence Post
Mounting Screws (large)
K 3 1” Mounting Arm Screws
(small)
L 1 Sensor Mounting Post
M 2 7 ½” Zip Ties
N 3 10 ¾” All Thread Screws
Table 2
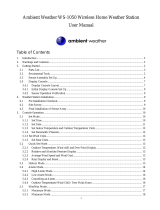
The parts listed above are shown in Figure 1.
Figure 1

3. Dimensions
SRS100 Dimensions
Inner Dimensions (WxLxH) SRS100: 2.5" x
4.3" x 4.4"
Outer Dimensions (WxLxH) SRS100: 7.4" x
9.2" x 9.6"
SRS100LX Dimensions
Inner Dimensions (WxLxH) SRS100LX: 2.5" x
4.3" x 7.4"
Outer Dimensions (WxLxH) SRS100LX: 7.4"
x 9.2" x 10.9"
4. Tools and Materials Needed
• 5/16” Wrench
• Drill with 3/16” Drill Bit to drill pilot
holes if attaching radiation to a
vertical post
5. Location Tips
• The radiation shield must be placed
away from large radiant heat sources,
such as sun exposed buildings.
• The radiation shield should be placed
in an open area to insure unrestricted
air flow or wind.
• Do not install over or near sprinklers.
Continuous moisture may damage the
temperature sensor.
6. Installation Options
There are two different mounting
configurations for the radiation shield:
• Pole or metal pipe with outside
diameter between 1” and 1 ½”
• On the side of a wooden post
7. Installation
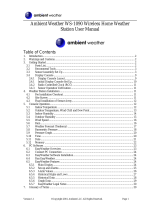
Step 1. Screw the three all thread screws (N)
into the top plate (A), as shown in Figure 2.
Figure 2
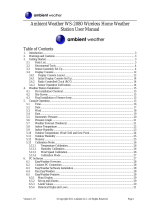
Step 2: Place one of the solid plates (B) over
the top plate (A) by aligning the holes with the
thread screws (N), as shown in Figure 3.
Figure 3
Version 2.0 ©Copyright 2011, Ambient LLC. All Rights Reserved. Page 3

Step 3: Slide all of the middle plates (C) over
the thread screws (N), as shown in Figure 4.
Figure 4
Step 4: Connect the sensor included with your
weather station to the sensor mounting post (L)
with the zip ties (M), as shown in Figure 5.
Figure 5
Step 5: Place the sensor mounting post (L) into
the center guide of the solid plate (B).
Thread the stop nuts (G) over the thread screws
(N) and hand tighten. This separates the upper
shield assembly from the lower shield
assembly, allowing easy access for sensor
maintenance and battery replacement.
Run any sensor cables outside of the top plate,
as shown in Figure 6.
Figure 6
Step 6: Slide the remaining two solid plates (B)
over the thread screws (N) and hand tighten the
entire assembly with the wing nuts (I) until the
radiation assembly is even, compressed and
tight on all sides, without overstressing the
plastic, as shown in Figure 7.
Figure 7
Version 2.0 ©Copyright 2011, Ambient LLC. All Rights Reserved. Page 4

Step 7: (pole mount only, skip this step for post
mount). Locate the four U-Bolt mounting holes
on the back panel of the mounting bracket (D).
Attach the U-Bolts (E), U-Bolt Washers (H)
and Hex Nuts (F) as shown in Figure 8. Finger
tighten the assembly around the mounting pole.
With a level, make sure the radiation shield is
level, and tighten the hex nuts with a wrench.
Do not overstress the plastic mounting bracket.
Figure 8
Step 8: Note: If mounting to a post, it is
recommended you proceed to Step 10 first
before completing this step.
Connect the mounting bracket (D) to the top
plate (A) with the three mounting arm screws
(K), as shown in Figure 9.
Figure 9
Step 9: Pole Mount. Finger tighten the
assembly around the mounting pole with the U-
Bolts (E). With a level, make sure the radiation
shield is level, and tighten the hex nuts (F)
around the pole with a wrench, as shown in
Figure 10.
Figure 10
Version 2.0 ©Copyright 2011, Ambient LLC. All Rights Reserved. Page 5

Version 2.0 ©Copyright 2011, Ambient LLC. All Rights Reserved. Page 6
Step 10. Post Mount. We recommend you
connect the mounting bracket (E) to the post
first before attaching the top plate (D).
Attach the mounting bracket (D) to your
mounting post with the mounting screws (J), as
shown in Figure 11. Attach the radiation shield
assembly top plate (A) to the mounting bracket
(D).
Figure 11
/