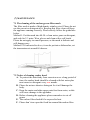
Euromaid ICF9BLS, a high-quality appliance, is designed to provide efficient and user-friendly cooking experiences. Equipped with a powerful low-noise motor, centrifugal leaf, and non-stick grease filter, it effectively absorbs dirt and ensures easy cleaning. Featuring a streamlined design, it blends seamlessly with modern kitchen décor. It offers three fan speeds, allowing you to choose the desired suction power for different cooking scenarios. The built-in lighting provides clear visibility while cooking, enhancing your cooking experience.
Euromaid ICF9BLS, a high-quality appliance, is designed to provide efficient and user-friendly cooking experiences. Equipped with a powerful low-noise motor, centrifugal leaf, and non-stick grease filter, it effectively absorbs dirt and ensures easy cleaning. Featuring a streamlined design, it blends seamlessly with modern kitchen décor. It offers three fan speeds, allowing you to choose the desired suction power for different cooking scenarios. The built-in lighting provides clear visibility while cooking, enhancing your cooking experience.


-
 1
1
-
 2
2
-
 3
3
-
 4
4
-
 5
5
-
 6
6
-
 7
7
-
 8
8
-
 9
9
-
 10
10
-
 11
11
-
 12
12
-
 13
13
-
 14
14
-
 15
15
-
 16
16
-
 17
17
-
 18
18


Euromaid ICF9BLS, a high-quality appliance, is designed to provide efficient and user-friendly cooking experiences. Equipped with a powerful low-noise motor, centrifugal leaf, and non-stick grease filter, it effectively absorbs dirt and ensures easy cleaning. Featuring a streamlined design, it blends seamlessly with modern kitchen décor. It offers three fan speeds, allowing you to choose the desired suction power for different cooking scenarios. The built-in lighting provides clear visibility while cooking, enhancing your cooking experience.
Ask a question and I''ll find the answer in the document
Finding information in a document is now easier with AI
