Page is loading ...

+44 (0) 1264 365881 +44 (0) 1264 356437 info@croydex.co.uk www.croydex.com
1
R&R 068 R01
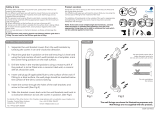
Always take care when using power tools,
particularly if there is any water in the
working area.
Do not use a hammer drill when drilling into a
tiled surface.
Always use a drill bit that is suitable for the
surface that is being drilled.
The wall plugs supplied are for use on solid
walls only. For cavity walls or plasterboard use
specialist fixings that are suitable for the type
of wall construction.
2
ASSEMBLING THE RAIL
To retain the best quality finish, clean product
regularly with a soft damp cloth.
Do not use abrasive or chemical cleaners, as
these will damage the product.
Do not use this product as a grab bar.
If the gliders become sticky, use a small
amount of furniture polish to improve
performance.
Do not overload the rail. Suitable for use with
a maximum of two standard shower curtains.
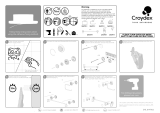
U-SHAPE
Two short rails and two corner rails.
91cm x 68.5cm x 91cm
(36” x 27” x 36”) approx
LARGE L-SHAPE
Two short rails, one long rail and one corner rail
167.5cm x 91cm
(66” x 36”) approx
STRAIGHT
Two short rails and one long rail.
190.5cm
(75”) approx
L-SHAPE
Two short rails and one corner rail.
91cm x 91cm
(36” x 36”) approx
SAFETY AND CARE
x1 (2)
x12 (24) x1 (2) x1 (2) x5 (6) x5 (6)
x1 (2) x1 (2) x1
Rails
Slenderline long rail x1
Slenderline short rail x2
Slenderline corner rail x2
x1 (2)
x2
Insert the wall brackets onto each end of your rail. If required cut the rail to the desired length and then
hold the rail in position ensuring there is adequate
curtain overlap into the bath or shower tray. (Cut wall
bracket rail ends only.)
Mark the position of each wall bracket on the
mounting surface.
Use a spirit level to ensure the rail is level.
Assemble your chosen rail configuration. You can see some
standard rail layouts here. To connect the dierent sections of
rails, use the connectors as illustrated below to join and lock
into position by tightening the screws.
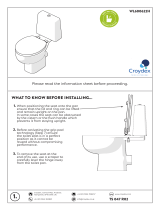
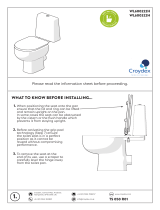
After you have marked the location of the wall
brackets on the mounting surface, measure the
distance between the top of the bracket and the
ceiling.
Use that measurement to cut the ceiling support rod
to the correct size.
Quantities of parts may vary due to product sizes.
3 4 Separate the wall bracket from the bracket cover.
x2 2x
x1x2
Croydex, Central Way, Andover,
Hampshire, SP10 5AW, UK
??
x3

Croydex, Central Way, Andover,
Hampshire, SP10 5AW, UK +44 (0) 1264 365881 +44 (0) 1264 356437 info@croydex.co.uk www.croydex.com
Slide the end stops to the desired location and twist
the hook to lock it in position. Then add a hook onto
the end stop.
Slide the bracket covers over the wall bracket to
ensure the rail is secure.
910
R&R 068 R01
11
13 16
Secure the ceiling bracket to the ceiling using the fixing
screw provided.
Insert the hook gliders and end stop into the rail and
then slide the wall bracket cover onto the rail. The
location of the end stop should be nearest your shower.
Place the rail into the wall brackets and lock in place
using the grub screw and hex key provided. DO NOT
OVER-TIGHTEN.
Assemble the ceiling support rod.
12
8
Place the rail into the wall brackets and slide the
ceiling support to the desired location. Mark the
position of the ceiling bracket on the mounting
surface ensuring it is vertical.
1514
Plastic washer
65 7 Slide the ceiling support assembly into the top
section of the rail.
Separate the ceiling bracket from the assembly then
mark the centre, drill and insert a wall plug in the
position marked on the ceiling.
Screw the wall bracket to the mounting surface.
Insert the ceiling support rod into the ceiling bracket
and secure in position using the small screw provided.
Place the wall brackets in the marked location, ensuring
that the open face of the wall bracket is facing towards
the showering area, then mark the hole positions.
Drill the marked holes and insert wall plugs.
/