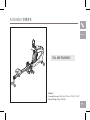
BH FITNESS OXFORD 5 Owner's manual
- Category
- Treadmills
- Type
- Owner's manual
This manual is also suitable for

AIR ROWER OWNER’S MANUAL
Read all precautions and instructions in this manual before using this equipment. Save this manual for future reference.
OXFORD 5

2
TO REDUCE THE RISK OF SERIOUS INJURY, READ THE IMPORTANT SAFETY
PRECAUTIONS BEFORE USING THIS EQUIPMENT:
• Read all instructions in this manual before using this equipment.
• Use this equipment only as described in this Owner’s Manual.
• Never allow children to use this unit.
• Inspect and tighten all parts before using this equipment. Replace any worn parts immediately.
• Observers should be warned to stay away from unit while in use. Failure to do so may cause injury to observer and/or exerciser.
• Never stick fingers or foreign objects through fan cover. Keep small children away from the air rower while in use. Failure to do so
could cause injury to child or unit.
• Never remove any of the safety guards that are attached to your air rower. If removal is required for any service or maintenance,
this should be done only by your authorized dealer and must be replaced before use.
• Wear appropriate workout attire, including running or aerobic shoes, when using the rower.
• If you experience any kind of pain, including but not limited to chest pains, nausea, dizziness, or shortness of breath, stop
exercising immediately and consult your physician before continuing.
• Keep the topside of the foot support clean and dry.
• Care should be taken when mounting or dismounting the equipment.
• At no time should more than one person be on the rower while in operation.
• Do not use other attachments that are not recommended by the manufacturer. Attachments may cause injury.
• Do not operate where aerosol (spray) products are being used or when oxygen is being administered.
• The equipment shall be installed on a stable base.
• It is essential that this machine is home product that only for indoors use.
• The folded equipment should stored at horizontal place for possible stability risk.
WARNING
1. Before beginning any exercise program, always consult your physician. If you experience chest pains, nausea, dizziness or
shortness of breath, stop exercising and consult your physician before continuing.
2. Before using rowing machine, ensure the FOLDING LOCKING PIN being fixed firmly on the frame.
OXFORD 5

3
At NO time should pets or children under the age of 14 be closer to the rower than 10 feet.
At NO time should children under the age of 14 use the rower.
Children over the age of 14 or disabled persons should not use the rower without adult supervision.
OXFORD 5

4
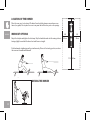
LOCATION OF THE ROWER
Place the rower on a level surface. We advice there should be clearance around your rower
trainer (see guide). Do not place the rower in any area that will block any vent or air openings.
3 ft
7 ft
3 ft
92 cm 92 cm
1 ft
214 cm
31 cm
WORKOUT OPTIONS
Adjust the footplate and tighten the footstraps. Grip the handle bar and start the rowing stroke in
leaning slightly forward with the knees bent and the arms straight.
Push backwards straightening and legs simultaneously. Return to the starting position, continue
the movement forward and backward.
MOVING THE ROWER
OXFORD 5

5
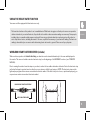
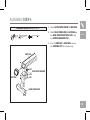
WIRELESS HEART RATE RECEIVER
(include)
When used in conjunction with a heart rate strap, your heart rate can be transmitted wirelessly to the rower and displayed on
the console. The rower not include a wireless heart rate strap (see the beginning of the ASSEMBLY section of your OWNER’S
MANUAL).
Prior to wearing the wireless heart rate strap on your chest, moisten the two rubber electrodes with water. Center the heart rate strap
just below the breast or pectoral muscles, directly over your sternum, with the logo facing out. NOTE: The heart rate strap must be
tight and properly placed to receive an accurate and consistent readout. If the chest strap is too loose, or positioned improperly, you
may receive an erratic or inconsistent heart rate readout.
BACKSIDE OF HEART RATE STRAP
APPLY MOISTURE HERE
LOGO
USING THE HEART RATE FUNCTION
Your rower could be equipped with heart rate sensor only.
The heart rate function on this product is not a medical device. While heart rate grips or a thumb pulse sensor can provide a
relative estimation of your actual heart rate, they should not be relied on when accurate readings are necessary. Some people,
including those in a cardiac rehab program, may benefit from using an alternate heart rate monitoring system like a chest or
wrist strap. Various factors, including movement of the user, may affect the accuracy of your heart rate reading. The heart rate
reading is intended only as an exercise aid in determining heart rate trends in general. Please consult your physician.
OXFORD 5

6
OXFORD 5

7
ASSEMBLY
There are several areas during the assembly process that special attention must be paid. It is very important to follow the assembly
instructions correctly and to make sure all parts are firmly tightened. If the assembly instructions are not followed correctly, the air
rower could have frame parts that are not tightened and will seem loose and may cause irritating noises. To prevent damage to
the air rower, the assembly instructions must be reviewed and correct actions should be taken.
Before proceeding, find your air rower’s serial number located on the main frame and enter it in the space provided below. Also
locate the model name which is next to the serial number.
ENTER YOUR SERIAL NUMBER IN THE BOXES BELOW:
WARNING
SERIAL NUMBER:
MODEL NAME: HORIZON FITNESS AIR ROWER

8
4-Z13
4-Z02
2-Z03
2-Z04
2-Z03
4-Z13
4-Z02
2-Z04
4-Z05
4-Z06
2-Z08
FOLDING LOCKING PIN
MIDDLE STABILIZER
REAR STABILIZER
PEDAL BRACKET
END CAP
CONSOLE WITH MAST
TOP CAP
FRONT STABILIZER
SEAT RAIL
MAIN FRAME
CONSOLE MAST BRACKET
ROTATION
SLEEVE
SEAT
SEAT BRACKET
SEAT STOP
BUMPER
2-Z09
Z10
Z14
2-Z09
2-Z02
Z14
Z12
Z11
4-Z01
4-Z02
4-Z01
4-Z02
2-Z07
OXFORD 5

9
TOOLS INCLUDED:
F Screwdriver
F 5 mm L-Shaped Wrench
F 5 mm T-Shaped Wrench
F 13 / 15 mm Wrench
PARTS INCLUDED:
F 1 Main Frame
F 1 Front Stabilizer
F 1 Middle Stabilizer
F 1 Rear Stabilizer
F 1 Seat Rail
F 1 Pedal Bracket
F 1 Seat
F 1 Seat Bracket
F 1 Console With Mast
F 1 End Cap
F 2 Seat Stop Bumper
F 1 Rotation Sleeve
F 1 Folding Locking Pin
F 1 Top Cap
F 1 Console Mast Bracket
F 1 Hardware Package
CAUTION
Read all precautions and instructions in this manual before using this equipment. Save
this manual for future reference.
Congratulations on choosing an Horizon Fitness Air Rower. You’ve taken an important
step in developing and sustaining an exercise program! Your Horizon Fitness Air Rower
is a tremendously effect tool for achieving your personal fitness goals. Regular use of
your Horizon Fitness Rower can improve the quality of your life in so many ways.
Here are a few of the health benefits of aerobic exercise:
• Weight Loss
• A Healthier Heart
• Improved Muscle Tone
• Increased Daily Energy Levels
• Reduced Stress
• Help in Countering Anxiety and Depression
• An Improved Self Image
PRE ASSEMBLY
OXFORD 5
If you have questions or if
there are any missing parts,
contact your local dealer.
NEED HELP?

10
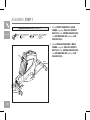
ASSEMBLY STEP 1
A Attach FRONT STABILIZER to MAIN
FRAME using four OVAL HEX SOCKET
BOLT (Z13), four SPRING WASHER (Z02),
two ARC WASHER (Z03) and two FLAT
WASHER (Z04).
B Attach MIDDLE STABILIZER to MAIN
FRAME using four OVAL HEX SOCKET
BOLT (Z13), four SPRING WASHER (Z02),
two ARC WASHER (Z03) and two FLAT
WASHER (Z04).
B O LT (Z13)
M8 x 30L
Qty: 8
SPRING WASHER (Z02)
Ø8.2 x Ø15.4 x 2.0T
Qty: 8
ARC WASHER (Z03)
Ø8.4 x Ø17 x 1.0T
Qty: 4
FLAT WASHER (Z04)
Ø8.2 x Ø20 x 1.5T
Qty: 4
HARDWARE PACKAGE STEP 1 CONTENTS :
Z13
Z02
Z03
Z04
Z03
Z13
Z02
Z04
FRONT
STABILIZER
MIDDLE
STABILIZER
MAIN FRAME
OXFORD 5

11
OXFORD 5
Z01
Z02
SEAT RAIL
PEDAL
BRACKET
SEAT
STOP
BUMPER
ASSEMBLY STEP 2
A Attach PEDAL BRACKET to SEAT RAIL using
four OVAL HEX SOCKET BOLT (Z01) and
four SPRING WASHER (Z02).
B Screw SEAT STOP BUMPER to SEAT RAIL.
HARDWARE PACKAGE STEP 2 CONTENTS :
B O LT (Z01)
M8 x 20L
Qty: 4
SPRING WASHER (Z02)
Ø8.2 x Ø15.4 x 2.0T
Qty: 4

12
OXFORD 5
Z05
Z06
SEAT PAD
SEAT BRACKET
SEAT RAIL
OVAL CROSS BOLT (Z05)
M6 x 15L
Qty: 4
SPRING WASHER (Z06)
Ø6.1 x Ø12.2 x 1.5T
Qty: 4
ASSEMBLY STEP 3
HARDWARE PACKAGE STEP 3 CONTENTS :
A Fix SEAT PAD on SEAT BRACKET by four
OVAL CROSS BOLT (Z05) and four SPRING
WASHER (Z06).
B Slide the Seat Assembly (SEAT BRACKET +
SEAT PAD) onto the SEAT RAIL.

13
OXFORD 5
ASSEMBLY STEP 4
A Screw SEAT STOP BUMPER to SEAT RAIL.
B Attach REAR STABILIZER to SEAT RAIL by
four OVAL HEX SOCKET BOLT (Z01) and
four SPRING WASHER (Z02).
C Insert the END CAP to SEAT RAIL and use
two SCREWS (Z07) to fix the end cap.
HARDWARE PACKAGE STEP 4 CONTENTS :
B O LT (Z01)
M8 x 20L
Qty: 4
SPRING WASHER (Z02)
Ø8.2 x Ø15.4 x 2.0T
Qty: 4
Oval Cross Tapping Screw (Z07)
Ø4 x 10L
Qty: 2
Z01
Z02
Z07
SEAT RAIL
END CAP
SEAT STOP BUMPER
REAR STABILIZER

14
OXFORD 5
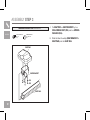
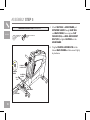
ASSEMBLY STEP 5
HARDWARE PACKAGE STEP 5 CONTENTS :
A Attach SEAT RAIL to MAIN FRAME, put
ROTATION SLEEVE through SEAT RAIL
and MAIN FRAME, then using two FLAT
WASHER (Z08) and OVAL HEX SOCKET
BOLT (Z09) to tighten SEAT RAIL on the
MAIN FRAME.
B Plug the FOLDING LOCKING PIN into the
hole on MAIN FRAME and then screw it tightly
by clockwise.
FLAT WASHER (Z08)
Ø8.6 x Ø26 x 2T
Qty: 2
OVAL HEX SOCKET BOLT (Z09)
M8 x 15L
Qty: 2
Z08
Z09
FOLDING
LOCKING PIN
SEAT RAIL
ROTATION
SLEEVE
ROTATION
SLEEVE
MAIN FRAME

15
Z09
Z02
Z10
Z14
Z14
CONSOLE
MAST
BRACKET
TOP CAP
FRAME BRACKET
OXFORD 5
ASSEMBLY STEP 6
A Put wire (P01) through the slot of CONSOLE
MAST BRACKET.
B Attach CONSOLE MAST BRACKET
onto FRAME BRACKET by two SPRING
WASHER (Z02) and two OVAL HEX
SOCKET BOLT (Z09).
C Attach TOP CAP onto FRAME BRACKET use
two OVAL CROSS BOLT (Z10) and two OVAL
CROSS TAPPING SCREW (Z14) to fix the
top cap.
HARDWARE PACKAGE STEP 6 CONTENTS :
BOLT (Z09)
M8 x 15L
Qty: 2
SPRING WASHER (Z02)
Ø8.2 x Ø15.4 x 2.0T
Qty: 2
OVAL CROSS BOLT (Z10)
M4 x 15L
Qty: 2
Oval Cross Tapping Screw (Z14)
Ø4 x 10L
Qty: 2
CONSOLE
MAST
BRACKET
FRAME
BRACKET
P01

16
OXFORD 5
Z12
CONSOLE WITH MAST
Z11
CONSOLE MAST BRACKET
ASSEMBLY STEP 7
A Connect the plug of (P01) and (P02) then
insert the wire to the slot of CONSOLE MAST
BRACKET.
B Attach CONSOLE MAST onto CONSOLE
MAST BRACKET by one OVAL HEX
SOCKET BOLT (Z11) and one NUT (Z12),
DO NOT screw the bolt too tight.
HARDWARE PACKAGE STEP 7 CONTENTS :
OVAL HEX SOCKET BOLT (Z11)
M8 x 45-15L
Qty: 1
NUT (Z12)
M8 x 1.25P
Qty: 1
Note: Before tighten the mast to bracket, remember to
connect the wires P01 & P02 to ensure the console
works normally.
P02
P01
CONSOLE
MAST
BRACKET

17
OXFORD 5
ASSEMBLY STEP 8
YOU ARE FINISHED!
Oxford 5
Assembly Dimension: 253 x 54 x 101 cm / 100” x 21” x 40”
Product Weight: 47kg / 103.5 lbs.

18
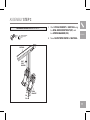
OXFORD 5
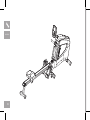
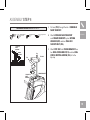
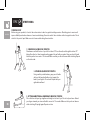
INSTRUCTION-FOLDING AND SET UP
Turn loose and pull out the
folding locking pin
A FOLDING
B SET UP
Lift and hold the seat, turn loose
and pull out the folding locking pin,
put the seat down to the end of rail.
Lift up the seat rail
Step the foot plate
Vertical fold and lock
the rail
Pull down the rail
Pull the seat at the top position
of rail, then plug the folding
locking pin to the rear of rail to
prevent seat fall down.
Plug the folding locking pin
and screw tightly
CAUTION
OXFORD5 is foldable, please take care not to step the foot plate when pass by.

19
AIR ROWER OPERATION GUIDE
This section explains how to use your air rower’s console and program. The BASIC OPERATION section in the AIR ROWER
GUIDE has instructions for the following:
• GETTING STARTED
• AUTO POWER ON/OFF
• OXFORD 5 OPERATION
• OXFORD 5 FUNCTIONS

20
OXFORD 5
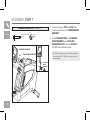
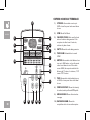
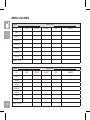
OXFORD 5 DISPLAY FEEDBACK
1) STROKES: Accumulates counts up to
9900 or from the preset value count down
to zero.
2) SPM: Stroke Per Minute
3) CALORIES/PULSE: Auto scan the heart
rate and calories during exercise. If the
computer not detect user’s heart rate,
calories only been shown.
4) WATTS: Shows the watts during exercise.
5) TIME/500M: Estimated time to reach
500M
6) METRES: Accumulates total distance from
zero up to 9999 metres, or from the preset
values count down to zero. If the values
excess 9999, the computer calculate the
distance by 10 metres, for instance, 10.01
means 10010 metres.
7) TIME: Accumulates total working time up
to 99:59, or from preset time count down
to zero.
8) PROFILE DISPLAY: Shows the intensity
of workout, watts profile and SPM profile.
9) MESSAGE BAR: Shows the instruction
message.
10) RACING DIAGRAM: Shows the
competition status of user and computer.
WATTS
SPM
TIME/500M
PULSE
METRES TIMESTROKES
CALORIES
USER
PACER
C
B
7
6
9
10
1
2
3 4
8
5
A
G HFED
Rudern
Modus
Eingabe
Erholung
Zurück
Anzeigenwechsel Ei n/A us
Display Change
On/Off
Mode
Enter
Recovery
Back
•
Pause
Row
Page is loading ...
Page is loading ...
Page is loading ...
Page is loading ...
Page is loading ...
Page is loading ...
Page is loading ...
Page is loading ...
Page is loading ...
Page is loading ...
Page is loading ...
Page is loading ...
Page is loading ...
Page is loading ...
Page is loading ...
Page is loading ...
Page is loading ...
Page is loading ...
Page is loading ...
Page is loading ...
-
 1
1
-
 2
2
-
 3
3
-
 4
4
-
 5
5
-
 6
6
-
 7
7
-
 8
8
-
 9
9
-
 10
10
-
 11
11
-
 12
12
-
 13
13
-
 14
14
-
 15
15
-
 16
16
-
 17
17
-
 18
18
-
 19
19
-
 20
20
-
 21
21
-
 22
22
-
 23
23
-
 24
24
-
 25
25
-
 26
26
-
 27
27
-
 28
28
-
 29
29
-
 30
30
-
 31
31
-
 32
32
-
 33
33
-
 34
34
-
 35
35
-
 36
36
-
 37
37
-
 38
38
-
 39
39
-
 40
40


BH FITNESS OXFORD 5 Owner's manual
- Category
- Treadmills
- Type
- Owner's manual
- This manual is also suitable for
Ask a question and I''ll find the answer in the document
Finding information in a document is now easier with AI
Related papers
Other documents
-
Tunturi R50 Owner's manual
-
NordicTrack RW200 User manual
-
-
Sunny SF-RW1205 Rowing Machine User manual
-
-
-
Weslo WLRW39916.1 User manual
-
ProForm PFICVRW70114.0 User manual
-
Matrix G1-FW162 Owner's manual
-
 Healthstream HS1100RW ROWER Owner's manual
