Optoma Technology HD81-LV User manual
- Category
- Data projectors
- Type
- User manual
This manual is also suitable for

H-
H T
P
U’ M
Manuel d’utilisation
Manual del usuario
Manual do utilizador

Trademarks
Trademarks are the rights of their respective owners.

Table of contents
1
English
Table of Contents ................................................................................... 1
Usage Notice ..........................................................................................3
Safety Information .........................................................................................4
Precautions....................................................................................................5
Eye Safety Warnings .....................................................................................7
Recommendations.........................................................................................8
Introduction.............................................................................................9
Product Features ...........................................................................................9
Package Overview....................................................................................... 11
Product Overview ........................................................................................12
Projector Part ....................................................................................................... 12
Video Box Part ..................................................................................................... 14
Remote Control .................................................................................................... 16
Installation ............................................................................................ 17
Connecting the Projector .............................................................................17
Connecting HD81-LV To AV Receiver .........................................................18
Powering On/Off the Projector.....................................................................21
Powering On the Projector ................................................................................... 21
Powering Off the projector ................................................................................... 22
Warning Indicator ................................................................................................. 22
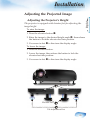
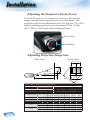
Adjusting the Projected Image.....................................................................23
Adjusting the Projector’s Height ........................................................................... 23
Adjusting the Projector’s Zoom / Focus ............................................................... 24
Adjusting Projected Image Size ........................................................................... 24
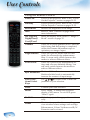
User Controls ....................................................................................... 25
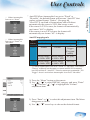
Control Panel & Remote Control .................................................................25
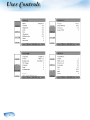
On-screen Display Menus ...........................................................................28
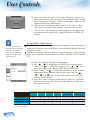
How to operate .................................................................................................... 28
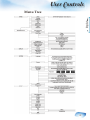
Menu Tree ...................................................................................................29
Image Adjustments .............................................................................................. 31
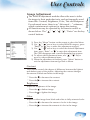
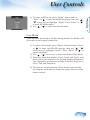
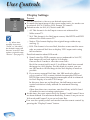
Display Settings .................................................................................................. 34
Advanced Adjustments ........................................................................................ 38
System Adjustments ............................................................................................ 44
Projector Settings ................................................................................................. 44
Setup Settings ...................................................................................................... 47

Table of contents
2
Appendices...........................................................................................53
Troubleshooting ...........................................................................................53
Image Problems .................................................................................................. 53
Intermission Problems ........................................................................................ 55
LED Problems ..................................................................................................... 56
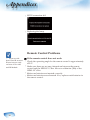
Remote Control Problems ................................................................................... 58
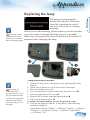
Replacing the Lamp.....................................................................................59
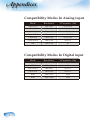
Compatibility Modes In Analog Input ...........................................................60
Compatibility Modes In Digital Input ............................................................60
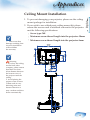
Ceiling Mount Installation ............................................................................61
Optoma Global Offi ce ..................................................................................62
Regulation & safety notices ........................................................................63
Table of contents
Table of contents

Usage Notice
3
English
ABOUT THIS MANUAL
This manual is designed for use with HD81-LV. Information in this
document has been carefully checked for accuracy; however, no guarantee
is given to the correctness of the contents. The information in this docu-
ment is subject to change without notice.
COPYRIGHT
© Copyright 2007
This document contains proprietary information protected by copyright.
All rights are reserved. No part of this manual may be reproduced by any
mechanical, electronic or other means, in any form, without prior written
permission of the manufacturer.
TRADEMARKS
All trademarks and registered trademarks are the property of their respec-
tive owners.
FCC COMPLIANCE
This device complies with Part 15 of the FCC Rules. Operation is subject to
the following two conditions:
(1) This device may not cause harmful interference, and
(2) This device must accept any interference received, including interfer-
ence that may cause undesired operation.
CE COMPLIANCE
This device complies with CE directive.
FEDERAL COMMUNICATIONS COMISSION (FCC)
STATEMENT
This equipment has been tested and found to comply with the limits for a
Class B digital device, pursuant to part 15 of the FCC Rules. These limits
are designed to provide reasonable protection against harmful interference
in a residential installation. This equipment generates uses and can radiate
radio frequency energy and, if not installed and used in accordance with
the instructions, may cause harmful interference to radio communications.
However, there is no guarantee that interference will not occur in a partic-
ular installation. If this equipment does cause harmful interference to radio
or television reception, which can be determined by turning the equipment
off and on, the user is encouraged to try to correct the interference by one
or more of the following measures:
▀■ Reorient or relocate the receiving antenna.
▀■ Increase the separation between the equipment and the receiver.
▀■ Connect the equipment to an outlet on a circuit different from that
to which the receiver is connected.
▀■ Consult the dealer or an experienced radio/TV technician for help.

Usage Notice
4
Safety Information
The lightning fl ash with arrowhead within an equilateral triangle is
intended to alert the user to the presence of uninsulated “dangerous volt-
age” within the product’s enclosure that may be of suffi cient magnitude to
constitute a risk of electric shock to persons.
The exclamation point within an equilateral triangle is intended to alert
the user to the presence of import operating and maintenance (servicing)
instructions in the literature accompanying the appliance.
WARNING: TO REDUCE THE RISK OF FIRE OR ELECTRIC SHOCK, DO NOT
EXPOSE THIS APPLIANCE TO RAIN OR MOISTURE. DANGEROUS HIGH
VOLTAGES ARE PRESENT INSIDE THE ENCLOSURE. DO NOT OPEN THE
CABINET. REFER SERVICING TO QUALIFIED PERSONNEL ONLY.
Class B emissions limits
This Class B digital apparatus meets all requirements of the Canadian Inter-
ference-Causing Equipment Regulations.
Important Safety Instruction
1. Read these instructions –before using this projector.
2. Keep these instructions –for future reference.
3. Follow all instructions.
4. Install in accordance with the manufacturer’s instructions
A. Do not block any ventilation openings
To ensure reliable operation of the projector and to protect it from over-
heating, put the projector in a position and location that will not inter-
fere with its proper ventilation. For example, do not place the projector
on a bed, sofa, carpet, or similar surface that may block the ventilation
openings. Do not put it in an enclosure, such as a bookcase or a cabinet
that may keep air from fl owing through its ventilation openings.
B. Do not use this projector near water or moisture. To reduce the risk
of fi re or electric shock, do not expose the projector to rain or moisture.
C. Do not install near any heat sources, such as radiators, heaters,
stoves or other apparatus (including amplifi ers) that produce heat.
5. Clean only with a dry cloth.
6. Only use attachments/accessories specifi ed by the manufacturer.
7. Refer all servicing to qualifi ed service personnel. Servicing is required
when the projector has been damaged in any way:
▀■ Such as power supply cord or plug is damaged.
▀■ Liquid has been spilled or objects have fallen into the apparatus.
▀■ The projector has been exposed to rain or moisture, does not oper-
ate normally, or has been dropped.
Do not attempt to service this projector yourself. Opening or removing
covers may expose you to dangerous voltages or other hazards. Please
call Optoma to be referred to an authorized service center near you.
8. Do not let objects or liquids enter the projector –as they may touch
dangerous voltage points or short-out parts that could result in a fi re or
electric shock.
9. See projector enclosure for safety related markings.
10. The projector should not be adjusted or repaired by anyone except
properly qualifi ed service personnel.

Usage Notice
5
English
Precautions
Please follow all warnings, precautions and mainte-
nance as recommended in this user’s guide.
▀■ Warning- Do not look into the projector’s lens when the lamp
is on. The bright light may hurt your eyes.
▀■ Warning- To reduce the risk of fi re or electric shock, do not
expose this projector to rain or moisture.
▀■ Warning- Please do not open or disassemble the projector &
box as this may cause electric shock.
▀■ Warning- When replacing the lamp, please allow unit to cool
down, and follow all replacement instructions. See
page 59.
▀■ Warning- This projector will detect the life of the lamp itself.
Please be sure to change the lamp when it shows
warning messages.
▀■ Warning- Reset the “Lamp Reset” function from the on-screen
display “System-->Projector-->Lamp” menu after
replacing the lamp module (refer to page 46).
▀■ Warning- When switching the projector off, please ensure the
cooling cycle has been completed before disconnect-
ing power. Allow 90 seconds for the projector to
cool down.
▀■ Warning- Do not use lens cap when projector is in operation.
▀■ Warning- When the lamp is approaching to the end of its life
time, the message “Replacement suggested” will
show on the screen. Please contact your local reseller
or service center to change the lamp as soon as pos-
sible.
When the lamp
reaches the end of its
life, the projector will
not turn back on until
the lamp module has
been replaced. To re-
place the lamp, follow
the procedures listed
under “Replacing the
Lamp” section on page
59.

Usage Notice
6
Do:
Turn off the product before cleaning.
Use a soft cloth moistened with mild detergent to clean the
display housing.
Disconnect the power plug from AC outlet if the product is
not being used for a long period of time.
Don’t:
Block the ventilation slots and openings on the unit.
Use abrasive cleaners, waxes or solvents to clean the unit.
Use under the following conditions:
- In extremely hot, cold or humid environments.
- In areas susceptible to excessive dust and dirt.
- Near any appliance that generates a strong magnetic fi eld.
- In direct sunlight.

Usage Notice
7
English
Eye Safety Warnings
▀■ Avoid staring directly into the projector beam at all times.
▀■ Minimize standing facing into the beam. Keep your back to
the beam as much as possible.
▀■ A stick or laser pointer is recommended to avoid the need for
the user to enter the beam.
▀■ Ensure that projectors are located out of the line of sight from
the screen to the audience; this ensures that, when presenters
look at the audience, they do not also have to stare at the pro-
jector lamp. The best way to achieve this is by ceiling-mount-
ing rather than fl oor or table-mounting the projector.
▀■ When projector is used in a classroom, adequately supervise
students when they are asked to point out something on the
screen.
▀■ In order to minimize the lamp power needed, use room blinds
to reduce ambient light levels.

Usage Notice
8
Recommendations
To unleash the performance of the HD81-LV, it is best to input video
content in its original form without any processing. This will utilize
the full capabilities of the HD81-LV for de-interlacing, scaling and im-
age enhancement. As an example, if a user has an HDMI DVD player
capable of outputting the video signal in a 480i/576i digital format, we
recommend feeding it directly to the HD81-LV without any processing
by the DVD player. This will provide the HD81-LV with the original
digital video stream and allow the HD81-LV to fully unleash its studio
grade video processing.
In general, we recommend the following:
If possible, use digital output (DVD, D-VHS, DTV setup box, etc). If
there is no digital output, use the component output terminals (YPbPr)
with short and high-quality components cables.
If you are unsure of the quality of the internal de-interlacing or scaler
of your video source, let HD81-LV do the processing by connecting to
the interlaced component output.
If possible, leave out any extra video processing in your video source
(DVD, D-VHS, and HDTV STB).
Some HDTV STB models have scaling conversion that will output
1080i from a 720p format. Try to output 1080i in its native signal for-
mat and let HD81-LV perform deinterlacing and scaling.
Not all HDMI DVD players have a digital interlaced output
(480i/576i). For these products, it is suggested that users try 480p/576p
fi rst, followed by 720p and 1080i. After viewing the full range of out-
put resolutions, the user can then judge which is the best image quality
and set the HD81-LV for that resolution.
Many high-end analog output DVD players also come with high qual-
ity DAC with 12 or 14 bits of processing.
Again, the users should try setting their 480i/576i output to HD81-LV
fi rst.
HD81-LV has BNC connectors for component video input. If the user
plans to use analog component to connect to their video source, for the
best image quality, it is recommend using the BNC connectors.
For connecting to Laser Disc player or S-VHS deck, we suggest to use
S-video output connection to connect to HD81-LV.
It is best to have a separate power outlet for audio and video equip-
ment.
Usage Notice
Usage Notice

Introduction
9
English
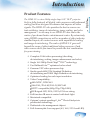
Product Features
The HD81-LV is a true 1080p single chips 0.95” DLP
®
projector.
Built-in fully-featured, all digital, video processor with advanced
scaling functions designed to enhance and improve all video
signals. The HD81-LV also provides the best in source con-
tent switching, image de-interlacing, image scaling, and color
management – in one easy to use HD81-LV also can be the
center of you home theater entertainment center. By extensively
using HDMI connections as well as a number of other industry
standard inputs, all content sources with unparalleled scaling
and image de-interlacing. The scaler of HD81-LV goes well
beyond the scope of other traditional video processors. Each
video source can be fi ne tuned to provide the best combination
for your viewing.
Complete 10-bit video processing (decoding,
de-interlacing, scaling, image enhancement and color)
Single 16:9 1080p Dark Chip3
TM
DLP
®
technology
Use BrilliantColor
TM
optimized color wheel
Gennum VXP video processor chip
Studio-grade 480i/576i Standard Defi nition
de-interlacing and 1080i High Defi nition de-interlacing
Optimized scaling for each input resolution
Video Compatibility:
▪ 480i-NTSC, NTSC4.43
▪ 586i-PAL/PAL-M/PAL-N/SECAM
▪ HDTV compatible (480p,576p,720p,1080i)
▪ RGB signal: HD, XGA, SVGA,VGA res-sizing
Full function IR remote control with back light
Macintosh compatible
Optoma’s patent-pending O
2
Air
TM
PhotoCatalyst air
purifi cation technology
Dedicated color management chipset
Full Anamorphic Lens support (4:3, 16:9, 2.35:1 and LBX)

Introduction
10
3 x HDMI input, 4 x Components input (2 x RCA and
2 x BNC), 3 x S-Video and 3 x Composite inputs
Unique HDMI switching that outputs HDMI audio to
HDMI-capable A/V receiver
Front panel inputs for camcorder, portable computer and
other video sources
Advanced video enhancement engines including:
▪ Vivid Color Engine – Provides RGBCYM saturation/
hue enhancement over 9 regions independently for each
color
▪ Edge Sharpening Engine – Advanced user-defi nable,
boundary-limiting function maximizes
▪ Auto Contrast Engine – Scene - dependent black and
white enhancement for greater picture
▪ Adaptive Noise Reduction Engine – Scene-specifi c noise
reduction removes unwanted image noise without
affecting detail or sharpness
▪ Image Gamma Engine – Users can defi ne their own
gamma curve in 9 regions

Introduction
11
English
Power Cord (1.8m) X 2
▪ 3 pin for Projector
▪ 2 pin for Box
IR Remote Controller X 1
HDMI to HDMI Cable
(15cm) X 1
Package Overview
The product ships standard with the accessories & items
shown below. If anything is missing or damaged, please
contact your dealer immediately.
Documentation :
User’s Manual
Warranty Card
Quick Start Card
Due to the differ-
ence in applications
for each country, some
regions may have dif-
ferent accessories.
AAA Batteries X 2
Projector with lens cap
RCA Component Cable
for YPbPr (2 m) X 1
RS232 Cable (2m) X 2
HDMI to HDMI Cable to
Projector (2m) X 1
Available in European version only
SCART RGB/S-Video
Adaptor
VGA Cable 1.8m
HD81-LV’s Video Box X 1
IR Module X 1

Introduction
12
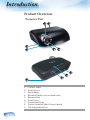
1. Control Panel
2. Zoom Lever
3. Focus Ring
4. Elevator Button (one on each side)
5. Elevator Feet
6. Zoom Lens
7. Connection Ports
8. Power Socket & Main Power Switch
9. Tilt-Adjustment Feet
Projector Part
Product Overview
12
5
4
63
8
1
7
9

Introduction
13
English
Connection Ports
1. HDMI Connector
2. RS232 Input Connector
3. USB Input Connector
4. Power Socket & Main Power Switch
5. Kensington
TM
Lock Port
Control Panel
1. Power LED
2. Lamp Indicator LED
3. Temp Indicator LED
1
2 3
2 31 4 5

Introduction
14
Video Box Part
1. Composite 3/CVBS 3 (NTSC, PAL and SECAM)
2. S-Video 3 (NTSC, PAL and SECAM)
3. VGA (RGB,RGBS (SCART RGB))
4. Four Directional Select Keys
5. Menu (On/Off)
6. On/Standby
7. Re-Sync
8. Enter/Source Select
9. IR Receiver
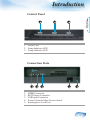
Front Panel
1
2
3 54
7 9
6
8

Introduction
15
English
Back Panel
1. AC In
2. Composite 1/CVBS 1 (NTSC, PAL and SECAM)
3. Composite 2/CVBS 2 (NTSC, PAL and SECAM)
4. S-video 1 (NTSC, PAL and SECAM)
5. S-video 2 (NTSC, PAL and SECAM)
6. Component YPbPr/BNC 1 (NTSC, PAL and SECAM, 480i/
p, 576i/p, 720p and 1080i)
7. Component YPbPr/BNC 2 (NTSC, PAL and SECAM, 480i/
p, 576i/p, 720p and 1080i)
8. DC 12V Output
9. DC 12V Output (Programmable)
10. YPbPr/RGBHV 1 (RGBHV, RGBS (SCART RGB), NTSC,
PAL and SECAM, 480i/p, 576i/p, 720p and 1080i)
11. YPbPr/RGBHV 2 (RGBHV, RGBS (SCART RGB), NTSC,
PAL and SECAM, 480i/p, 576i/p, 720p and 1080i)
12. HDMI 1 (480i/p, 576i/p, 720p and 1080i/p)
13. HDMI 2 (480i/p, 576i/p, 720p and 1080i/p)
14. HDMI 3 (480i/p, 576i/p, 720p and 1080i/p)
15. HDMI To AV Receiver
16. HDMI From AV Receiver
17. To Projector
18. RS232 For Control
19. RS232 To Projector
20. IR Module
5 7 9
11 12 13 14 15 16 17
1819
1 2 4 6 8
10
3
20

Introduction
16
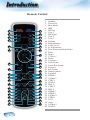
Remote Control
1. Standby
2. Power On
3. Brite Mode
4. IRIS
5. ISF Day
6. User 1
7. ISF Night
8. User 2
9. User 3
10. Gamma
11. Edge Enhance
12. Color Vivid
13. B/W Extension
14. Four Directional Select Keys
15. Enter
16. Menu
17. V.Shit +/-
18. Demo
19. Overscan
20. 16x9 format
21. Letter-Box format
22. Format 1
23. 4x3 format
24. Native format
25. Format 2
26. HDMI 1
27. S-Video 1
28. CVBS 1
29. YPbPr 1
30. BNC 1
31. CVBS 2
32. BNC 2
33. HDMI 2
34. HDMI 3
35. S-Video 3
36. CVBS 3
37. VGA
38. Auto
39. S-Video 2
40. YPbPr 2
1
2
4
7
8
9
18
15
16
17
20
21
27
26
39
19
24
25
34
12
13
3
5
6
10
11
14
23
22
35
36
37
38
28
29
30
33
31
40
32
Introduction
Introduction

Installation
17
English
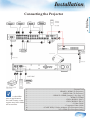
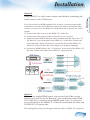
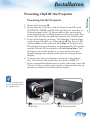
Connecting the Projector
Due to the differ-
ence in applications
for each country, some
regions may have differ-
ent accessories.
9
8
7
7
1
6
6
5 5
5 4
3
2
1
9 8
11 10
1...............................................................................................................Power Cord
2............................................................................. HDMI To HDMI (To Projector)
3..................................................................................... RS232 Cable (To Projector)
4.............................................................. HDMI To HDMI (Jumper) : See page 11
5...................................................................................................... HDMI To HDMI
6............................................................................................YPbPr/RGBHV (BNC)
7............................................................................................YPbPr/RGBHV (RCA)
8...........................................................................................................S-Video Cable
9.......................................................................................... Composite Video Cable
10......................................SCART RGB/S-Video Adaptor (For European Only)
11........................................................................ VGA Cable (For European Only)

Installation
18
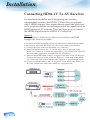
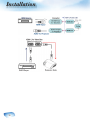
Connecting HD81-LV To AV Receiver
For maximum fl exibility when integrating into existing
entertainment systems, the HD81-LV Video Box is equipped
with 2 HDMI outputs. One output directly sends the signal out
to the projector and the second output sends the signal out to an
HDMI equipped AV receiver. There are three ways to connect
the HDMI output from the HD81-LV’s Video Box.
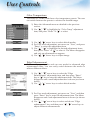
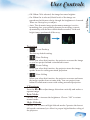
Option 1
Using HD81-LV’s Video Box as video source selector and HDMI
equipped AV Receiver for audio:
If you have an HDMI equipped AV receiver and wish to send the audio signal
to the receiver, but utilize the HD81-LV’s Box as the video source selector:
1) Connect the video sources to the HD81-LV’s video Box.
2) Attach an HDMI cable to the “To AV Receiver” port on the back of the
HD81-LV’s Video Box. Connect the other end to your AV Receiver. This will
allow the audio signal to be controlled by the AV Receiver.
3) Attach a 2nd HDMI cable to the AV out port on the back of the AV Receiver.
Connect the other end to the “From AV Receiver” on the back of the HD81-
LV’s Video Box. This will return the video signal in a “pass through” mode.
4) Connect an HDMI Cable to the “To Projector” on the back of the HD81-LV’s
Box side. Connect the other end to HD81-LV’s projector side.
Page is loading ...
Page is loading ...
Page is loading ...
Page is loading ...
Page is loading ...
Page is loading ...
Page is loading ...
Page is loading ...
Page is loading ...
Page is loading ...
Page is loading ...
Page is loading ...
Page is loading ...
Page is loading ...
Page is loading ...
Page is loading ...
Page is loading ...
Page is loading ...
Page is loading ...
Page is loading ...
Page is loading ...
Page is loading ...
Page is loading ...
Page is loading ...
Page is loading ...
Page is loading ...
Page is loading ...
Page is loading ...
Page is loading ...
Page is loading ...
Page is loading ...
Page is loading ...
Page is loading ...
Page is loading ...
Page is loading ...
Page is loading ...
Page is loading ...
Page is loading ...
Page is loading ...
Page is loading ...
Page is loading ...
Page is loading ...
Page is loading ...
Page is loading ...
Page is loading ...
Page is loading ...
Page is loading ...
Page is loading ...
-
 1
1
-
 2
2
-
 3
3
-
 4
4
-
 5
5
-
 6
6
-
 7
7
-
 8
8
-
 9
9
-
 10
10
-
 11
11
-
 12
12
-
 13
13
-
 14
14
-
 15
15
-
 16
16
-
 17
17
-
 18
18
-
 19
19
-
 20
20
-
 21
21
-
 22
22
-
 23
23
-
 24
24
-
 25
25
-
 26
26
-
 27
27
-
 28
28
-
 29
29
-
 30
30
-
 31
31
-
 32
32
-
 33
33
-
 34
34
-
 35
35
-
 36
36
-
 37
37
-
 38
38
-
 39
39
-
 40
40
-
 41
41
-
 42
42
-
 43
43
-
 44
44
-
 45
45
-
 46
46
-
 47
47
-
 48
48
-
 49
49
-
 50
50
-
 51
51
-
 52
52
-
 53
53
-
 54
54
-
 55
55
-
 56
56
-
 57
57
-
 58
58
-
 59
59
-
 60
60
-
 61
61
-
 62
62
-
 63
63
-
 64
64
-
 65
65
-
 66
66
-
 67
67
-
 68
68


Optoma Technology HD81-LV User manual
- Category
- Data projectors
- Type
- User manual
- This manual is also suitable for
Ask a question and I''ll find the answer in the document
Finding information in a document is now easier with AI
Related papers
-
Optoma EH1020 User manual
-
Optoma TX779 User manual
-
Optoma Technology ThemeScene H77 User manual
-
Optoma HD23-B User manual
-
Optoma Technology EP747 User manual
-
Optoma PRO350W User manual
-
-
-
Optoma DX609 User manual
-
Optoma Technology HD81 User manual

