Ricoh Aficio AP2700 User manual
- Category
- Print & Scan
- Type
- User manual
This manual is also suitable for

OPERATING INSTRUCTIONS
Printer Reference
Read this manual carefully before you use this product and keep it handy for future
reference.
For safety, please follow the instructions in this manual.

Aficio AP2700 OPERATING INSTRUCTIONS
RICOH COMPANY, LTD.
15-5, 1 chome, Minami-Aoyama, Minato-ku, Tokyo
Telephone: Tokyo 3479-3111
Overseas Affiliates
U.S.A.
RICOH CORPORATION
5 Dedrick Place
West Caldwell, New Jersey 07006
Phone: +1-973-882-2000
The Netherlands
RICOH EUROPE B.V.
Groenelaan 3, 1186 AA, Amstelveen
Phone: +31-(0)20-5474111
United Kingdom
RICOH UK LTD.
Ricoh House,
1 Plane Tree Crescent, Feltham,
Middlesex, TW13 7HG
Phone: +44-(0)181-261-4000
Germany
RICOH DEUTSCHLAND GmbH
Mergenthalerallee 38-40,
65760 Eschborn
Phone: +49-(0)6196-9060
France
RICOH FRANCE S.A.
383, Avenue du Général de Gaulle
BP 307-92143 Clamart Cedex
Phone: +33-(0)1-40-94-38-38
Spain
RICOH ESPAÑA S.A.
Avda. Litoral Mar, 12-14,
08005 Barcelona
Phone: +34-(0)93-295-7600
Italy
RICOH ITALIA SpA
Via della Metallurgia 12,
37139 Verona
Phone: +39-(0)45-8181500
Hong Kong
RICOH HONG KONG LTD.
23/F., China Overseas Building,
139, Hennessy Road,
Wan Chai, Hong Kong
Phone: +852-2862-2888
Singapore
RICOH ASIA PACIFIC PTE.LTD.
260 Orchard Road,
#15-01/02 The Heeren,
Singapore 238855
Phone: +65-830-5888
Model number: G038–17
Printed in Japan
UE USA G038-8617

Introduction
This manual contains detailed instructions on the operation and maintenance of this machine. To get
maximum versatility from this machine all operators should carefully read and follow the instructions in
this manual. Please keep this manual in a handy place near the machine.
Please read the Safety Information before using this machine. It contains important information related
to USER SAFETY and PREVENTING EQUIPMENT PROBLEMS.
Note
The names of the applications do not appear in the following pages. Confirm which applications you
will be using before reading this manual.
Consumables:
Software Versions Conventions Used in this Manual
• NetWare3.x means NetWare 3.11, 3.12 and 3.2.
• NetWare4.x means NetWare 4.1, 4.11 and IntranetWare.
Power Source
120V, 60Hz, 9.0A or more
Please be sure to connect the power cord to a power source as above.
Operator Safety:
This machine is considered a CDRH class I laser device, safe for office/ EDPuse. The machine con-
tains 5-milliwat, 760 - 800 nanometer wavelength, GaAIAs laser diodes. Direct (or indirect reflected)
eye contact with the laser beam might cause serious eye damage. Safety precautions and interlock
mechanisms have been designed to prevent any possible laser beam exposure to the operator.
Laser Safety:
The Center for Devices and Radiological Health (CDRH) prohibits the repair of laser-based optical unit
in the field. The optical housing unit can only be repaired in a factory or at a location with the requisite
equipment. The laser subsystem is replaceable in the field by a qualified Customer Engineer.The laser
chassis is not repairable in the field. Customer engineers are therefore directed to return all chassis
and laser subsystems to the factory or service depot when replacement or the optical subsystem is re-
quired.
Caution:
Use of controls or adjustment or performance of procedures other than those specified in this manual
might result in hazardous radiation exposure.
Important
Parts of this manual are subject to change without prior notice. In no event will the company be liable
for direct, indirect, special, incidental, or consequential damages as a result of handling or operating
the machine.
Do not attempt any maintenance or troubleshooting other than that mentioned in this manual. This ma-
chine contains a laser beam generator and direct exposure to laser beams can cause permanent eye
damage.
Two kinds of size notation are employed in this manual. With this machine refer to the inch version.
Ricoh shall not be responsible for any damage or expense that might result from the use of parts other
than genuine Ricoh parts in your Ricoh office product.
For good copy quality, Ricoh recommends that you use genuine Ricoh toner.
Descriptions in this manual Application
PRINTER MANAGER FOR ADMINIS-
TRATOR
Aficio Manager for Admin
PRINTER MANAGER FOR CLIENT Aficio Manager for Client
Consumables Name
Toner RICOH Toner Type 2210D Black
Photo Conductor Unit Photo Conductor Unit Type 270
Consumables Components
Maintenance Kit Type 270 Fusing Unit, Transfer Roller, Paper Feed Rollers,
Friction Pads

Note to users in the United States of America
Notice:
This equipment has been tested and found to comply with the limits for a Class B digital device, pursu-
ant to Part 15 of the FCC Rules. These limits are designed to provide reasonable protection against
harmful interference in a residential installation. This equipment generates, uses and can radiate radio
frequency energy and, if not installed and used in accordance with the instructions, may cause harmful
interference to radio communications.
However, there is no guarantee that interference will not occur in a particular installation. If this equip-
ment does cause harmful interference to radio or television reception, which can be determined by turn-
ing the equipment off and on, the user is encouraged to try to correct the interference by one more of
the following measures:
Reorient or relocate the receiving antenna.
Increase the separation between the equipment and receiver.
Connect the equipment into an outlet on a circuit different from that to which the receiver is
connected.
Consult the dealer or an experienced radio/TV technician for help.
Warning
Changes or modifications not expressly approved by the party responsible for compliance could void
the user's authority to operate the equipment.
Caution (in case of 100BaseTX environment):
1. Properly shielded and grounded cables (STP) and connectors must be used for connections to host
computer (and/or peripheral) in order to meet FCC emission limits.
2. STP with ferrite core must be used for RF interference suppression.
Declaration of Conformity
Product Name: Printer
Model Number: RICOH Aficio AP2700
Responsible party: Ricoh Corporation
Address: 5 Dedrick Place, West Caldwell, NJ 07006
Telephone number: 973-882-2000
This device complies with part 15 of the FCC Rules.
Operation is subject to the following two conditions:
1. This device may not cause harmful interference, and
2. this device must accept any interference received,
including interference that may cause undesired operation.
Note to users in Canada
Note:
This Class B digital apparatus complies with Canadian ICES-003.
Remarque concernant les utilisateurs au Canada
Avertissement:
Cet appareil numérique de la classe B est conforme à la norme NMB-003 du Canada.
In accordance with IEC 60417, this machine uses the following symbols for the main power switch:
a
means POWER ON.
b
means POWER OFF.
Copyright © 1999 Ricoh Co., Ltd.

Introduction
This manual contains detailed instructions on the operation and maintenance of this machine. To get
maximum versatility from this machine all operators should carefully read and follow the instructions in
this manual. Please keep this manual in a handy place near the machine.
Please read the Safety Information before using this machine. It contains important information related
to USER SAFETY and PREVENTING EQUIPMENT PROBLEMS.
Note
The names of the applications do not appear in the following pages. Confirm which applications you
will be using before reading this manual.
Consumables:
Software Versions Conventions Used in this Manual
• NetWare3.x means NetWare 3.11, 3.12 and 3.2.
• NetWare4.x means NetWare 4.1, 4.11 and IntranetWare.
Power Source
120V, 60Hz, 9.0A or more
Please be sure to connect the power cord to a power source as above.
Operator Safety:
This machine is considered a CDRH class I laser device, safe for office/ EDPuse. The machine con-
tains 5-milliwat, 760 - 800 nanometer wavelength, GaAIAs laser diodes. Direct (or indirect reflected)
eye contact with the laser beam might cause serious eye damage. Safety precautions and interlock
mechanisms have been designed to prevent any possible laser beam exposure to the operator.
Laser Safety:
The Center for Devices and Radiological Health (CDRH) prohibits the repair of laser-based optical unit in
the field. The optical housing unit can only be repaired in a factory or at a location with the requisite equip-
ment. The laser subsystem is replaceable in the field by a qualified Customer Engineer.The laser chassis
is not repairable in the field. Customer engineers are therefore directed to return all chassis and laser sub-
systems to the factory or service depot when replacement or the optical subsystem is required.
Caution:
Use of controls or adjustment or performance of procedures other than those specified in this manual
might result in hazardous radiation exposure.
Important
Parts of this manual are subject to change without prior notice. In no event will the company be liable
for direct, indirect, special, incidental, or consequential damages as a result of handling or operating
the machine.
Do not attempt any maintenance or troubleshooting other than that mentioned in this manual. This ma-
chine contains a laser beam generator and direct exposure to laser beams can cause permanent eye
damage.
Two kinds of size notation are employed in this manual. With this machine refer to the inch version.
Supplier shall not be responsible for any damage or expense that might result from the use of parts
other than genuine supplier's parts in your supplier's office product.
For good copy quality, supplier recommends that you use genuine supplier's toner.
Read this manual carefully before you use this product and keep it handy for future reference.
For safety, please follow the instructions in this manual.
Descriptions in this manual Application
PRINTER MANAGER FOR ADMINIS-
TRATOR
Net Virsion for Admin
PRINTER MANAGER FOR CLIENT Net Virsion for Client
Consumables Name
Toner SLP27/P7027 Toner
Photo Conductor Unit Photo Conductor Unit Type 270
Consumables Components
Maintenance Kit Type 270 Fusing Unit, Transfer Roller, Paper Feed Rollers,
Friction Pads

Note to users in the United States of America
Notice:
This equipment has been tested and found to comply with the limits for a Class B digital device, pursu-
ant to Part 15 of the FCC Rules. These limits are designed to provide reasonable protection against
harmful interference in a residential installation. This equipment generates, uses and can radiate radio
frequency energy and, if not installed and used in accordance with the instructions, may cause harmful
interference to radio communications.
However, there is no guarantee that interference will not occur in a particular installation. If this equip-
ment does cause harmful interference to radio or television reception, which can be determined by turn-
ing the equipment off and on, the user is encouraged to try to correct the interference by one more of
the following measures:
Reorient or relocate the receiving antenna.
Increase the separation between the equipment and receiver.
Connect the equipment into an outlet on a circuit different from that to which the receiver is
connected.
Consult the dealer or an experienced radio/TV technician for help.
Warning
Changes or modifications not expressly approved by the party responsible for compliance could void
the user's authority to operate the equipment.
Caution (in case of 100BaseTX environment):
1. Properly shielded and grounded cables (STP) and connectors must be used for connections to host
computer (and/or peripheral) in order to meet FCC emission limits.
2. STP with ferrite core must be used for RF interference suppression.
Declaration of Conformity
Product Name: Printer
Model Number: SAVIN SLP27/P7027
Responsible party: Ricoh Corporation
Address: 5 Dedrick Place, West Caldwell, NJ 07006
Telephone number: 973-882-2000
This device complies with part 15 of the FCC Rules.
Operation is subject to the following two conditions:
1. This device may not cause harmful interference, and
2. this device must accept any interference received,
including interference that may cause undesired operation.
Note to users in Canada
Note:
This Class B digital apparatus complies with Canadian ICES-003.
Remarque concernant les utilisateurs au Canada
Avertissement:
Cet appareil numérique de la classe B est conforme à la norme NMB-003 du Canada.
In accordance with IEC 60417, this machine uses the following symbols for the main power switch:
a
means POWER ON.
b
means POWER OFF.

i
Trademarks
Microsoft
®
, Windows
®
, and MS-DOS
®
are registered trademarks of Microsoft
Corporation in the United States and/or other countries.
PostScript
®
is a registered trademark of Adobe Systems, Incorporated.
PCL
®
is a registered trademark of Hewlett-Packard Company.
AppleTalk, Apple, Macintosh, TrueType, LaserWriter are registered trademarks
of Apple Computer, Incorporated.
Ethernet
®
is a registered trademark of Xerox Corporation.
PowerPC is a registered trademark of International Business Machines Corpora-
tion.
Other product names used herein are for identification purposes only and might
be trademarks of their respective companies. We disclaim any and all rights in-
volved with those marks.
Notes:
Some illustrations might be slightly different from your machine.
Certain options might not be available in some countries. For details, please con-
tact your local dealer.
Note
The proper names of the Windows operating systems are as follows:
• Microsoft
®
Windows
®
95 operating system
• Microsoft
®
Windows
®
98 operating system
• Microsoft
®
Windows
®
for Workgroups operating system Version 3.11
• Microsoft
®
Windows NT
®
Server network operating system Version 4.0
• Microsoft
®
Windows NT
®
Workstation operating system Version 4.0

ii
Safety Information
When using your equipment, the following safety precautions should always be
followed.
Safety During Operation
In this manual, the following important symbols are used:
R
WARNING:
Indicates a potentially hazardous situation which, if instructions
are not followed, could result in death or serious injury.
R
CAUTION:
Indicates a potentially hazardous situation which, if instructions are
not followed, may result in minor or moderate injury or damage to
property.

iii
R
WARNING:
•
Connect the power cord directly into a wall outlet and never use an ex-
tension cord.
•
Disconnect the power plug (by pulling the plug, not the cable) if the
power cable or plug becomes frayed or damaged.
•
To avoid hazardous electric shock or laser radiation exposure, do not
remove any covers or screws other than those specified in this man-
ual.
•
Turn off the power and disconnect the power plug (by pulling the
plug, not the cable) if any of the following conditions exist:
•
You spill something into the equipment.
•
You suspect that your equipment needs service or repair.
•
Your equipment's cover has been damaged.
•
Do not incinerate spilled toner or used toner. Toner dust is flammable
and might ignite when exposed to an open flame.
•
Disposal should take place at an authorized dealer or appropriate col-
lection site.
•
If you dispose of the used toner containers yourself, dispose of them
according to local regulations.

iv
R
CAUTION:
•
Protect the equipment from dampness or wet weather, such as rain, snow,
and so on.
•
Unplug the power cord from the wall outlet before you move the equipment.
While moving the equipment, you should take care that the power cord will
not be damaged under the equipment.
•
When you disconnect the power plug from the wall outlet, always pull the
plug (not the cable).
•
Do not allow paper clips, staples, or other small metallic objects to fall in-
side the equipment.
•
Do not eat or swallow toner.
•
Keep toner (used or unused) and toner cartridge out of reach of children.
•
For environmental reasons, do not dispose of the equipment or expended
supplies at a household waste collection point. Disposal sould take place
at an authorized dealer or an appropriate collection site.
•
Our products are engineered to meet the highest standards of quality and
functionality. When purchasing expendable supplies, we recommend using
only those specified by an authorized dealer.
•
The inside of the machine becomes very hot. Do not touch the parts with a
label indicating a “hot surface”. Touching a “hot surface” could result in a
burn injury. (
v
: means “hot surface”.)

v
ENERGY STAR Program
❖
Low-power mode (Energy Saver mode)
This printer automatically lowers its power consumption 10 or 15 minutes af-
ter the last operation has been completed. To exit Low-power (Energy Saver)
mode, press any key on the operation panel. To change the setting of the En-
ergy Saver mode, see P.89 “Using the Operation Panel”.
❖
Specifications
As an ENERGY STAR Partner, we have deter-
mined that this machine model meets the ENER-
GY STAR Guidelines for energy efficiency.
The ENERGY STAR Guidelines intend to establish an international energy-saving sys-
tem for developing and introducing energy-efficient office equipment to deal with en-
vironmental issues, such as global warming.
When a product meets the ENERGY STAR Guidelines for energy efficiency, the Part-
ner shall place the ENERGY STAR logo onto the machine model.
This product was designed to reduce the environmental impact associated with office
equipment by means of energy-saving features, such as Low-power mode.
The ENERGY STAR Guidelines intend to establish an international energy-saving sys-
tem for developing and introducing energy-efficient office equipment to deal with en-
vironmental issues, such as global warming.
This product was designed to reduce the environmental impact associated with office
equipment by means of energy-saving features, such as Low-power mode.
Energy Saver mode 1 Power Consumption 40W or less
Default Time 10 minutes
Recovery Time 100 seconds or less
Energy Saver mode 2 Power Consumption 25W or less
Default Time 15 minutes
Recovery Time 100 seconds or less

vi
-
Recycled Paper
Please contact your sales or service representative for recommended recycled
paper types that may be used in this machine.

vii
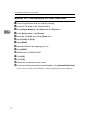
Manuals for this Printer
Manuals for this Printer
There are three manuals that come with this printer.
To enhance safe and efficient operation of your printer, all users should read and
follow the instructions contained in the following manuals.
❖
Setup Guide
Describes the procedures for installing your printer.
❖
Printer Reference
Describes the procedures and necessary information on using your printer
and its options. (This Manual)
❖
PostScript 3 Operating Instructions Supplement
Describes the menus and features you can set using the PostScript printer
driver. The manual is provided as a PDF file which is included in the CD-
ROM labeled “Printer Drivers and Utilities”.
❖
Network Interface Board Operating Insutructions
Describes the procedures and necessary information on setting up and using
your printer under the network environment. The manual is provided as a
PDF file which is included in the CD-ROM labeled “Printer Drivers and Util-
ities”.
❖
PortNavi Operating Instructions Supplement
Describes the procedures for using PortNavi. The manual is provided as a
PDF file which is included in the CD-ROM labeled “Printer Drivers and Util-
ities”.

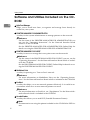
viii
How to Read this Manual
Symbols
In this manual, the following symbols are used:
R
WARNING:
This symbol indicates a potentially hazardous situation which, if instructions
are not followed, could result in death or serious injury.
R
CAUTION:
This symbol indicates a potentially hazardous situation which, if instructions
are not followed, may result in minor or moderate injury or damage to property.
* The statements above are notes for your safety.
Important
If this instruction is not followed, paper might be misfed, originals might be
damaged, or data might be lost. Be sure to read this.
Preparation
This symbol indicates the prior knowledge or preparations required before op-
erating.
Note
This symbol indicates precautions for operation, or actions to take after misop-
eration.
Limitation
This symbol indicates numerical limits, functions that cannot be used together,
or conditions in which a particular function cannot be used.
Reference
This symbol indicates a reference.
[]
Keys that appear on the machine's panel display.
Keys and buttons that appear on the computer's display.
{}
Keys built into the machine's operation panel.
Keys on the computer's keyboard.

ix
TABLE OF CONTENTS
1.Getting Started
Printer Features......................................................................................... 1
Printer Drivers for Your Printer...................................................................... 3
Software and Utilities Included on the CD-ROM..................................... 4
Guide to the Printer................................................................................... 5
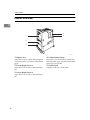
Exterior: Front View....................................................................................... 5
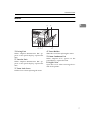
Exterior: Rear View....................................................................................... 6
Interior........................................................................................................... 7
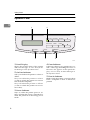
Operation Panel............................................................................................ 8
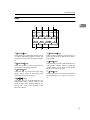
Keys.............................................................................................................. 9
Guides......................................................................................................... 10
2.Uninstalling the Printer Driver and Software
Uninstalling the PCL 6/5e Printer Driver ............................................... 11
Windows 95/98 - Uninstalling the PCL 6/5e Printer Driver.......................... 11
Windows NT 4.0 - Uninstalling the PCL 6/5e Printer Driver........................ 11
Windows 3.1x - Uninstalling the PCL 6/5e Printer Driver............................ 12
Uninstalling the PostScript Printer Driver............................................. 13
Windows 95/98 - Uninstalling the PostScript Printer Driver........................ 13
Windows NT 4.0 - Uninstalling the PostScript Printer Driver ...................... 13
Windows 3.1x - Uninstalling the PostScript Printer Driver .......................... 14
Macintosh - Uninstalling the PostScript Printer Driver ................................ 14
3.Setting Up the Printer Driver and Canceling a Print Job
PCL 6/5e - Accessing the Printer Properties ........................................ 15
Windows 95/98 - Accessing the Printer Properties..................................... 15
Windows NT 4.0 - Accessing the Printer Properties................................... 16
Windows 3.1x - Accessing the Printer Setting Dialog Box.......................... 17
PostScript - Setting Up for Printing....................................................... 19
Windows 95/98 - Accessing the Printer Properties..................................... 19
Windows NT 4.0 - Accessing the Printer Properties................................... 20
Windows 3.1x - Accessing the Printer Setting Dialog Box.......................... 21
Macintosh - Setting Up for Printing ............................................................. 23
Canceling a Print Job.............................................................................. 24
Windows 95/98 - Canceling a Print Job...................................................... 24
Windows NT 4.0 - Canceling a Print Job .................................................... 24
Windows 3.1x - Canceling a Print Job ........................................................ 25
Macintosh - Canceling a Print Job .............................................................. 26

x
4.Paper and Other Media
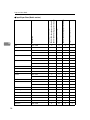
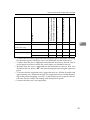
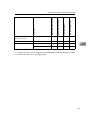
Paper and Other Media Supported by Your Printer ............................. 27
Paper Types and Sizes............................................................................... 27
Paper Recommendations............................................................................ 36
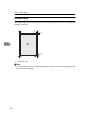
Printable Area ............................................................................................. 40
Loading Paper and Other Media ............................................................ 41
Loading Paper in the Paper Tray................................................................ 41
Changing Paper Size of the Paper Tray ..................................................... 42
Loading Thick Paper, Envelope or OHP Transparencies ........................... 44
Loading Paper on PS420 (Paper Feed Unit) .............................................. 44
Loading Paper in Bypass Tray Type 270.................................................... 45
Specifying the Custom Paper Size for the Bypass Tray ............................. 48
5.Troubleshooting
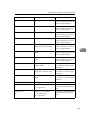
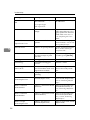
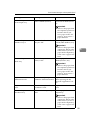
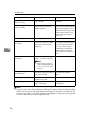
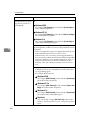
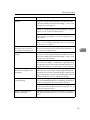
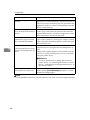
Error & Status Messages on the Operation Panel................................ 51
Getting Printer Information over the Network.............................................. 57
Printer Doesn't Print................................................................................ 62
Other Printing Problems......................................................................... 66
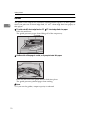
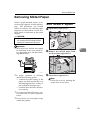
Removing Misfed Paper.......................................................................... 69
When "Misfeed: A" Appears........................................................................ 69
When "Misfeed: B" Appears........................................................................ 70
When "Misfeed: C" Appears........................................................................ 70
When "Misfeed: D" Appears........................................................................ 71
When "Remove Misfeed from Mailbox" Appears........................................ 72
When "Remove Misfeed From Finisher" Appears....................................... 72
When "Misfeed: Y" Appears........................................................................ 73
When "Remove Misfeed from Duplex Unit" Appears.................................. 74
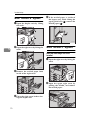
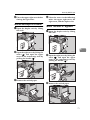
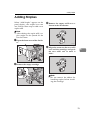
Adding Staples ........................................................................................ 75
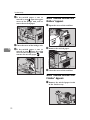
Removing Jammed Staples.................................................................... 77
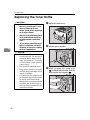
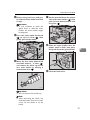
Replacing the Toner Bottle..................................................................... 78
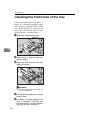
Replacing the Photo Conductor Unit..................................................... 80
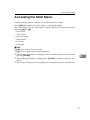
Cleaning the Paper Feed Roller ............................................................. 83
Cleaning the Friction Pad....................................................................... 85
Cleaning the Pad inside of the tray........................................................ 86
Cleaning the Registration Roller............................................................ 87
6.Using the Operation Panel
Menu Chart............................................................................................... 89
Accessing the Main Menu....................................................................... 91
Making Printer Settings with the Operation Panel............................... 92

xi
Proof Print Menu...................................................................................... 93
Proof Print Parameters................................................................................ 93
Job Control Menu.................................................................................... 94
Job Control Parameters.............................................................................. 94
Network Setup Menu............................................................................. 101
Maintenance Menu ................................................................................ 103
Maintenance Parameters ......................................................................... 103
List Print Menu....................................................................................... 105
List Print Parameters................................................................................. 105
Language Menu..................................................................................... 106
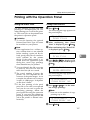
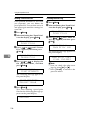
Printing with the Operation Panel........................................................ 107
Using the Proof Print................................................................................. 107
7.Appendix
Memory Capacity and Printer Function............................................... 109
Moving and Transporting the Printer .................................................. 110
Specifications........................................................................................ 111
Mainframe................................................................................................. 111
Options...................................................................................................... 113
INDEX...................................................................................................... 119

xii

1
1. Getting Started
Printer Features
This printer is designed especially for office workgroups. It can be used in net-
work environments and allows you to manage documents efficiently.
❖
High Productivity
As this printer comes with a 27 pages per minute (ppm) engine and offers a
variety of paper handling options, handling documents will be more efficient.
Proof print function *1
is one of the supporting features for making multiple
original print which allows you to confirm that the document prints as ex-
pected before printing many.
*1 Optional Printer Hard Disk Type 185 is required.
❖
Versatile Paper Handling Options
This printer offers both versatile input and output paper handling options. In-
put capacity can be raised to 3,100 sheets with the optional paper bank
(PS420) and the bypass tray (Type 270) to reduce the inconvenience of reload-
ing paper. For an output device, with the optional mailbox (CS370), you can
specify up to 5 places, including the standard output tray, to prevent from be-
ing mixed up with other person's documents. Also, collating *2 and stapling
capability is available with the optional finisher (SR720).
*2 Optional Printer Feature Expander Type 185 (32MB or 64MB) or Printer Hard
Disk Type 185 is required.
❖
Variety of Paper Media Support
Standard Tray 2 and optional Bypass Tray Type 270 support variety of paper
media such as thick paper *3 , transparency and some envelops *3 .
*3 For more information on the supported paper and other media, see P.27 “Paper
and Other Media”.
❖
Network Interface Board Standard *4
It comes standard with network-ready Ethernet capability supporting multi-
ple protocols. This feature can be used in a variety of network environments.
*4
For more information on configuring for a network, see “Network Interface Board
Operating Instructions” in the CD-ROM.
❖
PostScript 3 Standard
In addition to PCL 6 emulation, PostScript 3 is provided as a standard feature.
This feature can be used in Macintosh environments as well. PDF files can be
printed clearly and easily.
❖
Network Utility
PRINTER MANAGER *5 , software consisting of Administration and Client
versions, is provided. With this software, multiple print devices can be uti-
lized effectively together on a network. This software offers several conve-
nient functions such as parallel printing and recovery printing.
*5 For the name of the PRINTER MANAGER you use, see the “Operating Instruc-
tions” for the Network Interface Board which is included in the CD-ROM.

Getting Started
2
1
❖
Major Specifications
Continuous Printing Speed
27ppm (A4 long-edge feed or 8
1
/
2
”
×
11” long-
edge feed, simplex)
22ppm (A4 long-edge feed or 8
1
/
2
”
×
11” long-
edge feed, duplex)
Engine Resolution 600dpi / 300dpi resolution
Enhanced resolution with edge smoothing
Printer Languages PCL 5e, PCL 6
Adobe PostScript Level 3
Paper Input Capacity 500 sheets
×
2 trays
Max. 3,100 sheets with options
Paper Output Capacity 500 sheets
Max. 1,750 sheets with options
Memory 16MB
Max up to 80MB
HDD 1.6GB (option)
Interface 10BASE-T or 100BASE-TX
×
1
IEEE1284
×
1
Options PS400 (500-sheet paper feed unit)
PS440 (1000-sheet paper feed unit)
PS420 (2000-sheet paper feed unit)
Interchange Unit Type 280
Bypass Tray Type 270
AD370 (duplex unit)
CS370 (4-bin mailbox)
Bridge Unit Type 270
SR720 (1000-sheet finisher)
Printer Feature Expander Type 185 (32MB/64MB)
Printer Hard Disk Type 185
Page is loading ...
Page is loading ...
Page is loading ...
Page is loading ...
Page is loading ...
Page is loading ...
Page is loading ...
Page is loading ...
Page is loading ...
Page is loading ...
Page is loading ...
Page is loading ...
Page is loading ...
Page is loading ...
Page is loading ...
Page is loading ...
Page is loading ...
Page is loading ...
Page is loading ...
Page is loading ...
Page is loading ...
Page is loading ...
Page is loading ...
Page is loading ...
Page is loading ...
Page is loading ...
Page is loading ...
Page is loading ...
Page is loading ...
Page is loading ...
Page is loading ...
Page is loading ...
Page is loading ...
Page is loading ...
Page is loading ...
Page is loading ...
Page is loading ...
Page is loading ...
Page is loading ...
Page is loading ...
Page is loading ...
Page is loading ...
Page is loading ...
Page is loading ...
Page is loading ...
Page is loading ...
Page is loading ...
Page is loading ...
Page is loading ...
Page is loading ...
Page is loading ...
Page is loading ...
Page is loading ...
Page is loading ...
Page is loading ...
Page is loading ...
Page is loading ...
Page is loading ...
Page is loading ...
Page is loading ...
Page is loading ...
Page is loading ...
Page is loading ...
Page is loading ...
Page is loading ...
Page is loading ...
Page is loading ...
Page is loading ...
Page is loading ...
Page is loading ...
Page is loading ...
Page is loading ...
Page is loading ...
Page is loading ...
Page is loading ...
Page is loading ...
Page is loading ...
Page is loading ...
Page is loading ...
Page is loading ...
Page is loading ...
Page is loading ...
Page is loading ...
Page is loading ...
Page is loading ...
Page is loading ...
Page is loading ...
Page is loading ...
Page is loading ...
Page is loading ...
Page is loading ...
Page is loading ...
Page is loading ...
Page is loading ...
Page is loading ...
Page is loading ...
Page is loading ...
Page is loading ...
Page is loading ...
Page is loading ...
Page is loading ...
Page is loading ...
Page is loading ...
Page is loading ...
Page is loading ...
Page is loading ...
Page is loading ...
Page is loading ...
Page is loading ...
Page is loading ...
Page is loading ...
Page is loading ...
Page is loading ...
Page is loading ...
Page is loading ...
Page is loading ...
Page is loading ...
Page is loading ...
-
 1
1
-
 2
2
-
 3
3
-
 4
4
-
 5
5
-
 6
6
-
 7
7
-
 8
8
-
 9
9
-
 10
10
-
 11
11
-
 12
12
-
 13
13
-
 14
14
-
 15
15
-
 16
16
-
 17
17
-
 18
18
-
 19
19
-
 20
20
-
 21
21
-
 22
22
-
 23
23
-
 24
24
-
 25
25
-
 26
26
-
 27
27
-
 28
28
-
 29
29
-
 30
30
-
 31
31
-
 32
32
-
 33
33
-
 34
34
-
 35
35
-
 36
36
-
 37
37
-
 38
38
-
 39
39
-
 40
40
-
 41
41
-
 42
42
-
 43
43
-
 44
44
-
 45
45
-
 46
46
-
 47
47
-
 48
48
-
 49
49
-
 50
50
-
 51
51
-
 52
52
-
 53
53
-
 54
54
-
 55
55
-
 56
56
-
 57
57
-
 58
58
-
 59
59
-
 60
60
-
 61
61
-
 62
62
-
 63
63
-
 64
64
-
 65
65
-
 66
66
-
 67
67
-
 68
68
-
 69
69
-
 70
70
-
 71
71
-
 72
72
-
 73
73
-
 74
74
-
 75
75
-
 76
76
-
 77
77
-
 78
78
-
 79
79
-
 80
80
-
 81
81
-
 82
82
-
 83
83
-
 84
84
-
 85
85
-
 86
86
-
 87
87
-
 88
88
-
 89
89
-
 90
90
-
 91
91
-
 92
92
-
 93
93
-
 94
94
-
 95
95
-
 96
96
-
 97
97
-
 98
98
-
 99
99
-
 100
100
-
 101
101
-
 102
102
-
 103
103
-
 104
104
-
 105
105
-
 106
106
-
 107
107
-
 108
108
-
 109
109
-
 110
110
-
 111
111
-
 112
112
-
 113
113
-
 114
114
-
 115
115
-
 116
116
-
 117
117
-
 118
118
-
 119
119
-
 120
120
-
 121
121
-
 122
122
-
 123
123
-
 124
124
-
 125
125
-
 126
126
-
 127
127
-
 128
128
-
 129
129
-
 130
130
-
 131
131
-
 132
132
-
 133
133
-
 134
134
-
 135
135
-
 136
136
-
 137
137
-
 138
138


Ricoh Aficio AP2700 User manual
- Category
- Print & Scan
- Type
- User manual
- This manual is also suitable for
Ask a question and I''ll find the answer in the document
Finding information in a document is now easier with AI
Related papers
Other documents
-
Lanier 5222 User manual
-
Gestetner P7032 Setup Manual
-
-
Utax LP 110 Operating instructions
-
Xanté Impressia Digital Multi Media Press Owner's manual
-
Pitney Bowes DP50P/DP50S Printers User guide
-
Minolta PagePro 1100 User manual
-
-
Savin 9945DP User manual
-
HP 4181 User manual