Page is loading ...

Kambrook - Australia
Building 2, Port Air Industrial Estate
1A Hale Street
Botany NSW 2019
Australia
Customer Service Line 1300 139 798
Customer Service Fax 1800 621 337
www.kambrook.com.au
Due to continual improvement in design or otherwise, the product you
purchase may differ slightly from the illustration in this book. Issue B13
Kambrook - New Zealand
Private Bag 94411
Botany, Manukau
Auckland 2163
New Zealand
Customer Service Line/
Spare Parts 0800 273 845
Customer Service Fax 0800 288 513
www.kambrook.co.nz

Instruction Booklet
Jaguar 1600W
Vacuum
Cleaner
KVC50

Important
Please retain your instruction
book for future use.
In the event that you need some assistance with your
Kambrook appliance, please contact our Customer Service
Department on 1300 139 798 (Australia) or 0800 273 845
(New Zealand). Alternatively, visit us on our website at
www.kambrook.com.au or www.kambrook.co.nz

Contents
Kambrook Recommends p4
Safety First
Your Kambrook Jaguar p6
1600W Vacuum Cleaner
Operating Your Kambrook p7
Vacuum Cleaner
Care and Maintenance p8
Troubleshooting Guide p11

4
Kambrook Recommends Safety First
IMPORTANT: Please retain your
instruction book for future use.
At Kambrook, we believe that safe performance is the first priority in any
consumer product, so that you, our valued customer can confidently
use and trust our products. We ask that any electrical appliance that
you use be operated in a sensible fashion with due care and attention
placed on the following important operating instructions.
Important Safeguards For Your Kambrook
Jaguar 1600W Vacuum Cleaner
• Carefully read all instructions before operating
the vacuum cleaner for the first time and save
for future reference.
• Remove and safely discard any packaging
material and promotional labels before using
the vacuum cleaner for the first time.
• To eliminate a choking hazard for young
children, remove and safely discard the
protective cover fitted to the power plug of
this vacuum cleaner.
• Always ensure the vacuum cleaner is properly
assembled before use. Follow the instructions
provided in this book.
• Ensure that the power source to be used is
the same as the voltage requirements of the
products.
• Always switch the vacuum cleaner to ‘OFF’,
switch off at the power outlet, and unplug the
vacuum cleaner prior to cleaning the filters or
changing the dust bag.
• Never use the vacuum cleaner without a dust
bag and motor protection filter correctly fitted
and in place.
• Never use the vacuum cleaner to vacuum hot
ashes, broken glass, sharp objects, or liquids.
• Never use in the presence of explosive liquids
or vapours.
• Never vacuum up inflammable or poisonous
liquids such as petrol, copier toner or other
volatile substances. Never vacuum up acids,
asbestos or asbestos dust.
• Do not leave the vacuum cleaner unattended
when in use.
• Close supervision is required at all times when
operating the vacuum cleaner near children.
• Fully extend the cord (to the yellow tape
mark) whenever the vacuum cleaner is in use.
Ensure that the cord is not extended past the
red tape mark.
• Do not store outdoors.
• Do not use chemicals, steel wool, metal
scouring pad or abrasive cleaners to clean
the outside of the vacuum cleaner housing as
these can damaged the housing.
• To avoid an electrical overload, it is
recommended that no other appliances are
plugged into the same circuit as your vacuum
cleaner when it is in use.
• Hold the plug end when retracting the cord
to prevent it from striking you or the vacuum.
• Once the dust bag is inserted ‘puff-out’ the
bag as much as possible to ensure the full
capacity of the bag can be used.
• Dirty and clogged filters may result in reduced
suction performance. It is recommended
that filters are cleaned after every use and
replaced regularly to ensure maximum
efficiency from your vacuum cleaner. If filters
are left unclean, it may results in reduction of
suction power.
• Clean the floor tools regularly.
• Keep the vacuum cleaner clean. Follow the
cleaning instructions provided in this book.

5
Important Safeguards For All
Electrical Appliances
• Fully unwind the power cord before use.
• Connect only to 230V or 240V power outlet.
• Do not let the power cord hang over the edge
of a bench or table, touch hot surfaces or
become knotted.
• To protect against electric shock, do not
immerse the power cord, power plug or
appliance in water or any other liquid, unless it
is recommended in the cleaning instructions.
• The appliance is not intended for use by
persons (including children) with reduced
physical, sensory or mental capabilities, or lack
of experience and knowledge, unless they
have been given supervision or instruction
concerning use of the appliance, by a person
responsible for their safety.
• Children should be supervised to ensure that
they do not play with the appliance.
• It is recommended to inspect the appliance
regularly. Do not use the appliance if the
power supply cord, plug, connector or
appliance becomes damaged in anyway.
Return the entire appliance to the nearest
authorised Kambrook Service Centre for
examination and/or repair.
• Any maintenance other than cleaning should
be performed at an authorised Kambrook
Service Centre.
• This appliance is for household use only.
Do not use this appliance for other than its
intended use. Do not use in moving vehicles or
boats.
Do not use outdoors. Misuse may cause injury.
• The installation of a residual current device
(safety switch) is recommended to provide
additional safety protection when using
electrical appliances. It is advisable that a
safety switch with a rated residual operating
current not exceeding 30mA be installed in
the electrical circuit supplying the appliance.
See your electrician for professional advice.
• Always turn the appliance to the OFF
position, switch off at the power outlet
and unplug at the power outlet when the
appliance is not in use.
• Before cleaning, always turn the appliance
to the OFF position, switch off at the power
outlet, unplug at the power outlet and remove
the power cord, if detachable, from the
appliance and allow all parts to cool.
• Do not place this appliance on or near a heat
source, such as hot plate, oven or heaters.
• Position the appliance at a minimum
distance of 20cm away from walls, curtains
and other heat or steam sensitive materials
and provide adequate space above and
on all sides for air circulation.

6
Your Kambrook Jaguar 1600W Vacuum Cleaner
1. 1600 watt motor
2. Cord rewind button
3. Power On/Off button
4. Dust bag compartment
5. Dust bag full indicator
6. 360 degree crush proof hose
7. Variable speed control
8. Cord storage outlet
9. Telescopic chrome wand
10. Carry handle
11. Multi-terrain floor tool to vacuum
all floor surfaces
12. Crevice, small brush and
upholstery attachments
Not Shown
• Motor protection filter
• Exhaust filter compartment

7
Operating Your Kambrook Vacuum Cleaner
Before First Use
Remove all packaging from the unit,
hose and other accessories; ensure
that you have removed all of the
accessories before discarding the
packaging.
Ensure that the dust bag and filters
are correctly fitted.
Locate the crush proof hose and push
the connection point into the hose
inlet connection on the top of the
vacuum, until a “CLICK” sound
is heard.
Connect the wide end of the metal
wand to the hose end and push
together firmly.
Fit the floor tool to the narrow end of
the wand and push together firmly.
Fully extend the power cord by pulling
the power plug (situated at the rear
of the unit) out from the unit, until the
yellow tape on the cord is shown.
IMPORTANT: Ensure
that you do not over
extend the power cord,
do not extend past the
red warning tape on
the cord.
Plug into a 230V or 240V power point
and switch on.
To commence vacuuming, push
down on the ‘ON/OFF’ button
, at
the top, rear of the unit.
When vacuuming is complete, push
down on the ‘ON/OFF’ button to
switch OFF. Turn the power off at the
outlet and then remove the power
cord from the power outlet (when
removing plug from the power outlet
grasp the plug not the cord).
To retract the cord push down on the
‘CORD REWIND’ button
.
IMPORTANT: Hold the
plug end when retracting
the cord to prevent it
from striking you or the
vacuum.
WARNING: Always ensure
that the dust bag and
the motor protection filter
are correctly fitted. Never
operate without the dust
bag and filters in place.
Variable Power Control
The variable power control slide
switch is located on the top of the
vacuum cleaner. Slide the control
to ‘MAX’ for maximum power for
vacuuming hard floor and carpet
surfaces. Slide the control ‘MIN’ for
minimum power level when using the
crevice, upholstery and brush tools.
Crevice, Brush and
Upholstery Tool Accessories
The crevice tool is ideal for
vacuuming hard to reach places such
as the edges along skirting boards.
The brush and upholstery tool can be
used to vacuum delicate surfaces
and areas such as shelves and
venetian blinds.
Set the variable speed control
between minimum and medium
power when using the tool accessories.
Turn off the vacuum cleaner when
changing any attachments.

8
Replacing Cloth bag or
Paper dust Bag
With your vacuum cleaner you have
the option of using a cloth bag or
paper dust bag.
The dust bag should be changed
when full. The dust bag indicator
window will gradually turn red as
the bag fills up and when the dust
bag indicator displays ‘red’, it is
time to change the dust bag.
Always switch the vacuum cleaner
‘OFF’, then switch off at the power
outlet and unplug the vacuum
cleaner prior to replacing dust
bags or filters.
To remove the dust bag, ensure
the vacuum is down on its wheels,
remove the crush proof hose and
push the ‘Dust bag compartment lid
release lever’ located at the front of
the unit. Once the lid has released,
pull the top cover back.
To remove the bag, grasp the top of
the dust bag and pull out. If you are
using the cloth bag dispose the dust in
a rubbish bin. If you are using a paper
dust bag you can dispose the bag
with its contents in the rubbish bin.
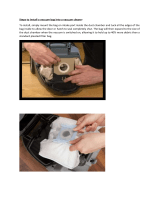
To place a new dust bag, take a
fresh dust bag and with the arrow
(printed on the front section of the
dust bag) pointing down, slide the
dust bag down into the holder, until it
comes in contact with the bottom of
the holder, then push the holding clip
forward to secure.
NOTE: Once the bag is inserted
‘puff-out’ the bag as much
as possible to ensure the full
capacity of the bag can be
taken up.
When vacuuming fine dust particles,
the fine dust particles can clog the
pores of the dust bag and the dust
bag indicator will indicate full. If this
happens the bag could appear
relatively empty, however the bag
will still need to be changed to avoid
strain on the motor.
NOTE: The bag compartment lid
may not close if the bag is not
correctly fitted.
Care and Maintenance

9
WARNING: Do not use the
unit without a dust bag in
place.
Always switch the vacuum cleaner
‘OFF’, then switch off at the power
outlet and then unplug the appliance
prior to cleaning or replacing filters.
Cleaning and
Replacing Filters
Filters must be cleaned from time to
time to remove the fine dust particles
that have been collected. This can be
done by shaking them; however after
approximately 5 dust bag changes,
the filters should be replaced.
Motor Protection Filter
The motor protection filter must
always be in place when operating
the vacuum otherwise damage to the
motor may occur.
To clean or replace the motor
protection filter, remove the dust bag
or pull the bag forward. The motor
protection filter sits in grooves located
at the rear of this dust bag chamber.
Pull the plastic filter holder upward to
remove. To clean, separate the foam
filter from the plastic holder and
shake debris from the filter into a
garbage receptacle.
When clean, replace the foam filter
into the plastic holder and reinsert into
the vacuum by pushing downwards
into the grooves provided. To replace
the filter, dispose of old filter and
insert a new, clean filter into the
vacuum cleaner.
Exhaust Filter
The exhaust filter should be cleaned
after every use for maximum
vacuuming performance. To clean,
simply unclip the grill at the back
of the vacuum cleaner and shake
and tap the filter to remove any dust
accumulated. Then relocate the filter
and reattach the grill.
NOTE: Dirty and clogged
filters may result in reduced
suction performance. It is
recommended that filters are
cleaned after every use and
replaced regularly to ensure
maximum efficiency from
your vacuum. If filters are left
uncleaned, it may result in
reduction of suction power.

10
Cleaning the Exterior
To clean the outside of the unit, wipe
the exterior with a soft, damp cloth.
Never use an abrasive cleaner.
Clean and/or replace both the
motor protection and exhaust filter
on a regular basis.
WARNING: Do not use
chemicals, steel wool,
metal scouring pad or
abrasive cleaners to
clean the outside of the
vacuum cleaner housing
as these can damage
the housing.
WARNING: Clean
the floor tools and
accessories regularly.
Spare Parts
To order spare parts for your
Kambrook Vacuum Cleaner including
Filters and Dust Bags, please contact
Customer Service on:
1300 139 798 (Australia)
or 0800 273 845 (New Zealand).
Dust bag and replacement filter
spare part code: KVB50.
Care and Maintenance continued

11
Troubleshooting Guide
Troubleshooting
PROBLEM POSSIBLE CAUSES WHAT TO DO
Vacuum cleaner is
not working
• The unit may not
be plugged into
power outlet
• Ensure the power plug is
securely plugged
Vacuum cleaner is
not picking up dirt
• Dust bag is full
• Filter is clogged
• Dust bag is not
fitted correctly
• Empty/replace dust bag
• Refer to ‘Cleaning and
Replacing Filters’, page 9
• Check dust bag installation
Dust escaping from
vacuum
• Dust bag is not
fitted correctly
• Hose is not fitted
correctly
• Dust bag is full
• Check dust bag installation
• Check hose installation
• Empty/replace dust bag
/