WOOD
HEAT
STOVES
& iSULftn
12426
N.
Bloomfield Road
Nevada City, CA 95959
(530) 265-8618
www.woodheatstoves.com
....
.'
..
' ,
..
...
@'
..
·
Wonder/ire
TM
...
,;
MEfdel
2570
~
..
~
<OirectVent
G'2ls~*ater
Owner's Guide
For
use
in
North
America
,,'
,
l,-
'.J
rJ
G /
lUi
II
10
BW[~8
occcDoi
'==
1/
G
n
11
\ /
r
,
!\
WOOD
HEAT
STOV
S &
SOLAR
12426
N.
Bloom eld Road
Nevada City, C 95959
{530} 265- 18
www.woodheatstves.com
WARNING:
If the information in this manual
is
not followed exactly, a fire
of'
·1
.
explosion may result causing property damage, personal
injury
or
loss
of
life.
I.
........
I
OQnot Store
or
use ·gasoline
or
other flammable vapors and
liquids
in
the 'vicinity
of
tl1is
or
any
other appliance.
.~.
" , "
..
.",
WHATTO
DO
IFYOU
SMELL
GAS
• Do
not
try
to
light
any
appliance.
•
Do
not
touch any electrical switch;
do
not use any phone
in
your
building.
" Immediately call
your
gas supplier from a neighbor's phone.
Follow
the
gas supplier's instructions.
" If you cannot reach your gas supplier, call
the
fire department.
IriStaliation and service must
be
performed
by
a qualified installer, service
agency
or
the gas supplier.


WOOD
HEAT
STOVES
&
SOLAR
12426
N.
Bloomfield
Road
Nevada
City,
CA
95959
(530)
265-8618
www.woodheatstoves.com
Table of Contents
Installation
.......................2
Jlss4!I1l11
1
1f
•••••••••••••••••••••••••
Ei
Op4!ration
••••••••••••••••••••••
13
Maint4!nanc4! .................
15
Sp4!cifications ...............
18
Parts
List
•••••••••••••••••••••••
19
Wiring Diagral1l ..............
2O
Jlpp4!ndix Jl ....................
21
Warrant1f .........
Back
Cov4!r
SaV4!
th4!s4!
instructions
for
futuN
reference.

2
Installation
Installation
The installation must conform with local codes
or,
in
the
absence of local codes, with the National Fuel Gas Code,
ANSI 2223.1 latest edition. (EXCEPTION: Do not derate
this appliance for altitude. Maintain the manifold pressure at
3.5 inches W.C. and 10 inches W.C. for Propane).
In
Canada, installation must be in accordance with the
current CAN 1 81-149.1 and .2 Installation Codes and/or
local codes.
The
Installation
should
be
done
by
a
qualified
service
person
who
Is
familiar
with
the
building
codes
and
Installation
techniques
appropriate
for
your
area
to
accomplish
a
safe
and
effective
installation.
Your
Wonderfire
dealer
or
your
local
gas
sup-
plier
will
be
able
to
refer
a
qualified
service
person.
WARNING: DUE
TO
HIGH TEMPERATURES, THE
WONDERFIRE DIRECT VENT GAS HEATER
SHOULD BE LOCATED OUT
OF
TRAFFIC AND
AWAY FROM FURNITURE AND DRAPERIES.
THE SURFACE OF THE WONDERFIRE IS HOT
WHEN IT
IS
IN USE. YOUNG CHILDREN SHOULD
BE WATCHED CAREFULLY WHEN THEY ARE
IN
THE SAME ROOM WHEN THE WONDERFIRE IS
IN USE, AND THEY SHOULD BE TAUGHT TO
AVOID THE HOT
SURFACE.·KEEPANY
OBJECTS THAT CAN BURN WELL AWAY FROM
THE
WONDERFIRE, AND OBSERVE THE
RECOMMENDED CLEARANCES THAT FOLLOW.
Hearth Requirements
The Wonderfire must
be
installed on rigid flooring. Any
carpeting under the unit must
be
removed. When the
Wonderfire is installed directly on any combustible surface
other than wood flooring, a metal
or
wood panel extending
the full width and depth of the unit must
be
used as the
hearth. There are no other hearth requirements.
Keep the Stove a Safe Distance
from Surrounding Materials
The Wonderfire will heat nearby surfaces when operating. A
safe installation requires that adequate
clearance be
maintained between the stove and nearby combustible
materials
to
ensure that such materials
do
not overheat The
diagrams that follow illustrate the minimum clearances for the
Wonderfire Direct Vent Gas Heater in
parallel, corner. and
alcove installations.
Stove Clearances
Measure
from the rear
of the cast
iron flue
collar.
Minimum
Clearances:
Parallel
Installation.
See
Page
10
for
specific
installation
procedures.
~----------------------------------~.
Minimum
Clearances;
Corner
Installation.

Installation
3
Alcove Installation
The
Wonderfire Direct Vent Gas Heater is approved for
installation into alcove construction composed
of
combUs-
tible materials.
42' (1070 mm)
-J
Min.
Alcove
width
-I
1---
48'
(1220 mm)
Max.
Alcove
depth
I
~~
I~~~=O=~
I
-....j
6'
.......-
----JIIooj
6'
f--t-
(150 (150
mm) mm)
Minimum
Alcove
Clearances.
See
Page
10
for
specific
installation
procedures.
,.--------
..
-~---
..
----------,
L
A
47
(1190
Min
Minimum
Clearances
to
Ceiling
or
Mantel.
ABC
-----=----
Min. Approved:
4'
22 3/4'
51'
100mm 580mm
1275mm
Effective Min.
w/
Wall
Thimble:
61/Z
165mm
251/4'
630mm
53 1/2'
1340mm
Effective Min.
w/
Wall
Thimble
and
9 1/2'
235mm
281/4'
710mm
561/2'
1420mm
'Z
Rear
Clearance:
See Page
10
for details.
Combustible
Ceiling
or
Mante'
--
~~--'lfb---'-'-
==
B
T
-
~
,
mm)
1
~
f-I-2,-J
c-
(50 mm)
Min.
\.
C
D
'i
.,.LJI'
1
Flue Collar Centerline from
the
Wall
12
5
As'
(315 mm)
Min.
Flue
collar
centerline
from
wall:
Corner
Installation.
L
6
..
7
As'
(165 mm)
Min.
Flue
collar
centerline
from
wall:
Parallel
Installation.
21'
/-t-- 535 mm --...J
I Min. !
-----~

4
Installation
Venting Requirements and Options
The Wonderfire Direct Vent Heater must
be
located to allow
venting to the outside through a nearby wall. It may be
installed parallel to the wall and vented to the rear or it may
be installed
in
a corner and vented to either side. The
Wonderfire Direct Vent Gas Heater is approved only for
venting through a side wall with a horizontal termination.
The Wonderfire Direct Vent Gas Heater is approved for
venting with use of the following components available from
DuraVent Corporation or your Wonderfire dealer:
Appliance Adaptor*
90'
Elbow*
45· Elbow
6"
Straight*
9' Straight
12' Straight
24"
Straight
36' Straight
48' Straight
11
14 5/8" Straight
Horizontal Vent
Cap·
Wall Thimble·
Vinyl Siding Stand-off
Snorkel Termination - 14'
923V
990 & 9908
945 & 9458
9088
9078
906 &
9068
904&
9048
903&
9038
902&
9028
9118
984&
9848
940 & 9408
950 & 9508
982&
9828
*Included
in
Standard Vent System #5084
,
63/4"
(170 mm)
'-t
11
1/4" (285mm)
I 3/4'
, (20mm)
t
•
1
28 1/4"
29"
(715
(740
mm)
#984
5"
I
(
130,-
...
0---
!",-..c::.L"'~
mm),
~.J_.
8" x 8"
Wall
Cut-out,
maintains
1/2"
min.
E
E
1'-0
"'"0>
clearance
Common
vent
configuration
through
a
combustible
wall.
All Straight vent pipe sections have a net length 1-1/2' less
than the nominal dimension; i.e., a
6"
Straight pipe section has
an effective length of 4-1/2'.
The Appliance Adaptor 923V , when installed, terminates
12'(300 mm) above the stove.
Vent Clearances
When planning your installation, the location of the vent
terminal and clearances must be considered. Some of the
most common clearances to keep
in
mind are shown
on
these
pages.
IMPORTANT: ALL VENT CLEARANCES MUST
BE
MAINTAINED. CHECK YOUR VENT CLEARANCES
AGAINST APPENDIX
A,
PAGE
21.
The vent should
be
placed so that people cannot be
bumed
by
accidentally touching the vent surfaces when the
stove is operating,
The vent termination should
be
located where it cannot be
damaged
by
such things as automobile doors, lawnmowers or
snowblowers and it should be located away from areas where
it could become obstructed
by
snow, etc.
Some considerations are:
• Obstructions or impediments
to venting.
• Nearby combustible materials that could come into
contact with combustion exhaust gases.
• Other nearby openings (within
9")
through which exhaust
gas could re-enter the building.
• All vegetation within 3' that may interfere with the
draft
• Vinyl siding
requires
protection
from
vented
heat
directly
above
the
vent
opening.
Use
Vinyl
Siding
Heat
Shield
Kit
*950
or
950B.
The
location
of
the
vent
terminal
must
observe
minimum
clearances
to
these
common
outdoor
fixtures.
See
Appendix A,
Page
21
for
complete
information.

Installation
5
--.------~--------~-~------------~.
Several
other
factors
will
influence
where
the
installation
will
be
sited,
including
the
location of outside
walls,
where
additional
heat
may
be
desired
in
the
home,
where
the
family
members gather most
regularly.
and perhaps
most
importantly,
the
distance limitations of
the
venting
system.
Refer
to
the manufacturer's instructions
included with the venting system for
complete installation procedures.
It
is important to note the following:
•
The
hOrizontal
tennlnatlon
must
not
be
recessed
Into
the
exterIOr
wall
or
siding.
•
Horizontal
vent
runs
must
be
level
or
rise
1/4"
per
foot
toward
the
vent
tennlnatlon.
•
Clearances
around
the
vent
tennlnatlon
must
be
maintained.
•
Parallel
Installations
with
minimum
wall
clearance
have
restricted
access
for
con-
necting
the
Horizontal
Vent
cap
straps
to
the
vent
pipe.
See
Page
10
of
the
Assembly
section for recommended Installation
procedures.
Maximum Vent Run
The
maximum
permissible vertical
rise
of
the
venting
system
above
the
top of
the
Wonderfire Direct Vent
Gas
Heater
is
9
feet.
The
maximum
permissible horizontal
run
is
6
feet.
Additional restrictions apply
to
the
maximum total
length
and
the
number
of
elbows
as
shown
in
the
chart
below.
to
9
8
7
I-
wa:
Wo
LL06
wo:!
>w
~>5
oog
W«
>w
g~.
<{~
Wo
oou.
a:~J
...J
......
<{co
UN
-02
b:
0
w«
>
0
0
2
3
5
6 7
•
HORIZONTAL
RUN,
FEET
CANADA
ONL
Y.-
The
maximum
vent
length must
be
reduced by 1
foot.
Approved
vent
systems
must
terminate
within
the
Iultched
area.

6
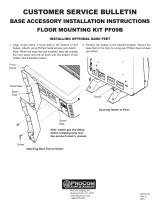
Assembly
Install the Legs and Leg Levellers
The leg bolts have been installed in the mounting holes
in
the stove bottom at the factory. Washers and leg levellers
are located
in
the bag with this manual.
Handle
enamelled
castings
tenderly
to
avoid
chipping!
If
assistance Is available,
It
is
most
easy
to
Install
the
legs by tilting the stove forward to rest on its front. The
Front Panel of the stove must be removed before tilting the
stove. Use the following procedure.
Prepare a
padded
surface, such as a thick carpet or a
thick blanket folded two or three times, to protect the stove
and the floor while the legs are installed.
Step
1.
Remove the small retainer blocks that have been
stapled to the pallet
in
front
of
the stove. Remove any
staples from the pallet to prevent scratching the stove.
Step
2.
Disengage the
two
compression latches on the
stove bottom by pulling each latch down and forward. Fig.
1.
Step
3.
Lift
the Front Panel from the bottom and pull it
up
and forward away from the stove. Fig. 2.
Step
4.
Carefully tilt the stove forward onto the padding.
Step
5.
Remove each leg bolt from the holes
in
the
bottom and attach the legs using the bolts and washers.
Tighten the bolts firmly with a 9/16' wrench.
Use the leg levellers if the stove
will
be
standing on an
uneven surface. Screw a leveller all the way into the foot of
each leg and adjust as necessary when the stove is
in
its
final position.
If
no
ass'.fance
,.
available,
the legs
can
be
installed one corner at a time
by
gradually sliding the stove
off of the shipping pallet as follows. You will need a 9/16'
socket wrench and extension. Install the leg levellers before
attaching the legs to the stove.
Step
1.
Remove the small wood blocks stapled to the
pallet in front of the stove. Be sure to remove all
01
the
staples to prevent scratching the stove.
Step
2.
Carefully pivot the stove until one front corner
overhangs the pallet enough to attach a leg to the stove.
Remove the hex head leg bolt from the stove bottom
and
use it together with a flat washer to attach the leg to the
stove. Fig. 3.
Step
3.
Slide the stove forward and swing the other front
corner off
of
the pallet enough to secure the other front leg.
Fig.
4.
Step
4.
Carefully swing the stove out over a front comer of
the pallet just enough
to
allow access
to
the rear corners.
Be
sure
the
stove bottom
is
adequately supported by the pallet.
Attach both rear legs. Fig.
5.
Step
5.
Walk the stove into the final position.
Figure
2.
Figure
1.
Figure
3.
Install
second
front leg.
/
5.
Install rear leg.

7
Install the
Optional Convection Fan Kit, #5081
The fan kit consists of a Blower Assembly and a Rheostat
Assembly that are joined
by
a cable. The Blower Assembly
mounts to the rear bottom of the stove and the Rheostat
mounts within the Remote Switch
box
on left rear corner of the
stove.
Blower Assembly
Fan
Kit
Components.
The
Rheo.tat
contain.
a "anapstat", a
tem-
peratu
.......
n.ing
.witch
that
extend.
into
the
.tove'.
heat
exchanger
and
automatically
turn.
the
fan.
"On"
or
"Off",
above
or
below
approxi.
mately
109·F.
The Rheostat also provides a range of fan
speed
settings
from Off, (which over-rides the snapstat function), to High.
Detailed installation/operation instructions are included
in
the
kit.
Step
1.
In.pect
the
blower
a.sembly.
• Remove any packing
debris
that may have fallen into
the housing. Make sure the fans spin freely.
Step
2.
Remove
the
Shroud
and
Switch
Box.
• Facing the
back
of the stove, remove the three 1/4-20
phillips screws on the right side of the stove. Also, remove the
two
sheet metal screws near the center of the shroud next to
the air intake pipe. Gently remove the shroud
and
set it down
next to the right side of the stove.
• Detach the Switch Box
by
removing the sheet metal
screw on the left. Gentiy pull enough switch wiring through
the shroud to provide slack. Remove the hole plug from the
Switch Box.
Remove
Shroud
and
Switch
box.
Step
3.
In.tall
the
Rheo.tat
A
••
embly.
• Insert the Rheostat control knob shaft through the
hole in the top of the switch
box
and secure the assembly
to the left side
of
the
box
with the two sheet metal screws
provided. Push the control knob on to the rheostat shaft.
Q)
Control
Knob
\
Sheet metal
screws
\
Mount
the
Rheostat
in
the
Switch
box.
• Feed the rheostat cable through the slot in the
shroud so that the entire
cable
will
be
hidden behind the
shroud.
• Slide the snapstat extension through the hole in the
shroud and re-attach the switch box to the shroud with
the single sheet metal screw. The U-shaped slot on the
right of the box should align with the
upper
hole
in
the
side of the shroud.

ON/OFF
Rheostat
RHEOSTAT
I
SNAPSTAT
BOX
8
Assembly
Mount
the
Switch
box
to
the
Shroud.
Step
4.
Mount
the
Blower
Assembly.
•
Start
the
two
1/4-20
hex
head bolts provided into
the
tapped
holes
on
the
bottom casting.
Slide
the
blower
assembly under
the
bolts and
tighten
with
a
7/16"
wrench.
Mount
the
Blower
assembly
to
the
stove.
•
Re-attach
the
shroud
to
the
stove,
positioning
the
snapstat
extension
in
contact
with
the
firebox
within
the
stove.
Replace
and
loosely tighten
the
three
1/4-20
phillips
screws
in
the
right side
of
the
shroud. Align
the
two
sheet
metal
pilot
holes
near
the
center
of
the
shroud
and
replace
the
two
sheet
metal
screws.
Tighten
all
screws.
•
Plug
the
power cord
into
a properly grounded electrical
outlet
This
completes installation of
the
Fan
Kit.
WARNING:
This
appliance
is
equipped
with
a
three-prong
(grounding) plug
for
your
protection
against
shock
hazard
and
should
be
plugged
directly
into
a
properly
grounded
three-prong
receptacle.
Do
not
cut
or
remove
the
grounding
prong
from
this
plug.
CONNECTION
DIAGRAM
POWER
CORD
FAN
JUNCTION
BOX
r--------------
BLK
Chassis I
Ground I
I-
··:
L
I I
I I
I . I
I
_.-
---------
-\-
--
I
Strain Relief
_
SCHEMATIC
DIAGRAM
FIELD
WIRING
120VAC
G
NOTE:
IF
ANY
OF
THE
ORIGINAL
WIRE,
AS
SUPPLIED
WITH
THE
APPLIANCE,
MUST
BE
REPLACED,
IT
MUST
BE
REPLACED
WITH
TYPE
SF-2.
200·C
WIRE
OR
ITS
EQUIVALENT.

9
Attach the Venting
The Wonderfire Direct Vent Gas Heater is approved for
installation only with the vent components listed
on
Page
4,
Follow the manufacturer'S instructions exactly.
Paint
Option.
Porcelain
Enamel
Stoves
You may wish to use the Medium-temperature paint pro-
vided to paint the vent components to match your stove
before assembling the system.
Appliance
Adaptor
Connection
Step
1.
Attach the adhesive-backed gasket, (located
in
the parts bag), to the flat flange of the Inner Adaptor Pipe.
Gasket
Step
2.
Attach the Inner Adaptor Pipe to the stove with
three 1/4-20 phillips screws, (parts bag),
Inner Appliance
Adaptor Pipe
Step
3.
Bottom the Outer Adaptor Pipe into the flue
collar.
Step
4.
Orient the pipe so that its seam is facing back
and the next elbow, when attached, will
be
pointing
in
the
appropriate direction. Drill ,140 dia. pilot holes through the
existing flue collar holes into the pipe.
Take
care
to
not
drill
through
the
Inner
Adaptor
Pipe.
Step
5.
Attach the pipe to the flue collar using three #10
sheet metal screws, (parts bag),
Adhesive-backed
Inner Appliance
Adaptor Pipe

10
Complete the Vent System
Install the rest of the vent system according to the
manufacturer's instructions included with the components.
NOTE: If the stove will be installed parallel to the wall with
minimum rear clearance,
(2"),
use the following procedure,
in
conjunction with the vent manufacturer's instructions, to
complete the vent connection. Be sure to follow the venting
guidelines in the Installation section and Appendix A of this
manual as well as those specified
by
the vent manufacturer.
Standard Parallel
Installation
(min. rear
clearance)
1.
Cut
the
opening. Determine the location,
cut
and
frame
an
8"
x
8"
square hole in the wall.
Be
sure
that
the
exterior
and
interior
cut·outs
are
leve.
with
each
other.
2.
Trim
the
Straps.
Installthe Vinyl Siding Stand-off if
applicable. Position the Horizontal Vent Cap within the
opening on the outside wall and temporarily secure it
in
place with one of the woodscrews provided. Mark and trim
each of the mounting straps to extend no more than
2 1/4"
(55mm) beyond the interior wall. Remove the Vent Cap from
the outside wall.
Interior Wall
Trim
Vent
Cap
~
Strap
...
·.1
3.
Drill
Wall
Thimble.
With the stove installed at
minimum clearance, insufficient room exists to
back
the wall
thimble away from the cut-out to allow access for attaching
the vent
cap
mounting straps. Before assembly, drill a 9/16'
dia. access hole through the side of the thimble near the
seam to allow attachment of the straps.
9/16" dia.
Wall
Thimble
Plate
4.
Locate
the
Stove.
Position the stove with vent
assembly, (including appliance adaptor, elbow, straight
section, and wall thimble), in the final location.
Be
sure to
center the straight pipe section within the wall cut-out
5.
Install
the
Vent
Cap.
Run
a bead of non-hardening
mastic around the outside
edge
of
the Horizontal Vent Cap.
The arrow
on
the vent
cap
should point
UP,
Position the
cap
in the center of the hole on'the outside wall, making certain
that the
cap
and pipe mate properly. Also,
be
sure that the
mounting straps are visible through the wall thimble access
hole. Secure the Vent Cap
to
the wall with the woodscrews
provided,
6.
Secure
the
Straps.
Rotate the Wall Thimble around
the elbow to provide access to secure the two mounting
straps to the straight vent pipe. Attach the straps with the
sheet metal screws supplied with the Vent Cap.
Wall
Seal
.--
Thimble
Secure
straps
through
Access
Hole
7.
Secure
the
Wan
Thimble.
Rotate the thimble to
hide the access hole. Secure the thimble plate
to
the interior,
wall using the four screws provided. .
Install the
Log
Set
The Log Set has been packed
insiGie
the stove in a protec-
tive box for shipping. The Front Panel casting and glass
, panel must
be
"removed to install the log set into the stove,
Follow the procedure outlined below. If you have previously
removed the Front begin at Step
3.
. Access
Hole

11
out.
3.
Pull
plate down.
Remove
the
Front and Glass
The
front
is
held
in
place by two compression latches
located under the stove
bottom.
Follow
this
procedure:
Step
1.
Disengage
the
latches by pulling
each
lever
down and forward.
Step
2.
Grasp
the
sides
of
the
front plate. Lift
it
up
and forward
to
disengage,
then
down and
away
from
the
stove body.
Handle
enamelled
castings
tenderly
to
avoid
chipping!
1.
Release
latch.
2.
Pull
front
plate
Log
Set
Base
Step
3.
Use
a Philiips screwdriver
to
first alternately
loosen
and
then
remove
the
eight screws that hold
the
,'frame
to
the
stove.
Follow
the
pattern
shown
below.
Loosen
the
screws
that
secure
the
frame.
Step
4.
Carefully
remove
the
glass and frame
assembly and place
it
on
a
flat.
padded surface such
as
a counter protected by a
towel.
Position the Log Set in
the
Firebox
The
matrix,
front
log
and top
log
are
pre-assembled and
are
installed
as
a
unit.
Step
1.
Place
the
matrix assembly
on
the
burner,
aligning the dimples
in
the
underside
with
the screw heads
that protrude
from
the burner plate.
Push
the
assembly
as
far
to
the
rear
as
possible.
L-..---;;-
______
_______
__;_---'
~
Align
the
matrix
with
the
screws
on
the
burner
plate.
Step
2.
Place
the back
log
on
the
matrix
mating
its
tabs
on
the
underside
with
the
keys
in
the matrix.
Push
the
back
log
to
the
rear
so
that
it
rests
against the fireback.
Back
log
tab
The
tabs
on
the
back
log
fit
into
keys
on
the
matrix.
Replace
the
Glass and Front
Step
1.
Position
the
glass
and
frame against
the
firebox
and
hold
it
in
place
with
one hand against
the
top center
of
the
frame.
The
bottom of
the
frame
will
be supported
by
the
iron
ledge. Adjust
the
glass
as
needed
so
that
it
contacts
the
gasket evenly
all
around
and
install
the
screws finger-tight.
Step
2.
To
avoid
uneven
pressure
on
the
glass
when
tightening
the
screws, tighten
them
alternately,
one
half-
turn
at a
time,
until
they
are
all
snug.
Step
3.
Replace
the
front.
holding its bottom edge
slightly away
from
the stove while
you
seat the top into
position.
Then
position the bottom against
the
stove
and
secure it
with
the
compression latches.

12
Thermostat Connection (optional)
Facing
the
rear
of
the
stove,
connect the millivolt
wall
thermostat
leads
to
the
double terminal block located under
the
shroud
in
the
lower right
area.
Either
wire
may be connected
to
either
terminal.
Note
in
the table below
the
appropriate gauge
thermostat
wire
to
use
for
the
length
of
lead required
in
your
installation.
Wire
Gauge
Maximum
Run
14
100'
16
64'
18
40'
20
25'
22
16'
Thermostat
Connection
Burner Conversion
A
label
on
the
front
of
the
Wonderfire
Direct
Vent
Stove
Indicates
whether
It
Is
configured
to
burn
Natural
Gas
or
Propane
Gas.
To
convert
a
Natural
Gas
Wonderfire
to
burn
propane,
use
only
LP
Conversion
Kit
*5080.
To
convert
a
Propane
Gas
Wonderflre
to
burn
Natural
Gas,
u_
only
Natural
Gas
Conversion
Kit
*5079.
WARNING
The
conversion
kit
shall
be
Installed
by
a
quali-
fied
service
agency
In
accordance
with
the
manufacturer's
Instructions
and
all
applicable
codes
and
requirements
of
the
authority
having
juriSdiction,
If
the
Information
In
the
Instructions
Is
not
followed
exactly,
a
fire,
explosion,
or
pro-
duction
of
carbon
monoxide
may
result
causing
property
damage,
personal
Injury
or
loss
of
life,
.
Thequallfleclservlceagencyperformlngthlswork
assumes
responsibility
for
the
properconverslon
of
this
appliance
with
the
kit.
Connect the Gas Supply
Step
1.
Remove
the
Control
Valve
Coverplate.
~~-
~
~-
-
~-
- -
--
-
::::::,,:··;:~:;:::'::;i;\~~~;£~l:';'~:;:i:~;;;:;it;::::
t~;:"
:
':::':;~;:.:
;:::::::#.:;
..
::i;'~
~:~r
':::::;~;;r;~:'::::::::;i:~::':
:::
..
:
:.::.:'/::::.
:
Remove
screw
Remove
Control
Valve
Step
2.
Connect the
main
Gas Supply
to
the
control
valve
inlet.
A 1/8-inch
N.P.T.
plugged tapping, accessible
for
test
gauge connection, should
be
installed
on
the
inlet gas
connection.
Gas
Supply Inlet
The
gas
supply
line
connects
to
the
inlet
to
the
left
of
the
control
valve.
CAUTION
•
The
gas
line
should
be
connected
only
by
qualified
gas
technician.
•
There
must
be
a
gas
shut-off
between
the
stove
and
the
supply
•.
With
natural
gas,
use
a 3/8' or 1/2'
natural
gas
supply
line
with
an
input
of
30,000
BTUs
at
a
manifold pressure
of
3.5'
and
minimum inlet supply
for
adjustment
of
5.0'W.C.
With
propane,
use
a 3/8' or 1/2' propane
gas
supply
line
with
an
input
of
30,000
BTUs
at a manifold
pressure
of
10.0' and
minimum
inlet supply
for
adjustment
of
11.0'
W.C.
Step
3.
Test
for
leaks
at
all
joints before operating.
Step
4.
Re-install
the
Coverplate over
the
Control
Valve.
This
completes assembly procedures
for
the Wonderfire
Direct
Vent
Gas
Heater.
i

Operation
13
Operation
Lighting
the
Fire .
Step
1.
Turn
the
thermostat,
if
any,
to
its
10000st
setting.
Step
2.
If
the
pilot
is
lit already, proceed
to
'Relighting
the
Fire'
below.
Before
lighting
the
pilot,
make
sure thatthe valve
is
in
the
OFF
position by pushing
in
the
gas control knob slightly and turning
it
clockwise
to
'OFF:
Also,
put
the
ONlOFF/f'ST
AT
switch.
located
at
the
left
rear
of
the
stove,
in
the
OFF
position.
Step
3.
Smell
for
gas. Inspect
the
unitfor any obvious sign
of
damage
or
deterioration.
If
damaged, do
not
attempt
to
light.
Step
4.
Locate
the
pilot under
the
front log
in
the
lower left
handcomerofthefirebox.
When
lit,
thepilotwill produceasmall
but steady
flame.
Step
5.
Turn
the
knob
on
the
gas control counterclockwise
to
·PILOT.'
Step
6.
Light
the
pilot
by
pushing
the
control knob
all
the
way
in
and holding
it
there.
Immediately
push
the
red
ignitor
button;
push
it
more
than
once
if
required
to
light
the
pilot
Continue
to
hold
the
control knob
in
for
about
one
(1)
minute
after
the
pilot
is
lit.
Then,
release
the
knob
and
it
will
pop back
up.
The
pilot should
remain
lit.
NOTE:
Once
the
pilot
has
been
lit,
it
will
remain
lit
continu-
ou&ly.
Step
7.
Turn
the
gas control knob counterclockwise
to
'ON:
Step
8.
Place
the
ON/OFF/f'STAT switch
in
the
ON
position
and
continue
to
watch
the
fire
until
the
entire
burner
is
lit.
For
thermostatic
control.
set
your
thermostat
and
then
place
the
remote
switch
in
the
T'STAT
position.
CAUTION
If
the
entire
fire
is
not
lit
within
five
(5)
seconds
of
turning
the
remote
rocker
switch
ON,
immediately
push
the
remote
rocker
switch
to
OFF.
Allow five (5) minutes for the gas
to
clear from
the
firebox. Repeat from Step
2.
Jf
again unsuccessful. completely
turn
off all gas
to
the
stove. Call your local WonderfireDealer
or
gas i
Turning Off
the
Fire
Step
1.
Simply
push the
remote
rocker switch
to
OFF.
The
pilot
wil
I
remain
on.
You
can
leave
the pilot running. (It costs
less
than
1 cent
an
hour
to
run.)
You
may
hear
a popping noise
from
within
the
firebox a
few
seconds after shutting
the
stove
off.
This
is
normal
and
does
not
indicate a problem.
NOTE:
If
you
do not intend
to
operate
the
unit
for
an
extended period
of
time,
it
is a good idea
to
turn
the
gas control
knob
to
OFF
and
to
turn
the
manual
gas
valve
on
the
supply
line
to
OFF-as
well.
ON/OFF/f'STAT
Switch
3-Way Switch Settings
ON:
Continuous burning.
OFF:
Gas
is
shut
off.
T'STAT:
Gas
flow
to
burner
is.
controlled by external thermostat
setting.
Control
Valve
Knob
Pilot
location
and
flame
pattern
Re-lighting
the
Fire
Step
1.
Check
to
see if
the
pilot
is
on.
Step
2.
Turn
on
the
remote
rocker switch and watch
to
be
sure
the
entire burner lights.

14
Operation
FORVOUR
SAFETY
READ
BEFORE
LIGHTING
WARNING:
IF
YOU
DO
NOT
FOLLOW
THESE
INSTRUCTIONS
EXACTLY,
A
ARE
OR
EXPLOSION
MAY
RESULT
CAUSING
PROPERTY
DAMAGE,
PERSONAL
INJURY,
OR
LOSS OF
LIFE.
A.
This appliance has a pilot. When lighting the pilot, follow these Instructions exactly.
B.
BEFORE
OPERATING smell all around the appliance area
for
gas.
Be
sure to smell next
to
the
floor because some gas
is
heavier than air and will settle
on
the floor.
WHAT
TO
DO
IF
YOU
SMELL GAS
• Do not
try
to
light any gas appliance.
•
Do
not touch any electric switch;
do
not use any phone in your building.
• Immediately call
your
gas supplier from a neighbor's phone. Follow the gas supplier's instruc-
tions.
• If you cannot reach your gas supplier, call the fire department.
C.
Use only your hand
to
turn the gas control knob. Never use tools. If the knob will not turn by
hand, don't
try
to
repair it.
call
a qualified service technician. Force
or
attempted repair may result
in a fire
or
explosion.
0.00
not use
this
appliance
if
any part has been under water. Immediately call a qual
Hied
service
technician
to
Inspect the appliance and
to
replace any part
of
the control system and any gas
control that has been under water.
LIGHTING
INSTRUCTIONS
1.
STOP! Read the safety information above on this label.
2.
Turn
off
all electric power
to
the appliance.
3.
Turn the thermostat
to
the lowest setting, (if applicable).
4.
Place the OFF/ONIT'STAT switch in the
OFF
position.
5.
Push in gas control knob slightly and turn clockwise
~to
"OFF."
NOTE: Knob cannot
be
turned from "PILOT"
to
"OFF" unless knob
is
pushed in slightly.
Do
not force.
6.
Wait five (5) minutes
to
clear out any gas. If you then smell gas, STOP! Follow
"B"ln
the safety
information above on
this
label. H you don't smell gas,
go
to
the next step.
7.
Turn knob
on
gas control counterclockwise ....,to "PILOT."
8.
Find pilot. The pilot
is
located below the logset in the forward lower left area
of
the firebox.
9.
Push in control knob all the way and hold in. Immediately light the pilot by pushing the
red
Ignitor
button. Continue
to
hold the control knob in for about one
(1)
minute after the pilot Is lit. Release knob
and
It will pop back up. Pilot should remain lit. If
it
goes out, repeat steps 5 through
9.
·If knob does not pop up when released, stop and immediately call your service technician
or
gas
supplier.
·If
the pilot will not stay lit after several tries,
tum
the gas control
knob
to
"OFF" and call your service technician
or
gas supplier.
10.
Tum
gas control knob
counterclockwi~to
"ON."
11. Place the
OFF
10NIT'STAT switch In the
ON
or
T'STATposition.
Pilot
Assembly
12. Tum on all electric power
to
the appliance.
TO
TURN
OFF
GAS
TO
APPLIANCE
1.
Tum
off
all electric power to the appliance If service Is
to
be
performed.
2.
Push In gas control knob slightly and
tum
clockwise
~to
"OFF:'
NOTE: Knob cannot
be
turned from "PILOT"
to
"OFF" unless knob
Is
pushed in slightly.
Do
not force.

Maintenance
15
Maintenance
Cleaning Painted Cast Iron
Surfaces
An
occasional dusting with a dry rag will keep the painted
surface of a Classic Black Wonderfire looking new.
The paint can
be
touched up as needed. Clean the
areas to
be painted with a wire brush. Cover controls or trim
with masking tape.
Touch up the cast iron with high- temperature stove paint.
Apply the paint sparingly; two light coats will give better
results than a single heavy coat.
Cleaning Porcelain Enamel
Use a dry or slightly
damp
rag or soft brush to clean
porcelain enamel surfaces. Use only a kitchen appliance
cleaner or polish recommended for use
on
enamel surfaces.
How
to Remove
the
Glass and
Front
The Front cast iron panel and the glass panel must
be
removed for inspection and cleaning of the logs and burner.
In
the event that the glass panel needs to be replaced,
REPLACEMENT OF
THE
GLASS PANEL SHOULD
BE DONE
BY
A LICENSED OR QUALIFIED SER·
VICE PERSON.
Use only the correct Wonderfire glass
panel, Part #160-1290, available from a Wonderfire Dealer.
In
order to remove the glass, it is first necessary to
remove the front. The front is held in place
by
two compres-
sion latches located on the underside of the stove. Follow
this procedure:
Step
1.
Disengage the latches
by
pulling each lever
down and forward.
I~J
=noUJ
I
:==
"---:-:-~-:;c;----~-=----:----l
Pull
the
latch
down
and
forward
to
disengage
the
front
plate
from
the
stove.
Step
2.
Grasp the sides of the front plate. Lift it up and
forward to disengage, then
down
and away from the stove
body.
Handle
the
plate
with
care
to
avoid
chip.
ping
enamelled
surfaces!
1.
Pull out.
2.
Pull
down.
Remove
the
Front
plate.
Step
3.
Use a Phillips screwdriver to gradually loosen
the eight screws that secure the glass and frame assembly
to the stove. Loosen in an alternating pattern as shown
below to evenly distribute pressure on the glass.
Loosen
the
screws
that
secure
the
frame.
Step
4.
Remove the glass and frame assembly as a
unit and place it on a flat,
padded
surface such as a counter
protected
by
a towel,
I

16
~aintenance
Replace
the
Glass and Front
Step
1.
Position
the glass and frame against
the
firebox
and install
the
screws finger-tight.
Step
2.
Alternately tighten the screws, one half-turn
each
to
avoid uneven pressure
on
the
glass, until they
are
snug. Follow
the
pattern
as
described
in
the
removal
procedure.
Step
3.
Replace
the
Front,
holding
the
bottom slightly
away
from
the stove while
you
seat
the
top properly.
Then,
seat
the
bottom
in
position against
the
sides
of
the stove and
secure
the
two
compression latches.
Clean
the
Log Assembly Annually
Before
you
begin, shut off
the
gas supply according
to
the
directions
on
Page 13 and allow
the
stove
to
cool. Spread
newspapers
or
a drop cloth
in
front of the stove.
The
logs and the matrix are extremely fragile and must be
handled carefully and brushed gently. Support them evenly
while handling.
Use
only a soft-bristled brush
to
clean
them.
Do
not
use
a vacuum cleaner.
Step
1.
Remove
the
front and
the
glass as described
on
Page
15.
Step
2.
Reach into
the
firebox and carefully
remove
the
back log.
Clean
it
gently with a soft
brush.
Step
3.
The
matrix,
front log, and top log are
assembled and installed
as
a
unit.
Remove
this unit
and gently brush
the
surfaces
of
the
three
components.
Step
4.
Clean the burner by gently brushing the top
surface.
Step
5.
Replace
the
assembly
on
the
burner, aligning
the
dimples
on
the
underside of
the
matrix with
the
screw
heads
on
the
burner plate. Place it
as
far
to
the
rear
as
possible.
Align
the
dimples
with
the
~~",---,,-~~,i
heads.
bolt
4¢i=~,~
Step
6.
Replace
the
back log
on
the
matrix so
that
the
tabs
on
the
bottom
fit
into
the
keys
in
the
matrix.
Push
the
back log
as
far back
as
possible.
It
should rest against
the
fireback.
Step
7.
Replace the glass and
the
front
as
described
previously.
Inspect the Vent System Annually
The
vent system must be inspected annually by a qualified
technician.
Both
the
inner exhaust pipe and
the
outer
combustion supply pipe must
be
checked
to
confirm that
they
are
unobstructed and
in
good condition. Inspect for
dust build-up, corrosion,
or
any sign
of
deterioration or
deposits.
Refer
to
the
vent manufacturer's instructions.
Re-
assemble and re-seal venting components
as
required.
Gasket Replacement
The
Radiance uses
5/16"
rope-type fiberglass gaskets
to
seal between
the
glass panel and
the
firebox.
In
time,
this
gasket can become brittle and compressed and should
be
replaced. New gasket
is
available
from
your Wonderfire
Dealer.
Shut off
the
gas supply according
to
the
directions
on
Page 13 and allow
the
stove
to
cool.
Wear
safety goggles
and a dust mask.
Step
1.
Remove
the
old gasket.
Use
a wire brush
to
clean
the
channel of
any
remaining cement
or
bits of gasket.
Use a cold chisel if necessary.
Step
2.
Determine
the
correct length of gasket by
laying it out
in
the
channel. Allow
an
extra 1-2" (25-50
mm),
and
mark
the
spot
to
be cut. Use a utility
knife.
Twist
the
ends slightly
to
prevent unraveling.
Step
3.
Lay
an
unbroken 1/8" (3 mm) bead
of
gasket
cement
in
the
channel.
Starting at one end, press
the
gasket into
the
channel.
Ensure
a good joint where the gasket ends meet
before trimming excess.
Do
not overlap
the
gasket ends
or
leave
ends with ragged edges.
Step
4.
Press
the
glass
frame
firmly against the gasket
to
seat it evenly
in
its channel.
Step
5.
Clean excess cement from around
the
channel.
Allow
the
cement
to
dry
for
at least 24 hours before using
your stove.

Maintenance
17
The Safety Switch
The Wonderfire Direct Vent Heater is equipped with a safety
switch which will render the appliance inoperable should a
firebox over-pressure condition occur. The switch is not
an
owner-serviceable component.
H
your
stove
will
not
operate,
call
your
Wonder-
fire
Dealer.
Step
1.
Shut off the gas supply to
the
stove. Tum off
all
power to the stove. Remove the Front
Panel,
Glass, and Log Set
as described on Pages 15-16.
Step
2.
Remove the two Burner retainer screws. Lifting the
back
of the Burner, slide it to the rear and lift it out of the
firebox to access the air shutter on the end of the J-tube.
Check the Gas Flame Regularly
To
ensure that your Direct Vent Gas Heater
is
operating
properly,
check
the flames periodically to confirm that they
are consistent the illustration below. The flame pattern
should
be
evenly distributed throughout the log set. The
flames will
be
blue during the first few minutes, but should
gradually change to yellow after about 15 minutes.
Do
not operate your stove if the flame pattern differs from
that shown here. Contact your Wonderfire Dealer
or
a
qualified
gas
technician for assistance.
Burner Adjustment
An air shutter, located on the burner, has been set at the
factory for either Propane
or
Natural
gas
and should not
require further adjustment. Installation characteristics vary,
however, and adjustment may
be
necessary to improve
flame picture or eliminate sooting. Generally, the shutter
should
be
set fully open for Propane and half-open for
Natural gas. Closing the shutter, (less air), produces a
yellow flame, (more prone to sooting). Opening the shutter,
(more air), produces a bluer flame. After adjusting the
shutter, the stove should
be
burned for at least one hour to
see the effect of the setting change. If soot appears on the
glass, the air shutter must
be
opened to eliminate the
condition.
Adjustment
should
be
made
only
by
a
qualified
gas
technician.
Remove
Screws
S:o;=:::?J
/
Step
3.
Loosen the shutter locking screw enough to
adjust the setting as needed
and
re-tighten.
Step
4.
Set the burner
back
into the firebox taking care to
ensure that the
end
of the J-tube fully engages
and
aligns
with the injector.
Align the J-tube and Injector
Step
5.
Replace the retainer screws, log set, glass,
and
Front Panel.

18
Specifications
Wonderfire Direct Vent Gas Heater
Model 2570
Fuel
Natural
gas,
or.
Propane
after
conversion.
Manifold
pressure,
NG
......................
3.5"
Manifold
pressure.
LP
........................
10.0"
Minimum
inlet
supply
pressure
for
the
purpose
of input
adjustment,
NG
.....................
5.0"
Minimum
inlet
supply
pressure
for
the
purpose
of
input
aqjustment,
LP
......................
11.0"
Maximum
inlet
supply
pressure:
NG
..
.
11.0"
Maximum
inlet
supply
pressure:
LP
....
.
13.0"
Input.
Btu/hr.,
NG
............................. .
2JJ,ooo
Input,
Btu/hr.,
LP
................................
2JJ,ooo
Output,
BtuJhr.,
NG
...........................
24,000
Output,
BtuJhr..
LP
............................
24,000
AFUE-
.............. .................................
71.30/0
Glass
panel
...................................
Hi-temp
ceramic
Weight........
......
.....................
350
Ibs./Shp.
3751bs.
Ignition.... .....
Standing
pilot
with
Piezo
ignition
"Seasonal
efficiency.
(NG
-
min.
vent.
no
fan)
AGA
Design
CertIfied
to
ANSI
Z21.44a
-1992
and
CGA
approved
to
CANICGA
2.19-M86
for
Direct
Vent
Gas
Fireplaces.
Clearances
Side
.....................6
inches
(150
mm)
Rear
...................... 2
inches
(50
mm)
Comer
................. 6
inches
(150
mm)
Hearth Requirements
The
Wonderfire
Direct
Vent
Gas
Heater
must
be
installed
on
rigid
flooring.
Any
carpeting under
the
unit
must
be
removed.
When
the
stove
is
installed
directly
on
any
combustible
surface
other
than
wood
flooring,
a
metal
or
wood
panel.
the
full
width
and
depth
of
the
unit,
must
be
used
as
a
hearth.
There
are
no
other
hearth
requirements.
2JJ"
(770
mm)
1--
1
281/4"
(715
mm)
1
29"
(740mm)
Front
View
1-
29"
(740
mm)
1
I
15"
I
~(380mm)-t
Side
View
~
31/2'
~
15"
~
_~L-_(OOn_m_}
__
.....,:!~
(380
mm)
I
21"
(
53Omm)
16"
(410mm)
•
lJ~~~U
Top
View
Page is loading ...
Page is loading ...
Page is loading ...
Page is loading ...
/