Page is loading ...

Pico rigging manual 2007.doc Page 1 of 28

Pico rigging manual 2007.doc Page 2 of 28
The Pico rigging instructions are a guide to rigging your boat. Due to production supplies
certain parts may be slightly modified from those shown. This instruction manual is not a
guide to sailing your craft and it should not be considered suitable for the task of learning
to sail a boat.
Options, accessories and spares are available from Laser Direct +44 (0)1327 841610
www.lasersailing.com
The Laser Centre
Station Works
Long Buckby
Northampton
NN6 7PF
UK
1. Glossary
2. Safety Afloat
3. Maintenance
4. Rigging the boat – Standard and Sport
4.1. Unpacking your Pico
4.2. Unpacking Pico Sport pack
4.3. Checking the hull
4.4. Rigging the mast and sail
4.5. Raising the mast
4.6. Rigging the boom
4.7. Rigging the kicker
4.8. Rigging the mainsheet and traveller
4.9. Attaching Sport Toe straps and mainsheet block
4.10. Fitting the Rudder assembly
4.11. Fitting the Centreboard
4.12. Reefing your Pico
4.13. Attaching the Jib
4.14. Stowing your Sail
5. Positioning Sail numbers – Standard and Sport
Pico Rigging Instructions
Laser Centre
Contents

Pico rigging manual 2007.doc Page 3 of 28

Pico rigging manual 2007.doc Page 4 of 28

Pico rigging manual 2007.doc Page 5 of 28
4.
Your Pico comes in the following main component parts:-
40001 Pico Standard Vela Grey 07 or 40003 Pico Standard Yellow 07
40010 Pico fitted hull vela grey or 40011 Pico hull fitted Yellow
40030 Pico sail kit standard Blue/White – Blue white Dacron mainsail and Jib
40060 Pico mast assembly 2007 – Upper and lower mast and boom
40100 Pico rudder and centreboard kit – Rudder assembly, tiller extension and rope pack
with blocks.
40200 Pico Documentation pack – Owners manual , sail numbers, Rigging manual, CE
certificate.
40002 Pico Sport Vela Grey 07 or 40004 Pico Sport Yellow 07
40010 Pico fitted hull vela grey or 40011 Pico hull fitted Yellow
40040 Pico Sport sail kit 2007 – Mylar mainsail c/w battens and black/white jib.
40060 Pico mast assembly 2007 - Upper and lower mast and boom
40101 Pico Sport rudder and centreboard kit - Rudder assembly, carbon tiller extension,
padded toe straps and rope pack with blocks.
40120 Pico Sport XD pack – Harken Vang assembly, mainsheet block and “stand-up”
boot.
40200 Pico Documentation pack – Owners manual , sail numbers, Rigging manual, CE
certificate.
Rigging your Pico

Pico rigging manual 2007.doc Page 6 of 28
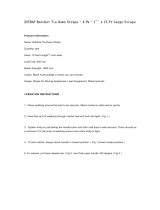
Unpack Pico and check that you have all the components.
40010/40011 Pico hull
1301 Pico upper
mast
1836 Pico Boom
1831 Pico Lower
mast
1840RB Pico mainsail
Blue/White.
1845 Pico mainsail Black
Mylar
1851 Pico rope
pack- Standard
1851 Pico Sport
rope pack
1841RB Pico jib Blue.
1841BW Pico jib
black/white
1820 Pico
Centreboard
1821 Pico Rudder
assembly
1
23
45
6
789
1
6
2
3
5
4
7
8
Pico blocks
and fittings
Pico Rope Pack.
1. Centre board and clew outhaul
shockcord.
2. Vang/kicking strap rope
3. Clew tie down
4. Traveller
5. Jib Halyard
6. Clew outhaul
7. Cunningham
8. Jib sheet
9. Mainsheet.
Pico Blocks and fittings
1. 1938 Kicking strap lower block inc. hook.
X1
2. 1364 Upper kicking strap block. X1
3. 3501P Single mainsheet block inc. clip X1
4. 3502P Traveller block inc. clip
5. D92058 Twisted hook for clew outhaul. X1
6. D40028 Engle field clips X4.
7. 2136 Rigging link X1
8. 1823 Hook Pico for jib tack X1
4.1 Unpack your Pico

Pico rigging manual 2007.doc Page 7 of 28
40120 Pico Sport XD pack- Replaces Standard kicking strap and mainsheet block.
Pico Sport padded toestraps
1871 Padded side toe strap x3
1872 Padded centre toe strap
40040 Pico Sport sail kit with Mylar mainsail and Black & white Jib replaces
standard blue sails
40101 Pico Sport rudder assembly has a carbon tiller extension that replaces the
aluminium extension on the standard boat.
1851S Pico rope pack Sport with black/red lines replaces the standard rope pack.
40126 Sport
Vang/Kicking
Strap
40125 Sport
mainsheet
boot
40124 Carbo
ratchet block
4.2 Pico Sport Pack

Pico rigging manual 2007.doc Page 8 of 28
Check that the 3 hatches and transom drain bung are fully screwed into the hull. It
is advisable to apply a small amount of Vaseline or other non-staining lubricant to
the threads on a regular basis.
1) Insert the upper mast into the lower mast, making sure that the red arrows align.
4.3 Checking the hull
4.4 Rigging the Mast and sail

Pico rigging manual 2007.doc Page 9 of 28
2) Thread the jib halyard through the Halyard plate eye on the upper mast. Take
one end of the halyard and pass it through the halyard cleat on the port side of the
lower mast and tie the 2 free ends together.
3) Unfold the mainsail (try to keep it clean and dry) and sleeve it over the top of the
mast and jib halyard, making sure that the mast stays together. Slide the sail down
over the mast, with the Cunningham D-ring on the sail facing forward in line with
the cleat at the centre and bottom of the mast.
With the Sport mainsail insert the 3 battens into the batten pockets and ensure that
the end of the batten engages into the fold in the outer end of the pocket.
Sport Mainsail

Pico rigging manual 2007.doc Page 10 of 28
4) Untie the ends of the jib halyard and tie a figure of eight knot in the part that
goes through the cleat. Pull the non-cleated rope end out from under the sail at the
halyard exit point in the sail. Rethread the jib halyard throw the eye and back
down outside the sail. Tie the free end of the halyard to the end that has passed
through the cleat.
5) From your rope kit, find the rope marked Cunningham. Tie a bowline loop onto
the sail D-ring, thread around the cleat bridge, back up to the D-ring and down to
the cleat. Tie a bowline loop in the end of the rope and add a small amount of
tension.

Pico rigging manual 2007.doc Page 11 of 28
1) With the boat turned into the wind, remove the mast gate pin and open the mast
gate. Lift mast into the boat, dropping the bottom of the mast into the mast step.
Raise the mast into an upright position and the mast gate will close.
Warning: do not let go of the mast at this stage or it may fall backwards.
2) Insert the mast gate pin into the mast gate claw. Remember to move the sliding
tang to 90 degrees to lock the pin in position.
1) Clip the boom onto the mast above the black collar. This will require a firm
push.
Note:- In windy or bad weather the boom can be rigged before raising the mast and without clipping
it onto the mast.
4.5 Raising the Mast
4.6 Rigging the boom

Pico rigging manual 2007.doc Page 12 of 28
2) At the back of the boom, use a small reef knot to tie on the clew hook with the
clew tie down rope.
3) Tie the clew outhaul line to the small fairlead on the outboard end of the boom.
With a bowline loop, then run through the eye of the clew hook, back round the
fairlead and up to the cleat on the boom.
4) Take the tail end of the clew outhaul line and pass it through the front fairlead
mounted on the boom. Thread through the small englefield clip and tie off with a
figure of eight knot.

Pico rigging manual 2007.doc Page 13 of 28
5) At the outer end take the long piece of shockcord, pass it through the eye of the
hook and tie a large knot or bowline.
6) At the other end pass through another small englefield clip and tie a figure of
eight knot in the end. Now clip the two clips together. This is the tidy up line for
your clew outhaul.

Pico rigging manual 2007.doc Page 14 of 28
7) Now take the sail and with the boat pointing into the wind, locate the clew hook
into the eyelet on the corner of the sail. Tension the clew out haul and secure in
the cleat on the boom.
1) Take the large kicker block with the snap hook and clip it to the plate on the
mast, just above the mast gate.
2) Take the small kicker block and fit it to the plate on the boom (near the front
end), using the small pin and ring.
4.7 Rigging the Kicker

Pico rigging manual 2007.doc Page 15 of 28
3) Tie one end of the kicking strap line to the Becket on the small block and thread
the line as shown in the photograph.
1
2
3
4
Sport

Pico rigging manual 2007.doc Page 16 of 28
If you have purchased the Pico Sport then attach the complete assembly to the
plate with the shackle on the block that has the cleat and the other end to the plate
on the boom .
Sport kicking strap attached to mast
and boom.
Sport kicker block with
cleat attached to lower
mast
Sport kicker block
attached to boom
Sport Kicking strap/Vang

Pico rigging manual 2007.doc Page 17 of 28
The angle of the cleat should be adjusted to a “fully up” position. This can be
changed by unscrewing the centre screw and re-assembling to the preferred angle.
1) Attach the traveller system. Take the traveller line, tie a knot in one end, pass it
through the small traveller block and the fairlead on the opposite side. Tie a knot
in the end of the rope.
4.8 Rigging the mainsheet and traveller

Pico rigging manual 2007.doc Page 18 of 28
2) Join the large traveller block to the small block on the traveller with the
englefield clips. Take the mainsheet. Starting at the back of the boom, you will
find a block with a Becket at the bottom. Pass the end of the mainsheet through
the back end of the block and tie a figure of eight knot (Photo 1). Then thread the
mainsheet down to the large traveller block and thread bow to stern (Photo 2).
Back up to the boom end block and along to the webbing loop. Pass the
mainsheet through the loop, along to the middle block and down to the ratchet
block in the middle of the boat (Photo 3) Ensure that the rope goes through the
block in the same direction as indicated by the arrow on the side of the block
(Photo 4). Tie a figure of eight knot in the end of the mainsheet (Photo 5).
1
3
4
2
5

Pico rigging manual 2007.doc Page 19 of 28
Centre Toe strap
Remove standard ratchet block and unscrew the mainsheet block attachment
plate. Remove the standard toe strap and replace with the padded Sport strap.
Before re-screwing the mainsheet plate and toe strap apply silicone sealant to the
screw holes. This is to avoid potential leaking.
Warning:
Please take care not to over-tighten the screws. Screws should be
“Finger tight”. Over-tightening can strip the thread in the plastic.
Sport “stand-up” mainsheet Block boot
1) Place the mainsheet block stand up boot over the mainsheet block attachment
point.
2) Remove the shackle from the base of the sport mainsheet block and shackle to
the mainsheet attachment point. To get access to the attachment point you will
have to compress the mainsheet boot.
3) Thread the mainsheet through the ratchet block and tie a figure of eight knot.
You will find a small black slide on the side of the ratchet block. This turns the
ratchet on and off. Ensure that the ratchet “Click-clicks” when the mainsheet is
pulled out to the cleats.
4.9 Fitting Sport Toe straps and mainsheet block and “Stand up” Boot

Pico rigging manual 2007.doc Page 20 of 28
Sport Padded side and front Toe straps.
1) Unscrew plastic toe strap plates on the insides and in front of the centreboard
case.
2) Secure toe straps. Before re-screwing the toe straps apply silicone sealant to
the screw holes. This is to avoid potential leaking.
Warning:
Please take care not to over-tighten the screws. Screws should be
“Finger tight”. Over-tightening can strip the thread in the plastic.
/