Movado 800 series Sub-Sea Operating Instructions Warranty & Service Manual
- Category
- Sport watches
- Type
- Operating Instructions Warranty & Service Manual

OPERATING INSTRUCTIONS
WARRANTY & SERVICE GUIDE

TABLE OF CONTENTS
PAGE
ABOUT MOVADO 3
CARE AND MAINTENANCE 4
OPERATING INSTRUCTIONS
Standard 2-Hand Models – Quartz and Automatic 7
(Includes most Movado Museum Dial watches)
Standard 3-Hand Day/Date Models – Quartz and Automatic 8
(Includes Datron, SE, Series 800 Sub-Sea, and Vizio PEEK quartz watches,
and Red Label and Series 800 Sub-Sea automatics)
Quartz Worldtime Models with Gmt Quick Change Feature 9
(Includes Series 800 Worldtime models)
Automatic 2- and 3-Hand Models with Animated Date 10
(Includes Movado Red Label Calendomatic and Red Label Calendomatic with small seconds)
Chronographs 11
Quartz Chronograph 1/1 of a Second – Type A 12
(Includes Movado BOLD large 43.5 mm and Series 800 Sub-Sea quartz chronographs)
Quartz Chronograph 1/1 of a Second – Type B 15
(Includes the Series 800 Sub-Sea Retrograde chronograph)
Quartz Chronograph 1/10 of a Second – Type A 17
(Includes the Movado Junior Sport quartz chronograph)
Quartz Chronograph 1/10 of a Second – Type B 19
(Includes the original Series 800 sport and sport elegant quartz chronographs)
Quartz Chronograph 1/10 of a Second – Type C 21
(Includes Cerena, Datron, Movado BOLD Titanium XL, new Movado Circa, Museum Sport,
Sapphire Synergy and SE Pilot quartz chronographs)
Quartz Chronograph 1/10 of a Second – Type D 24
(Includes Movado BOLD 38 mm mid-size and Verto quartz chronographs)
Ana-Digi Quartz Chronograph 1/100 of a Second 26
(Includes the Movado Dura ana-digi quartz chronograph)
Automatic Chronograph 1/1 of a Second – Type A 30
(Includes original Movado Circa, Movado Master and Vizio automatic chronographs)
Automatic Chronograph 1/1 of a Second – Type B 33
(Includes new SE automatic chronographs)
Automatic Chronograph 1/1 of a Second – Type C 35
(Includes new Datron automatic chronographs)

TABLE OF CONTENTS
PAGE
Automatic 3-Hand Model with Animated 24-Hour Universal Time Indication
37
(Includes Movado Red Label Calendomatic Universal Time models)
Automatic 2-Hand Model with Moon Phase Disk and Date Indicator 38
(Includes Movado Red Label Planisphere models)
Automatic 2-Hand Models with Moon Phase Aperture and Date Indicator 40
(Includes Movado Red Label Skymap)
Digital L.E.D. Touch-Screen Models with Dual-Time Zone and Month/Date Display 41
(Includes Movado BOLD Touch-Screen Digital)
Rotating Bezel 43
Screw-down Crown 44
OBTAINING SERVICE 45
WARRANTY INFORMATION 46
MOVADO AUTHORIZED SERVICE CENTERS 47

3
A premier Swiss watch company renowned for its modern design aesthetic, Movado has earned more
than 100 patents and 200 international awards for artistry and innovation since 1881. It is the hallmark
of some of the most famous timepieces ever created, notably the Movado Museum
®
Watch.
Designed in 1947 by artist Nathan George Horwitt and regarded today as an icon of Modernism,
the watch dial defined by a single dot at 12 o’clock, symbolizing the sun at high noon, has been
acclaimed for purity of design unrivaled in the history of time-keeping.
The Movado watch collection features precise Swiss quartz and automatic movements, solid
stainless steel craftsmanship and scratch-resistant sapphire crystals. Select styles are fashioned
of solid 18K gold, while others incorporate genuine diamonds and fine leather straps, or
exciting new materials like carbon fiber, rubber, ceramic and titanium. Movado Series 800
®
sport models are crafted of high grade Performance Steel
™
, some equipped with XTremeResin
™
straps reinforced by KEVLAR
®
. The Movado BOLD
™
collection features new touch-screen digital
and Swiss quartz analog movements, and K1 crystals. It draws on a range of innovative
materials including sleek TR90, silicone and other soft polymers, aluminum and titanium.
Water resistant, all Movado watches are distinguished by a legacy of design innovation and a
dedication to the future of time. Congratulations on your purchase.
ABOUT MOVADO

4
Like any finely crafted mechanism, your Movado watch requires periodic maintenance to ensure optimal performance.
Maintenance includes complete disassembly, cleaning, replacement of parts as needed, reassembly and lubrication
of the movement. A maintenance interval of 3 to 5 years is recommended, in addition to any required battery
replacement.
Never open the watch yourself. If your watch needs repair or adjustment, take or mail it directly to a Movado
Authorized Service Center. For a complete worldwide listing, visit us online at www.movado.com.
NOTE: The Movado Watch Company assumes responsibility only for service performed at its Authorized Service
Centers.
SHOCK
All Movado watches have shock-resistant movements, individually tested to meet international standards.
DUST
Dust can enter a watch if the case, crystal or crown is not intact. A small particle is enough to stop the movement.
Have your watch repaired promptly if the crystal becomes loose, chipped or cracked, or if there is damage to the
case or crown.
MAGNETISM
The exposure of a timepiece to strong magnetic fields will affect its time-keeping, and may cause it to stop. A quartz
watch should resume working with its original accuracy when removed from the magnetic field; a mechanical
timepiece may require demagnetization before it will operate again.
WATER RESISTANCE
All Movado watches are tested to meet international standards for water resistance.
Most styles are water resistant to 30 meters (3 bar/3ATM/99 feet); certain models are water resistant to even
greater pressures/depths, as marked on the dial or case-back.
CAUTION: If the water resistance limit is not marked on your watch, do not subject it to a pressure/depth greater
than 3 bar (3 ATM/30 meters/99 feet), or your watch could be damaged and your warranty will be voided.
IMPORTANT: Do not operate the watch crown, push-buttons on a chronograph model, or any other pushers/buttons
when the timepiece is wet or under water.
NOTE: The Movado Watch Company will not be responsible for any damage caused by or related to leakage
originating from improper handling or damage to the case, crown, gaskets or crystal.
To maintain water resistance, yearly maintenance is required. The gaskets and crown which seal the case are subject
to wear and deterioration under normal use. These parts should be inspected and replaced as needed each time
the watch is opened for service, including battery changes.
Your Authorized Movado Service Center will automatically retest your watch for water resistance as a routine step
in all service orders.
CARE AND MAINTENANCE

5
OTHER PRECAUTIONS:
If your watch is equipped with a screw-down crown or pushers, be sure to screw it/them back down into the case
after every operation.
Water resistance applies only to the watch case; some watch straps should not be worn under water or subjected
to wet conditions. Please see STRAP CARE.
Avoid exposing your watch to sudden and excessive temperature variations.
Do not drop your watch or bang it against a hard surface. Water resistance must be rechecked after every violent
shock.
Clean your watch regularly by wiping it with a soft cloth dampened with fresh water, especially after exposure to
seawater.
STRAP CARE
While the life span of a watch strap depends on your care and wearing habits, as well as the climate in which you
live, proper care will extend its life.
Leather straps should be kept dry. Exposure to water may cause a leather watch strap to become brittle and
eventually break. To preserve the finish of the leather, contact with perfumes should be avoided. Following exposure
to chlorinated or salt water, gently damp wipe your leather strap with fresh water, and air dry.
To help preserve the natural elasticity and quality of a Series 800 ThermoResin
™
or XTremeResin
™
strap, rinse it using
a soft cloth soaked in fresh water following exposure to salt water, chemicals or abrasive substances.
Use warm water and a neutral pH soap applied to a soft cloth to gently clean a white Series 800 ThermoResilient
™
strap or a Movado Master white rubber strap; then wipe with a second clean cloth dipped in warm water, or rinse
carefully under warm running water. Contact with acetone and ethyl alcohol should be avoided.
A natural gum rubber or “rubber cement pick-up” (found in art supply stores) may be used to remove most surface
stains from a Movado BOLD coated white leather strap or white TR90/silicone bracelet. Simply rub the natural gum
gently across the soiled area until the strap/bracelet is clean.
For stains that have penetrated the surface of a white Movado BOLD strap or bracelet, organic solvents like Zymol
liquid leather cleaner or Columbus gel super cleaner, a de-inking roller (ethyl alcohol and propylene ink remover) or
an ethyl alcohol-based solution such as Purell hand sanitizer (62% ethyl alcohol) may be used. Wipe soiled area with
a soft wet cloth. Then dampen a cotton ball or soft clean white cloth with the cleansing solution, and rub soiled area
gently. Repeat 2 to 3 times until stain disappears. Please test for color fastness on inside surface before applying any
solution. For best results, treat all stains/soil promptly.
NOTE: Movado watch straps are not covered by the Movado watch warranty.
CARE AND MAINTENANCE

6
BATTERY INFORMATION
A Movado quartz timepiece has a 1.55 Volt silver-oxide battery that is specially designed for watches. It will last
approximately 18 – 36 months under normal use.
NOTE: Frequent use of special functions, like the stopwatch timer on chronograph models, may shorten battery life.
End-of-life feature: The seconds hand on many models will start to move haltingly in 4-second increments when the
battery is almost exhausted, signaling the need to have it replaced.
Battery replacement: It is important to use only the replacement battery recommended by Movado. Take or send your
watch to an Authorized Service Center to have battery changed – your old battery will be disposed of/recycled
properly. Do not attempt to change the battery yourself.
CARE AND MAINTENANCE

7
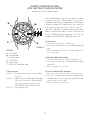
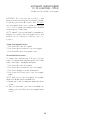
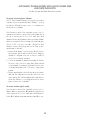
Crown positions:
Position 1 – Normal running position.
Crown pushed into case.
Position 2 – To set TIME:
Rotate crown in either direction.
To manually wind an automatic movement:
The motion of your arm during normal daily activities
should be sufficient to keep the movement of your Movado
automatic timepiece wound. However, if you have not
worn your watch for 38 hours or more, and the watch
has stopped, you will need to wind it by hand before
setting the time:
1. With the crown in position 1, turn the crown clockwise
approximately 20 revolutions.
2. Reset time following instructions above.
STANDARD 2-HAND MODELS
QUARTZ AND AUTOMATIC
Includes most Movado Museum Dial watches
FIGURE A
OPERATING INSTRUCTIONS

8
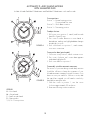
STANDARD 3-HAND DAY/DATE MODELS
QUARTZ AND AUTOMATIC
Includes Datron, SE, Series 800 Sub-Sea, and Vizio PEEK quartz watches,
and Red Label and Series 800 Sub-Sea automatics
Crown positions:
Position 1 – Normal running position.
Crown pushed into case.
Position 2 – To set DATE*:
Rotate crown clockwise.
To set DAY*:
Rotate crown counterclockwise.
Position 3 – To set TIME*:
Rotate crown in either direction.
* IMPORTANT: DO NOT set the Date on Vizio PEEK
models when the time is between 9:30 PM and 3:00
AM, and automatic calendar changes are already in
progress. Doing so could damage the mechanism.
*NOTE: If your watch has a screw-down crown, before
you can set the Date (Day/Date) or Time, you must
first unlock the crown by turning it counterclockwise
approximately six rotations. After Time/Date (Day/Date)
setting, the crown must be screwed back down into the
case to ensure water resistance.
To manually wind an automatic movement:
The motion of your arm during normal daily activities
should be sufficient to keep the movement of your
Movado automatic timepiece wound. However, if you
have not worn your watch for 38 hours or more, and the
watch has stopped, you will need to wind it by hand
before setting the time:
1. With the crown in position 1, turn the crown clockwise
approximately 20 revolutions.
2. Reset time following instructions above.
FIGURE A
FIGURE B

9
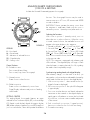
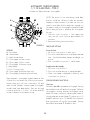
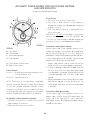
QUARTZ WORLDTIME MODELS
WITH GMT QUICK CHANGE FEATURE
Includes Series 800 Worldtime models
1 2 3
H
M
S
G
T
D
LEGEND:
H – Hour hand
M – Minute hand
S – Seconds hand
G – GMT hand
D – Date window
T – 24-hour Universal time scale
Crown positions:
Position 1 – Normal running position; crown pushed
into case
Position 2 – Rapid correction of Date and GMT hand:
Turn crown clockwise to change Date D
Turn crown counterclockwise to move
GMT hand G around 24-hour scale T
Position 3 – Time setting position
These models feature a precise Swiss quartz worldtime
movement with quick change feature. Local time is
indicated by the hour H, minute M and seconds S hands,
while arrow-tipped GMT hand G tracks the current time
in a selected global time zone on 24-hour scale T. A
time zone is selected by turning the unidirectional rotating
bezel inscribed with the names of major world cities until
the city in the desired zone is aligned at 12 o’clock. The
worldtime indicator hand G is adjusted by the crown.
To set the time:
1. Pull crown out to position 3; watch stops.
2. Turn crown in either direction to move hands to desired
time.
3. Push crown back in to position 1; watch restarts, now
set to correct time.
To correct the date (quick mode):
1. Pull crown out to position 2; watch continues to run.
2. Turn crown clockwise until correct date appears in date
window D.
3. Push crown back in to position 1.
To set the worldtime GMT indication:
1. Pull crown out to position 2; watch continues to run.
2. Turn crown counterclockwise until arrow-tipped GMT
hand G points to current correct time in desired second
time zone on 24-hour scale T.
3. Push crown back in to position 1.
FIGURE A

10
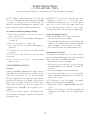
LEGEND:
H – Hour hand
M – Minute hand
S – Small seconds hand
D – Date window
1, 2, 3 – Crown positions
Crown positions:
Position 1 – Normal running position.
Crown pushed into case.
Position 2 – Quick date correction.
Position 3 – Time setting position.
To adjust the time:
1. Pull crown out to position 3; watch (small seconds
hand S in Figure B) stops.
2. Turn crown in either direction to move hands to
desired time, making sure highlighted date changes
at midnight, not noon.
3. Push crown back in to position 1; watch restarts,
now set to correct time.
To correct the date (quick mode):
1. Pull crown out to position 2; watch continues to run.
2. Turn crown clockwise until correct date appears
under date highlighter D.
3. Push crown back in to position 1.
To manually wind the automatic movement:
The motion of your arm during normal daily activities
should be sufficient to keep the movement of your
Movado automatic timepiece wound. However, if you
have not worn your watch for 38 hours or more, and
the watch has stopped, you will need to wind it by
hand before setting the time:
1. With the crown in position 1, turn the crown
clockwise approximately 20 revolutions.
2. Reset time following instructions above.
AUTOMATIC 2- AND 3-HAND MODELS
WITH ANIMATED DATE
Includes Movado Red Label Calendomatic and Red Label Calendomatic with small seconds
FIGURE A
FIGURE B

11
A chronograph combines two time-keeping functions. It incorporates a “stopwatch” device to measure intervals of
time, independent of the time of day.
All Movado Swiss chronographs are water resistant to a minimum depth of 30 meters (3 bar/3ATM/99 feet).
CHRONOGRAPHS

12
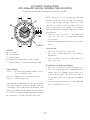
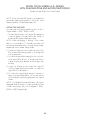
QUARTZ CHRONOGRAPH
1/1 OF A SECOND – TYPE A
Includes Movado BOLD large 43.5 mm and Series 800 Sub-Sea quartz chronographs
LEGEND:
H – Hour hand
M – Minute hand
S – Small seconds hand
C – Chronograph 60-seconds counter
E – Chronograph 30-minutes counter
F – Chronograph 12-hours counter
D – Date window
1, 2, 3 – Crown positions
A – Chronograph push-button (start/stop)
B – Chronograph push-button (split-time/reset)
These chronograph models feature a minute counter
(up to 30), hour counter, and small seconds subdial;
center-mounted chronograph seconds hand; and
date or big date window. They can be used to time
an event up to 12 hours in duration to the nearest
second.
TIME/DATE SETTING
To set the time:
1. Unlock screw-down crown on models with this feature.
See “Screw-down Crown” for instructions.
2. Pull crown out to position 3; watch stops.
3. Turn crown in either direction until hands indicate
desired time.
4. Push crown back in to position 1; watch restarts.
5. Screw crown back into case on models with screw-
down crown.
To adjust the time to the exact second:
1. Unlock crown on models with screw-down crown.
2. As soon as small seconds hand S reaches <<60>>
position, pull crown out to position 3; watch stops.
3. Turn crown to move hands and set time, making sure
date changes at midnight, not noon.
4. Move hands slightly ahead of exact time, then slowly
turn crown counterclockwise to align minute hand
with correct minute marker.
5. Take an accurate time signal (from a radio news
station, for example). When audible tone signals
exact time, immediately push crown back in to
position 1; watch restarts, now set to the exact time.
6. Screw crown back down into case on models with
screw-down crown.
To correct the date (quick mode):
1. Pull unlocked crown out to position 2; watch continues
to run.
2. Turn crown clockwise until correct date appears in
window D.
3. Push crown back in to position 1 and screw back
down into case.
FIGURE A
FIGURE B

13
NOTE: If date is adjusted between 9:00 PM and
12:00 AM when automatic date changes are already
in progress, it should be set to the following day: The
date will not automatically advance at midnight if it has
been corrected via quick mode during these hours.
To set date/time following a battery change:
1. Pull unlocked screw-down crown out to position 2;
watch continues to run.
2. Turn crown clockwise until yesterday’s date appears
in window D.
3. Pull crown out to position 3; watch stops.
4. Turn crown clockwise until today’s date appears in
window D.
5. Continue to turn crown clockwise until hands indicate
correct time.
NOTE: Be sure to take AM/PM into account when
setting time.
6. Push crown back in to position 1, and screw back
down into case.
CHRONOGRAPH FUNCTIONS
Overview
Use buttons A and B to operate the chronograph. Pressing
button A the first time will start the chronograph. Pressing
button A a second time will stop the chronograph,
allowing elapsed time to be read. Pressing button A a
third time will restart the chronograph. Pressing button
B will reset chronograph hands C, E and F to zero.
Adjusting the time does not stop the chronograph, but it
does block buttons A and B for as long as the crown is
pulled out.
NOTE: Crown must be in position 1 and hands must be
at zero before chronograph is started. Press button B to
reset hands to zero.
IMPORTANT: Do not push button A or B when crown
is pulled out to position 2 or 3. If button A or B is
accidentally activated while crown is not flush against
case, one or more of the chronograph hands may
become de-synchronized. Should this occur, follow
instructions at end for synchronizing chronograph hands.
Simple chronograph functions:
To measure the duration of a single, non-stop event:
1. Press button A to start chronograph.
2. Press button A a second time to stop chronograph, and
read the 3 chronograph hands to determine elapsed
time, for example: 1 hour, 8 minutes, 47 seconds.
3. Press button B to reset chronograph hands to zero.
Accumulated time functions:
To measure the combined time of a series of shorter
events, for example the actual playing time of a football
game, where play is repeatedly interrupted:
1. Press button A to start chronograph.
2. Press button A a second time to stop chronograph
and read elapsed time, for example: 15 minutes, 22
seconds.
3. Press button A again to resume measurement.
4. Press button A a fourth time to stop chronograph
again, and read new elapsed time, for example: 28
minutes, 35 seconds.
NOTE: Each time you stop chronograph, chronograph
hands will indicate total accumulated time.
5. Repeat steps 1 and 2 to add each additional interval
of time.
6. After you have taken your final accumulated time
reading, press button B to reset chronograph hands
to zero.
QUARTZ CHRONOGRAPH
1/1 OF A SECOND – TYPE A
Includes Movado BOLD large 43.5 mm and Series 800 Sub-Sea quartz chronographs

14
Split-time or intermediate-time functions:
To take intermediate time readings as a race progresses:
1. Press button A to start chronograph.
2. Press button B to momentarily stop chronograph.
3. Read off the intermediate time, for example: 11
minutes, 16 seconds.
4. Press button B to resume chronograph function. The
3 chronograph hands will quickly catch up with
ongoing event.
5. To read a second split time, press button B again.
Repeat steps 2 through 4 to take any additional split
times.
6. Press button A to stop chronograph.
7. Take a reading of the final time, for example: 2 hours,
14 minutes, 7 seconds.
8. Press button B to reset chronograph hands to zero.
Synchronizing chronograph hands:
After a battery change or in the event of an error, you may
need to manually adjust one or more of the chronograph
hands to align them all correctly at their zero positions.
NOTES: Once in corrective mode, each press and release
on push-button A will advance active chronograph hand
by one increment. To advance hand rapidly, depress and
hold push-button A. You may exit correction mode at any
time in the sequence by returning crown to position 1
(and screwing it back down into the case).
1. Pull unlocked screw-down crown out to position 3.
2. Press and hold push-buttons A and B simultaneously
for at least 2 seconds to enter corrective mode. When
chronograph seconds hand C rotates 360°, corrective
mode is activated; release buttons A and B.
3. Adjust center-mounted chronograph seconds hand C
using push-button A.
4. When hand C reaches zero position, press push-
button B.
5. Now press push-button A to adjust minute counter
hand E.
6. When hand E reaches zero position, press push-
button B.
7. Use push-button A again to adjust hour counter
hand F.
8. When hand F reaches zero position, push crown
back in to position 1 (and screw back down into
case). Timing hands are now synchronized at zero
position, and chronograph is ready for use.
QUARTZ CHRONOGRAPH
1/1 OF A SECOND – TYPE A
Includes Movado BOLD large 43.5 mm and Series 800 Sub-Sea quartz chronographs

15
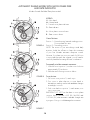
QUARTZ CHRONOGRAPH
1/1 OF A SECOND – TYPE B
Includes the Series 800 Sub-Sea Retrograde chronograph
LEGEND:
H – Hour hand
M – Minute hand
S – Small seconds hand
C – Chronograph retrograde 30-seconds counter
E – Chronograph retrograde 60-minutes counter
F – Chronograph retrograde 5-minutes counter
D – Date window
1, 2, 3 – Crown positions
A – Chronograph push-button (start/stop)
B – Chronograph push-button (split-time/reset)
This chronograph model features a center-mounted
retrograde seconds counter (up to 30), two retrograde
minutes counters (up to 5 and up to 60), a small seconds
subdial, and date window. It can be used to time
an event up to 1 hour, 5 minutes and 59 seconds in
duration to the nearest second. The chronograph will
stop automatically after 2 hours.
TIME/DATE SETTING
Crown positions:
Position 1 – Normal running position.
Crown screwed-down into case.
Position 2 – To set DATE:
Rotate crown clockwise.
Position 3 – To set TIME:
Rotate crown in either direction.
To adjust the time:
1. Unlock screw-down crown. See “Screw-down
Crown” for instructions.
2. When small seconds hand S reaches <<60>>
position, pull crown out to position 3; watch stops.
3. Turn crown in either direction to move hands and set
time, making sure date changes at midnight, not noon.
4. Push crown back in to position 1, and screw back
down into case. See “Screw-down Crown” for
instructions. Watch will restart, now set to correct time.
To correct the date (quick mode):
1. Unlock screw-down crown. See “Screw-down Crown”
for instructions.
2. Pull crown out to position 2; watch continues to run.
3. Turn crown clockwise until correct date appears in
window D.
4. Push crown back in to position 1, and screw back
down into case. See “Screw-down Crown” for
instructions.
FIGURE A

16
CHRONOGRAPH FUNCTIONS
Overview
Use buttons A and B to operate the chronograph. Pressing
button A the first time will start the chronograph. Pressing
button A a second time will stop the chronograph,
allowing elapsed time to be read. Pressing button A a
third time will restart the chronograph. Pressing button B
will reset chronograph hands C, E and F to zero.
IMPORTANT: Crown must be in position 1, screwed
down into case, and counter hands must be at zero
before chronograph is started. Press button B to reset
hands to zero, or, if necessary, reset them following
instructions below.
To reset chronograph counters to zero:
All chronograph hands must be in the zero position
before you start a timing. Unlock crown and follow
these steps as needed to reset the hands of the counters:
60-Minutes counter:
Pull crown to position 2, press and hold push-button B
and rotate crown clockwise.
30-Seconds counter:
Pull crown to position 3, press and hold push-button A
and rotate crown clockwise.
5-Minutes counter:
Pull crown to position 3, press and hold push-button B
and rotate crown clockwise.
Simple chronograph functions:
To measure the duration of a single, non-stop event:
1. Press button A to start chronograph.
2. Press button A a second time to stop chronograph,
and read the chronograph hands to determine
elapsed time, for example: 5 minutes, 57 seconds.
3. Press button B to reset chronograph hands to zero.
Accumulated time functions:
To measure the combined time of a series of shorter
events, for example the actual playing time of a football
game, where play is repeatedly interrupted:
1. Press button A to start chronograph.
2. Press button A a second time to stop chronograph
and read elapsed time.
3. Press button A again to resume measurement.
4. Press button A a fourth time to stop chronograph
again, and read new elapsed time.
NOTE: Each time you stop chronograph, chronograph
hands will indicate total accumulated time.
5. Repeat steps 1 and 2 to add each additional interval
of time.
6. After you have taken your final accumulated time
reading, press button B to reset chronograph hands
to zero.
Split-time or intermediate-time functions:
To take intermediate time readings as a race progresses:
1. Press button A to start chronograph.
2. Press button B to momentarily stop chronograph.
3. Read off the intermediate time, for example:
6 minutes, 4 seconds.
4. Press button B to resume chronograph function; the
3 chronograph hands will quickly catch up with
ongoing event.
5. To read a second split time, press button B again.
Repeat steps 2 through 4 to take any additional
split times.
6. Press button A to stop chronograph.
7. Take a reading of the final time, for example:
25 minutes, 18 seconds.
8. Press button B to reset chronograph hands to zero.
QUARTZ CHRONOGRAPH
1/1 OF A SECOND – TYPE B
Includes the Series 800 Sub-Sea retrograde chronograph

17
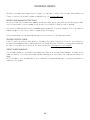
QUARTZ CHRONOGRAPH
1/10 OF A SECOND – TYPE A
Includes the Movado Junior Sport quartz chronograph
LEGEND:
H – Hour hand
M – Minute hand
C – Chronograph seconds hand
E – Chronograph 30-minutes counter
G – Chronograph tenths-of-a-second counter
S – Small seconds hand
D – Date window
1, 2, 3 – Crown positions
A – Chronograph push-button (start/stop)
B – Chronograph push-button (split-time/reset)
This quartz chronograph model features a tenths-of-
a-second counter, minute counter (up to 30), and
small seconds subdials; center-mounted chronograph
seconds hand; and date window. It can be used to
time an event up to 29 minutes and 59.9 seconds in
duration to the nearest 1/10 of a second.
TIME/DATE SETTING
To adjust the time:
1. As soon as the small seconds hand S in the subdial at
6 o’clock reaches the <<60>> position, pull crown
out to position 2; watch stops.
2. Turn crown in either direction to move hands and set
the time – check that the date changes at midnight,
not at noon.
3. Move the hands slightly ahead of the exact time, then
slowly turn the crown counterclockwise to align the
minute hand M with the correct minute marker.
4. Take an accurate time signal (from a radio news
station, for example). When the audible tone signals
the exact time, push crown back in to position 1;
watch will restart, now set to the exact time.
To correct time zone and date:
IMPORTANT: DO NOT change the date between
10:00 PM and 2:00 AM when automatic calendar
changes are in progress. Doing so could damage the
movement.
These adjustments will not stop the watch and do not
affect the time indicated by the minute and seconds
hands.
1. Pull crown out to position 2.
2. Turn crown in either direction to move hour hand H
one or several hours ahead or back, or to change the
time after crossing into another zone.
3. To change the date D, advance the hour hand H
by two complete revolutions, so that the date will
change at midnight, not noon.
4. Once the adjustments have been made, return the
crown to position 1 immediately.
CHRONOGRAPH FUNCTIONS
Overview
Use buttons A and B to operate the chronograph.
Pressing button A the first time will start the chronograph.
While the chronograph is running, once chronograph
seconds hand C has completed one turn, minute-counter
hand E will jump ahead one minute. Tenths-of-a-second
hand G does not move when the chronograph is
running. Pressing button A a second time will stop the
FIGURE A

18
chronograph and move hand G to the relevant tenth-of-
a-second mark. Pressing button B will reset hands G, E
and C to zero.
IMPORTANT: Crown must be in position 1, and hands
must be at zero before the chronograph is started. If
necessary, press button B to reset to zero. DO NOT
use chronograph while crown is pulled out to position 2
or 3. DO NOT operate chronograph buttons A and B
while the timepiece is under water.
NOTE: Adjusting the time does not stop the chronograph,
but it does block buttons A and B for as long as the stem
of crown is pulled out.
Simple chronograph functions:
1. Press button A to start chronograph.
2. Press button A a second time to stop chronograph.
3. Press button B to reset chronograph to zero.
Split-time functions:
You can take intermediate time readings as a race
progresses:
1. Press button A to start chronograph.
2. Press button B to momentarily stop chronograph.
3. Read off the intermediate time.
4. Press button B to resume chronograph function. Hands
will catch up with the ongoing event.
5. To read a second split time, press button B again.
Repeat steps 2 through 4 to take any additional
split times.
6. Press button A to stop chronograph.
7. Take a reading of the final time.
8. Press button B to reset chronograph to zero.
First place and runner-up results:
These chronograph models also allow you to measure
both a winning time and runner-up results:
1. Press button A to start chronograph.
2. As soon as the winner crosses finish line, press button
B. The chronograph will stop.
3. When the second runner crosses finish line, press
button A.
4. Note the time for the winner as shown on the dial.
5. Then press button B; the hands will move up to
indicate the time for the runner-up.
6. Press button B again to return all hands to zero.
Synchronization of chronograph hands:
After changing the battery, or in the event of an error, the
chronograph hands can be realigned to zero if needed:
Crown position 2:
Adjust minute-counter hand E using button B.
Crown position 3:
Adjust chronograph seconds hand C using button A.
Adjust tenths-of-a-second counter hand G using button B.
To advance hands rapidly, press push buttons and hold
longer than one second.
QUARTZ CHRONOGRAPH
1/10 OF A SECOND – TYPE A
Includes the Movado Junior Sport quartz chronograph

19
QUARTZ CHRONOGRAPH
1/10 OF A SECOND – TYPE B
Includes the original Series 800 sport and sport elegant quartz chronographs
LEGEND:
H – Hour hand
M – Minute hand
C – Chronograph seconds hand
E – Chronograph 30-minutes counter
G – Chronograph tenths-of-a-second counter
S – Small seconds hand
D – Date window
1, 2, 3 – Crown positions
A – Chronograph push-button (start/stop)
B – Chronograph push-button (split-time/reset)
This quartz chronograph model features a tenths-of-
a-second counter, minute counter (up to 30), and
small seconds subdials; center-mounted chronograph
seconds hand; and date window. It can be used to
time an event up to 29 minutes and 59.9 seconds in
duration to the nearest 1/10 of a second.
TIME/DATE SETTING
To adjust the time:
1. Unlock screw-down crown. See “Screw-down
Crown” for instructions.
2. As soon as small seconds hand S reaches <<60>>
position, pull crown out to position 3; watch stops.
3. Turn crown to move hands and set time, making sure
date changes at midnight, not noon.
4. Move hands slightly ahead of exact time, then slowly
turn crown counterclockwise to align minute hand M
with correct minute marker.
5. Take an accurate time signal (from a radio news
station, for example). When audible tone signals
exact time, push crown back in to position 1; watch
will restart, now set to the exact time.
6. Screw crown back down into case. See “Screw-
down Crown” for instructions.
To correct time zone and date:
1. Pull unlocked screw-down crown out to position 2.
2. Turn crown to move hour hand H ahead or back after
crossing into another zone, or to correct for daylight
savings/standard time change.
3. To change date D, advance hour hand H by two
complete revolutions, otherwise date will change at
noon. These adjustments will not stop the watch and
do not affect the time indicated by the minute and
seconds hands.
4. Once adjustments have been made, return crown
to position 1 immediately, then screw crown back
down into case.
CHRONOGRAPH FUNCTIONS
Overview
Use buttons A and B to operate the chronograph.
Pressing button A the first time will start the chronograph.
While the chronograph is running, once the chronograph
seconds counter hand C has completed one turn, minute-
counter hand E will jump ahead one minute. Tenths-of-a-
second hand G does not move when the chronograph
is running. Pressing button A a second time will stop the
chronograph and move hand G to the relevant tenth-of-
a-second mark. Pressing button B will reset hands G,
E and C to zero. Adjusting the time does not stop the
FIGURE A
Page is loading ...
Page is loading ...
Page is loading ...
Page is loading ...
Page is loading ...
Page is loading ...
Page is loading ...
Page is loading ...
Page is loading ...
Page is loading ...
Page is loading ...
Page is loading ...
Page is loading ...
Page is loading ...
Page is loading ...
Page is loading ...
Page is loading ...
Page is loading ...
Page is loading ...
Page is loading ...
Page is loading ...
Page is loading ...
Page is loading ...
Page is loading ...
Page is loading ...
Page is loading ...
Page is loading ...
Page is loading ...
Page is loading ...
-
 1
1
-
 2
2
-
 3
3
-
 4
4
-
 5
5
-
 6
6
-
 7
7
-
 8
8
-
 9
9
-
 10
10
-
 11
11
-
 12
12
-
 13
13
-
 14
14
-
 15
15
-
 16
16
-
 17
17
-
 18
18
-
 19
19
-
 20
20
-
 21
21
-
 22
22
-
 23
23
-
 24
24
-
 25
25
-
 26
26
-
 27
27
-
 28
28
-
 29
29
-
 30
30
-
 31
31
-
 32
32
-
 33
33
-
 34
34
-
 35
35
-
 36
36
-
 37
37
-
 38
38
-
 39
39
-
 40
40
-
 41
41
-
 42
42
-
 43
43
-
 44
44
-
 45
45
-
 46
46
-
 47
47
-
 48
48
-
 49
49


Movado 800 series Sub-Sea Operating Instructions Warranty & Service Manual
- Category
- Sport watches
- Type
- Operating Instructions Warranty & Service Manual
Ask a question and I''ll find the answer in the document
Finding information in a document is now easier with AI
Related papers
Other documents
-
Marathon WW194003 User manual
-
 Franck Dubarry Intrepidus Series User manual
-
Casio 3316 User manual
-
Alba 5Y85 Operating instructions
-
STERNGLAS ZEITMESSER Ivo User manual
-
sternglas hamburg User manual
-
sternglas Naos XS User manual
-
STERNGLAS ZEITMESSER Marus User manual
-
JACK MASON JM-A502-001 Operating instructions
-
JACK MASON JM-A502-003 Operating instructions
