Page is loading ...

I
N
S
T
A
L
L
A
T
I
O
N
I
N
S
T
R
U
C
T
I
O
N
S
I
N
S
T
A
L
L
A
T
I
O
N
I
N
S
T
R
U
C
T
I
O
N
S
© January 2007 by Rotary Lift. All rights reserved. CO6194.21 IN20412
Rev. D 03/15
SPOA30/SPOA40/SPO40
600 M Series And 700 E Series
Two Post Surface Mounted Lifts
SPOA30 Series Capacity: 3,100kg (775 kg per arm)
SPOA40 Series Capacity: 4,000kg (1,000kg per arm)
SPO40 Series Capacity: 4,000kg (1,000kg per arm)
Rheinland
TUV
LP20354

A
BC
D
E
F
G
H
J
K
I
Fig. 1a
Typical Bay Layout For SPOA30E And SPOA40E Series Lifts
A Wheel Spotting Dish
B 737mm
C 1829mm Minimum to nearest obstruction or bay. 2134mm minimum
nearest wall.
D 657mm
E Power unit (Driver Side)
F 2743mm Minimum to nearest obstruction.
G 457mm
H 2423mm SPOA30E Series*
2219mm SPOA30ENB Series (Narrow Bay)*
2082mm SPOA30E Series (3 Meter Bay)*
2575mm SPOA40E Series*
*Note: Dimension is from inside of baseplate to inside of baseplate
I Approach
J 165mm Minimum to other equipment.
K 4572mm Minimum to nearest obstruction.
2

A
B
CD
EF
G
H
I
Fig. 1b
Typical Bay Layout For SPO40E Series Lifts
A Wheel Spotting Dish
B 737mm
C 1829mm Minimum to nearest obstruction or bay. 2134mm minimum
nearest wall.
D 1178mm
E Power unit (Driver Side)
F 165mm Minimum to nearest obstruction.
G 3353mm Minimum to nearest obstruction.
H 381mm
I 2734mm Series*
*Note: Dimension is from inside of baseplate to inside of baseplate
J Approach
K 437mm Minimum to other equipment.
L 3963mm Minimum to nearest obstruction.
3

A
BC
D
E
F
G
F
I
H
J
K
Fig. 2a
A Wheel Spotting Dish
B 737mm
C 1829mm Minimum to nearest obstruction or bay. 2134mm minimum
nearest wall.
D 657mm
E Power unit
F 2743mm Minimum to nearest obstruction.
G 457mm
H 2423mm SPOA30M Series*
2219mm SPOA30MNB Series (Narrow Bay)*
2082mm SPOA30M Series (3 Meter Bay)*
2575mm SPOA40M Series*
*Note: Dimension is from inside of baseplate to inside of baseplate
I Approach
J 165mm Minimum to other equipment.
K 4572mm Minimum to nearest obstruction.
Typical Bay Layout For SPOA30M And SPOA40M Series Lifts
4

Fig. 2b
A Wheel Spotting Dish
B 737mm
C 1829mm Minimum to nearest obstruction or bay. 2134mm minimum
nearest wall.
D 1178mm
E Power unit
F 3353mm Minimum to nearest obstruction.
G 381mm
H 2734mm SPO40 Series*
*Note: Dimension is from inside of baseplate to inside of baseplate
I Approach
J 165mm Minimum to other equipment.
K 3963mm Minimum to nearest obstruction.
A
BC
D
E
F
G
H
I
J
K
Typical Bay Layout For SPO40E Series Lifts
5

A
A
B
B
1. Lift Location: Use architects plan when available to locate lift.
Fig. 1a, 1b or Fig. 2a, 2b shows dimensions of a typical bay layout.
2. Lift Height: See Fig. 3 for overall lift height of each specific lift
model. Add 25mm to overall height to lowest obstruction.
WARNING
DO NOT install this lift in a pit or
depression due to fire or explosion risks.
4. Column Extensions: Before standing columns upright, install
the column extensions using (12) 3/8”-16NC x 3/4” Carriage HHCS
and Flanged Lock nuts, Fig. 3 and Fig. 4.
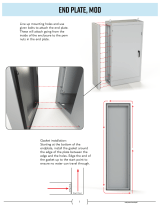
Overhead Mounting Bracket: Install Mounting Brackets to
column extensions, Fig 3.
Attention: E Series Lifts DO NOT Have
Latch Cable Conduit Guides or Locking Latch Cables.
3. Latch Cable Guides for M Series Lifts: Install the latch cable
conduit guide brackets to column extensions with (1) 1/4”-20NC x
1” HHCS and 1/4”-20NC Flanged lock nuts, Fig. 5. HHCS should go
through hole nearest the edge as shown, Fig. 5.
Fig. 4
Fig. 5
Fig. 3
A
B
C
D
E
F
G
Fig. 3 Detail
A Overhead assembly
B 3778mm Top of cylinder*
C 3556mm Top of overhead assembly (standard)*
D 3454mm Top of overhead assembly (low ceiling)*
*B, C, and D are for SPOA30 and SPO40 series. Low ceiling
(LC) is not available for the SPO40.
E Overhead mounting bracket
F 3/8“-16NCx3/4“ HHCS and flanged lock nut
G Use (4) 3/8“-16NCx3/4“ carriage bolts and flanged lock
nuts in front and (2) in back.
Fig. 4 Detail
A Standard Setting
B 102mm Lower Height Setting
6

A
B
C
C
B
C
C
5. Lift Setting: Position columns in bay using dimensions shown
in Fig. 1a, 1b or Fig. 2a, 2b. With column lying on the floor, two
people can lift the top of the column and walk towards the base.
As the column approaches vertical, one of the two people should
move to the opposite side of the column and assist in slowly
setting the column flat on its base. Both column base plate
backs must be square on center line of lift. Notches are cut into
each base plate to indicate center line of lift. Using appropriate
equipment, raise carriage to first latch position. Be sure locking
latch is securely engaged.
Note: For M Series lifts place column with power unit mounting
bracket on vehicle passenger side of lift.
6. Concrete and Anchoring: Concrete shall have a compression
strength of at least 20N/mm
2
and a minimum thickness of 200mm
in order to achieve a minimum anchor embedment of 95mm.
When using the standard supplied 20mm x 170mm lg. anchors, if
the top of the anchor exceeds 75mm above the floor grade, you
DO NOT have enough embedment. Drill (10) 20mm dia. holes in
concrete floor using holes in column base plate as a guide. See
Fig. 6 and Fig. 7 for hole depth, hole spacing, and edge distance
requirements.
Fig. 6
7.
IMPORTANT
Using the horse shoe shims provided, shim
each column base until each column is plumb, Fig. 7a. If one
column has to be elevated to match the plane of the other column,
full size base shim plates should be used (Reference Shim
Kit). Recheck columns for plumb. For M Series Lifts, install Toe
Guards, Fig. 7a. Tighten anchor bolts to an installation torque
of 200Nm(20.4kg-m). Shim thickness MUST NOT exceed 13mm.
Adjust the column extensions plumb. If anchors do not tighten
to 200Nm(20.4kg-m) installation torque, replace concrete under
each column base with a 1219mm x1219mm x 152mm thick 20N/
mm
2
minimum concrete pad keyed under and flush with the top
of existing floor. Let concrete cure before installing lifts and
anchors.
CAUTION
DO NOT install on asphalt or other similar
unstable surfaces. Columns are supported only by anchors in
floor.
Fig. 6 Detail
A Concrete Thickness (200mm) and hole depth (114mm)
B Edge Distance (150mm)
C Hole spacing (150mm)
7

A
B
C
D
E
F
Fig. 7 And 7a Detail
A 114mm Minimum
B 75mm
C 95mm
D 108mm
E Toe guard M series only.
F Anchor
G Shims (13mm maximum)
H Use rectangular shims at inside edge of baseplate. Use
construction adhesive or silicon cement to hold shim in
place. INSURE shims are held tightly between base plate
and floor after torquing anchors. If more than 2 horse
shoe shims are used at any of the column anchor bolts ,
pack non-shrink grout under the unsupported area of the
column base. Insure shims are held tightly between the
baseplate and floor after torquing anchors.
I Flat washer
J Nut
Fig. 7
Fig. 7a
Drill holes using
20mm carbide
tipped masonry bit
drill bit.
Clean Hole
Run nut down just below
impact section of bolt.
Drive anchor into hole
until nut and washer
contact base.
Tighten nut with torque
wrench to 200 Nm.
8

10. Continued crosshead installation:
Insert 1/4"-20NC x 2-3/4" HHCS through pivot hole in end of switch
bar. Insert opposite end of bar through slot in switch mounting
bracket Fig 10. Then secure HHCS and Switch Bar to overhead
as shown, using (2) 19mm spacer and 1/4”-20NC Lock nut.
Tighten Hex bolt leaving 1.6mm gap between the spacer and the
overhead assembly.
8. Overhead Assembly: Assemble overhead, Fig 8. Adjust to
appropriate dimension. Install (4) HHCS and Flanged lock nuts, (2)
Each Side. DO NOT TIGHTEN.
9a. Overhead Switch Installation:
Mount switch assembly towards power unit column using
(2) 1/4"-20NC x 3/4" lg. HHCS, 1/4”-20NC Nuts and 1/4" Star
Washers, Fig. 9. For Narrow Bay and 3 meter wide bay
installation, see step 9b, all others go to step 10.
9b. For Narrow Bay and 3 Meter wide bay installation only:
Remove cotter pin and switch bar. Cut off (Narrow Bay =143mm)
or (3Meter Bay =431mm) from the length of the bar and cushion
on the end opposite the 9mm mounting hole. Drill 4mm hole
through bar 6mm from the cut edge. Replace switch bar and
cotter pin. Continue to step 10.
Fig. 8
A
A.2
A.1
B
B.2
B.1
Fig. 8 Detail
A
SPOA40 Series
A.1 (4) 3/8“-1NC x 3/4“ Flanged HHCS
and flanged lock nut.
A.2 2829mm
B
SPO40 Series
B.1 (4) 3/8“-1NC x 3/4“ Flanged HHCS
and flanged lock nut.
B.2 2896mm
C
SPOA30 Series
C.1 (4) 3/8“-1NC x 3/4“ Flanged HHCS
and flanged lock nut.
C.2 2676mm
D
SPOA30NB Series (Narrow Bay)
D.1 (4) 3/8“-1NC x 3/4“ Flanged HHCS
and flanged lock nut.
D.2 2473mm
E
SPOA30MB Series (3 meter bay)
E.1 (4) 3/8“-1NC x 3/4“ Flanged HHCS
and flanged lock nut.
E.2 2337mm
9

Fig. 11
Fig. 9
11. Overhead: With a ladder by each column, two people position
the overhead assembly onto column mounting brackets and
fasten with (2) 3/8"-16NC x 3/4" lg. Flanged HHCS and (2) 3/8"
flanged lock nuts, Fig. 11. Use middle holes for SPO40 and
outside holes (marked R for Right and L for Left) for SPOA30/
SPOA40. Tighten bolts at center of overhead assembly.
Fig. 10
A
B
C
Fig. 9 Detail
A (2) 1/4“-20NC x 3/4“ lg. HHCS
B On one side use (2) 1/4“ External Tooth Lock washers.
C (2) 1/4“-20NC Zinc Hex Nuts
A
B
C
D
E
F
Fig. 10 Detail
A 1/4“-20NC x 2-3/4“ HHCS and lock nut.
B 1.6mm gap
C Star washers
D 197mm Standard SPOA30M Series
197mm Narrow Bay SPOA30M Series
197mm 3 Meter Bay SPOA30M Series
197mm Standard SPOA40M Series
298mm Standard SPO40M Series
E (2) 19mm Spacers
F Overhead Switch
G 50mm minimum
Fig. 11 Detail
A (2) 3/8“-16NC x 3/4“ HHCS
B (2) 3/8“ Lock Nuts
A
B
10

K
L
M
A
H
G
I
J
C
E
B
D
B
F
N
O
12. Power Unit for M Series Lifts:
A. Install (1) star washer onto one of the (4) 5/16"-18NC x 1-1/2”
Lg. HHCS. This is very important for grounding. Put the (4)
5/16"-18NC x 1-1/2" lg. HHCS through the holes in the power
unit bracket, using push nuts to hold in place, Fig. 12. With
motor being the heaviest part of the unit, two people lift the
unit, each with one hand supporting the motor. Position the
unit on the bolts with one person supporting the power unit
while the other installs 5/16” lock washers and 5/16”-18NC
Nuts.
B. Mount Adapter Plate on column, as shown in Fig. 12, using
(3) 5/16"-18NC x 1/2" Socket Flat Head Counter Sunk Machine
Screws.
C. Remove Control Panel Cover by loosening retaining screws
in each corner. Mount Control Panel Base on Adapter Plate,
as shown in Fig. 12, using (4) #8-32NC x 3/8" Socket Head Cap
Screws. Re-attach Control Panel Cover.
D. Install and hand tighten Branch Tee to pump until O-ring is
seated, Fig 13. Continue to tighten the lock nut to 14 - 20Nm
(1.4 - 2.1kg-m), or until the nut and washer bottom out against
the pump manifold. NOTE: You may still be able to rotate the
Branch Tee. This is acceptable unless there is seepage at
the O-ring. If so, slightly tighten the lock nut.
Fig. 13Fig. 12
ATTENTION
Instillation of power unit for E series
lifts go to section 13.
ATTENTION
Continue to section 14.
Fig. 12 Detail
A 5/16"-18NC x 1-1/2" Lg. HHCS
B 5/16" External Tooth Lock Washer
C Push Nut
D 5/16"-18NC Hex Nut
E Strain Relief
F Power Unit
G Adapter Plate
H 5/16"-18NC x 1/2" Socket Flat Head MS
I Control Panel Base
J Control Panel Cover
K #8-32NC x 3/8" Hex SHCS
Fig. 13 Detail
L Overhead Hose
M Branch Tee
N Crimped Hose Sleeve (Typical)
O Power Unit Hose (Short)
IMPORTANT
Over tightening lock nut may tear O-ring.
11

Fig. 14
Fig. 15
Fig. 16
13. Power Unit E Series Lifts:
Put (2) 5/16"-18NC x 1-1/2" HHCS through top holes in power
unit bracket using Vibration Pad to hold in place, Fig. 14. Install
5/16"-18NC Flanged Nuts until bolt end is flush with end of nut.
Install power unit onto column extension, Fig. 15. Slide bolt/nut
combination into top set of holes and down to bottom of slot.
Install HHCS, Vibration Pad, and Flanged HHCS in bottom power
unit holes and tighten. (Be sure to place vibration pad between
power unit and column extension). Tighten top HHCS and Nut.
Install and hand tighten Male Extension to pump until O-ring is
seated, Fig 16. Continue to tighten the lock nut to
14 - 20Nm (1.4 - 2.1kg-m), or until the nut and washer bottom out
against the pump manifold.
IMPORTANT
Over tightening lock nut may tear O-ring.
Install Female Swivel Tee To Male Extension, Fig. 16. Use Flared
Fittings Tightening Procedure to tighten the Female Swivel Tee to
the Male Extension.
14. Flared Fittings Tightening Procedure:
A
B
C
A
B
C
A
B
Flared Fittings Tightening Procedure
1. Screw the fittings together finger tight.
Then using proper size wrench rotate the fitting
2-1/2 hex flats.
IMPORTANT
Flare seat MUST NOT rotate
when tightening. Only the nut should turn.
2. Back the fittings off one full turn.
3. Again tighten the fittings finger tight then
using a wrench, rotate the fitting 2-1/2 hex flats.
This will complete the tightening procedure and
develop a pressure tight seal.
IMPORTANT
Over tightening will damage fit-
tings resulting in fluid leakage.
Fig. 16 Detail
A Install male extension after power unit is
mounted.
B Install Tee after male extension is placed on
power unit.
Note: DO NOT ROTATE MALE EXTENSION
WHILE INSTALLING TEE.
Fig. 14 Detail
A 5/16"-18NC x 1-1/2" Lg. HHCS
B Vibration Pad
C 5/16"-18NC Flanged Lock Nut
Fig. 15 Detail
A Hang power unit from bolts in top of power unit
bracket.
B Fill Breather Cap
C Insert bottom bolts through holes after power
unit it hung attach flanged lock nut from inside
column.
12

8
9
9
1
2
4
6
5
5
3
3
6
7
Fig. 17 Fig. 18
15. Hoses: Clean adapters and hose. Inspect all threads for
damage and hose ends to be sure they are crimped. Install hose
using Flared Fittings Tightening Procedure, Section 14. Install
hose clamps.
Adapter & Hose Installation (see Fig. 17 & 18)
1. Install item (2) with hose clamps, on power unit column side
connecting it to the cylinder (1) first. E series lifts only: Install
item #7 behind hose clip indicated. Orient such that welded
plug is inserted in near by hole.
2. Install item. (3) with hose clamps item (5) starting at opposite
cylinder and working toward the power unit. All excess hose
should be at bends & inside overhead assembly.
3. Connect item (2) & item (3) to Tee (4).
NOTE: Route Power Unit hose inside columns using slots
provided at column base, Fig. 19. Route Overhead Hose in column
channel on outside of column, Fig. 19. Overhead hose goes over
top end of overhead assembly, Fig. 20.
16. Oil Filling: Remove fill-breather cap on power unit,
Fig. 17 & 18. Fill to MIN____ mark on tank with Dexron III ATF,
or hydraulic fluid that meets ISO 32 specifications. Replace fill-
breather cap.
Fig. 17 Detail
Hose Routing For M Series Lifts
Item Quan-
tity
Description
1 2 Hydraulic Cylinder
2 1 Power Unit Hose
3 1 Overhead Hose
4 1 Branch Tee
5 6 Hose Clips
6 3/8-16NC x 3/4” Carriage Bolts
6 3/8-16NC Flanged Lock Nuts
6 4 Hose Clips
4 3/8-16NC x 3/4” HHCS
4 3/8-16NC Flanged Lock Nuts
7 2 Mechanical Lift Hole Plug
8 Fill Breather Cap
9 Hose runs down approach side to cylinder on left
column.
10 Cylinder bleeder.
Fig. 18 Detail
Hose Routing For E Series Lifts
Item Quan-
tity
Description
1 2 Hydraulic Cylinder
2 1 Power Unit Hose
3 1 Overhead Hose
4 1 Branch Tee
5 6 Hose Clips
6 3/8-16NC x 3/4” Carriage Bolts
6 3/8-16NC Flanged Lock Nuts
6 4 Hose Clips
4 3/8-16NC x 3/4” HHCS
4 3/8-16NC Flanged Lock Nuts
7 Fill Breather Cap
8 Hose runs down approach side to cylinder on left
column.
9 Cylinder bleeder.
13

A
B
C
A
A
17. Equalizing Cables:
A) Remove sheave cover, Fig. 19.
Fig. 20
Fig. 19
Fig. 22
Fig. 21
ATTENTION
For E Series Lifts Continue To Section 22.
A
B
C
D
Fig. 21 Detail
A Upper sheaves
B Cable 2
C Cable 1
D Lower sheaves
A
B
C
Fig. 19 Detail
A Attach hose to column using
3/8-16NC x 3/4" carriage bolts,
flanged lock nuts, and hose clips.
B Sheave Cover
C Hose slot and hose.
B) Refer to Fig. 21 for the general cable arrangement. First, run
a cable end up through the small hole in the lower tie-off
plate, Fig. 22.
Fig. 20 Detail
A 3/8-16NC x 3/4" flanged HHCS and
flanged lock nut.
C) Push the cable up until the stud is out of the carriage top
opening.
D) Run a nylon insert lock nut onto the cable stud so 13mm of
the stud extends out of the lock nut.
E) Pull the cable back down, Fig. 22.
F) Run cable around the lower sheave, then up and around
overhead sheave and across and down to the opposite
carriage, Fig. 21. Install sheave cover, Fig. 19.
G) Fasten the cable end to the carriage upper tie-off bracket.
Tighten the lock nut enough to apply light tension to the
cable.
Fig. 22 Detail
A Upper cable tie-off plate and 5/8"
nylon insert lock nut.
B Lower cable tie-off and 5/8" nylon
insert lock nut.
C Steel pipe spacer for narrow bay
and low ceiling.
To set up cables for a narrow bay
(NB) , 3 meter wide bay (3MB), or a
low ceiling (LC), use approximately
16mm I.D. with a 3mm minimum wall
thickness steel pipe located at the
lower cable tie off. The lengths re-
quired are as follows:
SPOA30
-NB or LC = 203mm
-NB or LC = 406mm
-3MB = 340mm
SPOA40
-LC = 203MM
H) Repeat procedure for the second cable. Adjust the tension
of both cables during the final adjustments in section. See
Section 38 for E series lifts and Section 41 for M series lifts.
14

A
B
C
D
E
F
A
18. Locking Latch Cable:
A) Install latch cable sheave, sheave covers, and retaining rings
in upper slot of power unit column as shown, Fig. 23.
B) Slip loop end of cable over end of shoulder screw on right
side latch control plate, Fig. 24.
C) Feed the other end of the cable through the latch cable
sheave slot making sure that the cable is running between
the bottom side of the latch cable sheave and sheave cover
then inside the right column, Fig. 24.
D) Attach latch cable conduit guide brackets to overhead as
shown, Fig. 25a & Fig. 25b. Always use the holes on the
approach side of the lift. HHCS should be in hole nearest the
center of the overhead, Fig. 25b.
E) Route cable up inside column and through the latch cable
guide, Fig. 25a & Fig. 25b.
IMPORTANT
Using wire ties provided, tie off cable guide
to column extension as shown, Fig. 25b. Guide must be
attached in hole closest to the outside edge of the column on
the NON-APPROACH side.
F) Continue routing cable to the left column latch cable guide,
Fig. 25a & Fig. 25b, routing the cable through the left column
latch cable guide, Fig. 25b.
IMPORTANT
Using wire ties provided, tie off cable guide
to column extension as shown, Fig. 25b. Guide must be
attached in hole closest to the outside edge of the column on
the NON-APPROACH side.
G) Bring the cable down inside the left column and feed the end
of the cable through the lower latch cable sheave slot so that
the cable is now back outside the column, Fig. 26.
H) Install latch cable sheave and retaining rings in lower slot of
non-power unit column as shown, Fig. 26.
Fig. 23
Fig. 24
Fig. 25a
A
B
C
D
Fig. 23 Detail
A Sheave Covers
Fig. 24 Detail
A Latch Cable Sheave
B (2) 3/8" Retaining Rings
C Shoulder Bolt
D Install latch handle using a 3/8" hex jam nut to lock
in place. Then install spacer nut and slot cover.
E 1/2"=13NC Jam Nut
F Slot Cover
Fig. 25a Detail
A Latch Cable Conduit Guide
B Latch Cable
C Notice the clearance removed between the control
plate slot and the latch dog pin.
D Right Column
15

I) Route cable under the bottom side of the latch cable sheave,
Fig. 26.
J) At this point you MUST install the latch handle, jam nut, and
right column latch cover Fig. 24 & Fig. 27. Install latch handle
ball, Fig. 27.
Fig. 27
Fig. 25b
Fig. 26
K) Insert cable in cable clamp along one side, loop around
shoulder screw and back down, inserting cable along other
side of cable clamp, Fig. 26. Place top back on clamp, barely
tightening.
L) Next, pull the control plate down, Fig. 25a & Fig. 26, to
eliminate any clearance between the control plate slot and
the latch dog pin, Fig. 25a.
M) Using Pliers, pull cable tight and secure the clamp close to
the shoulder screw. Tighten clamp.
Fig. 25b Detail
A Attach to extension using wire tie. Use hole closest
to OUTSIDE edge and on NON-APPROACH side.
B 3/8"-16NC x 3/4" HHCS and flanged lock nut.
C Cable guide runs UNDER hydraulic hose.
D 1/4"-20NCx1" HHCS and flanged lock nut.
E Latch cable runs along approach side of overhead.
A
B
B
CE
D
A
B
C
D
E
Fig. 26 Detail
A Shoulder Bolt
B Feed cable up though cable clamp, loop over end
of shoulder bolt and feed back down through cable
clamp.
C Cable Clamp
D Latch Cable Sheave
E (2) 3/8" Retaining Rings
A
B
Fig. 27 Detail
A 5/16-18NCx3/8" Lg. BHMS
B Latch handle MUST be positioned at the top of the
latch control cover slot.
16

Fig. 28
19. Electrical: Have a certified electrician run power supply to
motor, Fig. 28, 28a, or 28b. Size wire for appropriate amperage as
indicated. See Motor Operating Data Table, per Fig. 28, 28a, 28b.
Use separate circuit for each power unit. Protect each circuit
with circuit breaker per local code. Provide a separate discon-
nect between the power supply and the power unit (Mark with
"O" for OFF and "I" for ON). Wiring MUST comply with all local
electrical codes.
20. Overhead switch: Check overhead switch assembly to assure
that switch bar activates the switch when raised. Switch is wired
normally closed and will cut off motor when activated, see Fig. 28,
28a, or 28b & Fig. 29.
21. Check Operation: Operate lift and assure that push button
raises lift when pushed and stops lift when released. Check
disconnect switch for cutting power to push-button. Also check
that overhead switch stops lift from raising when actuated and
that lift regains power when deactivated.
Attention: Continue to Section 37.
*Notes: F, D, or T Model?
To find out if you have a F, D, or T model Power Unit look at the
4th letter from the end of your lift model number.
EXAMPLE: SPOA30MD585 would be a D Model.
Model number can be found on a tag on the side of the lift.
For E or S Models go to page 18.
NOTES:
1.) Units not suitable for use in unusual conditions. Contact
Rotary for moisture and dust environment duty units.
2.) Motor rotation is counter clockwise from top of motor.
T1
T2 T3 A2
L1
L2 L3 A1
PE L2
N
A
B
C
D
D
E
F
G
H
I
J
K
MOTOR OPERATING DATA - SINGLE PHASE (*F Model)
220-240 Volts 50Hz
LINE VOLTAGE
CURRENT
POWER
17A - 1.5Kw
Fig. 28 F Model Detail
A Overhead Switch
B Motor
C UP Switch
D Yellow-Green Wire
E Contactor
F Blue Wire
G E-Stop Disconnect
H Terminal Blocks
I Control Box
J Circuit Breaker 230v 1ø 20A (Over-Current Protec-
tion)
K 230v 1ø 20A Circuit breaker at electrical supply.
17

T1
T2 T3 A1
L1
L2 L3 A2
PE L1
L2 L3 N
A
B
C
D
D
E
F
G
G
H
I
J
K
Fig. 29
Fig. 28a
MOTOR OPERATING DATA - THREE PHASE (*D Models)
400 - 415 Volts 50Hz
LINE VOLTAGE
CURRENT
POWER
4.55A - 3Kw
Fig. 28a D Model Detail
A Overhead Switch
B Motor
C UP Switch
D Yellow-Green Wire
E Contactor
F E-Stop Disconnect
G Blue Wire
H Terminal Blocks
I Control Box
J Circuit Breaker 400v 3ø 10A (Over-Current Protec-
tion)
K 400v 3ø 10A Circuit breaker at electrical supply.
T1
T2 T3 A1
L1
L2 L3 A2
PE L1
L2 L3 N
A
B
C
D
D
E
F
G
G
H
I
J
K
Fig. 28b
MOTOR OPERATING DATA - THREE PHASE (*T Models)
400 - 415 Volts 50Hz
LINE VOLTAGE
CURRENT
POWER
10A - 4.9Kw
Fig. 28b D Model Detail
A Overhead Switch
B Motor
C UP Switch
D Yellow-Green Wire
E Contactor
F E-Stop Disconnect
G Blue Wire
H Terminal Blocks
I Control Box
J Circuit Breaker 400v 3ø 10A (Over-Current Protec-
tion)
K 400v 3ø 10A Circuit breaker at electrical supply.
AB
Fig. 29 Detail
A Normal Position
B Activated Position
18

A
C
B
Installing Electrical And Inbay Controller Components
For E Series Lifts.
22. Solenoid Attachment: Attach solenoids under locking latches
of both columns, Fig. 30. Place sliders onto solenoid plunger
rods. Place solenoids onto columns and tighten, Fig. 30.
Fig. 30
23. Installing Master Control Panel & Tool Holder:
Remove access panel from the master control panel (master
control panel has 5 cables attached to it), Fig. 31.
Install (2) 5/16"-18NC x 3/8" PHMS screws in holes on each side
of the locking latch (power unit side) leaving approximately 3mm
exposed to hold the panel. Hang the master control panel
over locking latch to column on the 5/16"-18NC x 3/8" PHMS
screws and pull the locking latch solenoid wire through the panel,
Fig. 31. Plug locking latch solenoid into master control panel.
Connect the ground wire with ring to terminal at one of the lock
solenoid mounting screws, Fig. 30.
Install (1) 5/16"-18NC x 3/8" PHMS in bottom of master control
panel. Tighten down all (3) screws. Do not install access panel
back into control panel at this time. It will be reinstalled in a later
step.
23a. Install one of the air tool holders under the master control
panel with two 5/16"-18NC x 3/8" PHMS, Fig. 31.
Fig. 30 Detail
A
IMPORTANT
Attach slider to solenoid plunger
rod.
B 5/16"-18NCx3/8" PHMS Place screws through sole-
noid and attach to column.
C Solenoid ground wire from control panel.
19

23b. Install Master Cable Motor Cable to Master panel
connections.
A
B
C
H
D
E
J
K
I
F
G
L
Fig. 31 Detail
A 5/16"-18NCx3/8" PHMS, Leave these two screws
exposed out of the column approximately 3mm.
B
IMPORTANT
Master control panel always
mounts on the power unit side.
C Access Panel
D 5/16"-18NCx3/8" PHMS, Through the control panel.
E Tool Holder
F 5/16"-18NCx3/8" PHMS
Fig. 31 Detail
G Pull connector through panel
H Overhead Switch Cable
I Master Cable
J Lowering Valve Cable
K Motor Cable
L Power Cable (connected in Step 26)
Fig. 31
20
/