Page is loading ...

Nortel Communication Server 1000
IP Phone 1110
User Guide
Title page


Revision history
3
Revision history
June 2010
Standard 06.01. This document is up-issued to support
Communication Server 1000 Release 7.0.
October 2009
Standard 05.01. Because of the similarity between
Communication Server 1000 Release 6.0 for UNIStim 4.0
features and Release 5.5 features, UNIStim 4.0 Release 6.0
documentation is also used for Release 5.5.
June 2009
Standard 04.02. This document is up-issued to support Nortel
Communication Server 1000 Release 6.0.
May 2009
Standard 04.01. This document is up-issued to support Nortel
Communication Server 1000 Release 6.0.
April 2008
Standard 03.03. This document is up-issued to support Nortel
Communication Server 1000 Release 5.5 for UNIStim 3.0.
May 2007
Standard 02.01. This document is issued to support Nortel
Communication Server 1000 Release 5.0.
March 2007
Standard 01.01. This document is issued to support
Communication Server 1000 Release 4.5. This is the first
publication of this document.

Revision history
4

Contents
5
Contents
About the Nortel IP Phone 1110 . . . . . . . . . . . . . . . . . . . . . . 9
Basic features . . . . . . . . . . . . . . . . . . . . . . . . . . . . . . . . . . . . . . 9
Telephone controls . . . . . . . . . . . . . . . . . . . . . . . . . . . . . . . . . 11
Telephone display . . . . . . . . . . . . . . . . . . . . . . . . . . . . . . . . . 15
License Notification . . . . . . . . . . . . . . . . . . . . . . . . . . . . . . . . 15
Call features and Flexible Feature Codes . . . . . . . . . . . . . . . 16
Security features . . . . . . . . . . . . . . . . . . . . . . . . . . . . . . . . . . . 16
Using Encrypted Calling . . . . . . . . . . . . . . . . . . . . . . . . . . 16
Managing your Station Control Password (SCPW) . . . . . 16
Entering and editing text . . . . . . . . . . . . . . . . . . . . . . . . . . . 19
Entering text using the dialpad . . . . . . . . . . . . . . . . . . . . . . . . 19
Editing text using the soft keys . . . . . . . . . . . . . . . . . . . . . . . . 19
Entering text using the USB keyboard . . . . . . . . . . . . . . . . . . 21
Connect the components . . . . . . . . . . . . . . . . . . . . . . . . . . 22
Before you begin . . . . . . . . . . . . . . . . . . . . . . . . . . . . . . . . . . 22
Telephone features . . . . . . . . . . . . . . . . . . . . . . . . . . . . . . . . 28
Telephone Options . . . . . . . . . . . . . . . . . . . . . . . . . . . . . . . . . 28
Volume adjustment... . . . . . . . . . . . . . . . . . . . . . . . . . . . . . . . 30
Contrast adjustment . . . . . . . . . . . . . . . . . . . . . . . . . . . . . . . . 31
Language... . . . . . . . . . . . . . . . . . . . . . . . . . . . . . . . . . . . . . . . 32
Date/Time... . . . . . . . . . . . . . . . . . . . . . . . . . . . . . . . . . . . . . . 33
Local Dialpad Tone . . . . . . . . . . . . . . . . . . . . . . . . . . . . . . . . . 34
Set Info . . . . . . . . . . . . . . . . . . . . . . . . . . . . . . . . . . . . . . . . . . 34
Diagnostics . . . . . . . . . . . . . . . . . . . . . . . . . . . . . . . . . . . . . . . 35
Ring type... . . . . . . . . . . . . . . . . . . . . . . . . . . . . . . . . . . . . . . . 36

Contents
6
Call timer . . . . . . . . . . . . . . . . . . . . . . . . . . . . . . . . . . . . . . . . 37
Live Dial Pad . . . . . . . . . . . . . . . . . . . . . . . . . . . . . . . . . . . . . 38
Caller ID display order . . . . . . . . . . . . . . . . . . . . . . . . . . . . . . 39
Normal mode indication . . . . . . . . . . . . . . . . . . . . . . . . . . . . . 39
Local tools . . . . . . . . . . . . . . . . . . . . . . . . . . . . . . . . . . . . . . . 41
1. Using the Preferences submenu . . . . . . . . . . . . . . . . . . . . 42
1. Contrast . . . . . . . . . . . . . . . . . . . . . . . . . . . . . . . . . . . . 43
2. Languages... . . . . . . . . . . . . . . . . . . . . . . . . . . . . . . . . 43
3. Backlight Timer . . . . . . . . . . . . . . . . . . . . . . . . . . . . . . 44
2. Using the Local Diagnostics submenu . . . . . . . . . . . . . . . . 45
1. IP Set&DHCP Information . . . . . . . . . . . . . . . . . . . . . . 46
2. Network Diagnostic Tools . . . . . . . . . . . . . . . . . . . . . . 46
3. Ethernet Statistics . . . . . . . . . . . . . . . . . . . . . . . . . . . . 46
4. IP Network Statistics . . . . . . . . . . . . . . . . . . . . . . . . . . 46
5. DHCP Information . . . . . . . . . . . . . . . . . . . . . . . . . . . . 47
6. License Information . . . . . . . . . . . . . . . . . . . . . . . . . . . 47
7. Certificate Information . . . . . . . . . . . . . . . . . . . . . . . . . 47
3. Using the Network Configuration submenu . . . . . . . . . . . . 47
4. Using the Lock Menu . . . . . . . . . . . . . . . . . . . . . . . . . . . . . 47
Making a call . . . . . . . . . . . . . . . . . . . . . . . . . . . . . . . . . . . . . 48
Using Off-hook dialing . . . . . . . . . . . . . . . . . . . . . . . . . . . . . . 48
Using On-hook Dialing . . . . . . . . . . . . . . . . . . . . . . . . . . . . . . 49
Using Predial . . . . . . . . . . . . . . . . . . . . . . . . . . . . . . . . . . . . . 49
Using Ring Again . . . . . . . . . . . . . . . . . . . . . . . . . . . . . . . . . . 50
Using Last Number Redial . . . . . . . . . . . . . . . . . . . . . . . . . . . 52
Using Speed Call . . . . . . . . . . . . . . . . . . . . . . . . . . . . . . . . . . 53
Using System Speed Call . . . . . . . . . . . . . . . . . . . . . . . . . . . . 54

Contents
7
Answering a call . . . . . . . . . . . . . . . . . . . . . . . . . . . . . . . . . . 55
While on an active call . . . . . . . . . . . . . . . . . . . . . . . . . . . . . 55
Placing a call on hold . . . . . . . . . . . . . . . . . . . . . . . . . . . . . . . 55
Transferring a call . . . . . . . . . . . . . . . . . . . . . . . . . . . . . . . . . . 56
Using Timed Reminder Recall . . . . . . . . . . . . . . . . . . . . . . . . 57
Using Call Park . . . . . . . . . . . . . . . . . . . . . . . . . . . . . . . . . . . . 58
Recording a Calling Party Number . . . . . . . . . . . . . . . . . . . . . 60
Tracing a malicious call . . . . . . . . . . . . . . . . . . . . . . . . . . . . . 61
While away from your desk . . . . . . . . . . . . . . . . . . . . . . . . . 62
Using Call Forward . . . . . . . . . . . . . . . . . . . . . . . . . . . . . . . . . 62
Using Internal Call Forward . . . . . . . . . . . . . . . . . . . . . . . . . . 63
Using Remote Call Forward . . . . . . . . . . . . . . . . . . . . . . . . . . 64
Securing your telephone . . . . . . . . . . . . . . . . . . . . . . . . . . . . . 66
Talking with more than one person . . . . . . . . . . . . . . . . . . 68
Setting up a conference call . . . . . . . . . . . . . . . . . . . . . . . . . . 69
Using Group Call . . . . . . . . . . . . . . . . . . . . . . . . . . . . . . . . . . 70
Working without interruption . . . . . . . . . . . . . . . . . . . . . . . 72
Activating Make Set Busy . . . . . . . . . . . . . . . . . . . . . . . . . . . . 72
Additional call features . . . . . . . . . . . . . . . . . . . . . . . . . . . . 73
Using Call Page Connect to make an announcement . . . . . . 73
Charging a call or charging a forced call . . . . . . . . . . . . . . . . 74
Using Enhanced Override . . . . . . . . . . . . . . . . . . . . . . . . . . . 77
Using Forced Camp-on . . . . . . . . . . . . . . . . . . . . . . . . . . . . . 78
Overriding a busy signal . . . . . . . . . . . . . . . . . . . . . . . . . . . . . 80
Using Privacy Release . . . . . . . . . . . . . . . . . . . . . . . . . . . . . . 80
Using Radio Page . . . . . . . . . . . . . . . . . . . . . . . . . . . . . . . . . . 81

Contents
8
Additional phone features . . . . . . . . . . . . . . . . . . . . . . . . . . 84
Secure Communication . . . . . . . . . . . . . . . . . . . . . . . . . . . . . 84
Using Virtual Office . . . . . . . . . . . . . . . . . . . . . . . . . . . . . . . . . 84
Logging in to Virtual Office . . . . . . . . . . . . . . . . . . . . . . . . 86
Using Virtual Office on your Remote telephone . . . . . . . . 87
Using Virtual Office on your Office telephone . . . . . . . . . 90
Logging out of Virtual Office . . . . . . . . . . . . . . . . . . . . . . . 92
Automatic log out from Virtual Office . . . . . . . . . . . . . . . . 92
Emergency calls on your Remote IP Phone . . . . . . . . . . 92
Troubleshooting Virtual Office . . . . . . . . . . . . . . . . . . . . . 93
Using Media Gateway 1000B . . . . . . . . . . . . . . . . . . . . . . . . . 95
Using Test Local Mode . . . . . . . . . . . . . . . . . . . . . . . . . . 96
Using Resume Normal Mode . . . . . . . . . . . . . . . . . . . . . . 96
Troubleshooting MG 1000B . . . . . . . . . . . . . . . . . . . . . . . 97
Using Hospitality features . . . . . . . . . . . . . . . . . . . . . . . . . . 98
Configuring Automatic Wake-Up . . . . . . . . . . . . . . . . . . . . . . 98
Station Control Password . . . . . . . . . . . . . . . . . . . . . . . . . 100
Accessing External Server Applications . . . . . . . . . . . . . 102
Flexible Feature Codes (FFC) . . . . . . . . . . . . . . . . . . . . . . 103
Regulatory and safety information . . . . . . . . . . . . . . . . . . 105
Other . . . . . . . . . . . . . . . . . . . . . . . . . . . . . . . . . . . . . . . . . . . 107
DenAn regulatory notice for Japan . . . . . . . . . . . . . . . . . . . . 107
Terms you should know . . . . . . . . . . . . . . . . . . . . . . . . . . 109
Index . . . . . . . . . . . . . . . . . . . . . . . . . . . . . . . . . . . . . . . . . . 115

About the Nortel IP Phone 1110
9
About the Nortel IP Phone 1110
The Nortel IP Phone 1110 brings voice and data to the desktop by
connecting directly to a Local Area Network (LAN) through an Ethernet
connection.
Basic features
Your IP Phone 1110 supports the following:
• four context-sensitive soft keys providing access to a maximum of 10
features
For information about context-sensitive soft keys, see Features and
Services Fundamentals (NN43001-106).
Context-sensitive soft keys are Nortel Communication Server
dependent. Some IP Phone 1110 phones are not configured to
support context-sensitive soft key functionality. Contact your site
administrator for further details
• pixel-based LCD screen, backlit, with adjustable contrast
• speaker for on-hook listening and on-hook dialing
• volume control keys for adjusting ringer, speaker, and handset
volume
• three call-processing fixed keys:
—Line
—Hold
— Goodbye
• three specialized feature keys:
— Message/Inbox
—Services
—Expand
• integrated 10/100 Ethernet switch for shared PC access
• automatic network configuration

About the Nortel IP Phone 1110
11
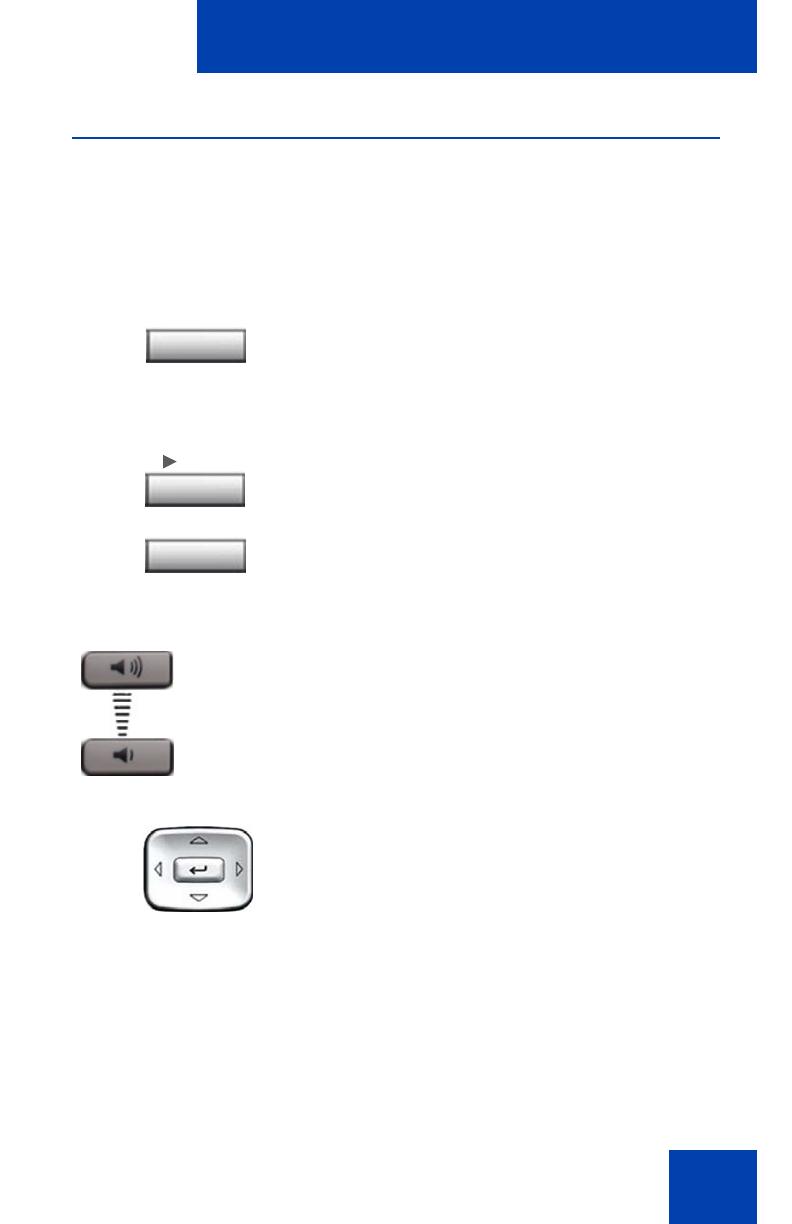
Telephone controls
Table 1: Telephone controls
Note: In some geographic regions, the IP Phone 1110 is offered with
key caps that have English text labels. Text in parentheses indicates
labels appearing on the key caps, for example, (Services).
Context-sensitive soft keys are located
below the LCD display area. The LCD label
above each context-sensitive soft key
changes based on the call state or active
feature.
When a triangle appears before a context-
sensitive soft key label, the feature
associated with the context-sensitive soft
key is active.
Press the More key to access the next layer
of context-sensitive soft keys.
Use the Volume control buttons to adjust
the volume of the ringer, handset and
speaker. Press the top button to increase the
volume, and press the bottom button to
decrease volume.
Use the Navigation keys to scroll through
menus and lists appearing on the LCD
display screen. The outer part of this key
cluster rocks for up, down, left, and right
movements.
Fwd
Fwd
More...
(Volume +)
(Volume -)
About the Nortel IP Phone 1110
12
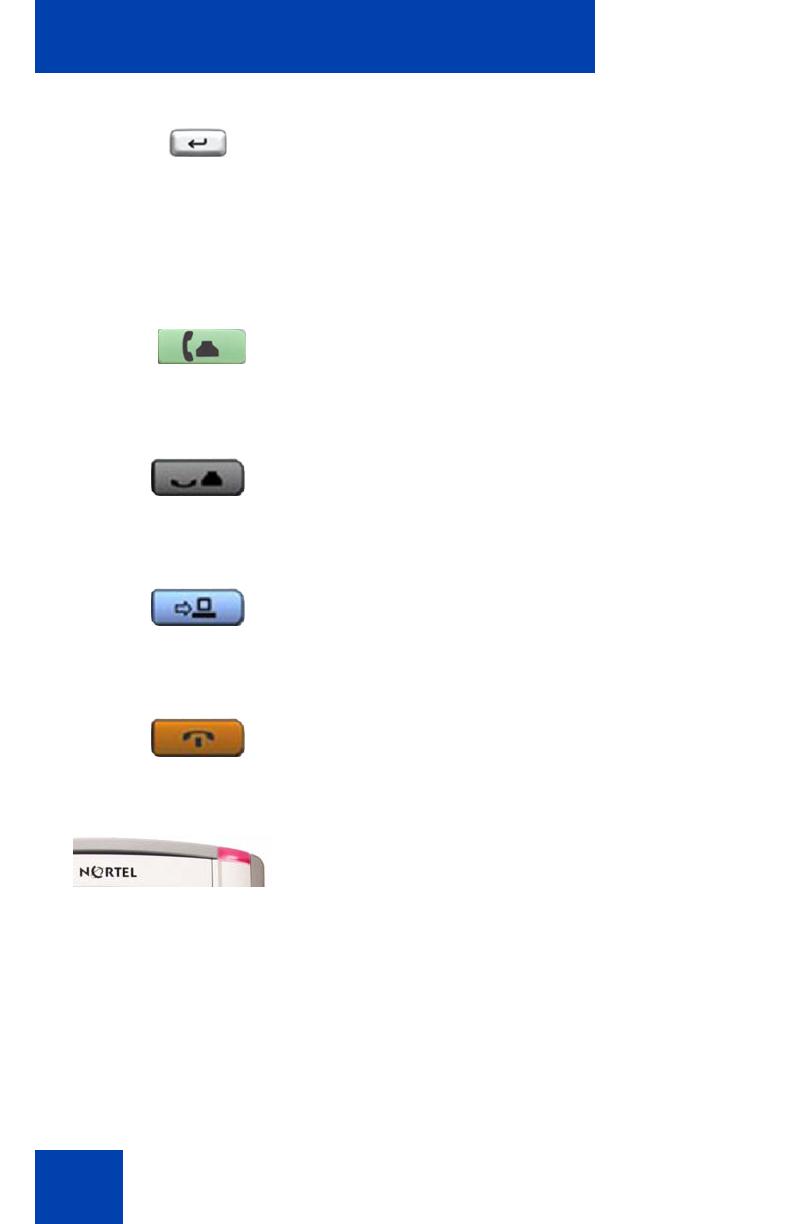
Press the Enter key, at the center of the
Navigation key cluster, to confirm menu
selections.
In many cases, you can use the Enter key
instead of the Select context-sensitive soft
key.
Use the Line (DN) key to access the single
line and activate on-hook dialing. No status
icon or LED is provided.
Press the Hold key to put an active call on
hold. Press the Hold key again to return to
the caller on hold.
Use the Expand key to access external
server applications.
Use the Goodbye key to terminate an active
call.
When a message is waiting, the red Visual
Alerter/Message Waiting indicator flashes.
Also, when the ringer sounds, this indicator
flashes. The flash cadence for each alert is
different.
Note: You may also hear an audio
Message Waiting Indicator (stutter or
beeping dial tone) when you go off-hook.
(Line)
(Hold)
(Expand)
(Goodbye)

About the Nortel IP Phone 1110
13
When your IP Phone 1110 firmware is being
updated, the blue Feature Status Lamp
flashes.
Note: To find out if additional features
are supported, contact your
administrator.
Press the Services key once to access the
following server-based options:
• Telephone Options:
— Volume adjustment...
— Contrast adjustment
— Language...
— Date/Time...
— Local Dialpad Tone
— Set Info
— Diagnostics
— Ring type...
— Call timer
—Live Dial Pad
— Caller ID display order
— Normal mode indication
• Password Admin:
— Station Control Password
Note: The Password Admin menu may
not be available on all IP Phone 1110
sets. Consult your system administrator.
(Services)

About the Nortel IP Phone 1110
14
• Virtual Office Login and Virtual Office
Logout (if Virtual Office is configured)
• Test Local Mode and Resume Local
Mode (if Media Gateway 1000B is
configured)
Note: Press the Services key to exit
from any menu or menu item.
Press the Services key twice to access the
following telephone-based (local) options:
• 1. Preferences
• 2. Local Diagnostics
• 3. Network Configuration
•4. Lock Menu
Note 1: Access to these local options
can be password protected. If you press
the Services key twice and a password
prompt appears, contact your system
administrator.
Note 2: Press the Cancel context-
sensitive soft key to exit from any menu
or menu item.
Press the Message/Inbox key to access
your voice mailbox.
Note: This function may not be available
on all IP Phone 1110s; consult your
system administrator.
(Services)
(Services)
(Msg/Inbox)

About the Nortel IP Phone 1110
15
Telephone display
Table 1 shows the LCD screen of your IP Phone 1110.
Figure 2: IP Phone 1110 LCD screen
The LCD screen on your IP Phone 1110 consists of two basic display
areas:
• The upper display area is for information such as caller number, caller
name, feature prompt string, user-entered digits, date and time (or
call timer, if provisioned in the Telephone Options menu), and
telephone information.
• The lower display area is for context-sensitive soft key labels.
License Notification
Notify your system administrator if your IP Phone displays a message in a
pop-up window about the licensing feature or evaluation period. License
notification provides details to help diagnose why the features are
disabled on the phone. You can press the Stop key or lift the handset to
close the window. The window redisplays every 24 hours at 1:00 AM
(default). The time and time frame can be configured when you provision
the phone. For information about provisioning the IP Phones, see Nortel
Communication Server 1000 IP Phones Fundamentals (NN43001-368).

About the Nortel IP Phone 1110
16
Call features and Flexible Feature Codes
Some features are not available on all IP Phones. Call features and
Flexible Feature Codes (FFCs) must be assigned to your IP Phone and
supported by system software. Contact your system administrator to
configure these features and codes on your IP Phone. Use table “Flexible
Feature Codes (FFC)” on page 103 to record the FFCs that your system
administrator assigns to your phone.
Security features
The following security features are available on your IP Phone 1110:
• Using Encrypted Calling
• Connect the components
Using Encrypted Calling
Your IP Phone 1110 supports secure communication using SRTP media
encryption. If the feature is enabled, a security icon (q) is displayed on
the screen when your call is secured using SRTP media encryption.
Contact your system administrator to find out if this feature is available for
your use.
Managing your Station Control Password (SCPW)
Your Station Control Password (SCPW) enables the following security
features:
• Electronic Lock to prevent others from making calls from your IP
Phone
• Password-protected IP Phone features (for example, Personal
Directory, Redial List, and Callers List)
Your system administrator defines your initial SCPW. Contact your
system administrator for detailed information.

About the Nortel IP Phone 1110
17
To change your password (SCPW):
(Services)
1. Press the Services key.
2. Press the Up/Down navigation keys to
scroll up or down, and highlight
Password Admin.
3. Press the Enter key.
4. Use the dialpad to enter your password
at the prompt.
5. Press the Up/Down navigation keys to
scroll up or down, and highlight New
Password.
6. Press the Enter key.
7. Use the dialpad to enter the new
password.
8. Press the Enter key to accept the new
password.
If you are locked out of your IP Phone 1110,
or if you forget your SCPW, contact your
system administrator.

About the Nortel IP Phone 1110
18
Note: The default configuration for Password Protection is off.
To turn Password Protection on or off:
1. Press the Directory key.
2. Press the Up/Down navigation keys to
scroll up or down, and highlight Change
Protection Mode.
3. Use the dialpad to enter your password
(if Password Protection is enabled).
4. Press the Enter soft key.
5. Press the Up/Down navigation keys to
highlight one of the following:
— Enable Password Protection
— Disable Password Protection
6. Choose one of the following soft keys:
— Yes to accept the selection
— No to return to the Directory menu
7. Press the Done soft key.
Enter
or
Yes No
Done

Entering and editing text
19
Entering and editing text
You can enter and edit text on your IP Phone 1110 using the following
methods:
• “Connect the components” on page 22
• “Editing text using the soft keys” on page 19
• “Connect the components” on page 22
The use of any of these methods for text entry depends on the applica-
tion. Table 2 shows the applications and input devices that you can use
for text entry.
Entering text using the dialpad
You can use the dialpad to enter text when you use features such as
Personal Directory, Redial List, and Callers List.
For example, if you want to use the letter A, press the number 2 key once.
If you want the letter C, press the number 2 key three times.
Note: No letters are associated with the number 1 or the 0 keys.
Editing text using the soft keys
Table 2: Application text entry
For: Use:
Call Server-related applications
(for example, changing feature
key labels, adding personal
directory entries, or dialing)
Dialpad
USB keyboard for numeric
entries only
Graphical applications USB keyboard
Local Tools menu USB keyboard
Dialpad for numeric entries

Entering and editing text
20
You can use soft keys to edit text when you use features such as
Personal Directory, Redial List, and Callers List.
To edit an entry in your Personal Directory, press the Directory key, and
select the desired entry from your Personal Directory.
To edit text with the soft keys:
1. Press the Edit soft key.
2. Press the Left/Right navigation keys to move through the text.
3. Select the appropriate editing soft key for the operation you want to
perform.
4. If the character you want is not visible, press the More soft key to
access the next layer of soft keys.
5. To add non-alphanumeric symbols, press the Symbol soft key, and
perform the following:
a. Press the Up navigation key to access the symbols.
b. Press the Left/Right navigation keys to move to a specific
symbol.
c. Press the Choose soft key to select a symbol.
6. Press the Next soft key to submit your changes.
Table 3 describes the soft key editing functions on your IP Phone 1110.
Table 3: Editing soft key description (Part 1 of 2)
Key Description
Cancel Action is cancelled.
Choose Select a non-alphanumeric symbol (available
only after the Symbol soft key is selected).
Clear Clear the input field.
Case Switch the next character to either uppercase
or lowercase.
Delete Backspace one character.
/