Midmark M Series Steam Sterilizer User manual

Type
User manual

This manual is also suitable for

Midmark M Series Steam Sterilizer offers a reliable and efficient sterilization solution for your medical or dental practice. With its advanced features, it ensures effective sterilization of instruments and materials, maintaining a sterile environment for your patients' safety.

Midmark M Series Steam Sterilizer offers a reliable and efficient sterilization solution for your medical or dental practice. With its advanced features, it ensures effective sterilization of instruments and materials, maintaining a sterile environment for your patients' safety.

1
Applies to Models:
M9 / M11 / M3
QC1 -01
QC3(R) -01
QC6(R) -01
Sterilizer and QuickClean™ Startup Procedures
003-10351-00 Rev. AA2 (1/7/22)
M9 / M11 Steam Sterilizer
Note: These instructions outline basic startup procedures. For all technical information
and user guides, visit our technical library at technicallibrary.midmark.com
Equipment Alert
Use distilled water or water that meets the
water purity specifications referenced in
your Users Guide. Failure to comply may
result in sterilizer malfunction and/or premature
failure due to excessive corrosion.
Door
Gasket
Dam
Gasket Chamber
Tray Rack
Tray Plate
Trays
Cleaning.
A) Wash the exterior of the sterilizer according to your facility’s
procedure for clinical contact surfaces, noting the following:
(Use only quaternary disinfectants to disinfect unit.
Staining, pitting, discoloration, or softening could occur if
phenolic, iodophor, or glutaraldehyde-based disinfectant is
used on plastic surfaces of the unit. Also, use of alcohol or
aerosol spray cleaner / disinfectant containing substantial
amounts of alcohol in the formula can damage the faceplate).
B) Wring excess solution from cloth.
C) Using soft cloth, wipe all external surfaces.
D) Follow the instructions provided with the cleaner / disinfectant
used regarding rinsing and drying of external surfaces.
E) Examine gaskets for possible damage.
F) Clean gaskets and mating surfaces with a damp cloth.
G) Wash trays, rack, plate, and inside of chamber with mild soap
or Speed-Clean and distilled water or water that meets the
 referencedwaterpurityspecications.
© 2020 Midmark Corp. | 60 Vista Drive Versailles, OH 45380 USA | 1.800.643.6275 | 1.937.526.3662 | midmark.com
2
M9 / M11 Steam Sterilizer - continued
Equipment Alert
Install tray rack / plate with angled end of plate
toward the back of the chamber.
Do not allow plate to contact the water level sensor.
Install tray rack / plate, and trays.
A) Insert the tray rack into the tray plate.
B) Place back of tray plate in chamber.
C) Press down on tray rack, while sliding into chamber.
D) Place the trays onto the tray rack slots.
Tray Plate
(Angled end must face back of chamber)
Tray Rack
Trays
Fill / Vent
Filter Screen
Air Filter
Screen
Water Level
Sensor
Check filters.
Visually check to ensure filter screens are in place,
both the back and bottom of your sterilizer chamber.
© 2020 Midmark Corp. | 60 Vista Drive Versailles, OH 45380 USA | 1.800.643.6275 | 1.937.526.3662 | midmark.com 003-10351-00
3
Voltage Rating
Connect power cord.
A) Plug power cord into receptacle on back of sterilizer.
B) Plug power cord into a properly polarized and grounded receptacle
rated for a minimum of 15 amps. A dedicated circuit only used for
the sterilizer is recommended.
C) M9 / M9D and M11 are not equipped with an on/off switch, the display
operates off very low power. (example: microwave oven display)
Note: When power is connected, the messages shown will appear on the display.
Fill reservoir.
A) Open door to unit.
B) Pour distilled water into fill opening until
water level reaches the top of the fill level
label on the water level indicator tube.
Equipment Alert
Use distilled water or water that meets the
water purity specifications referenced in
your Users Guide. Failure to comply may
result in sterilizer malfunction and/or premature
failure due to excessive corrosion.
*
*
M9 / M11 Steam Sterilizer - continued
Note
For M9-04x / M11-04x models, The User Settings mode will enable
the user to set the desired unit of measure and adjust the time clock.
Refer to “User Settings” in your User Guide.
M9-04x / M11-04x
Display Shown
* These screens will display the total number of cycles run on the unit, the
model number (M9/M9D or M11), the software version number, serial number
and M9/M11-04X models also display the date and time.
© 2020 Midmark Corp. | 60 Vista Drive Versailles, OH 45380 USA | 1.800.643.6275 | 1.937.526.3662 | midmark.com 003-10351-00
4
Qualication Testing
Your sterilizer should be tested after sterilizer installation, malfunctions, relocation, major repairs, and
aftersterilizationprocessfailure.Qualicationtestingshouldbeperformedpriortoplacingthesterilizerin
service.Ifmultiplecycletypesareused,e.g.“Pouches”and“Packs”eachcycletypeshouldbequalied.
QualicationtestingshouldincludeatleastoneBiologicalIndicator(BI)(sometimesreferredtoasSpore
Tests) and one Chemical Indicator (CI). The test pack should be placed on the bottom tray near the chamber
doorandperformedwithitemsroutinelyprocessedandconsideredtobethemostdiculttosterilize.
Additional items should be placed in the chamber along with the Biological Indicator and Chemical Indicator
so that chamber is fully loaded (don’t exceed the maximum capacities listed in the tables under “Guidelines
for Loading” in this manual). One test run for each cycle type tested, with negative results from the BIs,
and the appropriate readings from all physical monitors and chemical indicators demonstrating complete
sterilization,providevericationthatthesterilizerhasbeenproperlyinstalled(orreinstalledafterrelocation)
orrepairedtothemanufacturer’sspecicationsandthatitwillfunctioneectivelyinthefacilityinwhichit
isinstalled.Allitemsprocessedduringqualicationtestingshouldbequarantineduntiltheresultsofthe
biological testing are available.
Equipment Alert
The sterilizer will not operate unless the door is closed and latched properly.
Close and latch the door.
A) Lift the door handle, then push the door closed.
B) While pushing in on the door, slide the door handle down to engage the latch.
Select cycle.
Press the desired cycle button on the display panel.
M9 / M11 Steam Sterilizer - continued
Test Cycle
Run a test cycle to ensure that your system is running properly.
© 2020 Midmark Corp. | 60 Vista Drive Versailles, OH 45380 USA | 1.800.643.6275 | 1.937.526.3662 | midmark.com 003-10351-00
5
© 2020 Midmark Corp. | 60 Vista Drive Versailles, OH 45380 USA | 1.800.643.6275 | 1.937.526.3662 | midmark.com 003-10351-00
M3 Sterilizer
Chamber
Filter
Gasket
Cleaning.
A) Wash unit according to your facility’s procedure for clinical
contact surfaces noting the following:
(Use only quaternary disinfectants to disinfect unit. Staining, pitting,
discoloration, or softening could occur if phenolic, iodophor, or
glutaraldehyde-based disinfectant is used on plastic surfaces of the
unit. Also, use of alcohol or aerosol spray cleaner / disinfectant
containing substantial amounts of alcohol in the formula can
damage the faceplate.).
B) Wring excess solution from cloth.
C) Using soft cloth, wipe all external surfaces.
D) Follow the instructions provided with the cleaner / disinfectant
used regarding rinsing and drying of external surfaces.
E) Wash gasket and mating surface with a damp cloth.
F) Inspect gasket for damage.
G) Replace gasket if necessary.
H) Visually check to ensure the chamber filter screen is in place.
6
M3 Sterilizer - continued
0
0
Equipment Alert
The tank hose must be properly connected
(and not kinked). Improper connection will
cause water / steam leaks or a sterilizer
malfunction if water flow to the tank is restricted.
Note
External Condensing Tank is not needed if M3 is connected
to the VistaCool direct-to-drain thermal reduction system.
Connect the condensing tank.
A) If connected, disconnect sterilizer power cord.
B) Push tank hose into compression fitting on lid.
Tighten nut. (If step B is difficult - see NOTE)
C) Connect tank hose to back of sterilizer.
D) Fill condensing tank with tap water to minimum
water level indicator line.
E) Secure the lid on the condensing tank by aligning
the tabs and rotate lid clockwise to secure.
Note
If tubing is difficult to install.
A) Remove compression nut & two ferrules.
B) Install nut and ferrules onto tank hose as shown.
(Large & small ferrules must be positioned as shown)
C) Insert hose into tank fitting, then tighten nut.
Power Cord
Compression
Fitting
Tank Hose
Min. Water Level
Indicator Line
Ferrule
(small)
Ferrule
(large)
Nut
© 2020 Midmark Corp. | 60 Vista Drive Versailles, OH 45380 USA | 1.800.643.6275 | 1.937.526.3662 | midmark.com 003-10351-00
7
M3 Sterilizer - continued
Note
Clearance.
Maintain a minimum of 6 inch clearance above the condensing tank for
proper steam ventilation. If enclosed in a cabinet the support surface
and surrounding surfaces, should be protected with a water resistant
material (e.g. plastic, laminate, stainless steel, etc.). If enclosed in a
cabinet, it is recommended that the door be vented to avoid heat,
moisture build up and potential damage to the inside of cabinet.
Connect the condensing tank - continued.
F) Place tank on a level surface, preferably below the sterilizer
but in no case should it be higher than the sterilizer support surface.
G) Connect sensor plug.
H) Plug power cord into receptacle on back of sterilizer.
I) Plug power cord into a properly polarized and grounded receptacle
rated for a minimum of 15 amps. A dedicated circuit only used for
the sterilizer is recommended.
0
0
Power Cord
Sensor Plug
© 2020 Midmark Corp. | 60 Vista Drive Versailles, OH 45380 USA | 1.800.643.6275 | 1.937.526.3662 | midmark.com 003-10351-00
8
Power Switch
The power switch must be ON (I) for the sterilizer to operate.
0
0
0
OFF (O)
ON (I)
M3 Sterilizer - continued
Fill reservoir.
Pour one (1) gallon of distilled water into fill port.
Do not fill above lower lip of fill port.
Lower
Lip
Equipment Alert
Use distilled water or water that meets the
water purity specifications referenced in
your Users Guide. Failure to comply may
result in sterilizer malfunction and/or premature
failure due to excessive corrosion.
© 2020 Midmark Corp. | 60 Vista Drive Versailles, OH 45380 USA | 1.800.643.6275 | 1.937.526.3662 | midmark.com 003-10351-00
9
Qualication Testing
Your sterilizer should be tested after sterilizer installation, malfunctions,
relocation,majorrepairs,andaftersterilizationprocessfailure.Qualication
testing should be performed prior to placing the sterilizer in service. If multiple
cycles types are used, e.g. “Pouches” and “Low Temp” each cycle type should
bequalied.QualicationtestingshouldincludeatleastoneBiologicalIndicator
(BI) (sometimes referred to as Spore Tests) and one Chemical Indicator (CI).
The test pack should be placed near the front of the tray and performed with
itemsroutinelyprocessedandconsideredtobethemostdiculttosterilize.
Additional items should be placed in the chamber along with the Biological Indicator
and Chemical Indicator so that chamber is fully loaded (don’t exceed the maximum
capacities listed in the tables under “Guidelines for Loading” in this manual). One test run for each cycle
type tested, with negative results from the BIs, and the appropriate readings from all physical monitors and
chemicalindicatorsdemonstratingcompletesterilization,providevericationthatthesterilizerhasbeen
properlyinstalled(orreinstalledafterrelocation)orrepairedtothemanufacturer’sspecicationsandthatit
willfunctioneectivelyinthefacilityinwhichitisinstalled.Allitemsprocessedduringqualicationtesting
should be quarantined until the results of the biological testing are available.
Test Cycle
Run a test cycle to ensure that your system is running properly.
Priming the Water Pump
Put the sterilizer into User Diagnostics Mode to prime the water pump.
M3 Sterilizer - continued
To prime the sterilizer pump.
A) Put the unit in User Diagnostic Mode.
B) Press the <START> button to start the pump priming progress.
The unit will automatically cycle through a pre programmed priming cycle...
• Closing the sterilizer door.
• Heating the boiler.
• Cycling the pump ON and OFF until the pump is primed.
When finished the 2nd line of the display will show “PRIMING COMPLETE”.
C) Press the <START> button to return to the User Diagnostic Menu.
D) Turn the power switch OFF (O) to exit User Diagnostic Mode.
To activate User Diagnostic Mode.
A) Turn Power Switch OFF (O).
B) Press and hold the <START> button.
C) Turn Power Switch ON ( I ).
D) Press the <START> button when the display
shows “USER DIAGNOSTIC”.
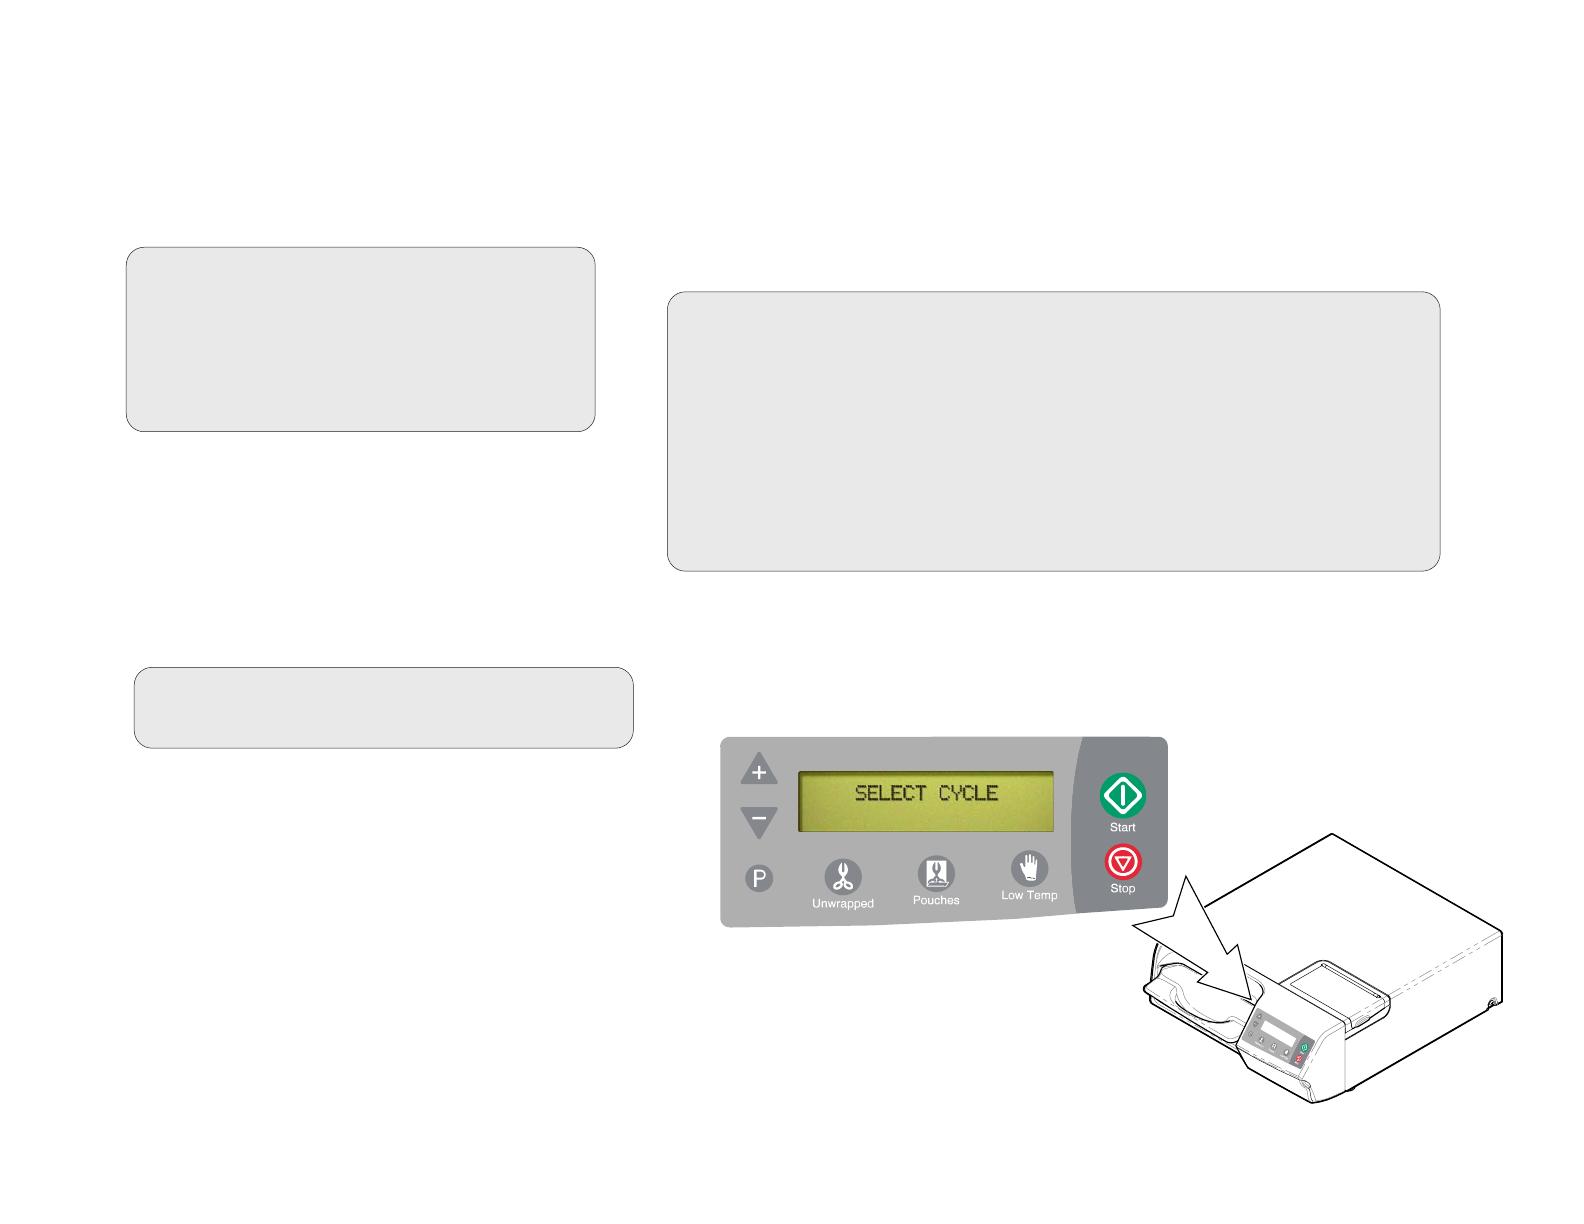
Select cycle.
Press the desired cycle button on the display panel.
© 2020 Midmark Corp. | 60 Vista Drive Versailles, OH 45380 USA | 1.800.643.6275 | 1.937.526.3662 | midmark.com 003-10351-00
10
QuickClean™ Units
Close drain valve.
Ensure that the drain valve is in the Closed position.
Drain Valve Closed
Drain Valve Open
Before Operating the QuickClean™
A) Clean unit and wipe out tank. “Clean by wiping with a damp soapy cloth and rinse.”
B) Pour water into the bath so that it reaches the liquid level sensor, but do not exceed the
maximum fill level. Follow cleaning agent’s recommendations on water temperature.
Cleaning efficacy can only be guaranteed if the water temperature is at least 70 F.
C) Add the required dose of cleaning agent. Follow cleaning agent and instrument
manufacturers’ recommendations for acceptable cleaners and concentrations.
To accommodate for tank size round up the amount of cleaning agent to the nearest
1 oz/gal, 10 ml/l or 10 gram/l.
D) Turn on the machine via the switch at the rear of the unit, just above the power cord.
The switch will then illuminate.
E) Run a Degas Cycle.
ON/OFF Switch
(Push Button)
Bath Fill
Line
Water Level
Sensor
Max Fill Level
Main Power
Connection
Connecting the power cord.
A) Plug the power cord into the main power connection
located on the back of your unit
B) Ensure your QuickClean™ ultrasonic bath is plugged
into a 115 VAC fully grounded outlet.
© 2020 Midmark Corp. | 60 Vista Drive Versailles, OH 45380 USA | 1.800.643.6275 | 1.937.526.3662 | midmark.com 003-10351-00
11
Degas
Degas cycle will allow optimal ultrasonic activity by removing gases present in
ordinary tap water.
The time needed to degas the liquid will vary depending on the amount of gas
present in the liquid and the quantity of water in the tank.
A degas period of 5 to 10 minutes is recommended.
During the degas cycle you will see bubbles of gas forming on the inside of the
ultrasonic bath and slowly rising to the surface, when you no longer see these
bubbles come to the surface you can end your degas cycle.
Running a Degas Cycle.
A) When the unit is powered on, when you change the solution or when the liquid has
fallen below the water level sensor you will receive the option to degas your ultrasonic.
B) Prior to starting the degas cycle, remove all instruments and make sure the unit is filled
with liquid and the required dose of cleaning solution.
C) Place the lid on the ultrasonic unit.
D) Select the upper < YES to start the degas cycle. The screen below will display
E) Once all the bubbles have come to the surface your degas cycle is complete.
F) Press the left arrow SKIP to end the degas cycle. Your degas cycle will NOT
automatically stop when degassing has completed
QuickClean™ Units - continued
Degas Cycle
© 2020 Midmark Corp. | 60 Vista Drive Versailles, OH 45380 USA | 1.800.643.6275 | 1.937.526.3662 | midmark.com 003-10351-00
12
Perform the “Foil” Test
Purpose: Used to determine the efficiency of an Ultrasonic Cleaner.
Quarterly testing of the ultrasonic cleaner to assure that it is operating properly is recommended.
Testing should also be performed whenever deterioration in the cleaner performance is suspected.
This foil test is relatively easy to perform and will provide a permanent record for the future
comparative evaluation of the ultrasonic cleaners performance.
Note: The foil test instructions can be found in your User Guide.
QuickClean™ Units - continued
Foil test set-up submerged in water solution
Test Cycle
Run a test cycle by performing a “Foil” test to ensure that your system is running properly.
© 2020 Midmark Corp. | 60 Vista Drive Versailles, OH 45380 USA | 1.800.643.6275 | 1.937.526.3662 | midmark.com 003-10351-00
  • Page 1 1
  • Page 2 2
  • Page 3 3
  • Page 4 4
  • Page 5 5
  • Page 6 6
  • Page 7 7
  • Page 8 8
  • Page 9 9
  • Page 10 10
  • Page 11 11
  • Page 12 12

Midmark M Series Steam Sterilizer User manual

Type
User manual
This manual is also suitable for

Midmark M Series Steam Sterilizer offers a reliable and efficient sterilization solution for your medical or dental practice. With its advanced features, it ensures effective sterilization of instruments and materials, maintaining a sterile environment for your patients' safety.

Ask a question and I''ll find the answer in the document

Finding information in a document is now easier with AI