Page is loading ...

DVD/VCD/CD PLAYER
Model
DV-P345UK
Instruction manual
To obtain the best performance and ensure years of
trouble-free use. please read this instruction manual
completely.
//

- 1 -
SAFETY INFORMATION
CAUTION
DVD Player is a class 1 laser product. However this product uses a visible laser beam which could cause
hazardous radiation exposure. Be sure to operate the player correctly as instructed.
While this player is plugged to the wall outlet, do not place your eyes close to the opening of the disc tray
or other openings to look into the inside of this product for your own safety.
Use of controls or adjustments or performance of procedures other than those specified may result in
hazardous radiation exposure. Do not open covers and do not attempt to repair any damaged parts. Refer
product to a service technician or qualified professional for any necessary repair.
WARNING
To reduce the risk of fire or electric shock, do not expose this equipment to rain or moisture.
To reduce the risk of fire or electric shock, and any interference, use the recommended accessories only.
9#40+0)

- 2 -
UK PLUG WARNING
IMPORTANT
The mains lead on this equipment may be supplied with a moulded plug
incorporating a fuse, the value of which is indicated on the pin face of
the plug. Should the fuse need to be replaced, an ASTA or BSI approved
BS1362 fuse must bu used of the same rating. If the fuse cover is
detachable never use the plug with the cover omitted. If a replacement
fuse cover is required, ensure it is of the same colour as that visible on
the pin face of the plug. Fuse covers are available from your dealer.
DO NOT cut off the mainsplug from tis equipment. If the plug fitted is
not suitable for the power points in your home or the cable is too short
to reach a power point, then obtain an appropriate safety approved
extension lead or consult your dealer.
Should it be necessary to change the mains plug, this must be carried
out by a competent person, preferably a qualified electrician.
If there is no alternative to cutting off the mains plug, ensure that you
dispose of it immediately, having first removed to fuse, to avoid a
possible shock hazard by inadvertent connection to the mains supply.
IMPORTANT
The wires in this mains lead are coloured in accordance with the following
code:
Blue : NEUTRAL
Brown : LIVE
As these colours may not correspond to the coloured markings identifying
the terminals in your plug, proceed as follows:
The wire coloured BLUE must be connected to the terminal marked with
the letter N or coloured BLUE or BLACK. The wire coloured BROWN must
be connected to the terminal marked with the letter L or coloured BROWN
or RED.
On no account connect either of these wires to the terminal marked E or
by the earth symbol
W or coloured green or green and yellow.
Alternatively, this equipment may be supplied with a rewireable plug
already fitted, which may be removed if not suitable and an alternative
fitted in accordance with the preceding instructions.

- 3 -
CONTENTS
SAFETY INFORMATION ..................................................................................... 1
WARNING ........................................................................................................... 1
UK PLUG WARNING ......................................................................................... 2
CONTENTS ......................................................................................................... 3
ABOUT THIS MANUAL ....................................................................................... 4
ACCESSORIES ................................................................................................... 5
GENERAL PROPERTIES .................................................................................... 6
DISC TYPES COMPATIBLE WITH THIS UNIT ................................................... 7
NOTES ON CD-R AND CD-RW DISCS ............................................................. 8
NOTES ON DISCS .............................................................................................. 9
SAFETY PRECAUTIONS .................................................................................. 10
FRONT PANEL FUNCTIONS ........................................................................... 11
FRONT PANEL DISPLAY .................................................................................. 12
REAR PANEL PARTS ........................................................................................ 13
CONNECTION OF YOUR DVD PLAYER WITH TV ......................................... 14
CONNECTION OF YOUR DVD PLAYER WITH AV AMPLIFIER ..................... 16
FITTING BATTERIES IN YOUR REMOTE CONTROL ..................................... 17
REMOTE CONTROL ........................................................................................ 17
REMOTE CONTROL FUNCTIONS .................................................................. 18
DVD PLAYBACK ............................................................................................... 19
DIRECT SELECTION OF SCENES .................................................................. 20
REPEAT PLAY .................................................................................................... 21
CONVENIENT FUNCTIONS ............................................................................. 22
VIDEO CD PLAYBACK ..................................................................................... 24
DIRECT SELECTION OF SCENES .................................................................. 26
REPEAT PLAY .................................................................................................... 27
CONVENIENT FUNCTIONS ............................................................................. 27
AUDIO CD PLAYBACK ..................................................................................... 28
DIRECT SELECTION OF TRACKS .................................................................. 29
REPEAT PLAY .................................................................................................... 30
CONVENIENT FUNCTIONS ............................................................................. 30
CD MENU ......................................................................................................... 31
USING SETUP MENU ....................................................................................... 34
MENU ITEMS .................................................................................................... 35
TROUBLESHOOTING ...................................................................................... 38
SPECIFICATIONS .............................................................................................. 39
DEFINITION OF TERMS ................................................................................... 40
SOME DOS AND DONTS ON THE SAFE USE OF EQUIPMENT .................... 41
UK GUARANTEE .............................................................................................. 42

- 4 -
ABOUT THIS MANUAL
Instructions in this manual describe the controls on the player. You can also use the controls on the remote
if they have the same or similar names as those on the player.
Dear Customers
We would like to thank you for purchasing this DVD/VCD/CD/CD-R/CD-RW/MP3/JPEG/MPEG player.
We strongly recommend that you carefully study the operating instructions before attempting to operate
the unit and that you note the listed safety precautions.

- 5 -
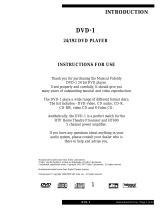
ACCESSORIES
In the packaging material you will find the following:
D
F
E
(a) Remote control
(b) Two R03 (AAA) batteries for remote control.
(c) Operation Manual

- 6 -
GENERAL PROPERTIES
1) DVD/VCD/CD/CD-R/CD-RW/MP3/JPEG/MPEG playback
2) NTSC/PAL playback (according to disc content)
3) User-friendly multilanguage OSD menu control
4) Vacuum Fluorescent Display (VFD)
5) Dolby Digital, DTS, LPCM audio via coaxial digital audio outputs.
6) Multiple Aspect Ratio support (16:9 Widescreen, 4:3 Letterbox, 4:3 PAN & SCAN)
7) Multi-Audio (up to 8) support
8) Multi-Subtitle (up to 32) support
9) Multi-Angle (up to 9) support
10) 8 parental level
11) Fast forward and rewind in different speeds.
12) Smooth and seamless playback in 2x speed.
13) Slow motion playback in different speeds.
14) Frame by frame forward playback
15) Time Search
16) Repeat
17) A − B repeat
18) Different play modes for Audio CD, MP3, JPEG and MPEG (Normal/Shuffle/Intro)
19) Program function for Audio CD, MP3 and JPEG
20) Scart Socket
21) Composite Video output
22) S-Video output
23) Coaxial and optical Digital Audio outputs
24) Analogue Audio Output

- 7 -
DISC TYPES COMPATIBLE WITH THIS UNIT
This player can play the following discs.
'9'
9,'(2&'
$8',2&'
03&'
-3(*
3,&785(&'

- 8 -
NOTES ON CD-R AND CD-RW DISCS
CD-R (Recordable) and CD-RW (Rewritable) discs, recorded by the users, may only be used after finalization
process.
CD-R and CD-RW discs may not be usable, depending on the disc features, recording conditions and
damage or dirt on disc. The disc configuration and features are determined by the tool and device used for
recording. Therefore, users may face with the following undesired consequences:
Some discs may not be read at all.
Some discs may cause system crash after playing for a while.
Some parts of the disc may be skipped or worked abnormally.
Compare with the original discs, the time passed for reading a CD-R and CD-RW discs may be longer.

- 9 -
NOTES ON DISCS
On handling discs
To keep the disc clean, handle the disc by its edge. Do not touch the surface.
Do not stick paper or tape on the disc.
If the disc is contaminated with any substance like glue remove before using it.
Do not expose the disc to direct sunlight or heat sources such as hot air ducts, or leave it in a car parked
in direct sunlight as the temperature can rise quickly and damage the disc.
After playing, store the disc in its case.
On cleaning
Before playing, clean the disc with a cleaning cloth. Wipe the disc from the center out.
Do not use solvents such as benzine, thinner, commercially available cleaners or anti-static spray intended
for vinyl LPs.
Discs that should not be used
Only the discs including the marks shown on page 5 can be played.
Note, however, that discs with special shapes (heart-shaped discs, hexagonal discs, etc.) cannot be played.
Do not attempt to play such discs, as they may damage the player.
¥ NOTE:
Do not use record spray or antistatic. Also do not use volatile chemicals such as benzene or thinner.

- 10 -
SAFETY PRECAUTIONS
Power Source
The unit should be operated only from a 220-240V~ 50 Hz outlet. Please do not open the cover by yourself.
There is high voltage in the set, which will endanger your life. Please contact local service agent for help
and advice. Repairs to be carried out by a qualified technician only.
The player is not disconnected from the AC power source (mains) as long as it is connected to the wall
outlet, even if the player itself has been turned off.
If you are not going to use the player for a long time, be sure to disconnect the player from the wall outlet.
Power Cord
Do not place furniture on, or pinch, the power cord (mains lead). Handle the power cord by the plug. Do not
pull out the plug by tugging the cord and never touch the power cord when your hands are wet as this could
cause a short circuit or electric shock. Never make a knot in the cord or tie it with other cords. The power
cords should be routed in such a way that they are not likely to be stepped on. A damaged power cord can
cause fire or give you an electrical shock. Check the power cord once in a while. When you find it damaged,
ask closest service agent for help. Should the AC power cord need to be changed, it should be done at a
qualified service shop only.
Choice Of Location
Please do not place the set in a place subject to direct sun light, excessive dust or mechanical shock or
in a location near heat sources.
The set should be placed on a solid and safe base. Do not place the player on a soft surface such as a
rug that might block the ventilation holes on the bottom.
A location should not be selected such as a room with high humidity, as the condensation, arising in the
kitchen for example, may cause malfunction or damage the set.
Heating or other thermal radiation under the set also may cause malfunction or damage the set.
The hot air, which arises during the operation, should be ventilated with sufficient air circulation. Please
do not put the set into closed areas and do not cover it.
Please avoid contact of the set with water or humidity. Do not put into operation near bath or swimming
pools.
Take care to provide a good air circulation. Place the player in a location with adequate ventilation to prevent
heat build-up in the player.
Should any solid object or liquid fall into the cabinet, unplug the player and have it checked by qualified
personnel before operating it any further.

- 11 -
FRONT PANEL FUNCTIONS
1. Disc Tray
Place a disc on the tray.
2. Front Panel Display (VFD)
Indicates the playing time, title, chapter/track, etc.
3. OPEN/CLOSE ( ) button
Opens or closes the disc tray.
4. STOP button
Stops playing disc.
5. PLAY/PAUSE button
Plays/pauses the disc. For any DVD title that has a root menu with still picture, this button functions as
button select (selects highlighted item) in the root menu. Otherwise this functioning of play/pause button
on the root menu will be prohibited by the disc, and
´
will appear.
6. SKIP buttons
Press to go back to the preceding chapter/track or go to the next chapter/track.
7. STANDBY button
Turns the unit on or switches the unit to standby mode.

- 12 -
FRONT PANEL DISPLAY
1. Play/Pause
2. Current Disc
3. Time or Title / Chapter / Track number
4. Dolby Digital / DTS
5. Zoom
6. Title Number
7. Angle
8. Chapter / Track Number
9. Repeat

- 13 -
REAR PANEL PARTS
1. DIGITAL OUT (OPTICAL) connector
Connects to an audio component using the optical digital connection cord.
2. DIGITAL OUT (COAXIAL) connector
Connects to an audio component using the coaxial digital connection cord.
3. AUDIO connectors
Connects to the AV amplifier by using 2 cords (Left, Right).
4. VIDEO connector
Connects to the video input connectors on the TV.
5. S VIDEO OUT connector
Connects to the S video input connector on the TV.
6. SCART connector.
Connects to the scart-input connector on the TV.
7. AC Power Cord

- 14 -
CONNECTION OF YOUR DVD PLAYER WITH TV
Be sure to turn off the power of each component before making the connections.
Scart socket
via scart socket with a scart cable gives you the best picture performance. If your DVD player will not be
connected to a hi-fi set or A/V amplifier to hear better sound, scart is enough for both audio & video
connections.
Video & Audio Output sockets
Video (yellow) & audio (Red: right, White: left) output sockets can be used to connect the DVD player to
your TV set via cables. To make this connection, your TV set must have Video & audio input connectors.
This type of connection is alternative to scart connection. Picture quality is not as good as Scart connection
but audio performance is the same.

- 15 -
S-Video Output sockets
S-Video Output socket can be used to have a better picture quality than the video output. Your TV set must
have S-video input connector for this type of connection. This socket is used for only video connection.
For audio, red & white output sockets must be used. S-video picture quality is not as good as Scart connection.
Putting into operation
After making the necessary connections stated above, plug the power cord to the mains socket. Unit will
be in standby mode. Press standby to turn on the unit. Open the disc tray with open/close button and insert
a playable disc (DVD/VCD/CD/CD-R/CD-RW/MP3/JPEG/MPEG). Press open/close button again to close
the disc tray and to start operating the player. Player will start playing the disc automatically.

- 16 -
CONNECTION OF YOUR DVD PLAYER WITH AV AMPLIFIER
Be sure to turn off the power of each component before making the connections.
Analogue Audio Output Sockets
To get better sound quality, the unit can be connected to an amplifier via analogue audio left/right outputs.
Digital Audio Output Sockets
For the best sound, the unit can be connected via optical or coaxial digital audio outputs to an AV amplifier
with a built-in Dolby Digital decoder.

- 17 -
FITTING BATTERIES IN YOUR REMOTE CONTROL
First open the battery cover on the underside of the remote control. Fit both batteries 1.5Volt (R03/AAA)
referring to the imprinted symbols (+/-) in the battery case and put on the battery cover again.
While using the remote control, direct it towards the front of the DVD player. If the remote control does not
work or the chosen function could not be made, the batteries are most probably exhausted and they should
be replaced as soon as possible. Please use only leak proof batteries. If you will not be using your remote
control for a long time, it is recommended to take out the batteries from your remote control.
REMOTE CONTROL

- 18 -
REMOTE CONTROL FUNCTIONS
1. STANDBY button
Turns the unit on or switches the unit to standby mode.
2. OPEN/CLOSE ( ) button
Opens or closes the disc tray.
3. TITLE button
Displays the title menu on the TV screen or activates the digest menu in picture cd.
4. DISPLAY button
Displays the current playing status or set-up menu on the TV screen.
5. MENU button
Displays the DVD root menu on screen. During VCD playback, shows the VCD menu if it exists.
Press again to resume play.
6. ZOOM button
Zooms the picture.
7. RETURN button
Returns to the preceding selection screen.
8. Arrow buttons
Move to the items or settings.
9. SELECT button
Executes the items or settings.
10. PLAY/PAUSE button
Plays/pauses the disc. For any DVD title that has a root menu with still picture, this button functions
as button select (selects highlighted item) in the root menu. Otherwise this functioning of Play/
Pause button on the root menu will be prohibited by the disc, and
´
will appear.
11. STOP button
Stops playing disc.
12. SKIP/FRAME button
Press to go to the next chapter or track or to go back to the preceding chapter or track during playback
and next frame during pause.
13. SEARCH/SLOW button
Press to adjust the forward and reverse playback at different speed during playback (fast forward/
reverse) or during pause mode (slow motion).
14. SUBTITLE button
Changes the language of the subtitle while playing a DVD.
15. AUDIO button
Changes the language of the sound while playing a DVD.
16. ANGLE button
Changes the angle when playing a DVD.
17. SEARCH MODE button
Press to select the unit for search (title, chapter, track, time)
18. PROGRAM button
Press to enter the program menu in stop mode for audio CD, MP3 CD and JPEG CD.
19. REPEAT button
Press to execute disc/title/chapter repeat.
20. A − B button
Press to execute the A - B repeat play.
21. TIME button
Changes the playing time display mode of the disc, title, track, on the OSD and front panel display.
22. Number buttons
Press to enter track/chapter/title/time numbers directly.
C button
Using this button you can delete mistyped entries or you can cancel some functions.
+10 button
Using this button you can enter the numbers greater than 9.

- 19 -
DVD PLAYBACK
Preparations
Turn on your audio system if the player has been
connected to an audio system.
Basic Play
1. Press on the standby button
2. Press OPEN/CLOSE (
) to open the disc tray.
3. Place a disc onto the tray
Hold the disc without touching either of its surfaces,
position it with the printed title side facing up, align
it with the guides, and place it in its proper position.
4. Press OPEN/CLOSE (
) .
The disc tray is automatically closed and play
commences if the disc does not have any menus
recorded on it.
A menu may appear on the TV screen after a few
moments or the film may start immediately after
the introduction of the Film Company. This
behaviour depends on the disc content and may
change.
¥ NOTE:
Step 5 and 6 is available only when a menu is
recorded on the disc.
5. Press
3/4/6/5 or the number button(s) to
select the preferred title.
6. Press SELECT.
Play of the selected items now starts.The played
item may be a motion picture, a still picture or
another submenu depending on the disc.
¥ NOTE:
When using menus the disc controls the behaviour
of the player.
For stopping play and returning to the menu screen
(when a menu is available on the disc), press MENU
or TITLE button depending on the disc. Play is
suspended, and the Disc menu screen is displayed.
After operation
When the unit is not in use, remove the disc and
press STANDBY to turn off the unit.
¥ NOTE:
The disc continues to rotate while the menu is
displayed even after the player has finished playing
a particular item. When no further selections are to
be played, be sure to press the STOP (<) button to
clear the menu display.
If the disc is placed in upside down ( and it is a single
sided disc), the VFD display on the player will
indicate BAD DISC .
For your reference:
If an action corresponding to a button is prohibited,
the
´
symbol appears.
Stopping Play
Press stop (<) twice.
When play is stopped, the unit records the point
where STOP (<) was pressed once (RESUME
function). Press PLAY / PAUSE again, and play will
resume from this point. When the tray is opened or
the STOP (< ) is pressed again, the RESUME
function will be cleared.
To stop to play permanently, press STOP (<) twice.
When the STOP (<) button is pressed for the first
time, a message Press play to continue will appear
on the screen to remind you if you want to continue
to play. To stop to play press the STOP (<) button
again or you can press PLAY/ PAUSE to continue.
Fast Forward / Reverse
Press SEARCH/SLOW (7 Fast reverse or 8
Fast forward ) on the remote control or Search 7
or 8 on the main unit during playback.
Normal play is resumed when the PLAY/PAUSE
button is pressed.
The speed of forward or reverse changes for every
press of the FF or FR button.
/