Page is loading ...

READ AND SAVE THIS USE AND CARE BOOK
CONSERVER CE GUIDE D’ENTRETIEN ET D’UTILISATION
POR FAVOR LEA ESTE INSTRUCTIVO ANTES DE USAR EL PRODUCTO
MODEL NO. IM-712W
12” OSCILLATING TABLE FAN
VENTILATEUR DE TABLE AVEC OSCILLATION DE 12”
VENTILADOR DE MESA CON OSILACION DE 12”
®

SAFETY PRECAUTIONS
WARNING
POLARIZED PLUG
This appliance has a polarized plug (one blade is wider than the other.) As a safety feature,
this plug fits in a polarized outlet only one way. If the plug does not fit into the outlet,
reverse the plug and try again. If it still does not fit, contact a qualified electrician. Do not
attempt to defeat this safety feature.
ELECTRICAL CORD
The cord of this appliance was selected to reduce the possibility of tangling in or tripping
over a longer cord. If more length is needed, use an extension cord rated no less than 15
amperes. When using an extension cord, do not let it drape over the working area or dangle
where someone could accidentally trip over it. Handle cord carefully for longer life; avoid
jerking or straining it at outlet and appliance connections.
2 English
Be sure to shut off electric supply at main switch
or circuit breaker before installation. The impor-
tant safeguards and instructions on this manual
are not meant to cover all possible conditions
and situation that may occur. It must be under-
stood that common sense, caution and care are
factors which cannot be built into any product.
These factors must be supplied by the person(s)
caring for and operating the unit.
No responsibility will be accepted for any dam-
age which may occur during transport or by
improper installation or voltage fluctuation or
if any portion of the porduct has been altered or
modified.
• If the supply cord is damaged, it must be
replaced by the manufacturer or its service
agent or similar qualified person in order to
avoid a hazard.
• Never insert fingers, pencils or any other ob-
ject through the grille when the fan is running.
• Unplug the fan from the power socket when
moving it from one location to another.
• Unplug the fan from the power socket when
removing grilles for cleaning.
• Ensure the fan is standing on a stable surface
before operating.
• Do not place the fan close to an open window.
Rain splashing on the fan could cause an
electric shock hazard.
• Do not plug the AC cord into the wall outlet
until fan has been completely assembled.
• Never operate the fan with a cracked or dam-
aged fan blade.
• To reduce the risk of fire or electric shock, do
not use the fan with a solid state speed control
device.
• For indoor use only.
• This product employs overload protection
(fuse). A blown fuse indicates an overload
or short-circuit situation. If the fuse blows,
unplug the product from the outlet. Replace
the fuse (see How To Replace Fuse for
instructions) following the product markings
for proper fuse rating. Check the product. If
replacement fuse blows, a short-circuit may be
present and the product should be discarded or
returned to an authorized service facility for
examination and/or repair.
• Do not run cord under carpeting. Do not cover
cord with throw rugs, runners or similar cov-
erings. Do not route cord under furniture or
appliance. Arrange cord away from traffic area
and where it will not be tripped over.
• Never pull or yank on the cord or the appli-
ance.
• Do not replace attachement plug. This con-
tains safety device (fuse) that should not be
removed, Discard product if the attachment
plug is damaged.
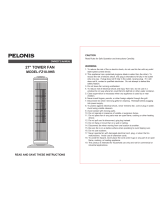
PARTS
English 3
MORE PRECAUTIONS
• Use the fan only for purposes described in the
instruction manual.
• Use power source of the fan according to
electric nameplate under the base.
• To protect against electrical hazards, do not
wet, damp, immerse in liquid, or place this fan
near liquids.
• Turn unit off and unplug when leaving for an
extended period of time.
• Always turn the fan off and unplug before
cleaning.
• Do not store the fan where it can fall into
water or any other liquid.
• Store the fan in a cool dry place.
SAVE THESE
INSTRUCTIONS
FOR HOUSEHOLD
USE ONLY
HOW TO REPLACE FUSE
1. Open fuse cover - slide open fuse access cover
on top of attachment plug towards blade.
2. Remove fuse carefully - turn fuse holder over
to remove fuse.
3. Insert new fuse.
4. Close fuse cover - slide close the fuse access
cover on top of attachment plug.
WARNING! Risk of fire. Replace with same
size and rated fuse.
1. Front Grill
2. Cap
3. Blade
4. Nut
5. Rear Grill
6. Bolt
7. Shaft
8. Motor Cover
9. Oscillating Button
10. Motor Housing
11. Fan Pitch Adjustment
12. Plug & Wire
13. Switch
14. Fan Base

4 English English 5
OPERATING
INSTRUCTIONS
CARE & CLEANING
This appliance requires little maintenance and
contains no user serviceable parts. Do not try
to fix it yourself. Refer it to qualified service
personnel if servicing is needed.
The fan is permanently lubricated and will not
require additional lubrication for the life of the
fan.
TO CLEAN: Before cleaning, turn fan off and
unplug from electrical outlet. Wipe off excess
dust with a lint-free cloth. To ensure adequate
air circulation to the motor, keep vents located
at the rear of the motor housing free from dust
accumulation. A vacuum cleaner hose can be
used to clean these vents. Do not immerse
fan in water or any other liquid. Disassemble
grilles and blade. Grilles and blade may be
cleaned with mild soap and water. Use a soft,
slightly damp cloth to wipe the remaining fan
parts. Do not allow water or any other liquid
to get into the motor housing or base. Reas-
semble fan after grilles and blade have dried
completely. Do not plug fan into electrical
outlet until it has been fully reassembled.
TO STORE: Make sure to disassemble and
clean the fan before storing. Retain the original
packaging for the purpose of storing the fan.
Always store fan in a dry place. Never store
it while it is still plugged in. Never wrap the
cord tightly around the fan, and do not put
any stress on the cord where it enters the fan
housing, as it could cause the cord to fray and
break.
ASSEMBLY
INSTRUCTIONS
1. Insert motor assembly onto base and snap
into place making sure the wire is not pro-
truding from top of base (some models may
already be attached. If so, please skip this
step)
2. Attach rear grill onto motor assembly and
secure with screw-on collar
3. Insert fan blade onto motor assembly shaft
(align grooves on fan blade with extensions
on post) and secure with screw-on knob.
Note: Knob tightens counter-clockwise.
4. Secure front grill onto rear grill with grill
connector ring (grooves on grill connector
ring should align on front and rear grills)
and snap into place. You can tighten or
loosen the front grill by turning the screw
on the connector ring.
1. Place fan on flat surface and plug into
outlet.
2. Adjust fan head up or down by loosening
and then tightening tilt adjustment knob.
3. By simply pulling or pressing the oscilla-
tion knob, your fan can either turn from
side to side or stay in a fixed position.
For oscillation (turning) mode, make sure
oscillation knob is in the lower position.
For stationary (fixed) operation, make sure
oscillation knob is in the upper position.
4. On the base, press either “1” (low speed) or
“2” (high speed) depending on your prefer-
ence. Pressing “0” will turn the fan off.
WARRANTY
Length of Warranty
1 year from date of purchase
Within 1 year from date of purchase,
1) Return product to place of purchase
(if your dealer allows)
OR
2) Send product postage pre-paid to:
I.E.A.C.
3030 East Vernon Avenue
Vernon, California, USA 90058
Please include original dated receipt,
explanation of defect and return name
and address as well as a contact phone
number.
We will, within 10 days of receiving
your product, return a new or refur-
bished (at our discretion) product at NO
ADDITIONAL CHARGE.
We will also return your receipt. If prod-
uct is found to be in working condition,
we will return product postage collect.
PACK YOUR PRODUCT WELL!
We will not be responsible for damages
incurred as a result of improper packing.
Or contact us via e-mail at
/