Anchoring Tub
P 847•244•1234 www.barclayproducts.com
04/17/2019
FREESTANDING TUB INSTALLATION INSTRUCTIONS
Tools Needed
• Screws or Liquid Nails • Wooden Blocks • Pencil •
Stabilize Tub to Prevent Sliding
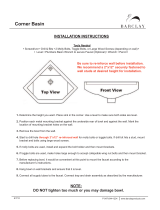
1. Place tub in intended position on floor.
2. Use pencil to trace around tub on floor.
3. Move tub to the side to allow work space.
4. Place wooden blocks on floor inside traced pattern of tub. Blocks can be secured to floor using
screws or liquid nails.
5. Put tub back into position over wooden blocks. Wooden blocks will not be visible and will
prevent tub from sliding across floor.
6 .Once the tub is position and secure, apply small bead of sealent around the base.
7. For ease installation: We recommend use of 5598-ITD (Easy Install Tub drain Rough In Kit).
This reccomendation is for Resin, Acrylic, and Copper tubs only.
Be sure to re-inforce the floor before securing tub. We recommend 2- 2”x12”‘s securely
fastened to floor beams where you plan to secure your tub.
Tools Needed
• Wrench or socket • Drill & Bits •
Anchor Tub to Floor
1. Place tub in intended position on floor.
2. Mark foot anchoring locations on floor with pencil.
3. Move tub to the side to allow work space.
4. Drill starter holes in floor.
5. Put tub back into position.
6. Place flat washers on lag bolts.
7. Put lag bolts through slot in bottom of foot and screw into floor using wrench or socket.
Be sure to re-inforce the floor before securing tub. We recommend 2- 2”x12” securely
fastened to floor beams where you plan to secure your tub.
Parts Recommended
• 2-2”x12” boards • 4 Lag Bolts • 4 Flat Washers
CLAW FOOT TUB INSTALLATION INSTRUCTIONS
Page 1