Page is loading ...

DuPont
™
Self-Adhered Flashing Systems Products
Installation of Integral Flanged Windows in
Recessed Openings Before Water-Resistive Barrier
(WRB) Is Installed
For up to 4" Recess Using Single and
Double Stud Window Framing
INSTALLATION GUIDELINE
FOR BUILDINGS LESS THAN 5 STORIES AND LOW-RISE MULTI-
FAMILY RESIDENTIAL BUILDINGS LESS THAN 6 STORIES


Copyright ©2016 E. I. du Pont de Nemours and Company. All Rights Reserved. K27349 Version 4/16 3
Installation of Integral Flanged Windows in Recessed Openings
Before Water-Resistive Barrier (WRB) Is Installed
DuPont™ Self-Adhered Flashing Systems Products – Installation
Guidelines for up to 4" Recess Using Single and Double Stud
Window Framing
This installation bulletin includes the steps required to fabricate and install a self-
adhered flashing solution for the inside corners of recessed integral flanged windows
using DuPont
™
FlexWrap
™
NF and provides instructions for flashing windows when they
are installed before the DuPont
™
Tyvek
®
WRB.
Table of Contents
Applicable Products .......................................................................................................... 3
Required Materials Based on Project Requirements, Details, and Specifications ............ 4
Warranty ........................................................................................................................... 4
General Instructions ........................................................................................................ 4
Key Installation Requirements for Drainable Window / Door Installation
Under the Limited Product and Labor Warranty ............................................................... 5
Field preparation of Recessed Window Corner using
DuPont
™
FlexWrap
™
NF ................................................................................................... 6
DuPont
™
Self-Adhered Flashing Systems Products – Installation Guidelines
for Up to 4" Recess Using Single and Double Stud Window Framing ............................. 9
Corner Release Paper Removal Guide for
ALTERNATIVE METHOD described on page 8 ............................................................... 17
Applicable Products
DuPont™ Self-Adhered Flashing Systems Products
PRODUCT WIDTH
DuPont
™
FlexWrap
™
NF 6 in
9 in
DuPont
™
StraightFlash
™
4 in
9 in
DuPont
™
Flashing Tape 4 in
6 in
9 in
12 in
Water-Resistive Barriers (WRB)
PRODUCT DIMENSIONS AREA
DuPont
™
Tyvek
®
HomeWrap
®
3 ft x 100 ft
3 ft x 165 ft
5 ft x 200 ft
9 ft x 100 ft
9 ft x 150 ft
10 ft x 100 ft
10 ft x 150 ft
300 sq ft
495 sq ft
1,000 sq ft
900 sq ft
1,350 sq ft
1,000 sq ft
1,500 sq ft
DuPont
™
Tyvek
®
StuccoWrap
®
5 ft x 200 ft 1,000 sq ft
DuPont
™
Tyvek
®
DrainWrap
™
9 ft x 125 ft
10 ft x 125 ft
1,125 sq ft
1,250 sq ft
DuPont
™
Tyvek
®
ThermaWrap
™
LE 5 ft x 150 ft
9 ft x 100 ft
750 sq ft
900 sq ft
DuPont
™
Tyvek
®
CommercialWrap
®
5 ft x 200 ft
10 ft x 125 ft
1,000 sq ft
1,250 sq ft
DuPont
™
Tyvek
®
CommercialWrap
®
D 5 ft x 200 ft
10 ft x 125 ft
1,000 sq ft
1,250 sq ft

Copyright ©2016 E. I. du Pont de Nemours and Company. All Rights Reserved. K27349 Version 4/16 4
Installation of Integral Flanged Windows in Recessed Openings
Before Water-Resistive Barrier (WRB) Is Installed
Required Materials Based on Project Requirements, Details,
and Specifications
PRODUCT
DuPont
™
Tyvek
®
Tape
DuPont
™
Tyvek
®
Wrap Cap Fasteners or recommended fastening system
DuPont
™
Window & Door Foam
DuPont
™
Residential Sealant, or other recommended sealant*
DuPont
™
Adhesive/Primer
Backer Rod
Brushes for Surface Preparation
J-Roller
Apply per manufacturers’ guidelines. For non DuPont products, DuPont assumes no liability in use of
recommended products; installers need to evaluate suitability of recommended products in their end-use
applications.
Warranty
Please refer to the DuPont Weatherization Products 10-Year Limited Warranty for
Buildings Less Than 5 Stories and Low-Rise Multi-Family Residential Buildings Less
Than 6 Stories.
NOTE: In order to make a claim under the DuPont Weatherization Products 10-Year
Limited Product and Labor Warranty, you must have met all of the terms and conditions
of the warranty, including use of the applicable DuPont Installation Guidelines. In the
event that a specific detail or installation technique is not covered in the DuPont
Installation Guidelines at the time you are building, then the Key Installation
Requirements outlined in this document must have been followed in order to make a
claim under the warranty. It is in the sole discretion of DuPont to determine if full
compliance with the Key Installation Requirements exists. Please contact DuPont or a
DuPont
™
Tyvek
®
Specialist if you have any questions regarding any DuPont Installation
Guideline.
General Instructions
These installation guidelines are intended for buildings less than 5 Stories and
low-rise multi-family residential buildings less than 6 stories when performance
requirements do not exceed ASTM E1677 (65 mph equivalent structural load and 15
mph equivalent wind-driven rain water infiltration), and window/door design ratings that
do not exceed DP45.
DuPont
™
self-adhered flashing systems products should be installed on clean, dry
surfaces that are free of frost. Wipe surfaces to remove moisture, dirt, grease and other
debris that could interfere with adhesion.
Apply pressure along entire surface of flashing for a good bond using firm hand pressure,
J-roller, or alternate tool without sharp edges (such as a plastic carpet tuck tool) to assist
with application of uniform pressure during installation of DuPont™ self-adhered flashing
systems products.
Remove all wrinkles and bubbles that may allow for water intrusion by smoothing
surface and repositioning as necessary.
When flashing the sill area for windows and doors, DuPont recommends the use of 6”
wide DuPont
™
FlexWrap
™
NF for 2”x 4” framing and 9” wide DuPont
™
FlexWrap
™
NF
for 2” x 6” framing. As an option, if a rigid back dam is desired, cut the corner back dam
the length of the sill and nail into place on the interior edge of the sill prior to installation
of DuPont
™
FlexWrap
™
NF. Then install DuPont
™
FlexWrap
™
NF over sill and corner
guard back dam. If using 6” DuPont
™
FlexWrap
™
NF with optional rigid back dam, seal
ends of corner guard with DuPont
™
Residential Sealant or recommended sealant.
Door and window rough sill framing must be level or slightly sloped to the exterior to
ensure proper drainage to the exterior. This best practice ensures continuous support
with positive slope to the exterior.
DuPont
™
self-adhered flashing systems products are not intended for through-
wall flashing applications.
DuPont
™
Residential Sealant should be tooled flat to allow the natural curing process to
create a concave joint.
Please contact your local DuPont
™
Tyvek
®
Specialist for additional information and
installation support.

Copyright ©2016 E. I. du Pont de Nemours and Company. All Rights Reserved. K27349 Version 4/16 5
Installation of Integral Flanged Windows in Recessed Openings
Before Water-Resistive Barrier (WRB) Is Installed
DO NOT STRETCH DuPont
™
FlexWrap
™
NF when installing along the length of sills or
jambs. DuPont
™
FlexWrap
™
NF is only intended to be extended when covering corners
or curved sections.
DuPont
™
self-adhered flashing systems products perform best when installed at
temperatures above 25°F (–4°C).
Avoid placing DuPont
™
Tyvek
®
Wrap Cap Fasteners where flashing or DuPont
™
Tyvek
®
Tape will be installed; however, DuPont
™
Tyvek
®
Wrap Cap Fasteners can be applied
over the flashing.
Adverse weather conditions or cold temperatures may require use of a primer to
promote adhesion of DuPont
™
self-adhered flashing products to most common building
materials. Concrete, masonry, and fiber-faced exterior gypsum board require the use of
DuPont
™
Adhesive/Primer.
Please call 1-800-44-Tyvek (800-448-9835), visit www.weatherization.tyvek.com, or
consult your local DuPont
™
Tyvek
®
Specialist for additional information and installation
support.
Key Installation Requirements for Drainable Window / Door
Installation Under the Limited Product and Labor Warranty
When flashing windows or doors, the following principles must be followed:
• When installed properly, DuPont
™
StraightFlash
™
, DuPont
™
FlexWrap
™
NF, and
DuPont
™
Flashing Tape provide nail sealability at window/door openings to help
protect critical window-wall interfaces. Metal sill pan flashing may be used, but must
not replace flexible sill flashing that provides nail sealability.
• DuPont
™
self-adhered flashing systems products comply with AAMA 711-13,
Voluntary Specification for Self Adhering Flashing Used for Installation of Exterior
Wall Fenestration Products, which has a modified version of ASTM D 1970 that is
more representative for vertical wall applications.
• Direct water onto an acceptable air and water barrier drainage plane with an
unobstructed path to the exterior of the wall. Provide a drainage path for any water
intrusion through the window/door attachment system that collects at the sill.
• Properly integrate flashing with acceptable DuPont
™
Tyvek
®
WRB in accordance with
the details in this installation guideline. DuPont
™
self-adhered flashing systems
products must be applied with a minimum 2” lap onto the WRB.
• DuPont requires that DuPont
™
FlexWrap
™
NF and StraightFlash
™
be covered within
nine months (270 days) of installation. DuPont requires that DuPont
™
Flashing Tape
be covered within four months (120 days) of installation.
• Ensure that window / door and flashing system design takes into account common
factors that will impact performance, such as:
– Climate considerations: Rainfall, Wind, Temperature (hot / cold cycles), Humidity
– Building design: Window / Wall Design (overhangs, recessed openings, bump-
outs), Wall Assembly (wood frame or masonry), Window System (wood or vinyl),
New Construction or Replacement Window drainage path
– UV exposure prior to the construction of the exterior facade
• Field testing the window / door and wall installation as a complete system is a
recommended best practice.
• Use of trained installers is highly recommended.

Copyright ©2016 E. I. du Pont de Nemours and Company. All Rights Reserved. K27349 Version 4/16 6
Installation of Integral Flanged Windows in Recessed Openings
Before Water-Resistive Barrier (WRB) Is Installed
Field Preparation of Recessed Window Corner Using
DuPont
™
FlexWrap
™
NF
The method illustrated in this bulletin uses 6" wide DuPont
™
FlexWrap
™
NF to fabricate
a Recessed Window Corner for a recess that is up to 2" deep with double stud framing.
The same method can be used for recesses greater than 2", and up to 4" deep, which
requires the use of 9" DuPont
™
FlexWrap
™
NF. This installation guideline also applies to
single stud framing which is limited to the use of 6" FlexWrap
™
NF for fabrication of
Recessed Window Corners. See summary of FlexWrap
™
NF dimensions below and
pictures to right for additional guidance.
6”
2”
9”
3”
1”
Perforation in Release Paper
Line of Release Paper
Line of Release Paper
1’
1’
6" FlexWrap
™
NF 9" FlexWrap
™
NF
(for up to 2" recess, single and double stud framing) (for over 2" recess, double stud framing)
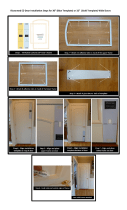
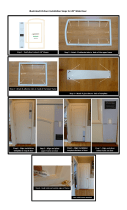
The following photos show the fabricated Recessed Window Corners for a recess that
is up to 2" deep with double stud window framing using 6" DuPont
™
FlexWrap
™
NF (left)
and a recess that is 4" deep with double stud window framing using 9"" DuPont
™
FlexWrap
™
NF (right).
The pictures below show the 6" FlexWrap
™
NF Recessed Window Corner installed on a
single stud window. Note that the FlexWrap
™
NF Recessed Window Corner extending
slightly beyond the face of the stud (left) can be fully adhered into framing (right). See
Step B-3 for additional information.

Copyright ©2016 E. I. du Pont de Nemours and Company. All Rights Reserved. K27349 Version 4/16 7
Installation of Integral Flanged Windows in Recessed Openings
Before Water-Resistive Barrier (WRB) Is Installed
FABRICATE FOUR RECESSED WINDOW CORNERS
A-1. Cut Four 12" Pieces of 6" DuPont
™
FlexWrap
™
NF
A-2. Create Horizontal CREASE A. Fold FlexWrap
™
NF at release paper to break
perforations and create crease.
NOTE: The narrow release paper will be used to guide corner fold in Step A-5.
A-3. Create Vertical CREASE B. Fold FlexWrap
™
NF in half, lengthwise, and create
sharp crease at the fold.
A-4. Set Corner Fold Width. Place index finger on the top side of the FlexWrap
™
NF at
the intersection of CREASE A and CREASE B.
NOTE: This will put pressure on the opposite side of release paper at the crease, and
set the corner fold width.
A-5. Create Corner Fold. On the reverse side of the FlexWrap
™
NF, starting at the
intersection of CREASE A and CREASE B, fold along CREASE B going out towards
edge of narrow release paper.

Copyright ©2016 E. I. du Pont de Nemours and Company. All Rights Reserved. K27349 Version 4/16 8
Installation of Integral Flanged Windows in Recessed Openings
Before Water-Resistive Barrier (WRB) Is Installed
A-6. Crease Center Fold. Press firmly to create sharp crease in center and edges of
fold. Sharp creases are necessary so the folds remain in the top sheet of the
FlexWrap
™
NF after release paper is removed.
NOTE: Center crease should be sharp enough to assist in creating a ~90° fold between
the two release papers at a right angle with vertical crease (Crease B), as shown below:
A-7. Form Recessed Window Corner. Remove narrow-width release paper and, using
the creases made in Step A-6, carefully press together the exposed butyl within
the corner fold to create Recessed Window Corner. Repeat with the 3 remaining
12" pieces of FlexWrap™ NF.
ALTERNATIVE METHOD: Use the guide on page 17 of this document to create a
reusable template using a piece of hard/rigid plastic. Once created, the template can be
used to aid in removal of the release paper from the corner section only as indicated
below. The template will be placed over the 12” piece of DuPont
™
FlexWrap
™
NF
(release paper facing up) and aligned according to the applicable marks on the template.
The release paper can then be torn along the edge of the template to expose the butyl.
Alternatively, the template can be used to mark the release paper for removal. In this
case a straight edge can be used to assist in tearing the release paper. Do not cut the
release paper with a knife or other sharp object as this could result in damage to the
butyl and compromise protection provided by the DuPont™ FlexWrap™ NF Recessed
Window Corners.
Once the release paper is removed to create a triangular area of expose butyl, fold the
DuPont
™
FlexWrap
™
NF according to Step A-6 above to create the 90° corner and press
exposed butyl together. Once the remaining narrow release paper is removed, the
Recessed Window Corner is ready to install.
6”
6”
2”
2”
3”
3”
6" FlexWrap
™
NF 9" FlexWrap
™
NF
(for up to 2" recess) (for over 2" recess)

Copyright ©2016 E. I. du Pont de Nemours and Company. All Rights Reserved. K27349 Version 4/16 9
Installation of Integral Flanged Windows in Recessed Openings
Before Water-Resistive Barrier (WRB) Is Installed
DuPont
™
Self-Adhered Flashing Systems Products – Installation
Guidelines for Up to 4" Recess Using Single and Double Stud
Window Framing
B-1 Install DuPont
™
Tyvek
®
WRB Frame Around Window Rough Opening
Installation of DuPont
™
Tyvek
®
WRB frame prior to window installation is necessary for
proper shingling and integration with the DuPont
™
Tyvek
®
WRB which will be installed
after the window (see Step B-12).
A. Cut a piece of DuPont
™
Tyvek
®
WRB that is 24” wider and 24” taller than the
window rough opening to allow a 12" width around all sides.
B. Center the piece of DuPont
™
Tyvek
®
WRB over the rough opening and fasten along
the sides and across the top using DuPont
™
Tyvek
®
Wrap Caps or recommended
fastening system. Fasteners should not be installed within 10" of the edge of the
rough opening, and no fasteners should be installed within 8" of the bottom edge
of the DuPont
™
Tyvek
®
WRB.
C. Cut an opening using an “O” cut at the perimeter of the rough opening along the
dashed indicated lines to create a DuPont
™
Tyvek
®
WRB frame around the
window. (Ensure that the DuPont
™
Tyvek
®
WRB frame is cut flush with the
sheathing and is not wrapped into the rough opening).
12”
Rough Opening
A
10”min.
10”min.
8”min.
10”min.
No Fasteners
in This Area
B
C

Copyright ©2016 E. I. du Pont de Nemours and Company. All Rights Reserved. K27349 Version 4/16 10
Installation of Integral Flanged Windows in Recessed Openings
Before Water-Resistive Barrier (WRB) Is Installed
B-2 Prepare DuPont
™
Tyvek
®
WRB Frame for Window Installation
A. Cut two 45 degree slits extending a minimum of 8" up and away from the top
corners of the rough opening. This will create a flap to expose sheathing or
framing members to allow head flashing installation.
B. Flip the head flap up to expose the sheathing and temporarily secure with DuPont
™
Tyvek
®
Tape.
C. Temporarily secure the DuPont
™
Tyvek
®
WRB frame with DuPont
™
Tyvek
®
Tape
around rough opening before flashing is installed to help facilitate flashing
installation.
NOTE: In lieu of temporarily taping, the DuPont
™
Tyvek
®
flap at the window head can be
tucked under the DuPont
™
Tyvek
®
WRB frame.
8”
A
B
C
B-3 Install DuPont
™
FlexWrap
™
NF Recessed Window Corner at Sill
A. Place FlexWrap
™
NF Recessed Window Corner into corner of recess so exposed
butyl is against face of recessed window frame and adhere.
NOTE: For double stud window frames, the FlexWrap
™
NF Recessed Window Corner
should extend a minimum of 2" onto the face of the recessed window frame and cover
the seams between the studs. For single stud window frames, the FlexWrap
™
NF
Recessed Window Corner extending slightly beyond the face of the stud can be fully
adhered into framing.
B. Remove remaining release paper.
C. Adhere exposed butyl to sill and jamb surfaces of recess.
D. Fan FlexWrap
™
NF at bottom corners onto DuPont
™
Tyvek
®
WRB frame on face of
wall. Coverage of FlexWrap
™
NF should be 2" to 3" onto the face of the wall.
E. Place a bead of DuPont
™
Residential Sealant or recommended sealant behind the
loose triangular flap within the FlexWrap™ NF Recessed Window Corner.
F. Press down the loose triangular flap onto the sealant.
A
D
E
F

Copyright ©2016 E. I. du Pont de Nemours and Company. All Rights Reserved. K27349 Version 4/16 11
Installation of Integral Flanged Windows in Recessed Openings
Before Water-Resistive Barrier (WRB) Is Installed
B-4 Install DuPont
™
Flashing Tape at Sill
A. Cut the DuPont
™
Flashing Tape the length of the outer sill (S). Refer to Table 1
below to determine which width of DuPont™ Flashing Tape to use.
B. Fold the DuPont
™
Flashing Tape lengthwise using the measurements (X, Y and Z)
shown in Table 1, creating sharp creases to help achieve sharp corners when
release paper is removed.
C. Remove the center piece of release paper by carefully tearing along the creases.
Do not cut release paper with sharp object as this could result in damage to butyl
and compromise protection provided by the DuPont
™
Flashing Tape.
D. Adhere exposed butyl to sill.
E. Unfold unadhered flashing, remove remaining pieces of release paper and adhere
butyl adhesive onto the face of the recessed window frame and onto the DuPont
™
Tyvek
®
WRB.
S
X
X
Y
Y
Z
Z
A
E
E
Table 1: Sill/Head Flashing for Shallow Recessed Flanged Window Condition
X Y Z
6" DuPont
™
Flashing Tape (single stud) 2" 1" 3"
6" DuPont
™
Flashing Tape (single stud) 2" 2" 2"
6" DuPont
™
Flashing Tape (double stud) 2" 2" 2"
9" DuPont
™
Flashing Tape (double stud) 3" 3" 3"
9" DuPont
™
Flashing Tape (double stud) 3" 4" 2"
B-5 Install DuPont
™
FlexWrap
™
NF in Rough Opening at Sill
A. Cut FlexWrap
™
NF at least 12" LONGER than width of inner/recessed sill (S
1
).
NOTE: Use 6” wide DuPont™ FlexWrap
™
NF for 2”x 4” framing and 9” wide DuPont
™
FlexWrap
™
NF for 2” x 6” framing.
B. Remove wide piece of release paper. Cover horizontal sill by aligning inside edge
of sill, and adhere into rough opening along sill and up jambs (min. 6" on each side).
C. Remove narrow release paper.
D. Fan out FlexWrap
™
NF at bottom corners onto face of recessed window framing.
Coverage of FlexWrap
™
NF should be a minimum of 2" onto the face of the
recessed window frame, extending beyond into the recess if necessary.
FRONT VIEW CORNER DETAIL
No Gap in Corner
WRONG CORRECT
Window Jamb
DuPont
™
FlexWrap
™
NF
Sill
S
1
6” Minimum

Copyright ©2016 E. I. du Pont de Nemours and Company. All Rights Reserved. K27349 Version 4/16 12
Installation of Integral Flanged Windows in Recessed Openings
Before Water-Resistive Barrier (WRB) Is Installed
B-6 Install Window
A. Apply DuPont
™
Residential Sealant or recommended sealant on the face of the
inner recess framing at jambs and head as shown below. If sealant is applied to
the sill, ensure that there are at least two (2) 2" gaps in the sealant bead for every
4‘ of window to allow for drainage.
B. Install window per window manufacturer’s instructions.
A
B

Copyright ©2016 E. I. du Pont de Nemours and Company. All Rights Reserved. K27349 Version 4/16 13
Installation of Integral Flanged Windows in Recessed Openings
Before Water-Resistive Barrier (WRB) Is Installed
B-7 Install DuPont
™
Flashing Tape at Jambs
A. Cut a piece of DuPont
™
Flashing Tape that is 2" LONGER than the length of the
outer jamb (J).
B. Fold the DuPont
™
Flashing Tape lengthwise using the measurements (X, Y and Z)
shown in Table 2 below, creating sharp creases to help achieve sharp corners
when release paper is removed.
D. Remove the first piece of release paper to expose the butyl that will be installed
onto the window flange by tearing along the crease. Leave the release paper on
the 2" flap created in Step C. Do not cut release paper with sharp object as this
could result in damage to butyl and compromise protection provided by the
DuPont
™
Flashing Tape.
E. Starting at top of window, adhere exposed butyl adhesive onto window flange.
F. Remove the release paper from the corner flap in the DuPont
™
Flashing Tape,
created in Step C, and adhere the flap to the sill.
NOTE: Keeping the remaining release papers intact will make the flashing more rigid to
help maneuver the flashing into the corners.
G. Once the butyl is adhered to the window flange and sill, remove the center release
paper – leaving the release paper on the 2" flap created in Step C. The flashing
can now be adhered to the inside edge of the rough opening.
H. Remove the release paper from the
second corner flap and adhere over
the first flap.
I. Remove the remaining release paper
and adhere the DuPont
™
Flashing
Tape onto the face of the wall and
onto the DuPont
™
Tyvek
®
WRB.
J. Apply DuPont™ Residential Sealant,
or recommended sealant, to the
interfaces as shown at right.
K. Repeat Steps A-J for opposite jamb.
E
F
H
I
J
G
J
BB
C
A
C. Starting at the bottom, cut a 2"
vertical slit in the DuPont
™
Flashing
Tape along each crease. This will be
used to create the DuPont
™
Flashing
Tape corner that is created in Steps
F and G shown below.
NOTE: Cut the first crease from the left
edge of the DuPont
™
Flashing Tape when
preparing to apply to the right-hand jamb
or the first crease from the right when
preparing for the left-hand jamb.
Table 2: Jamb Flashing for Shallow Recessed Flanged Window Condition
X Y Z
6" DuPont
™
Flashing Tape (single stud) 2" 1" 3"
6" DuPont
™
Flashing Tape (single stud) 2" 2" 2"
6" DuPont
™
Flashing Tape (double stud) 2" 2" 2"
9" DuPont
™
Flashing Tape (double stud) 3" 3" 3"
9" DuPont
™
Flashing Tape (double stud) 3" 4" 2"

Copyright ©2016 E. I. du Pont de Nemours and Company. All Rights Reserved. K27349 Version 4/16 14
Installation of Integral Flanged Windows in Recessed Openings
Before Water-Resistive Barrier (WRB) Is Installed
B-8 Install DuPont
™
Flashing Tape at Head
A. Cut a piece of DuPont
™
Flashing Tape the length of the head rough opening "H".
B. Fold the DuPont™ Flashing Tape lengthwise using the measurements (X, Y and Z)
determined in Step B-4, creating sharp creases to help achieve sharp corners
when release paper is removed.
C. Remove the center release paper. The center piece of the release paper can be
carefully removed by tearing along the creases, but do not cut release paper with
sharp object as this could result in damage to butyl and compromise protection
provided by the DuPont
™
Flashing Tape.
D. Adhere exposed butyl to recessed surface above window.
E. Remove the outer pieces of release paper.
F. Adhere exposed butyl over window head flange.
G. Adhere last section of exposed butyl onto exterior sheathing.
H
A. Install DuPont
™
FlexWrap
™
NF
Recessed Window Corners into the
upper corner of the window rough
opening with exposed butyl adhered
onto the window flanges in a similar
manner used for lower corner pieces
(See B-3).
B. Remove remaining release paper.
C. Adhere exposed butyl to head and
jamb surfaces of recess.
D. Fan DuPont
™
FlexWrap
™
NF
Recessed Window Corners at upper
corners onto face of wall. Coverage
of DuPont
™
FlexWrap
™
NF Recessed
Window Corners should be 2" to 3"
onto the face of the wall.
E. Place a bead of DuPont
™
Residential
Sealant or recommended sealant
inside the corner flap behind the
loose triangular flap of the corner
piece.
F. Press the loose triangular flap onto
the sealant in the corner piece.
G. Repeat Steps A-F for opposite
corner.
A
D
E
F
B-9 Install DuPont
™
FlexWrap
™
NF Recessed Window Corners at Head

Copyright ©2016 E. I. du Pont de Nemours and Company. All Rights Reserved. K27349 Version 4/16 15
Installation of Integral Flanged Windows in Recessed Openings
Before Water-Resistive Barrier (WRB) Is Installed
B-10 Secure Upper Flap
A. Flip down upper flap of DuPont
™
Tyvek
®
WRB so it lays flat across head flashing.
B. Cut ~1" strip of the DuPont
™
Tyvek
®
WRB at lower horizontal edge of head flap.
C. Continuous tape seams as shown with DuPont
™
Flashing Tape. Skip-taping at head
is acceptable if an air barrier is not required or if additional drainage is desired.
D. Install mechanical fasteners through the flashing at the head flap.
A
D
C
B-11 Seal Interior Opening
Install DuPont
™
Residential Sealant or recommended sealant (and backer rod as
necessary) around the window opening at the interior. It is also acceptable to use
DuPont
™
Window & Door Foam or recommended foam at the interior cavity of the
jambs and head. If foam is used at the sill, recommended sealant should be used at the
sill area behind the foam to ensure a proper water seal. The seal created by the sealant
(and backer rod as necessary) will also serve as a back dam. DuPont
™
Residential
Sealant should be tooled flat to allow the natural curing process to create a concave
shape. Be sure that the sealant penetrates the grooves of the DuPont
™
FlexWrap
™
N F.
Interior

Copyright ©2016 E. I. du Pont de Nemours and Company. All Rights Reserved. K27349 Version 4/16 16
Installation of Integral Flanged Windows in Recessed Openings
Before Water-Resistive Barrier (WRB) Is Installed
A
Rough Opening
Area
No Fasteners Area
No Fasteners Area
12”
8”
8”
8”
Rough Opening
Area
6”
6”
6”
6”
B
C
D
D
E
F
Tyvek
Flashing Tape
Tyvek
Flashing Tape
Tyvek
Flashing Tape
Tyvek
Flashing Tape
Tyvek
Flashing Tape
Tyvek
Flashing Tape
Tyvek
Flashing
B-12 Install and Integrate DuPont
™
Tyvek
®
WRB
A. Install the DuPont
™
Tyvek
®
WRB according to the DuPont
™
Tyvek
®
Air- and
Water-Resistive Barrier Installation Guidelines. Do not install fasteners within
8" of the rough opening along jambs and head and within 12" along the sill.
B. Mark a perimeter box 6" away from the rough opening sill, jambs and head.
C. Cut the DuPont
™
Tyvek
®
WRB along perimeter marking to expose window
and DuPont
™
Tyvek
®
WRB frame below. Do not cut DuPont
™
Tyvek
®
WRB
frame underneath.
D. Create 6" horizontal slits in the DuPont
™
Tyvek
®
WRB at each lower corner of
the perimeter cut.
E. Bring the bottom portion of the DuPont
™
Tyvek
®
WRB frame through the
slits so it laps over the top layer of DuPont
™
Tyvek
®
WRB.
F. Tape seams at bottom, sides, and top of rough opening using DuPont
™
Tyvek
®
Tape.

2”
2”
3”
5”
6”
2”
3”
Align bottom edge of 6"
DuPont
™
FlexWrap
™
NF here
Align bottom edge of 6"
DuPont
™
FlexWrap
™
NF here
Copyright ©2016 E. I. du Pont de Nemours and Company. All Rights Reserved. K27349 Version 4/16 17
Installation of Integral Flanged Windows in Recessed Openings
Before Water-Resistive Barrier (WRB) Is Installed
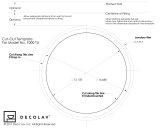
Corner Release Paper Removal Guide for ALTERNATIVE
METHOD described on page 8
Use the following guide to create a template to aid in removal of the release paper
from the corner section only. This will assist in creating the 90° fold between the
two release papers.
Align the bottom edge of 6" DuPont
™
FlexWrap
™
NF with the the 2" marks (for up to 2"
recess). Align the bottom edge of 9" FlexWrap
™
NF with the lower edge of the template
(for recesses greater than 2").
For best results, create a reusable template using a piece of heavy/rigid plastic. The
template can also be used as a guide when tearing the release paper. Otherwise, use
the template to mark the release paper and then use a metal straight edge to assist in
tearing the release paper. Do not cut the release paper with a knife or other sharp
object as this could result in damage to the butyl and compromise protection provided
by the FlexWrap
™
NF Recessed Window Corners.

Copyright ©2016 E. I. du Pont de Nemours and Company. All Rights Reserved. K27349 Version 4/16 18
Installation of Integral Flanged Windows in Recessed Openings
Before Water-Resistive Barrier (WRB) Is Installed
Technical Specifications
DuPont
™
Tyvek
®
WRBs used in construction products are made from 100% flash spunbonded
high density polyethylene fibers which have been bonded together by heat and pressure,
without binders or fillers, into a tough durable sheet structure. Additives have been incorporated
into the polyethylene to provide ultraviolet light resistance. DuPont requires that DuPont
™
Tyvek
®
CommercialWrap
®
and CommercialWrap
®
D be covered within nine months (270 days) of
installation and that all other DuPont
™
Tyvek
®
WRB’s be covered within 4 months (120 days) of
installation.
DuPont
™
self-adhered flashing products are made from a synthetic rubber adhesive and a laminate of
polyethylene film, polypropelene film, elastic fiber, synthetic rubber adhesive, polyurethane adhesive,
and a top sheet of flash spunbonded high density polyethylene fibers or polypropelene film. Additives
have been incorporated into these materials to provide ultraviolet light resistance. DuPont requires
that DuPont
™
FlexWrap
™
NF, and StraightFlash
™
be covered within nine months (270 days) of
installation. DuPont requires that DuPont™ Flashing Tape be covered within four months (120 days)
of installation.
Warning
DuPont
™
Tyvek
®
WRBs are slippery and should not be used in any application where they
will be walked on. In addition, because they are slippery, DuPont recommends using
kickjacks, scaffolding, or lifts for exterior work above the first floor. If ladders must be used,
extra caution must be taken to use them safely by following the requirements set forth in
ANSI Standards 14.1, 14.2, and 14.5 for ladders made of wood, aluminum, and fiberglass,
respectively. DuPont
™
Tyvek
®
products are combustible and should be protected from
flames and other high heat sources. DuPont
™
Tyvek
®
products will melt at 275°F (135°C) and
if the temperature of DuPont
™
Tyvek
®
reaches 750°F (400°C), it will burn and the fire may
spread and fall away from the point of ignition. For more information, call 1-800-44-Tyvek.
DuPont
™
self-adhered flashing products and their release paper are slippery and should not
be walked on. Remove release paper from work area immediately. DuPont
™
self-adhered
flashing products will melt at temperatures greater than 250°F (121°C). DuPont
™
self-
adhered flashing products are combustible and should be protected from flames and other
high heat sources. DuPont
™
self-adhered flashing products will not support combustion if
the heat source is removed. However, if burning occurs, ignited droplets may fall away from
the point of ignition. For more information, call 1-800-44-Tyvek.
DuPont
™
Residential Sealant is irritating to skin, eyes, and respiratory tract. For proper
usage, follow directions stated on the product label. For health information, refer to the
Material Safety Data Sheet or call Chemtrec at 1-800-424-9300.
Note
When installed in conjunction with other building materials, DuPont
™
self-adhered flashing products
must be properly shingled with these materials such that water is diverted to the exterior of the
wall system. DuPont
™
Tyvek
®
products are air and water barriers and not the primary water barrier.
The outer facade is the primary barrier. You must follow facade manufacturer’s installation and
maintenance requirements for all facade systems in order to maintain water holdout properties and
ensure performance of DuPont
™
Tyvek
®
WRBs. Use of additives, coatings or cleansers on or in the
facade system may impact the performance of DuPont
™
Tyvek
®
WRBs. DuPont
™
Tyvek
®
Weatherization Systems products are to be used as outlined in this installation guideline. DuPont
™
self-adhered flashing products should only be used to seal penetrations and flash openings in
houses or buildings. DuPont
™
self-adhered flashing products are not to be used in roofing
applications. For superior protection against bulk water penetration, DuPont suggests a system
combining a quality exterior facade, a good secondary air and water barrier and exterior sheathing,
high quality windows and doors, and appropriate flashing materials paying attention to proper
installation of each component. In a system where no exterior sheathing is used and DuPont
™
Tyvek
®
WRBs are installed directly over the wall studs, exterior facade materials should be
selected to ensure maximum protection against water intrusion. Careful workmanship and proper
installation of each component is very important.
DuPont believes this information to be reliable and accurate. The information may be subject to
revision as additional experience and knowledge is gained. It is the user’s responsibility to determine
the proper construction materials needed.
For complete warranty information please visit www.weatherization.tyvek.com or call
1-800-44-Tyvek.
This information is not intended to be used by others for advertising, promotion, or other
publication for commercial purposes.


For more information about DuPont Weatherization
Systems, please call 1-800-44-Tyvek or visit us at
www.weatherization.tyvek.com
Copyright © 2016 E. I. du Pont de Nemours and Company. The DuPont Oval Logo, DuPont
™
, Tyvek
®
, CommercialWrap
®
, FlexWrap
™
NF, and StraightFlash
™
are registered trademarks or trademarks of DuPont or its affiliates. All rights reserved.
K-27349 4/16
/