
www.dell.com | support.dell.com
Dell™ PowerVault™ ML6000
Getting Started Guide (English)
Panduan Pengaktifan (Bahasa Indonesia)
スタートガイド (Japanese)
시작하기 설명서 (Korean)
入门指南 (Simplified Chinese)
*MK444 A06*
MK444 A06
APCC.book Page 1 Wednesday, September 9, 2015 12:00 PM

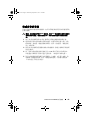
Notes, Cautions, and Warnings
NOTE: A NOTE indicates important information that helps you make better use of
your computer.
CAUTION: A CAUTION indicates potential damage to hardware or loss of
data if instructions are not followed.
WARNING: A WARNING indicates a potential for property damage, personal
injury, or death.
Catatan, Perhatian, dan Peringatan
CATATAN: CATATAN menunjukkan informasi penting yang dapat membantu Anda
menggunakan komputer dengan lebih baik.
PERHATIAN: PERHATIAN menunjukkan potensi kerusakan atau hilangnya data
jika instruksi tidak diikuti.
PERINGATAN: PERINGATAN menunjukkan potensi rusaknya properti, cedera diri
atau kematian.
メモ、注意、警告
注:「メモ」は、コンピュータをより良く使用できるようにする重要な情
報を示します。
注意:「注意」は、指示を守らないとハードウェアの損傷やデータの損失
を招きかねないような状況を示します。.
警告:「警告」は、物的損害や人身事故、あるいは死亡事故が起きる可能
性を示します。
주 , 주의 및 경고
주 : " 주 " 는 컴퓨터를 보다 효율적으로 사용할 수 있는 중요한 정보를 제공합
니다 .
주의 : " 주의 " 는 지침을 따르지 않을 경우 발생할 수 있는 잠재적 하드웨어 손
상 또는 데이터 유실을 나타냅니다 .
경고 : " 경고 " 는 재산상의 피해나 부상 또는 사망의 위험성이 있음을 나타냅
니다 .
APCC.book Page 2 Wednesday, September 9, 2015 12:00 PM

注、注意和警告
注:“ 注 ” 表示可以帮助您更好地使用计算机的重要信息。
注意:“ 注意 ” 表示如果不遵循说明,就有可能损坏硬件或导致数据丢失。
警告:“ 警告 ” 表示可能会造成财产损失、人身伤害甚至死亡。
____________________
Information in this document is subject to change without notice.
©Copyright © 2015 Dell Inc. All rights reserved.
This product is protected by U.S. and international copyright and intellectual property laws. Dell™
and the Dell logo are trademarks of Dell Inc. in the United States and/or other jurisdictions. All other
marks and names mentioned herein may be trademarks of their respective companies.
2015 - 08
Informasi dalam dokumen ini dapat berubah tanpa pemberitahuan.
© 2015 Dell Inc. Semua hak dilindungi undang-undang.
Produk ini dilindungi oleh undang-undang hak cipta dan kekayaan intelektual A.S. dan internasional.
Dell™ dan logo Dell adalah merek dagang Dell Inc. di Amerika Serikat dan/atau yurisdiksi lain.
Semua merek dan nama lain yang disebutkan di sini mungkin merupakan merek dagang perusahaannya
masing-masing.
2015 - 08
このマニュアルの情報は、予告なしに変更されることがあります。
© 2015 すべての著作権は Dell Inc. にあります。
この製品は米国の著作権法、国際著作権法、知的財産法によって保護されています。
Dell™ および Dell のロゴは、米国および / またはその他の法域における Dell Inc. の商標で
す。ここに掲載されているその他のマークや名称はすべて各社の商標です。
2015 - 08
이 문서의 정보는 공지없이 변경될 수 있습니다 .
© 2015 Dell Inc. All rights reserved.
이 제품은 미국과 해외의 저작권과 지적재산권법에 의해 보호받고 있습니다 . Dell ™ 과 Dell
로고는 미국 그리고 / 또는 다른 사법권에서 Dell Inc. 의 상표입니다 . 여기에서 언급되는 그 외
모든 상표와 이름은 그들 각자 회사의 상표일 수
있습니다 .
2015 - 08
本说明文件中的信息如有更改,恕不另行通知。
© 2015 Dell Inc. 版权所有,翻印必究。
此产品受美国及国际版权和知识产权法律保护。Dell™ 和 Dell 徽标为 Dell Inc. 在美国和 / 或
其他司法管辖区的商标。此处提及的所有其他标识和名称可能为其对应公司的商标。
2015 - 08
August 2015 P/N MK444 Rev. A06
APCC.book Page 3 Wednesday, September 9, 2015 12:00 PM

APCC.book Page 4 Wednesday, September 9, 2015 12:00 PM

Contents
1 Dell PowerVault ML6000
Getting Started Guide (English) . . . . . . . . 9
Installing Your Library in a Rack . . . . . . . . . . . . 10
Installing a 14U Library in a Rack
. . . . . . . . . . . . 10
Special Instructions for LTO-5 and Later Tape Drives
. 12
Connecting Fibre Channel Cables to a Host or Switch
. 14
Connecting Fibre Channel Cables Through a
Fibre Channel I/O Blade
. . . . . . . . . . . . . . . . . 15
Connecting Serial Attached SCSI (SAS) Cables
. . . . 16
Finishing Cabling the Library
. . . . . . . . . . . . . . 18
Powering On the Library
. . . . . . . . . . . . . . . . . 19
Getting Started
. . . . . . . . . . . . . . . . . . . . . . 20
2 Panduan Pengaktifan Dell PowerVault
ML6000 (Bahasa Indonesia) . . . . . . . . . . 21
Memasang Perpustakaan di Rak . . . . . . . . . . . . 22
Memasang Kepustakaan Data 14U di Rak
. . . . . . . 22
Petunjuk Khusus untuk Drive Pita Data LTO-5 dan
Versi Lanjutan
. . . . . . . . . . . . . . . . . . . . . . 24
Menyambungkan Kabel Kanal Serat ke Induk
atau Switch
. . . . . . . . . . . . . . . . . . . . . . . 25
APCC.book Page 5 Wednesday, September 9, 2015 12:00 PM
Page is loading ...
Page is loading ...

8 Contents
APCC.book Page 8 Wednesday, September 9, 2015 12:00 PM

Dell PowerVault ML6000 Getting Started Guide 9
Dell PowerVault ML6000 Getting
Started Guide (English)
WARNING: Before cabling your library, read the Dell™ PowerVault™ Systems
safety instructions in your Safety, Environmental and Regulatory Information
guide.
WARNING: All libraries must be installed in a rack having a main protective
earthing (grounding) terminal. For detailed installation information, see the Dell™
PowerVault™ ML6000 Tape Library User’s Guide (http://www.dell.com/support).
WARNING: The socket outlet shall be installed near the equipment and shall be
easily accessible.
WARNING: The front panel power switch is not the main disconnection device.
Please pull all main plugs out of the appliance inlets in order to switch off the
appliance completely.
WARNING: Before cabling your library, remove all interior packaging. Be sure to
remove the orange robot restraint assembly that secures the robot to the floor of
the library. In addition, remove the yellow strip in the I/E station. Save all
packaging materials and the orange robot restraint assembly in case you need to
move or ship the library in the future. For details, see the unpacking instructions
that came with your library and the Dell™ PowerVault™ ML6000 Tape Library
User’s Guide (http://www.dell.com/support).
APCC.book Page 9 Wednesday, September 9, 2015 12:00 PM

10 Dell PowerVault ML6000 Getting Started Guide
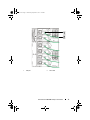
Installing Your Library in a Rack
All Dell™ PowerVault™ ML6000 libraries must be installed in a rack. For
instructions, see the
Dell
™
PowerVault
™
ML6000 Tape Library User’s Guide
(http://www.dell.com/support)
.
• ML6010 CM is a single 5U Library Control Module.
• ML6020 CM consists of one (1) ML6010 CM 5U Library Control Module
and one (1) ML6000 EM 9U Library Expansion Module (14U total). See
special racking instructions "Installing a 14U Library in a Rack" on page 10.
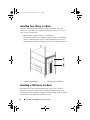
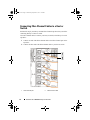
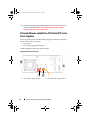
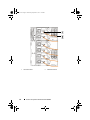
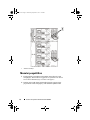
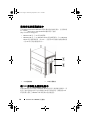
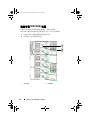
Installing a 14U Library in a Rack
Refer to the Dell™ PowerVault™ ML6000 Tape Library User’s Guide to
perform this procedure. Other documents about this library do not include
information about the 14U library being pre-assembled, which greatly simplifies
the installation of the ML6020 14U library in a rack.
1 5U Library Control Module 2 9U Library Expansion Module
APCC.book Page 10 Wednesday, September 9, 2015 12:00 PM

Dell PowerVault ML6000 Getting Started Guide 11
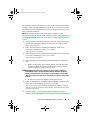
The steps below describe modifications to the procedure “Installing the Library
in a Rack” which will make installing the 14U library in a rack easier. Read this
procedure before unpacking the library because the shipping restraints are left in
place to simplify installation.
NOTE:
This procedure assumes that you are installing a new library in a rack.
Do not take apart the 5U and 9U modules for this procedure, and do not remove
the shipping restraints. Leave the 14U library intact and the shipping restraints
in place.
1
Unpack the library from the shipping carton. Leave the orange robot shipping
restraint and the magazine shipping restraint in place until this procedure
directs you to remove it.
2
Follow the instructions for “Preparing for Installation” in the
Dell
™
PowerVault
™
ML6000 Tape Library User’s Guide
(http://www.dell.com/support)
.
3
Follow the instructions for “Installing the Rack-mount Shelves” in the
Dell
™
PowerVault
™
ML6000 Tape Library User’s Guide
(http://www.dell.com/support)
.
4
For the procedure “Preparing Modules for Rack Installation”, follow these
steps:
a
Remove all tape drives, power supplies, and all cords and cables from
the library modules. The modules are much easier to lift into the rack
without the additional weight of the tape drives.
WARNING: Without tape drives, tape cartridges, or power supplies, a 5U Library
Control Module weighs approximately 60 lbs (27.2 kg). A 9U Library Expansion
Module, without tape drives, tape cartridges, or power supplies, exceeds 65 lbs
(29.5 kg). To avoid serious injury, at least two people are required to safely lift the
modules.
b
Do not remove the orange shipping restraint from the robot.
5
Follow the instructions for “Installing the Bottom Module in the Rack” in the
Dell
™
PowerVault
™
ML6000 Tape Library User’s Guide
(http://www.dell.com/support)
with the assembled 14U library.
Do not take
apart the 5U and 9U modules for this procedure. Follow the next step before
powering on the library.
6
Ensure the library is secured properly and the installation in the rack is
complete.
Remove all shipping restraints before powering up the library
.
APCC.book Page 11 Wednesday, September 9, 2015 12:00 PM

12 Dell PowerVault ML6000 Getting Started Guide
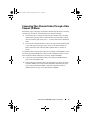
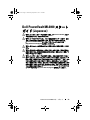
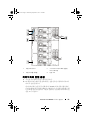
Special Instructions for LTO-5 and Later Tape
Drives
Currently, the library does not support using the following features on LTO-5
and later tape drives:
• Ethernet port
• Port 2 on dual-port tape drives
See the following two figures for details.
APCC.book Page 12 Wednesday, September 9, 2015 12:00 PM

Dell PowerVault ML6000 Getting Started Guide 13
LTO-5 Fibre Channel Tape Drive
LTO-5 SAS Tape Drive
1 Ethernet port - do not use 2 Fibre Channel port - use this port
1 SAS port 1 - use this port 2 SAS port 2 - do not use
3 Ethernet port - do not use
APCC.book Page 13 Wednesday, September 9, 2015 12:00 PM

14 Dell PowerVault ML6000 Getting Started Guide
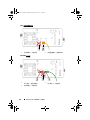
Connecting Fibre Channel Cables to a Host or
Switch
Perform this step if your library contains Fibre Channel tape drives that you will be
connecting directly to a host or switch.
Use Fibre Channel cables to connect your host (or switch) to the library. For each
tape drive:
1
Connect one end of the Fibre Channel cable to the Fibre Channel port on the
tape drive.
2
Connect the other end of the Fibre Channel cable to your host or switch.
1 Fibre Channel port 2 Fibre Channel cable
APCC.book Page 14 Wednesday, September 9, 2015 12:00 PM

Dell PowerVault ML6000 Getting Started Guide 15
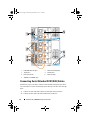
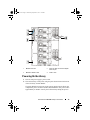
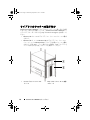
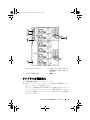
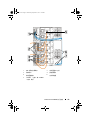
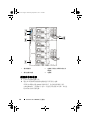
Connecting Fibre Channel Cables Through a Fibre
Channel I/O Blade
Perform this step if your library contains Fibre Channel tape drives that you will be
connecting to your host or switch through a Fibre Channel I/O blade.
1
For each tape drive: Connect one end of a Fibre Channel cable to the Fibre
Channel port on the tape drive. Connect the other end of the Fibre Channel
cable to an initiator port (lower ports 3 – 6) on the nearest Fibre Channel I/O
blade.
2
For each Fibre Channel I/O blade: Connect one end of a Fibre Channel cable
to one of the target ports (upper ports 1 and 2) on the Fibre Channel I/O
blade. Connect the other end of the Fibre Channel cable to your host or
switch.
Use Ethernet cables to connect the LCB in the 5U Library Control Module to each
9U Library Expansion Module that contains a Fibre Channel I/O blade. For each
Fibre Channel I/O blade installed in a 9U Library Expansion Module:
3
Connect one end of the Ethernet cable to any of the four middle Ethernet
ports on the LCB Ethernet hub.
4
Connect the other end of the cable to the appropriate port on the 9U Library
Expansion Module. If the Fibre Channel I/O blade is installed in the upper
bay, use the port labelled "UPPER." If the Fibre Channel I/O blade is
installed in the lower bay, use the port labelled "LOWER."
APCC.book Page 15 Wednesday, September 9, 2015 12:00 PM

16 Dell PowerVault ML6000 Getting Started Guide
Connecting Serial Attached SCSI (SAS) Cables
Perform this step if your library contains serial attached SCSI (SAS) tape drives.
Use SAS cables to connect the SAS tape drives directly to the host. For each tape
drive:
1
Connect one end of the SAS cable to the SAS port on the tape drive.
2
Connect the other end of the SAS cable directly to the host.
1 LCB middle Ethernet ports 2 Fibre Channel I/O blade
3 Target ports 4 Initiator ports
5 Fibre Channel port 6 Ethernet cables
7 "UPPER" and "LOWER" ports
APCC.book Page 16 Wednesday, September 9, 2015 12:00 PM

Dell PowerVault ML6000 Getting Started Guide 17
1 SAS port 2 SAS cable
APCC.book Page 17 Wednesday, September 9, 2015 12:00 PM

18 Dell PowerVault ML6000 Getting Started Guide
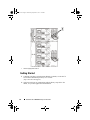
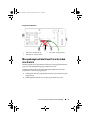
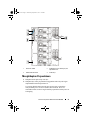
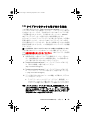
Finishing Cabling the Library
All libraries must use module terminators. Libraries that consist of multiple
modules must use module-to-module cables.
CAUTION: The module terminator is not the same as a SCSI terminator. Using a
SCSI terminator instead of a module terminator can damage the library. The
module terminators are located in a plastic package tied to the back of the
5U Library Control Module.
1
Remove the protective plastic caps covering the module connectors on the
5U Library Control Module and 9U Library Expansion Module(s).
2
Using the module-to-module cables from the accessory kit, connect each
module to the one above it. Connect one end of the cable to the bottom
module. Then connect the other end of the cable to the module above it.
3
Using the module terminators from the plastic package tied to the back of the
5U Liberary Control Module, terminate the topmost and botommost
modules.
4
Connect an Ethernet cable to the top Gigabit Ethernet port on the library
control blade (LCB) for remote access to the library via the Web client.
(Ethernet cable not supplied.)
5
At least one power supply is required for each module that contains tape
drives. For each power supply, connect one end of the power cord to the
power supply. Connect the other end to a nearby grounded AC power source
(of the type marked on the product label).
APCC.book Page 18 Wednesday, September 9, 2015 12:00 PM

Dell PowerVault ML6000 Getting Started Guide 19
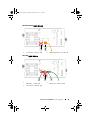
Powering On the Library
1
Turn on each power supply’s power switch.
2
Turn on the library’s main power using the power button located on the front
of the 5U Library Control Module.
The Setup Wizard screen appears on the operator panel when the library has
completed its power-on self-test (POST) and initialization. This process takes
approximately 30 minutes. Do not power off the library during this process.
1 Module terminator 2 Ethernet cable connected to Gigabit
Ethernet port
3 Module-to-module cable 4 Power cords
APCC.book Page 19 Wednesday, September 9, 2015 12:00 PM

20 Dell PowerVault ML6000 Getting Started Guide
Getting Started
1
Configure your library using the Setup Wizard. For details, see the
Dell™
PowerVault™ ML6000 Tape Library User’s Guide
(http://www.dell.com/support)
.
2
Verify that each host can communicate with the library’s tape drives. For
details, see your host application documentation.
1 Power supply power switch
APCC.book Page 20 Wednesday, September 9, 2015 12:00 PM
Page is loading ...
Page is loading ...
Page is loading ...
Page is loading ...
Page is loading ...

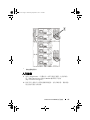
26 Panduan Pengaktifan Dell PowerVault ML6000
1 Port Kanal Serat 2 Kabel Kanal Serat
APCC.book Page 26 Wednesday, September 9, 2015 12:00 PM
Page is loading ...
Page is loading ...
Page is loading ...
Page is loading ...
Page is loading ...
Page is loading ...
Page is loading ...
Page is loading ...
Page is loading ...
Page is loading ...
Page is loading ...
Page is loading ...
Page is loading ...
Page is loading ...
Page is loading ...
Page is loading ...
Page is loading ...
Page is loading ...
Page is loading ...
Page is loading ...
Page is loading ...
Page is loading ...
Page is loading ...
Page is loading ...
Page is loading ...
Page is loading ...
Page is loading ...
Page is loading ...
Page is loading ...
Page is loading ...
Page is loading ...
Page is loading ...
Page is loading ...
Page is loading ...
Page is loading ...
Page is loading ...
Page is loading ...
Page is loading ...
Page is loading ...
Page is loading ...

Dell PowerVault ML6000 入门指南 67
入门指南
1
使用
“ Setup Wizard ”
(设置向导)对库存机进行配置。
有关详细信
息,请参阅
Dell™ PowerVault™ ML6000
磁带库用户指南
(http://www.dell.com/support)
。
2
验证各个主机均可与库存机的磁带机通信。有关详细信息,请参阅您
的主机应用程序文档资料。
1
供电电源电源开关
APCC.book Page 67 Wednesday, September 9, 2015 12:00 PM
Page is loading ...
-
 1
1
-
 2
2
-
 3
3
-
 4
4
-
 5
5
-
 6
6
-
 7
7
-
 8
8
-
 9
9
-
 10
10
-
 11
11
-
 12
12
-
 13
13
-
 14
14
-
 15
15
-
 16
16
-
 17
17
-
 18
18
-
 19
19
-
 20
20
-
 21
21
-
 22
22
-
 23
23
-
 24
24
-
 25
25
-
 26
26
-
 27
27
-
 28
28
-
 29
29
-
 30
30
-
 31
31
-
 32
32
-
 33
33
-
 34
34
-
 35
35
-
 36
36
-
 37
37
-
 38
38
-
 39
39
-
 40
40
-
 41
41
-
 42
42
-
 43
43
-
 44
44
-
 45
45
-
 46
46
-
 47
47
-
 48
48
-
 49
49
-
 50
50
-
 51
51
-
 52
52
-
 53
53
-
 54
54
-
 55
55
-
 56
56
-
 57
57
-
 58
58
-
 59
59
-
 60
60
-
 61
61
-
 62
62
-
 63
63
-
 64
64
-
 65
65
-
 66
66
-
 67
67
-
 68
68


Ask a question and I''ll find the answer in the document
Finding information in a document is now easier with AI
in other languages
Related papers
-
Dell PowerVault ML6000 User guide
-
-
-
-
-
-
-
-
-
Dell PowerVault 35F User guide

