
www.dell.com | support.dell.com
Dell™ PowerVault™ ML6000
Getting Started Guide (English)
Guide de démarrage rapide (French)
Guia de Introdução (Portuguese)
Guía de inicio (Spanish)
*HK591 A06*
HK591 A06
DAO.book Page 1 Wednesday, September 9, 2015 11:31 AM

Notes, Cautions, and Warnings
NOTE: A NOTE indicates important information that helps you make better use of
your computer.
CAUTION: A CAUTION indicates potential damage to hardware or loss of data if
instructions are not followed.
WARNING: A WARNING indicates a potential for property damage, personal
injury, or death.
Remarques, mises en garde et avertissements
REMARQUE : UNE REMARQUE désigne des informations importantes destinées à
vous aider à optimiser l'utilisation de votre ordinateur.
MISE EN GARDE : UNE MISE EN GARDE désigne un risque potentiel de
dommage matériel ou de perte de données en cas de non-respect des instructions.
AVERTISSEMENT : UN AVERTISSEMENT désigne un risque potentiel de
dommage de propriété, de blessures, voire de mort.
Notas, cuidados e alertas
NOTA: Uma NOTA indica informações importantes que lhe ajudam a usar melhor
seu computador.
CUIDADO: CUIDADO indica danos potenciais ao hardware ou perda de dados se
as instruções não forem seguidas.
ALERTA: Um ALERTA indica um dano potencial à propriedade, ferimentos
pessoais ou morte.
Notas, precauciones y advertencias
NOTA: Las NOTAS indican información importante que ayuda a utilizar mejor el
equipo.
PRECAUCIONES: Las PRECAUCIONES indican daños potenciales al hardware o
la pérdida de datos si no se observan las instrucciones.
ADVERTENCIAS: Las ADVERTENCIAS indican un peligro potencial de datos a la
propiedad, lesiones personales o la muerte.
____________________
DAO.book Page 2 Wednesday, September 9, 2015 11:31 AM
Page is loading ...

DAO.book Page 4 Wednesday, September 9, 2015 11:31 AM

Contents
1 Dell PowerVault ML6000
Getting Started Guide (English) . . . . . . . . 9
Installing Your Library in a Rack . . . . . . . . . . . . 10
Installing a 14U Library in a Rack
. . . . . . . . . . . . 10
Special Instructions for LTO-5 and Later Tape Drives
. . 12
Connecting Fibre Channel Cables to a Host or Switch
. . 14
Connecting Fibre Channel Cables Through a
Fibre Channel I/O Blade
. . . . . . . . . . . . . . . . . 15
Connecting Serial Attached SCSI (SAS) Cables
. . . . 16
Finishing Cabling the Library
. . . . . . . . . . . . . . 18
Powering On the Library
. . . . . . . . . . . . . . . . . 19
Getting Started. . . . . . . . . . . . . . . . . . . . . . 20
2 Guide de démarrage rapide de
Dell PowerVault ML6000 (French) . . . . . . 21
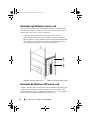
Installation de votre bibliothèque dans un rack . . . . 22
Installation d’une bibliothèque 14U dans un rack
. . . 23
Instructions spéciales pour les lecteurs de bande
LTO-5 et ultérieurs
. . . . . . . . . . . . . . . . . . . . 24
DAO.book Page 5 Wednesday, September 9, 2015 11:31 AM
Page is loading ...
Page is loading ...

8 Contents
DAO.book Page 8 Wednesday, September 9, 2015 11:31 AM

Dell PowerVault ML6000 Getting Started Guide 9
Dell PowerVault ML6000 Getting
Started Guide (English)
WARNING: Before cabling your library, read the Dell™ PowerVault™ Systems
safety instructions in your Safety, Environmental and Regulatory Information
guide.
WARNING: All libraries must be installed in a rack having a main protective
earthing (grounding) terminal. For detailed installation information, see the Dell™
PowerVault™ ML6000 Tape Library User’s Guide (http://www.dell.com/support).
WARNING: The socket outlet shall be installed near the equipment and shall be
easily accessible.
WARNING: The front panel power switch is not the main disconnection device.
Please pull all main plugs out of the appliance inlets in order to switch off the
appliance completely.
WARNING: Before cabling your library, remove all interior packaging. Be sure to
remove the orange robot restraint assembly that secures the robot to the floor of
the library. In addition, remove the yellow strip in the I/E station. Save all
packaging materials and the orange robot restraint assembly in case you need to
move or ship the library in the future. For details, see the unpacking instructions
that came with your library and the Dell™ PowerVault™ ML6000 Tape Library
User’s Guide (http://www.dell.com/support).
DAO.book Page 9 Wednesday, September 9, 2015 11:31 AM

10 Dell PowerVault ML6000 Getting Started Guide
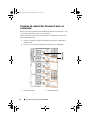
Installing Your Library in a Rack
All Dell™ PowerVault™ ML6000 libraries must be installed in a rack. For
instructions, see the
Dell
™
PowerVault
™
ML6000 Tape Library User’s Guide
(http://www.dell.com/support)
.
• ML6010 CM is a single 5U Library Control Module.
• ML6020 CM consists of one (1) ML6010 CM 5U Library Control Module
and one (1) ML6000 EM 9U Library Expansion Module (14U total). See
special racking instructions "Installing a 14U Library in a Rack" on page 10.
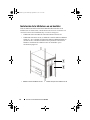
Installing a 14U Library in a Rack
Refer to the Dell™ PowerVault™ ML6000 Tape Library User’s Guide to
perform this procedure. Other documents about this library do not include
information about the 14U library being pre-assembled, which greatly simplifies
the installation of the ML6020 14U library in a rack.
1 5U Library Control Module 2 9U Library Expansion Module
DAO.book Page 10 Wednesday, September 9, 2015 11:31 AM

Dell PowerVault ML6000 Getting Started Guide 11
The steps below describe modifications to the procedure “Installing the Library
in a Rack” which will make installing the 14U library in a rack easier. Read this
procedure before unpacking the library because the shipping restraints are left in
place to simplify installation.
NOTE:
This procedure assumes that you are installing a new library in a rack.
Do not take apart the 5U and 9U modules for this procedure, and do not remove
the shipping restraints. Leave the 14U library intact and the shipping restraints
in place.
1
Unpack the library from the shipping carton. Leave the orange robot shipping
restraint and the magazine shipping restraint in place until this procedure
directs you to remove it.
2
Follow the instructions for “Preparing for Installation” in the User’s Guide.
3
Follow the instructions for “Installing the Rack-mount Shelves” in the User’s
Guide.
4
For the procedure “Preparing Modules for Rack Installation”, follow these
steps:
a
Remove all tape drives, power supplies, and all cords and cables from
the library modules. The modules are much easier to lift into the rack
without the additional weight of the tape drives.
WARNING: Without tape drives, tape cartridges, or power supplies, a 5U Library
Control Module weighs approximately 60 lbs (27.2 kg). A 9U Library Expansion
Module, without tape drives, tape cartridges, or power supplies, exceeds 65 lbs
(29.5 kg). To avoid serious injury, at least two people are required to safely lift the
modules.
b
Do not remove the orange shipping restraint from the robot.
5
Follow the instructions for “Installing the Bottom Module in the Rack” in the
User’s Guide with the assembled 14U library.
Do not take apart the 5U and
9U modules for this procedure. Follow the next step before powering on the
library.
6
Ensure the library is secured properly and the installation in the rack is
complete.
Remove all shipping restraints before powering up the library
.
DAO.book Page 11 Wednesday, September 9, 2015 11:31 AM

12 Dell PowerVault ML6000 Getting Started Guide
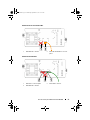
Special Instructions for LTO-5 and Later Tape
Drives
Currently, the library does not support using the following features on LTO-5
and later tape drives:
• Ethernet port
• Port 2 on dual-port tape drives
See the following two figures for details.
DAO.book Page 12 Wednesday, September 9, 2015 11:31 AM

Dell PowerVault ML6000 Getting Started Guide 13
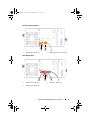
LTO-5 Fibre Channel Tape Drive
LTO-5 SAS Tape Drive
1 Ethernet port - do not use 2 Fibre Channel port - use this port
1 SAS port 1 - use this port 2 SAS port 2 - do not use
3 Ethernet port - do not use
DAO.book Page 13 Wednesday, September 9, 2015 11:31 AM

14 Dell PowerVault ML6000 Getting Started Guide
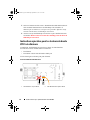
Connecting Fibre Channel Cables to a Host or
Switch
Perform this step if your library contains Fibre Channel tape drives that you will be
connecting directly to a host or switch.
Use Fibre Channel cables to connect your host (or switch) to the library. For each
tape drive:
1
Connect one end of the Fibre Channel cable to the Fibre Channel port on the
tape drive.
2
Connect the other end of the Fibre Channel cable to your host or switch.
1 Fibre Channel port 2 Fibre Channel cable
DAO.book Page 14 Wednesday, September 9, 2015 11:31 AM

Dell PowerVault ML6000 Getting Started Guide 15
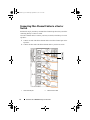
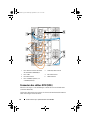
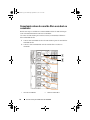
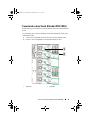
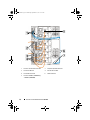
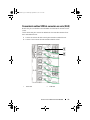
Connecting Fibre Channel Cables Through a Fibre
Channel I/O Blade
Perform this step if your library contains Fibre Channel tape drives that you will be
connecting to your host or switch through a Fibre Channel I/O blade.
1
For each tape drive: Connect one end of a Fibre Channel cable to the Fibre
Channel port on the tape drive. Connect the other end of the Fibre Channel
cable to an initiator port (lower ports 3 – 6) on the nearest Fibre Channel I/O
blade.
2
For each Fibre Channel I/O blade: Connect one end of a Fibre Channel cable
to one of the target ports (upper ports 1 and 2) on the Fibre Channel I/O
blade. Connect the other end of the Fibre Channel cable to your host or
switch.
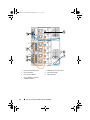
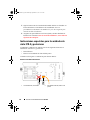
Use Ethernet cables to connect the LCB in the 5U Library Control Module to each
9U Library Expansion Module that contains a Fibre Channel I/O blade. For each
Fibre Channel I/O blade installed in a 9U Library Expansion Module:
3
Connect one end of the Ethernet cable to any of the four middle Ethernet
ports on the LCB Ethernet hub.
4
Connect the other end of the cable to the appropriate port on the 9U Library
Expansion Module. If the Fibre Channel I/O blade is installed in the upper
bay, use the port labelled "UPPER." If the Fibre Channel I/O blade is
installed in the lower bay, use the port labelled "LOWER."
DAO.book Page 15 Wednesday, September 9, 2015 11:31 AM

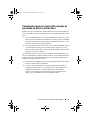
16 Dell PowerVault ML6000 Getting Started Guide
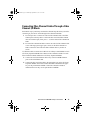
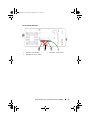
Connecting Serial Attached SCSI (SAS) Cables
Perform this step if your library contains serial attached SCSI (SAS) tape drives.
Use SAS cables to connect the SAS tape drives directly to the host. For each tape
drive:
1
Connect one end of the SAS cable to the SAS port on the tape drive.
2
Connect the other end of the SAS cable directly to the host.
1 LCB middle Ethernet ports 2 Fibre Channel I/O blade
3 Target ports 4 Initiator ports
5 Fibre Channel port 6 Ethernet cables
7 "UPPER" and "LOWER" ports
DAO.book Page 16 Wednesday, September 9, 2015 11:31 AM

Dell PowerVault ML6000 Getting Started Guide 17
1 SAS port 2 SAS cable
DAO.book Page 17 Wednesday, September 9, 2015 11:31 AM

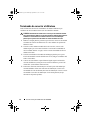
18 Dell PowerVault ML6000 Getting Started Guide
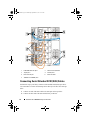
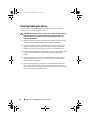
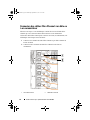
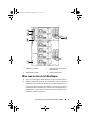
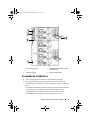
Finishing Cabling the Library
All libraries must use module terminators. Libraries that consist of multiple
modules must use module-to-module cables.
CAUTION: The module terminator is not the same as a SCSI terminator. Using a
SCSI terminator instead of a module terminator can damage the library. The
module terminators are located in a plastic package tied to the back of the
5U Library Control Module.
1
Remove the protective plastic caps covering the module connectors on the
5U Library Control Module and 9U Library Expansion Module(s).
2
Using the module-to-module cables from the accessory kit, connect each
module to the one above it. Connect one end of the cable to the bottom
module. Then connect the other end of the cable to the module above it.
3
Using the module terminators from the plastic package tied to the back of the
5U Liberary Control Module, terminate the topmost and botommost
modules.
4
Connect an Ethernet cable to the top Gigabit Ethernet port on the library
control blade (LCB) for remote access to the library via the Web client.
(Ethernet cable not supplied.)
5
At least one power supply is required for each module that contains tape
drives. For each power supply, connect one end of the power cord to the
power supply. Connect the other end to a nearby grounded AC power source
(of the type marked on the product label).
DAO.book Page 18 Wednesday, September 9, 2015 11:31 AM

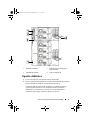
Dell PowerVault ML6000 Getting Started Guide 19
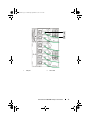
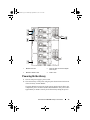
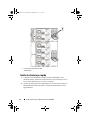
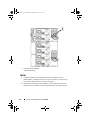
Powering On the Library
1
Turn on each power supply’s power switch.
2
Turn on the library’s main power using the power button located on the front
of the 5U Library Control Module.
The Setup Wizard screen appears on the operator panel when the library has
completed its power-on self-test (POST) and initialization. This process takes
approximately 30 minutes. Do not power off the library during this process.
1 Module terminator 2 Ethernet cable connected to Gigabit
Ethernet port
3 Module-to-module cable 4 Power cords
DAO.book Page 19 Wednesday, September 9, 2015 11:31 AM

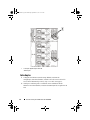
20 Dell PowerVault ML6000 Getting Started Guide
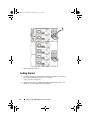
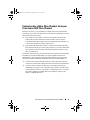
Getting Started
1
Configure your library using the Setup Wizard. For details, see the
Dell™
PowerVault™ ML6000 Tape Library User’s Guide
(http://www.dell.com/support)
.
2
Verify that each host can communicate with the library’s tape drives. For
details, see your host application documentation.
1 Power supply power switch
DAO.book Page 20 Wednesday, September 9, 2015 11:31 AM
Page is loading ...
Page is loading ...
Page is loading ...
Page is loading ...

Guide de démarrage rapide Dell PowerVault ML6000 25
Lecteur de bande LTO-5 SAS
1 Port SAS 1 : port à utiliser 2 Port SAS 2 : ne pas utiliser
3 Port Ethernet : ne pas utiliser
DAO.book Page 25 Wednesday, September 9, 2015 11:31 AM
Page is loading ...
Page is loading ...
Page is loading ...
Page is loading ...
Page is loading ...
Page is loading ...
Page is loading ...
Page is loading ...
Page is loading ...
Page is loading ...
Page is loading ...
Page is loading ...
Page is loading ...
Page is loading ...

40 Guia de introdução do Dell PowerVault ML6000
1 Portas Ethernet LCB centrais 2 Blade de E/S de canal de fibra
3 Portas de destino 4 Portas do iniciador
5 Porta de canal de fibra 6 Cabos Ethernet
7 Portas “UPPER” (superior) e
“LOWER” (inferior)
DAO.book Page 40 Wednesday, September 9, 2015 11:31 AM
Page is loading ...
Page is loading ...
Page is loading ...
Page is loading ...
Page is loading ...
Page is loading ...
Page is loading ...
Page is loading ...
Page is loading ...
Page is loading ...
Page is loading ...

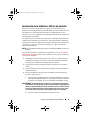
52 Guía de inicio de Dell PowerVault ML6000
1 Puertos centrales Ethernet LCB 2 Tarjeta de E/S Fibre Channel
3 Puertos de destino 4 Puertos de iniciador
5 Puerto Fibre Channel 6 Cables Ethernet
7 Puertos “UPPER” (SUPERIOR) y
“LOWER” (INFERIOR)
DAO.book Page 52 Wednesday, September 9, 2015 11:31 AM
Page is loading ...
Page is loading ...
Page is loading ...
Page is loading ...
-
 1
1
-
 2
2
-
 3
3
-
 4
4
-
 5
5
-
 6
6
-
 7
7
-
 8
8
-
 9
9
-
 10
10
-
 11
11
-
 12
12
-
 13
13
-
 14
14
-
 15
15
-
 16
16
-
 17
17
-
 18
18
-
 19
19
-
 20
20
-
 21
21
-
 22
22
-
 23
23
-
 24
24
-
 25
25
-
 26
26
-
 27
27
-
 28
28
-
 29
29
-
 30
30
-
 31
31
-
 32
32
-
 33
33
-
 34
34
-
 35
35
-
 36
36
-
 37
37
-
 38
38
-
 39
39
-
 40
40
-
 41
41
-
 42
42
-
 43
43
-
 44
44
-
 45
45
-
 46
46
-
 47
47
-
 48
48
-
 49
49
-
 50
50
-
 51
51
-
 52
52
-
 53
53
-
 54
54
-
 55
55
-
 56
56


Ask a question and I''ll find the answer in the document
Finding information in a document is now easier with AI
in other languages
- français: Dell PowerVault ML6000 Guide de démarrage rapide
- español: Dell PowerVault ML6000 Guía de inicio rápido
- português: Dell PowerVault ML6000 Guia rápido
Related papers
-
Dell PowerVault ML6000 User guide
-
-
-
-
-
Dell LTO4-EH1 User manual
-
-
-
-