Page is loading ...

Regulatory model: C7017Tf
User‘s Guide
Dell C7017T

2
NOTE: A NOTE indicates important information that helps you make better use of
your computer.
CAUTION: A CAUTION indicates potential damage to hardware or loss of data if
instructions are not followed.
WARNING: A WARNING indicates a potential for property damage, personal
injury, or death.
© 2016 - 2019 Dell Inc. All rights reserved.
Information in this document is subject to change without notice. Reproduction of these materials
in any manner whatsoever without the written permission of Dell Inc. is strictly forbidden.
Trademarks used in this text: Dell™ and the DELL logo are trademarks of Dell Inc.; Microsoft®,
Windows®, and the Windows start button logo are either trademarks or registered trademarks of
Microsoft Corporation in the United States and/or other countries.
Other trademarks and trade names may be used in this document to refer to either the entities
claiming the marks and names or their products. Dell Inc. disclaims any proprietary interest in
tradmarks and trade names other than its own.
2019
–1
0
Rev. A05

3
Contents
About Your Monitor ..................................... 5
Package Contents . . . . . . . . . . . . . . . . . . . . . . . . . . . . . . . .5
Product Features . . . . . . . . . . . . . . . . . . . . . . . . . . . . . . . . 7
Remote Control . . . . . . . . . . . . . . . . . . . . . . . . . . . . . . . . . 8
Identifying Parts and Controls . . . . . . . . . . . . . . . . . . . . . . . . 12
Monitor Specifications . . . . . . . . . . . . . . . . . . . . . . . . . . . . 15
Plug and Play Capability . . . . . . . . . . . . . . . . . . . . . . . . . . . 24
LCD Monitor Quality & Pixel Policy . . . . . . . . . . . . . . . . . . . . . 28
Maintenance Guidelines . . . . . . . . . . . . . . . . . . . . . . . . . . . 29
Setting Up the Monitor..................................30
Connecting Your Monitor . . . . . . . . . . . . . . . . . . . . . . . . . . 30
Wall Mounting . . . . . . . . . . . . . . . . . . . . . . . . . . . . . . . . . 33
Operating the Monitor .................................. 34
Power On the Monitor . . . . . . . . . . . . . . . . . . . . . . . . . . . . 34
Using the Front-Panel Controls . . . . . . . . . . . . . . . . . . . . . . . 34
Using the On-Screen Display (OSD) Menu. . . . . . . . . . . . . . . . . 35
Touch OSD Control . . . . . . . . . . . . . . . . . . . . . . . . . . . . . . 48
OSD Messages . . . . . . . . . . . . . . . . . . . . . . . . . . . . . . . . . 49
Setting the Maximum Resolution . . . . . . . . . . . . . . . . . . . . . . 52
Dell Web Management for Monitors . . . . . . . . . . . . . . . . . . . . 54

4
Troubleshooting .......................................60
Self-Test . . . . . . . . . . . . . . . . . . . . . . . . . . . . . . . . . . . . . 60
Built-in Diagnostics . . . . . . . . . . . . . . . . . . . . . . . . . . . . . . 61
Common Problems . . . . . . . . . . . . . . . . . . . . . . . . . . . . . . 62
Product-Specific Problems. . . . . . . . . . . . . . . . . . . . . . . . . . 65
Universal Serial Bus (USB) Specific Problems . . . . . . . . . . . . . . . 66
Mobile High-Definition Link (MHL) Specific Problems . . . . . . . . . 67
Touch Problems . . . . . . . . . . . . . . . . . . . . . . . . . . . . . . . . 67
Ethernet Problems . . . . . . . . . . . . . . . . . . . . . . . . . . . . . . . 68
Appendix . ............................... ............ 69
Safety Instructions ............................................. 69
FCC Notices (U.S. Only) and Other Regulatory Information .. . . . . 69
Contact Dell. . . . . . . . . . . .
. . . . . . . . . . . . . . . . . . . . 69
About Your Monitor 5
About Your Monitor
Package Contents
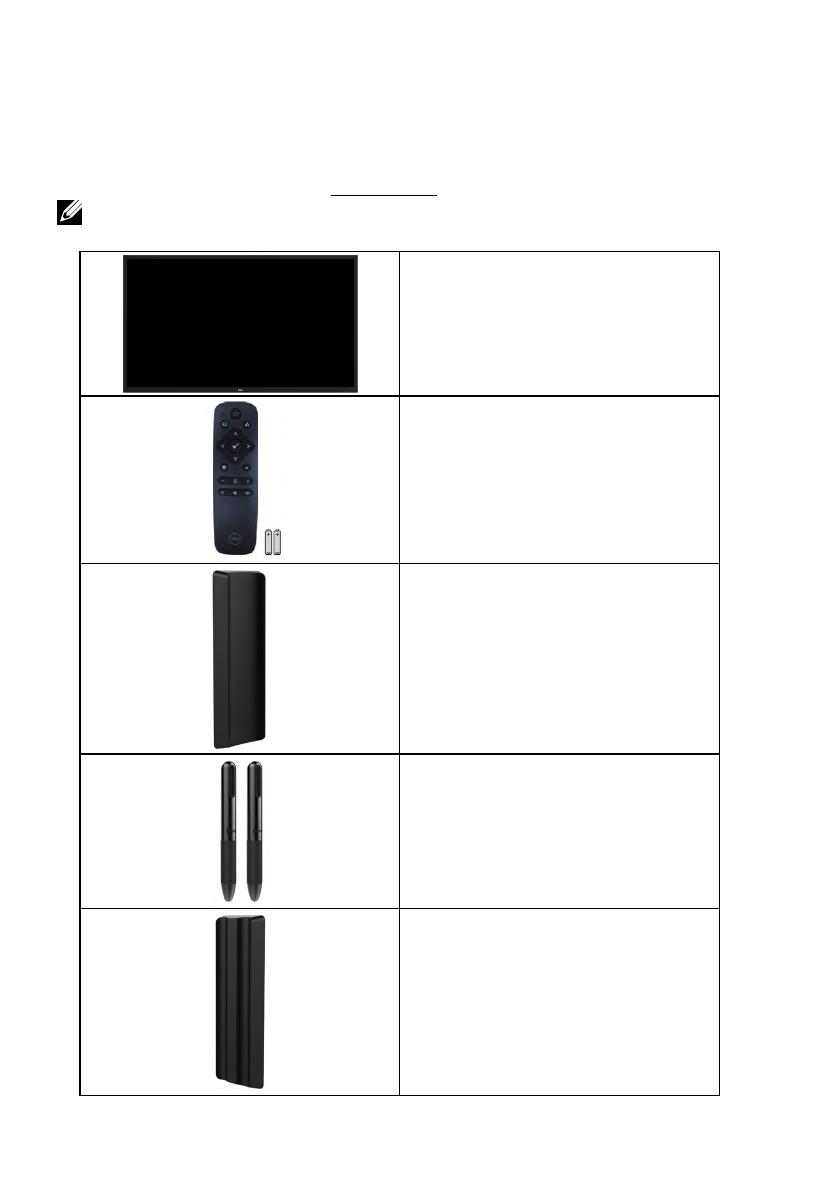
Your monitor ships with all the components shown below. Ensure that you have
received all the components and Contact Dell if anything is missing.
NOTE: Some items may be optional and may not ship with your monitor. Some
features or media may not be available in certain countries.
• Monitor
• Remote Control & Batteries (AAA x 2)
• Remote control holder
• Stylus
• Stylus holder

6 About Your Monitor
• LSA1U Wall Mount Kit
• Wire Saddle
• Power Cable (varies with countries)
• VGA Cable
• HDMI Cable
• DP Cable
• USB 3.0 upstream cable (enables the
USB ports on the monitor)
• Quick Setup Guide
• Safety and Regulatory Information

About Your Monitor 7
Product Features
at-panel display has an active matrix, Thin-Film Transistor, Liquid
Crystal Display and LED backlight. The monitor’s features include:
•
• Video Electronics Standards Association (VESA) 400 mm mounting holes.
• Plug and play capability if supported by your system.
• On-Screen Display (OSD) adjustments for ease of set-up and screen optimization.
•
ENERGY STAR certified.
• Asset Management Capability.
•
CECP (for China).
• Energy Gauge shows the energy level being consumed by the monitor in real time.
• Analog backlight dimming control f
ker free display.
C7017T: 176.563 cm (69.513 in.) agonal viewable image size, 1920 x 1080
resolution, plus full-screen support for lower resolutions.

8 About Your Monitor
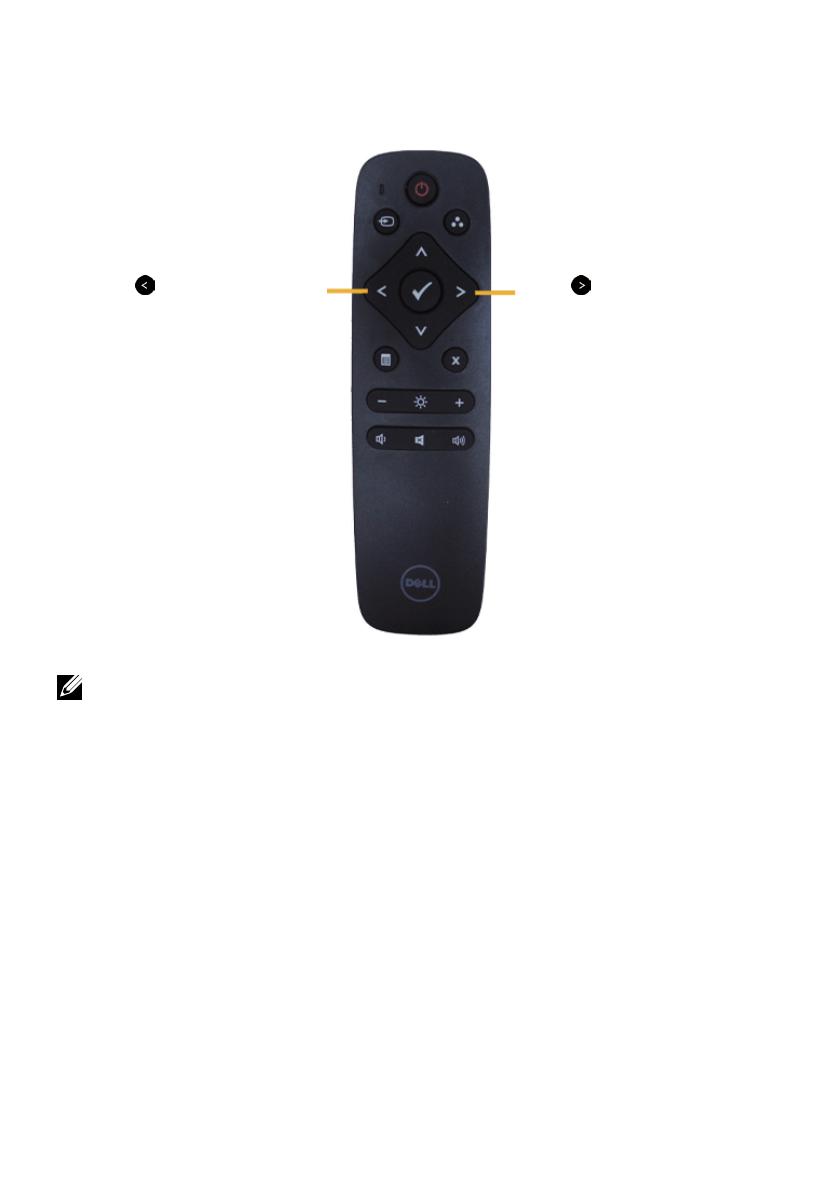
Remote Control
3. Up
Press to move the selection up
in OSD menu.
4. Left
Press to move the selection left
in OSD menu.
5. Down
Press to move the selection
down in OSD menu.
6. Menu
Press to turn on the OSD menu.
7. Brightness -
Press to decrease the Brightness.
8. Volume -
Press to decrease the Volume.
9. MUTE
Press to turn the mute function
on/off.
10.Preset Modes
Display information about Preset
Modes.
11. Right
Press to move the selection
right in OSD menu.
12. OK
Confirm an entry or selection.
13. Exit
Press to exit the Menu.
1. Power On/Off
Switch this monitor on or off.
14. Brightness +
Press to increase the Brightness.
2. Input Source
Select input source. Press
or
button to select from VGA or DP or
HDMI1 or HDMI2 or HDMI3 . Press
button to confirm and exit.
15. Volume +
Press to increase the Volume.
About Your Monitor 9
Hide Screen
This feature allows the user to temporarily hide the screen content by
displaying a white screen.
Press button on the
remote control to display
a white screen.
Press button on the
remote control to exit the
white screen.
Ensure the OSD menu is not on the screen when activating this feature.
NOTE: There is no touch functionality on the monitor when this feature is activated.
DisplayNote
This monitor comes with software license from DisplayNote.
Please refer to the DisplayNote documentation that came with the monitor for
information on software license and download.
For more information, please visit https://www.displaynote.com/
10 About Your Monitor
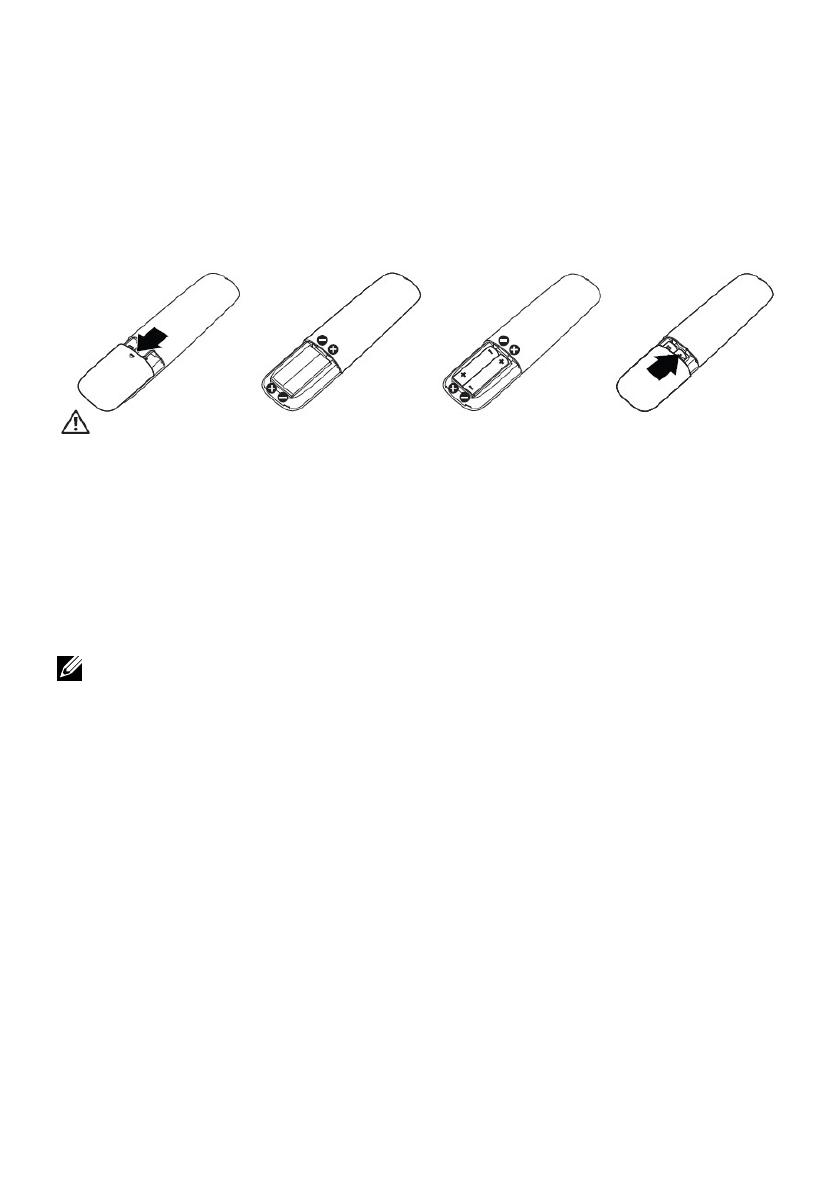
Inserting the batteries in the remote control
The remote control is powered by two 1.5 V AAA batteries.
To install or replace batteries:
1. Press and then slide the cover to open it.
2. Align the batteries according to the (+) and (–) indications inside the
battery compartment.
3. Replace the cover.
CAUTION: The incorrect use of batteries can result in leaks or bursting. Be
sure to follow these instructions:
• Place “AAA” batteries matching the (+) and (–) signs on each battery to the (+) and
(–) signs of the battery compartment.
• Do not mix battery types.
• Do not combine new batteries with used ones. It causes shorter life or leakage of
batteries.
• Remove the dead batteries immediately to prevent them from liquid leaking in the
battery compartment. Don’t touch exposed battery acid, as it can damage your
skin.
NOTE: If you do not intend to use the remote control for a long period, remove the
batteries.
Handling the remote control
• Do not subject to strong shock.
• Do not allow water or other liquids to splash on the remote control. If the remote
control gets wet, wipe it dry immediately.
• Avoid exposure to heat and steam.
• Other than to install the batteries, do not open the remote control.
About Your Monitor 11
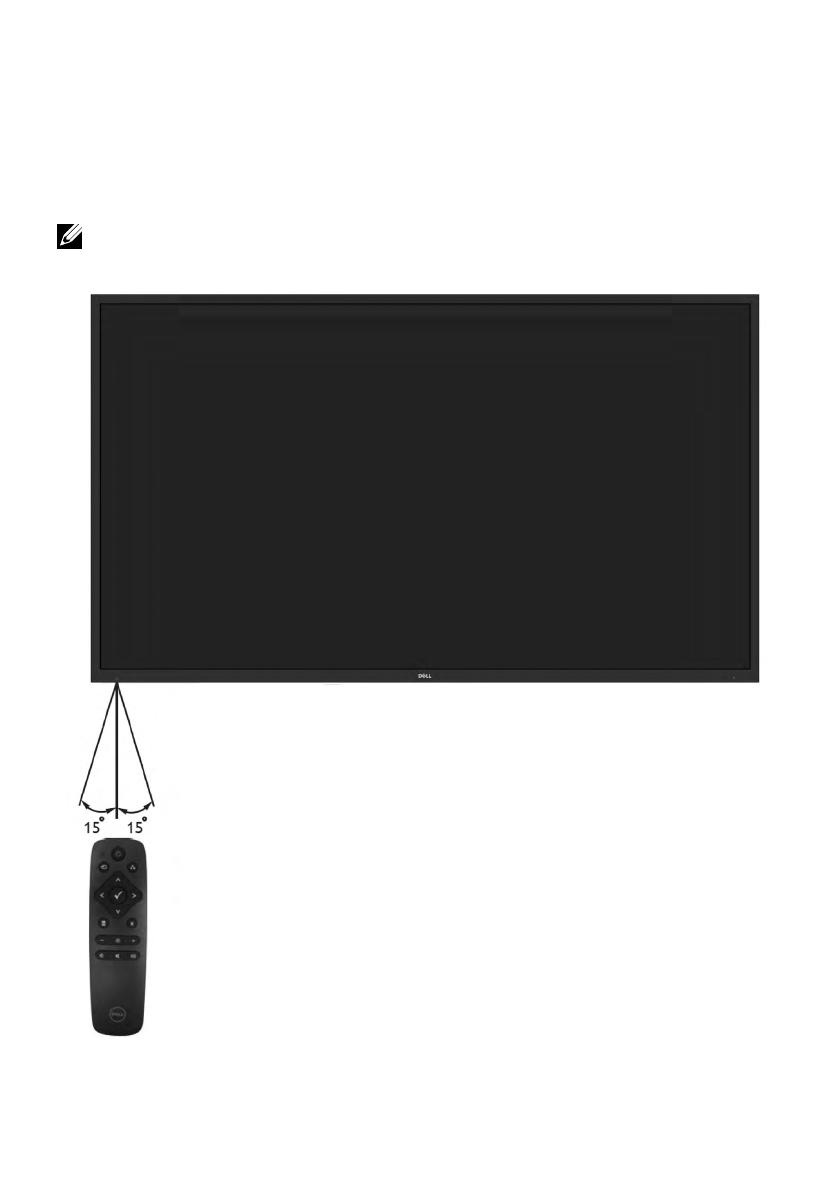
Operating range of the remote control
Point the top of the remote control toward the LCD monitor’s remote sensor
during button operation.
Use the remote control within a distance of about 8 m from remote control
sensor or at a horizontal and vertical angle of within 15° within a distance of
about 5.6 m.
NOTE: The remote control may not function properly when the remote control
sensor on the display is under direct sunlight or strong illumination, or when there is
an obstacle in the path of signal transmission.
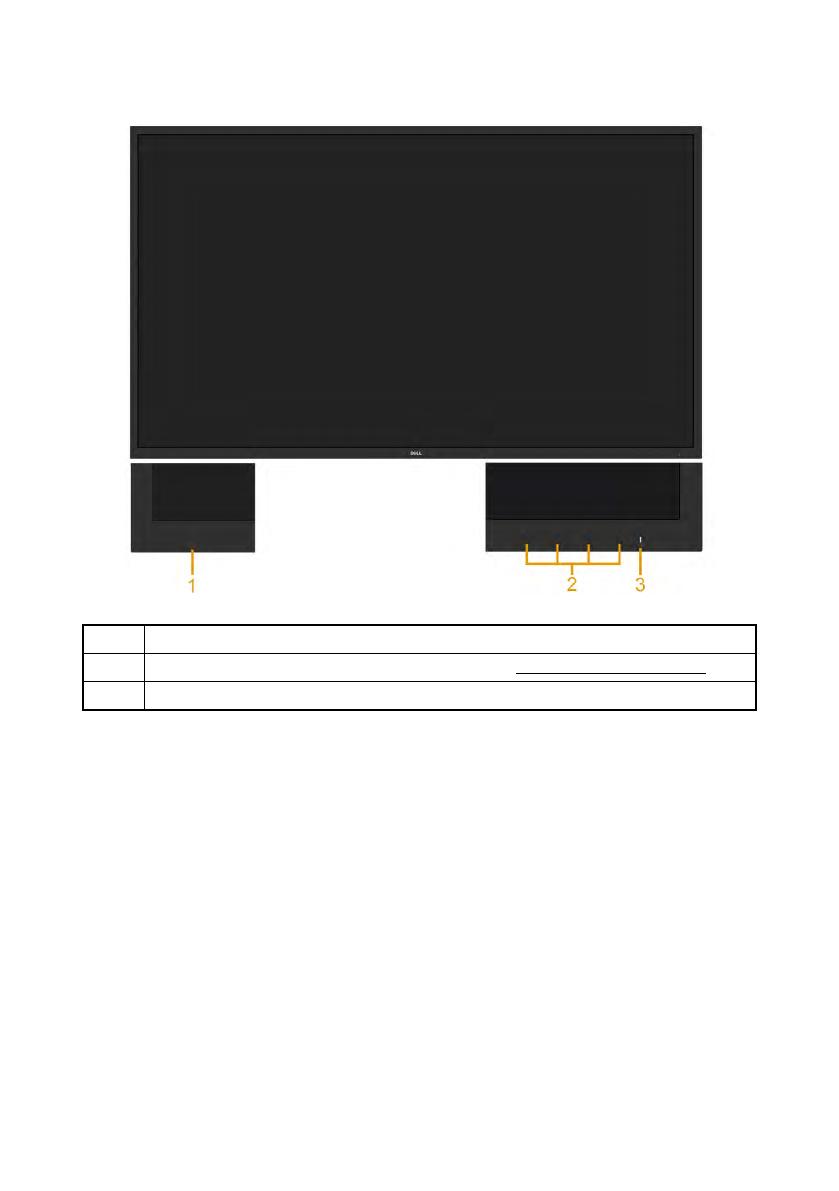

About Your Monitor 13
Back View
Label Description Use
1 Screw Hole For Accessory mounting.
2 Wire Saddle hole For accessory wire saddle placement.
3 VESA mounting holes (400
mm)
To mount the monitor.
4 RCA label Indicates the connector type.
5 Regulatory rating label Lists the regulatory approvals.
6 RJ-45 connector For remote control use.
7 Barcode serial number label Refer to this label if you need to contact
Dell for technical support.
8 AC power connector Connect the monitor power cable.
14 About Your Monitor
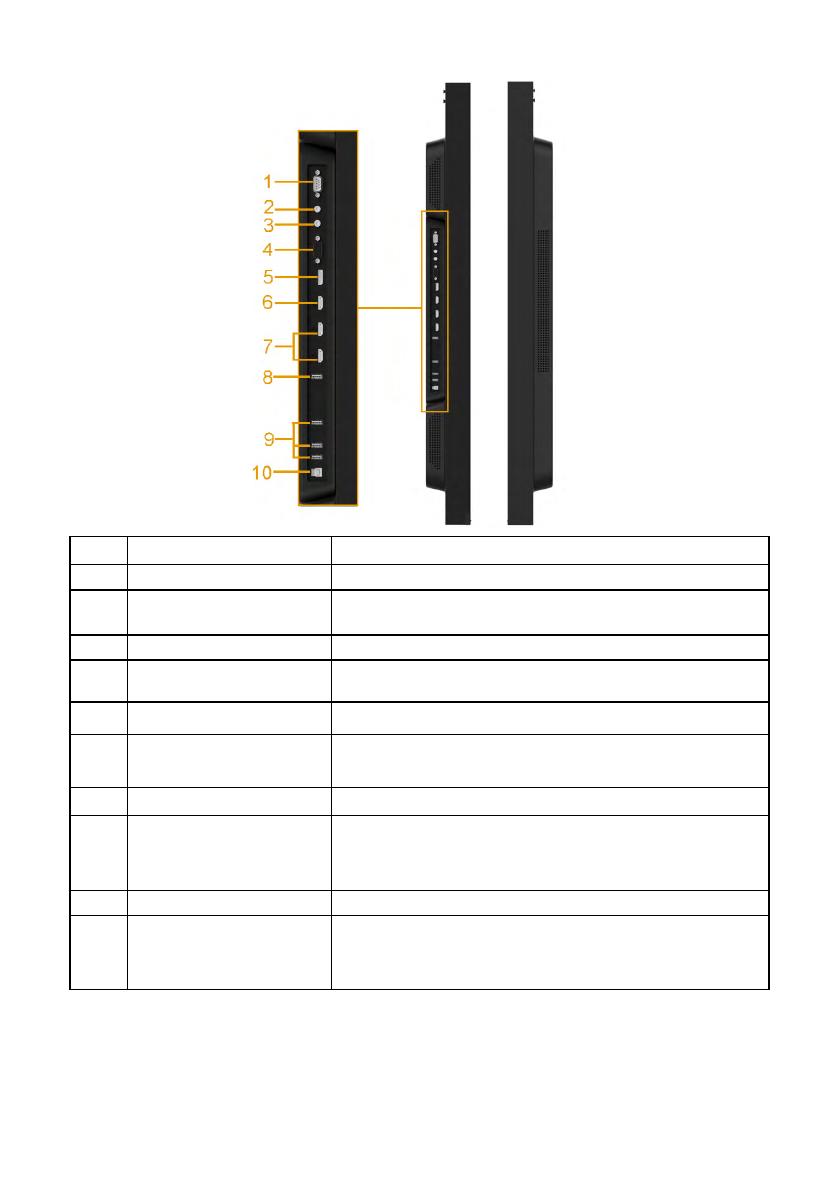
Side View
Label Description Use
1 RS232 connector Connect your computer with RS232 cable.
2 Audio Out Connect the soundbar mini stereo plug (Supports
two channel output ).
3 Audio in Analog audio (two channel) input.
4 VGA connector Connect your computer to the monitor with VGA
cable.
5 DisplayPort connector Connect your computer with DP cable.
6
HDMI/MHL connector
Connect your computer with HDMI cable.
Connect your MHL devices with MHL cable.
7 HDMI connector Connect your computer with HDMI cable.
8 USB Down Stream Port
(Dedicated Charging
Port)
Connect your USB devices for charging.
DCP port is for charging devices and has no data
lines.
9 USB Down Stream Port Connect your USB devices.
10 USB upstream port Connect the USB cable that came with your monitor
to the computer. Once this cable is connected, you
can use the USB connectors on the monitor.
Bottom View
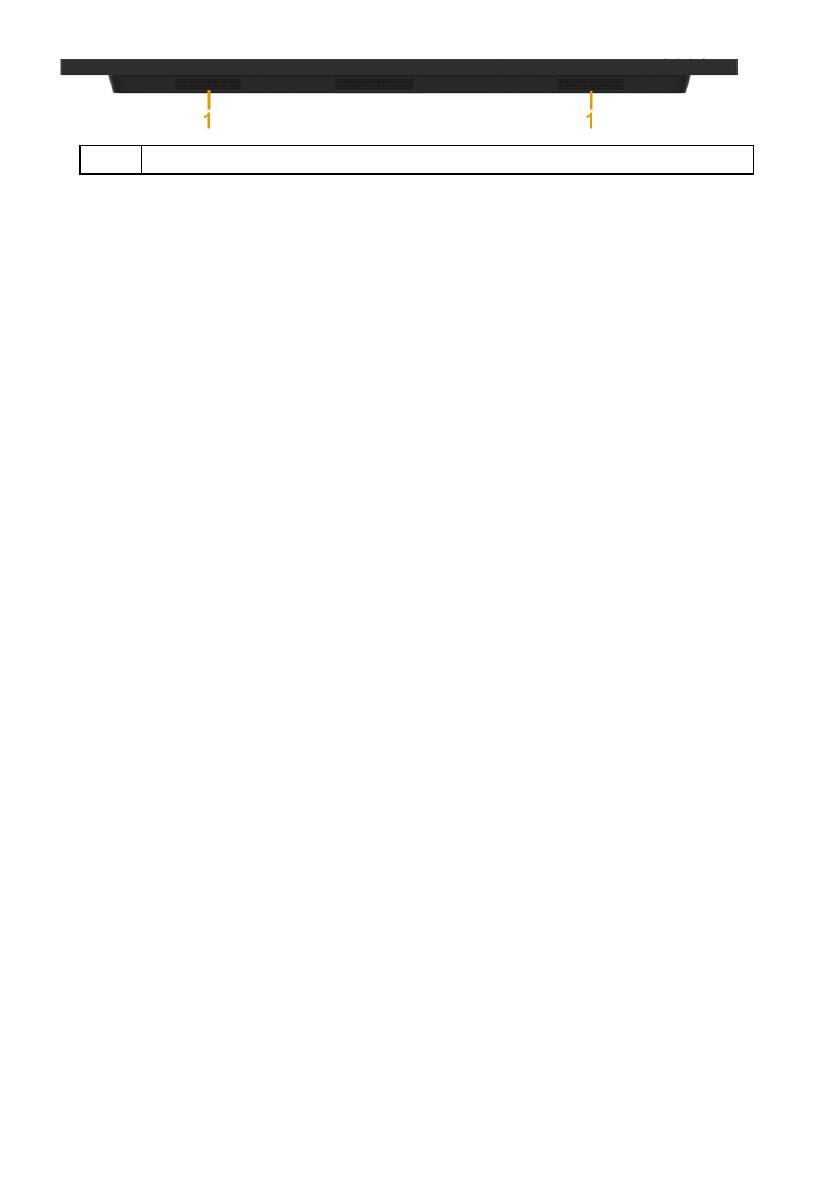
About Your Monitor 15
1 Speakers
Monitor Specifications
The following sections give you information about the various power management
modes and pin assignments for the various connectors of your monitor.

16 About Your Monitor
NOTE: This monitor is ENERGY STAR certified.
This product qualifies for ENERGY STAR in the factory default
settings which can be restored by "Factory Reset" function in the
OSD menu. Changing the factory default
settings or enabling
other features may increase power consumption that could
exceed the ENERGY STAR specified limit.
NOTE:
P :Power consumption of On Mode as defined in Energy Star 8.0 version.
Power Management Modes
If you have VESA’s DPM compliance display card or software installed in your PC,
the monitor can automatically reduce its power consumption when not in use. This
is referred to as Power Save Mode. If the computer detects input from the keyboard,
mouse, or other input devices, the monitor automatically resumes functioning. The
following table shows the power consumption and signaling of this automatic
power saving feature.
VESA
Modes
Horizontal
Sync
Vertical
Sync
Video
Power
Indicator
Power
Consumption
Normal
operation
Active
Active Active White
230 W (maximum)**
145 W (typical)
Active-off
mode
Inactive
Inactive
Blanked
Glowing
white
Less than 0.5 W
Switch off
- - Off
Less than 0.3 W
Network Standby
mode
Inactive
Inactive
Blanked
Glowing
white
Less than 3 W
** Maximum power consumption with max luminance, and USB active.
This document is informational only and reflects laboratory performance. Your
product may perform differently, depending on the software, components and
peripherals you ordered and shall have no obligation to update such information.
Accordingly, the customer should not rely upon this information in making
decisions about electrical tolerances or otherwise. No warranty as to accuracy or
completeness is expressed or implied.
TM
on
Power Consumption
P
120 W
Not Applicable
Total Energy Consumption(TEC)
on
TEC: Total energy consumption in kWh as defined in Energy Star 8.0 version.

About Your Monitor 17
Pin Assignments
RS232 connector
Pin Number Monitor Side of the 9-pin Side Signal Cable
1
2 RX
3 TX
4
5 GND
6
7 Not Used
8 Not Used
9
VGA connector
Pin Number Monitor Side of the 15-pin Side Signal Cable
1 Video-Red
2 Video-Green
3 Video-Blue
4 GND
5 Self-test
6 GND-R
7 GND-G
8 GND-B
18 About Your Monitor
9 DDC +5 V
10 GND-sync
11 GND
12 DDC data
13 H-sync
14 V-sync
15 DDC clock
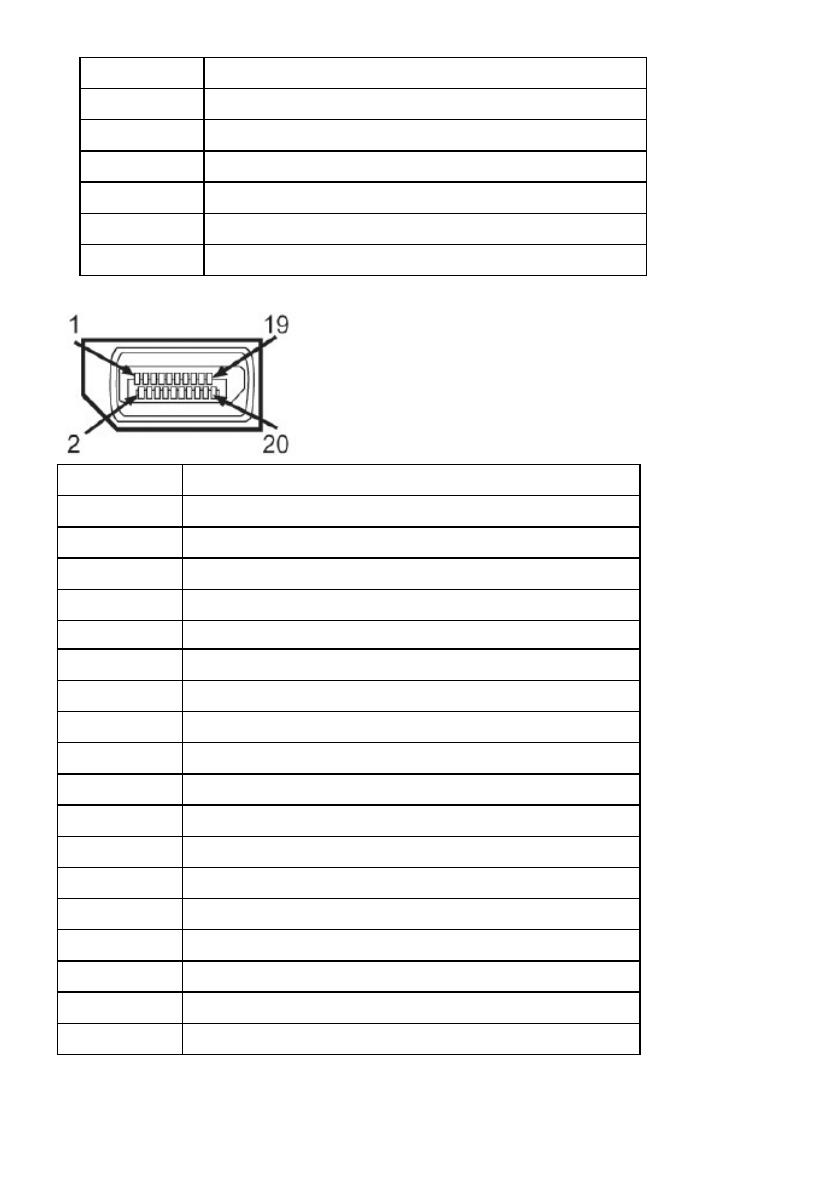
DisplayPort Connector
Pin Number 20-pin Side of the Connected Signal Cable
1 ML0(p)
2 GND
3 ML0(n)
4 ML1(p)
5 GND
6 ML1(n)
7 ML2(p)
8 GND
9 ML2(n)
10 ML3(p)
11 GND
12 ML3(n)
13 GND
14 GND
15 AUX(p)
16 GND
17 AUX(n)
18 HPD
About Your Monitor 19
19 DP_PWR_Return
20 +3.3 V DP_PWR
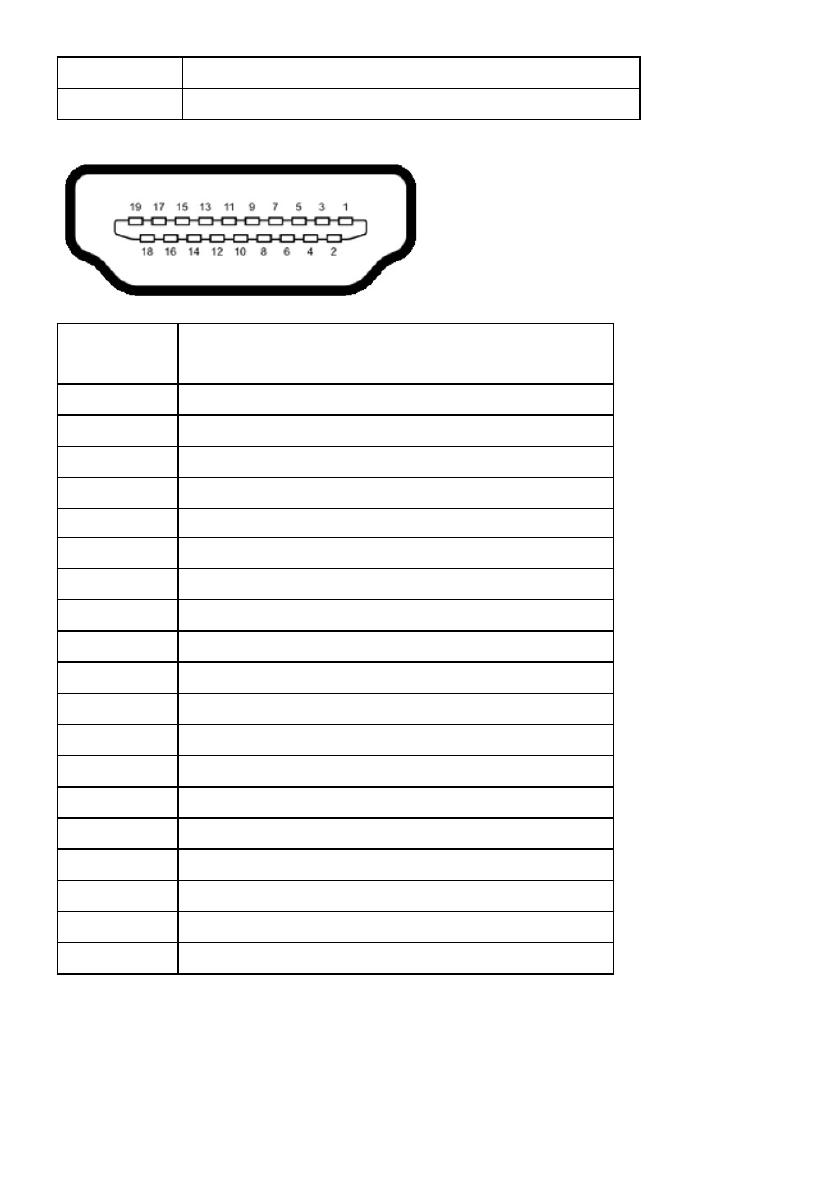
HDMI Connector
Pin Number 19-pin Side of the Connected Signal Cable
1 TMDS DATA 2+
2 TMDS DATA 2 SHIELD
3 TMDS DATA 2-
4 TMDS DATA 1+
5 TMDS DATA 1 SHIELD
6 TMDS DATA 1-
7 TMDS DATA 0+
8 TMDS DATA 0 SHIELD
9 TMDS DATA 0-
10 TMDS CLOCK+
11 TMDS CLOCK SHIELD
12 TMDS CLOCK-
13 CEC
14 Reserved (N.C. on device)
15 DDC CLOCK (SCL)
16 DDC DATA (SDA)
17 DDC/CEC Ground
18
+5 V POWER
19 HOT PLUG DETECT
20 About Your Monitor
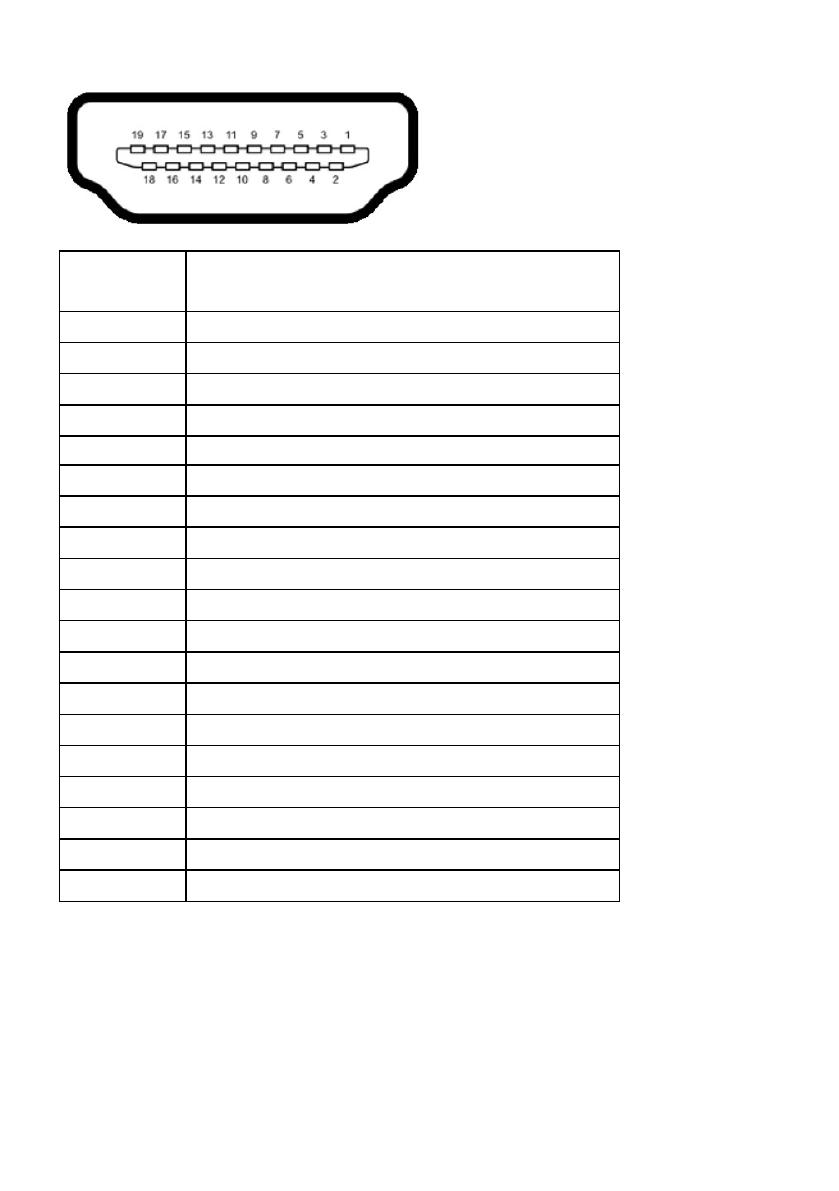
MHL Connector
Pin Number 19-pin Side of the Connected Signal Cable
1 TMDS DATA 2+
2 TMDS DATA 2 SHIELD
3 TMDS DATA 2-
4 TMDS DATA 1+
5 GND
6 TMDS DATA 1-
7 MHL+
8 TMDS DATA 0 SHIELD
9 MHL-
10 TMDS CLOCK+
11 GND
12 TMDS CLOCK-
13 CEC
14 Reserved (N.C. on device)
15 DDC CLOCK (SCL)
16 DDC DATA (SDA)
17 GND
18
VBUS (+5 V, 900 mA maximum)
19 CBUS
/