Electrolux ERW33900X User manual
- Category
- Drink coolers
- Type
- User manual
This manual is also suitable for
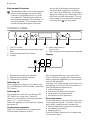
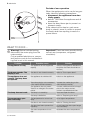
Electrolux ERW33900X is a wine cellar that provides optimal storage conditions for your wine collection. With two temperature zones, you can store both red and white wines at their ideal serving temperatures. The top compartment is designed for immediate consumption wines, with a temperature range of +6 to +11°C, while the bottom compartment is perfect for long-term storage and aging of wines, with a temperature range of +12 to +18°C.
Electrolux ERW33900X is a wine cellar that provides optimal storage conditions for your wine collection. With two temperature zones, you can store both red and white wines at their ideal serving temperatures. The top compartment is designed for immediate consumption wines, with a temperature range of +6 to +11°C, while the bottom compartment is perfect for long-term storage and aging of wines, with a temperature range of +12 to +18°C.


-
 1
1
-
 2
2
-
 3
3
-
 4
4
-
 5
5
-
 6
6
-
 7
7
-
 8
8
-
 9
9
-
 10
10
-
 11
11
-
 12
12
-
 13
13
-
 14
14
-
 15
15
-
 16
16


Electrolux ERW33900X User manual
- Category
- Drink coolers
- Type
- User manual
- This manual is also suitable for
Electrolux ERW33900X is a wine cellar that provides optimal storage conditions for your wine collection. With two temperature zones, you can store both red and white wines at their ideal serving temperatures. The top compartment is designed for immediate consumption wines, with a temperature range of +6 to +11°C, while the bottom compartment is perfect for long-term storage and aging of wines, with a temperature range of +12 to +18°C.
Ask a question and I''ll find the answer in the document
Finding information in a document is now easier with AI
Related papers
-
Electrolux ERW33911X User manual
-
Electrolux ERW33900X User manual
-
-
Electrolux ERW1573AOA User manual
-
-
-
-
 Electrolux Rex ERW3313AOX User manual
-
-
Electrolux ERW3313BOX User manual

Other documents
-
De Dietrich DWSR980X Owner's manual
-
 Electrolux Rex ERW3313AOX User manual
-
-
ELECTROLUX-REX WI3300DXV User manual
-
Rex-Electrolux WI3300DXVS User manual
-
Zanussi ZRW106N User manual
-
AEG SWD81800G1 User manual
-
Aeg-Electrolux SWD81800G1 User manual
-
Aeg-Electrolux SWD81800L0 User manual
-
