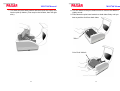
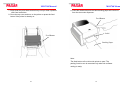
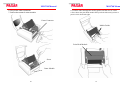
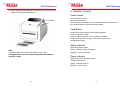
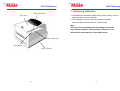
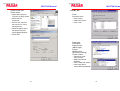
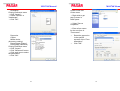
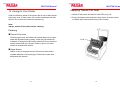
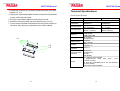
Paxar MO 9742 is a versatile printer designed for high-quality and efficient printing. With its ability to operate in standard, peel-off, or cutter modes, it offers great flexibility for various applications. The standard mode allows for easy collection of individual labels, while the peel-off mode conveniently removes the backing material after printing, saving time and effort. The cutter mode provides the convenience of automatic label cutting, enhancing productivity.
Paxar MO 9742 is a versatile printer designed for high-quality and efficient printing. With its ability to operate in standard, peel-off, or cutter modes, it offers great flexibility for various applications. The standard mode allows for easy collection of individual labels, while the peel-off mode conveniently removes the backing material after printing, saving time and effort. The cutter mode provides the convenience of automatic label cutting, enhancing productivity.


-
 1
1
-
 2
2
-
 3
3
-
 4
4
-
 5
5
-
 6
6
-
 7
7
-
 8
8
-
 9
9
-
 10
10
-
 11
11
-
 12
12
-
 13
13
-
 14
14
-
 15
15
-
 16
16
-
 17
17
-
 18
18
-
 19
19
-
 20
20
-
 21
21
-
 22
22
-
 23
23
-
 24
24
-
 25
25
-
 26
26
-
 27
27
-
 28
28
-
 29
29
-
 30
30
-
 31
31
-
 32
32
-
 33
33
-
 34
34
-
 35
35


Paxar MO 9742 is a versatile printer designed for high-quality and efficient printing. With its ability to operate in standard, peel-off, or cutter modes, it offers great flexibility for various applications. The standard mode allows for easy collection of individual labels, while the peel-off mode conveniently removes the backing material after printing, saving time and effort. The cutter mode provides the convenience of automatic label cutting, enhancing productivity.
Ask a question and I''ll find the answer in the document
Finding information in a document is now easier with AI
Related papers
Other documents
-
Zonet ZUC3120 Quick Installation Manual
-
 RFI Emission OS-204 User manual
-
CAB E2 Operating instructions
-
Dascom 7010/7010R Installation guide
-
Argox R-400PLUS Specification
-
AMT Datasouth 4600 User manual
-
Argox X-3200 User manual
-
Global Sources TM254G User manual
-
-
MFJ 5427 User manual
