9 HUSKYTOOLS.COM
Please contact 1-888-43-HUSKY for further assistance.
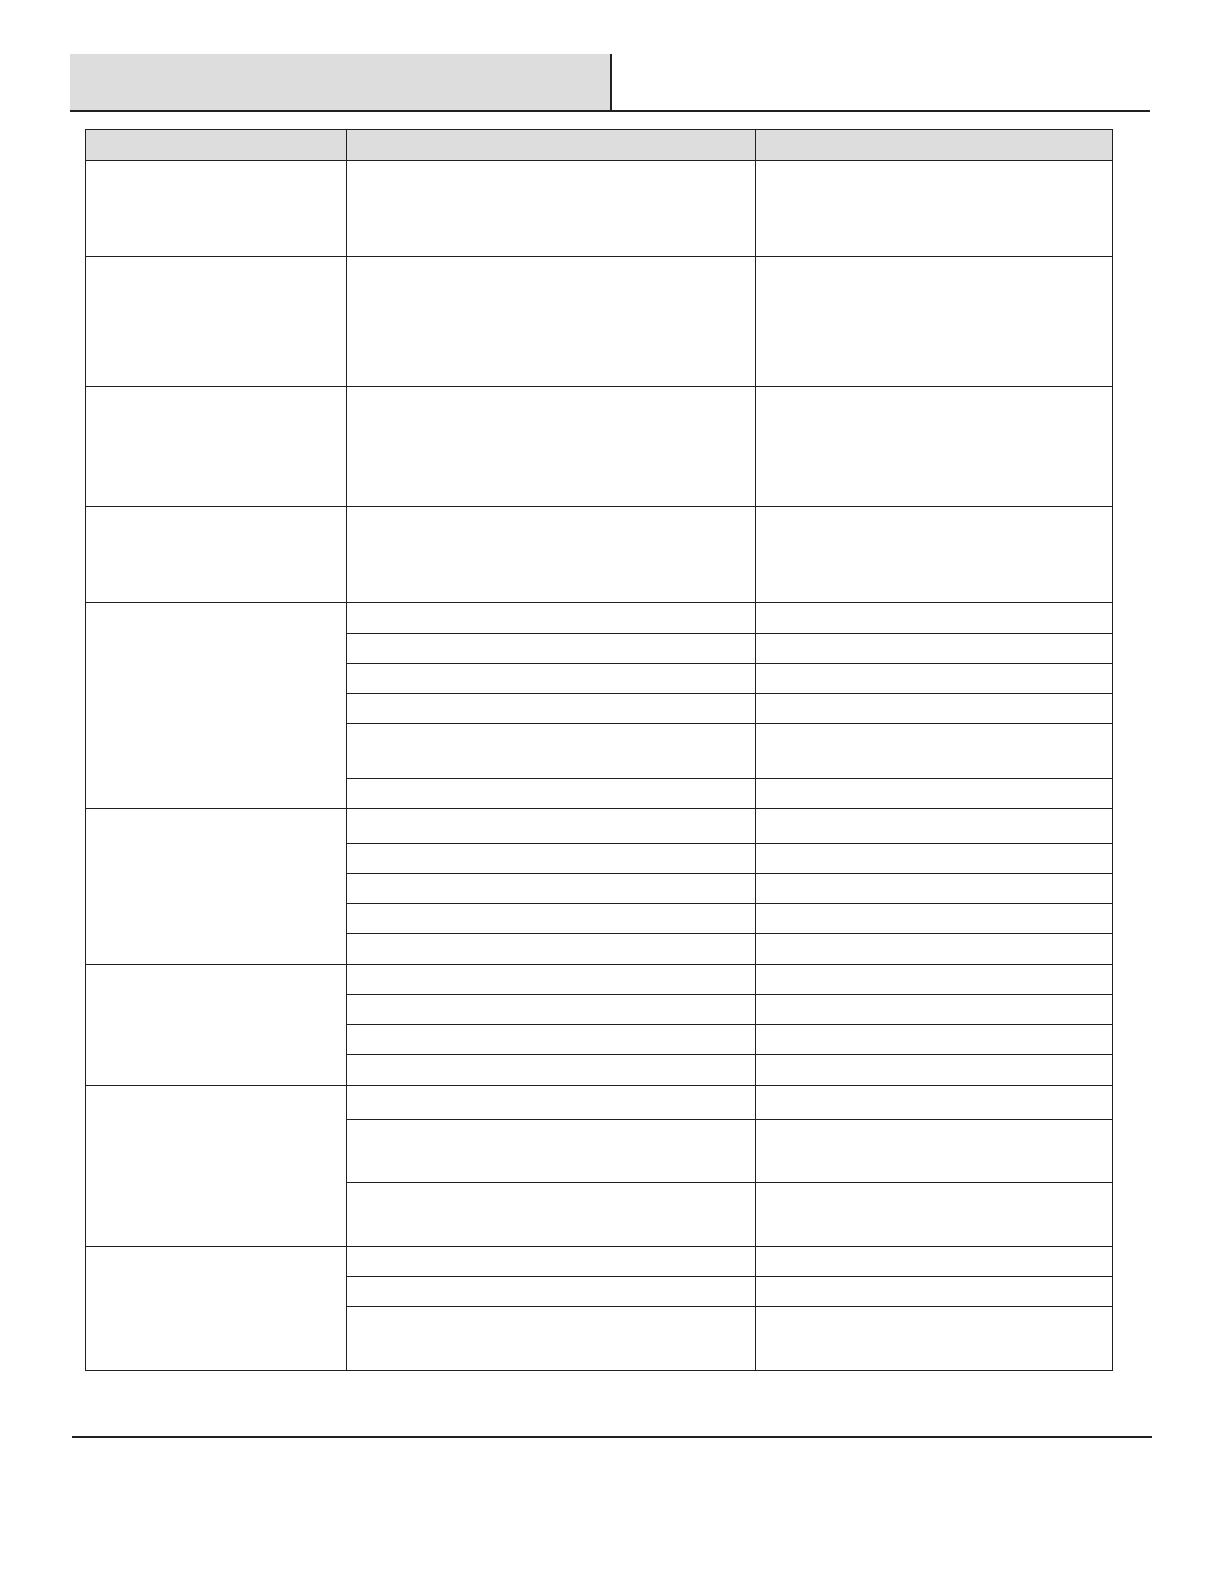
Troubleshooting
Problem Possible Cause Solution
Heavy spray pattern to the left
or right of the paint surface.
□ Holes in the left or right side of the air cap
are plugged.
□ Dirt on the left or right side of the uid tip.
□ Use only non-metalic paint.
□ Clean the air cap.
□ Clean the uid tip.
Heavy spray pattern to the top
or bottom of the paint surface.
□ Dried material at the top or bottom of the
uid tip.
□ The air cap is loose or the seat is dirty.
□ The air cap is plugged.
□ Use only non-metalic paint.
□ Clean the uid tip.
□ Clean and tighten the air cap.
Spray gun emits split spray
pattern.
□ The fan pattern is open too far.
□ The uid control is turned too far.
□ The atomization air adjustment is too high.
□ Partially close the pattern adjustment.
□ Increase uid using the uid control
knob.
□ Reduce the atomization air pressure.
The spray gun emits split spray
pattern.
□ The fan adjustment is partially closed.
□ The paint material is too thick.
□ Atomization pressure is too low.
□ Open the fan pattern adjustment.
□ Thin paint material to proper viscosity.
□ Increase the atomization pressure.
The spray gun emits sputtering
spray pattern.
□ The material level is too low. □ Rell the paint cup.
□ The container is tipped too far. □ Hold the spray gun upright.
□ Loose uid inlet connection. □ Tighten the uid cap.
□ Loose or damaged uid tip / seat. □ Adjust or replace the uid tip or seat.
□ Dry or loose uid needle packing nut. □ Lubricate and tighten the uid needle
and packing nut.
□ The air vent is clogged. □ Clear the vent hole.
Air is leaking from the air cap
without pulling the trigger.
□ The air valve stem is sticking. □ Lubricate the valve stem.
□ There is contaminate on the valve or seat. □ Clean air valve or seat.
□ The air valve or seat is worn or damaged. □ Replace air valve or stem.
□ The air valve spring is broken. □ Replace air valve spring.
□ Valve stem is bent. □ Replace valve stem.
Fluid leaking from uid tip of
spray gun.
□ The packing nut is too tight. □ Adjust the packing nut.
□ The uid tip is worn or damaged. □ Replace the tip and / or needle.
□ There is foreign matter on the tip. □ Clean the uid tip.
□ The uid needle spring is broken. □ Replace uid needle spring.
The spray gun emits excessive
overspray.
□ The atomization pressure is set too high. □ Reduce the atomization pressure.
□ The spray gun is held too far away from the
work surface.
□ Adjust to the proper distance.
□ Improper stroking (arcing, gun motion too
fast).
□ Move the spray gun at a moderate
pace, parallel to the surface.
The spray gun will not spray. □ There is no air pressure at the gun. □ Check the air lines.
□ The uid control is not open enough. □ Open uid control.
□ The material is too heavy. □ Thin the material or change over to a
pressure feed system.