Page is loading ...

Operating Instructions
M9920


1
Safety Information ........................................ 1
Panel Controls .............................................. 2
General Operation ........................................ 3
Sound Setting ............................................... 3
CD/MP3/WMA Operation ............................. 4
USB/SD/MMC MP3 Playback....................... 5
Tuner Operation ........................................... 7
Menu Function .............................................. 7
Bluetooth Operations .................................... 8
Electrical Connections ................................ 10
Anti-Theft System ....................................... 11
Installation Guide ........................................ 11
Troubleshooting .......................................... 12
Specications ............................................. 13
Thank you for purchasing this product. Please
read through these operating instructions
so you will know how to operate your model
properly. After you have finished reading the
instructions, keep this manual in a safe place
for future reference.
PRECAUTIONS
Use only in a 12-volt DC negative-ground
electrical system.
Disconnect the vehicle's negative battery
terminal while mounting and connecting the
unit.
When replacing the fuse, be sure to use
one with an identical amperage rating.
Using a fuse with a higher amperage rating
may cause serious damage to the unit.
DO NOT attempt to disassemble the unit.
Laser beams from the optical pickup are
dangerous to the eyes.
Make sure those pins or other objects do
not get inside the unit, they may cause
malfunctions, or create safety hazards such
as electrical shock or laser beam exposure.
If you have parked the car for a long
time in hot or cold weather, wait until the
temperature in the car become normal
before operating the unit.
Keep the volume at a level at which you can
hear outside warning sounds (horns sirens,
etc.).
Stop the car before performing any
complicated operation.
CD NOTES
Playing a defective or dusty CD can cause
dropouts in sound.
Handle the disc by holding its inner and
outer edges. Do not touch the surface of
the unlabeled side of the disc.
Do not touch the unlabeled side.
Do not attach any seal, label or data
protection sheet to either side of a disc.
Do not expose a CD to direct sunlight or
excessive heat.
Wipe a dirty CD from the center outward
with a cleaning cloth.
Never use solvents such as benzine or
alcohol.
This unit can not play 3-inch ( 8cm ) CDs.
Never insert a 3-inch CD contained in the
adapter or an irregularly shaped CD. The
unit may not be able to eject it, resulting in
a malfunction.
In addition to ordinary CDs, this unit can
play back a CD-R/CD-RW/MP3/UDF/CD-
TEXT.
SAFETY INFORMATION
CONTENTS

2
PANEL CONTROLS
1. - Press to eject disc.
2. - Band switch:
FM1 -> FM2 -> FM3 -> AM1 -> AM2
- Dial / Receive / Transfer call (in BT mode)
3. Power / Toggle the audio source
4. - Previous / next track
- Search (long press)
5. - Unlock the front panel.
6. - Scan play / Preset scan
- Auto memory store (long press)
7. - Button 1: Scan play / Preset station 1
- Button 2: Repeat play / Preset station 2.
- Button 3: Random play / Preset station 3.
- Button 4: Play / Pause / Top play (long press)
/ Preset station 4.
- Button 5: Previous folder / Preset station 5.
10 tracks down (long press) /
- Button 6: Next folder / Preset station 6.
10 tracks up (long press) /
8. - MUTE
- Sound effect setting
9. - Display switch
- System setup (long press)
10. - Aux-in jack
11. - USB connector
12. - CD disc slot
13.-Adjustvolumelevel/Conrm(press)
14. - MP3/WMA mode – Search function.
- CD mode – No function.
- RADIO mode – No function.
- AUX mode – No function.
- USB mode – Search function.
- BT mode – Reject / Terminate call.
MUTE
EQ
3
GENERAL OPERATION
Power On/Off Button
Press the [SRC / ] button to turn the unit on
when the vehicle ignition switch is on. Press
and hold the button to turn the unit off.
Adjust Volume level
Rotate the volume knob to adjust volume
level. Rotate it clockwise to increase and
counterclockwise to decrease the volume.
Audio Mute
Press the [ MUTE ] button to mute the volume
from the system. “MUTE” will appear on the
display panel and the volume will be muted.
Press the [ MUTE ] button again, or rotate
or press the VOL/MENU control to return the
volume level to the setting in use before the
Mute function was activated.
Mode Button (SRC)
Press the [SRC / ] button to change
between Radio, DISC (when disc is in), USB
(when USB is connected), Card(when SD/
MMC card is in), A2DP(when BT is connected)
or AUX play.
Auxiliary Input
To access an auxiliary device:
1. Connect the portable audio player to the
AUX interface on the front panel.
2. Press the [SRC / ] button to select Aux-
In mode.
Press SRC again to cancel Aux-In mode and
go to the next mode.
Display Selector (DISP)
This unit can display either the clock time
or radio frequency/CD player functions.
Ordinarily, the radio frequency or CD
player track indication is displayed, but the
unit will display the time when the DISP
button is pressed. The time will display for
approximately 5 seconds then return to the
radio or CD player function display.
Press and hold the [ MUTE ] button to enter
sound effect setting mode. First press shows
current EQ. Rotate the volume knob to
changes BEAT EQ in this order:
OFF -> POP -> CLASSIC -> ROCK -> JAZZ
-> CUSTOM
Rotate the volume knob to changes CUSTOM,
and press the volume knob, then press [
]
or [ ] button to select it including: BAS-G
-> TRE-G, rotate the volume knob to select a
value.
BAS-G / TRE-G: (-7)- (+7)
Press and hold the [ MUTE ] button, then
press [
] or [ ] button to select USER
preset including:
BALANCE -> FADER -> LOUD, rotate the
volume knob to select a value.
BALANCE:LEFT 1-7->CENTER->RIGHT 1-7
FADER:FRONT 1-7->CENTER->REAR 1-7
LOUD: ON/OFF
SOUND SETTING

4
CD/MP3/WMA OPERATIONS
This unit can play back MP3/WMA
les
Notes:
If you play a WMA file with active DRM (Digital
Rights Management), no audio is output.
To disable DRM
(Digital Rights Management)
When using Windows Media Player 9/10/11,
click on Tool -> Options -> Copy music tab,
then under Copy settings, unclick the Check
box for Copy protect music. Then, reconstruct
les.
PersonallyconstructedWMAlesareusedat
your own responsibility.
Precautions when creating MP3/
WMA le
Usable sampling rates and bit rates
1. MP3: Sampling rate 8 kHz-48 kHz, Bit rate
8 kbps-320 kbps / VBR
2. WMA: Bit rate 8 kbps-320 kbps
File extensions
1. Alwaysaddaleextension“.MP3”,“.WMA”
to MP3, WMA file by using single byte
letters. If you add a file extension other
than specified or forget to add the file
extension,thelecannotbeplayed.
2. Files without MP3/WMA data will not play.
Theleswillbeplayed soundlesslyifyou
attempt to play files without MP3/WMA
data.
* When VBR files are played, the play
time display may differ the play location.
* When MP3/WMA files are played, a
little no sound part is caused between
tunes.
Logical format (File system)
1. When writing MP3/WMA file on a CD-R
disc or CD-RW disc, please select
“ISO9660 level 1, 2 or Joliet or Romeo” or
Apple ISO as the writing software format.
Normal play may not be possible if the disc
is recorded on another format.
2. The folder name and file name can be
displayed as the title during MP3/WMA
play but the title must be within 32 single
byte alphabetical letters and numerals
(including an extension).
3. Donotafxanametoaleinsideafolder
having the same name.
Folder structure
A disc with a folder having more than
8 hierarchical levels will not read.
Number of les or folders
1. Up to 999 files can be recognized per
folder.
Upto3000lescanbeplayed.
2. Tracks are played in the order that they
were recorded onto a disc. (Tracks may not
always be played in the order displayed on
the PC.)
3. Some noise may occur depending on
the type of encoder software used while
recording.
Eject function
Just pressing the [ ] button, ejects the disc
even if the power to the unit was not turned
on.
Notes:
• If you force a CD into before auto
reloading, this can damage the CD.
• If a CD (12 cm) is left ejected for 15
seconds, the CD is automatically reloaded
(Auto reload).
Listening to a disc already loaded
in the unit
Press the [SRC / ] button to select the CD/
MP3/WMA mode.
When the unit enters the CD/MP3/WMA
mode, play starts automatically.
Loading a CD
Insert a CD into the center of the CD
SLOT with label facing up. The CD plays
automatically after loading.
Notes:
• Neverinsertforeign objects into theCD
SLOT.
• IftheCDisnotinsertedeasily,theremay
be another CD in the mechanism or the
unit may require service.
5
Selecting a track
Track-up
1. Press the [ ] button to move to the
beginning of the next track.
2. Each time you press the [ ] button, the
track advances to the beginning of the
next track.
3. For MP3/WMA disc, press and hold the
[6] button (1 sec.) to move ahead to +10
tracks.
Track-down
1. Press the [ ] button to move back to the
beginning of the current track.
2. Press the [ ] button twice to move back
to the beginning of the previous track.
3. For MP3/WMA disc, press and hold the [5]
button (1 sec.) to move back to -10 tracks.
Fast-forward/Fast-reverse
Fast-forward
Press and hold the [ ] button .
Fast-reverse
Press and hold the [ ] button .
* For MP3/WMA discs, it takes some time until
the start of searching and between tracks. In
addition, some error may occur in the play
time.
Folder select
This function allows you to select a folder
containing MP3/WMA files and start playing
fromthersttrackinthefolder.
• Discswithoutthe
or
TEXT
mark and
CD-ROMs cannot be played by this unit.
• Some CD-R/CD-RW discs may not be
usable.
Pausing play
1. Press the [ 4 ] button on the front panel or the
[ ] button on the remote control to pause
play.
“PAUSE” appears in the display.
2. Press the above button again to resume CD
play.
Displaying CD titles
This unit can display title data for MP3/WMA
disc.
When SCROLL is OFF, each time you press
the [DISP] button to change the title display.
MP3/WMA disc
FILE --> FOLDER --> TITLE --> ARTIST -->
ALBUM
Notes:
• IfMP3/WMAdiscis not inputTAG, “NO
TITLE” appears in the display.
• OnlyASCIIcharacterscanbedisplayedin
Tags.
CD/MP3/WMA OPERATIONS
1. Press the [ 5 ] or [ 6 ] button.
Press the [ 5 ] button to move the previous
folder. Press the [ 6 ] button to move the
next folder.
2. To select a track, press the [ ] or [ ]
button.
Search Function
Press the [MENU], then rotate the volume
knob to choose FOLD SCH or TRK SCH.
Direct Song/File Access
1. Press the volume knob to enter the track
list search mode.
2. Turn the volume knob to select a digit.
3. Press the volume knobtoconrmentryand
thetensdigitwillash.
4. Turn the volume knob to select digit.
5. Repeat above steps to enter the hundreds
and thousands digit, if necessary.
NOTE: The unit will only allow the selection
of digits that correspond with the number of
lesonthemediayouaresearching.
6. Once the track number appears on the
screen, press the volume knob to play the
selectedsong/le.
Searching Folders/Files
1. Press the volume knob to enter the folder
list search mode.
2. Turn the volume knob to select a folder.
3. Press the volume knob to enter the file
list search mode. And then the track list
appears in the display.

5
Selecting a track
Track-up
1. Press the [ ] button to move to the
beginning of the next track.
2. Each time you press the [
] button, the
track advances to the beginning of the
next track.
3. For MP3/WMA disc, press and hold the
[6] button (1 sec.) to move ahead to +10
tracks.
Track-down
1. Press the [ ] button to move back to the
beginning of the current track.
2. Press the [ ] button twice to move back
to the beginning of the previous track.
3. For MP3/WMA disc, press and hold the [5]
button (1 sec.) to move back to -10 tracks.
Fast-forward/Fast-reverse
Fast-forward
Press and hold the [ ] button .
Fast-reverse
Press and hold the [ ] button .
* For MP3/WMA discs, it takes some time until
the start of searching and between tracks. In
addition, some error may occur in the play
time.
Folder select
This function allows you to select a folder
containing MP3/WMA files and start playing
fromthersttrackinthefolder.
• Discswithoutthe
or
TEXT
mark and
CD-ROMs cannot be played by this unit.
• Some CD-R/CD-RW discs may not be
usable.
Pausing play
1. Press the [ 4 ] button on the front panel or the
[ ] button on the remote control to pause
play.
“PAUSE” appears in the display.
2. Press the above button again to resume CD
play.
Displaying CD titles
This unit can display title data for MP3/WMA
disc.
When SCROLL is OFF, each time you press
the [DISP] button to change the title display.
MP3/WMA disc
FILE --> FOLDER --> TITLE --> ARTIST -->
ALBUM
Notes:
• IfMP3/WMAdiscis not inputTAG, “NO
TITLE” appears in the display.
• OnlyASCIIcharacterscanbedisplayedin
Tags.
CD/MP3/WMA OPERATIONS
1. Press the [ 5 ] or [ 6 ] button.
Press the [ 5 ] button to move the previous
folder. Press the [ 6 ] button to move the
next folder.
2. To select a track, press the [ ] or [ ]
button.
Search Function
Press the [MENU], then rotate the volume
knob to choose FOLD SCH or TRK SCH.
Direct Song/File Access
1. Press the volume knob to enter the track
list search mode.
2. Turn the volume knob to select a digit.
3. Press the volume knobtoconrmentryand
thetensdigitwillash.
4. Turn the volume knob to select digit.
5. Repeat above steps to enter the hundreds
and thousands digit, if necessary.
NOTE: The unit will only allow the selection
of digits that correspond with the number of
lesonthemediayouaresearching.
6. Once the track number appears on the
screen, press the volume knob to play the
selectedsong/le.
Searching Folders/Files
1. Press the volume knob to enter the folder
list search mode.
2. Turn the volume knob to select a folder.
3. Press the volume knob to enter the file
list search mode. And then the track list
appears in the display.

6
1. Loading SD/MMC Card
Insert the SD/MMC card into the slot.
The unit will play the music automatically and the LCD will show
CARD.
2. Take out SD/MMC Card
Push SRC button and switch to non CARD mode, slightly press SD/
MMC card, take out the card when it was popped out.
3. Loading USB equipment
Open the rubber cap, insert the USB into the connector and the unit
play the music in the USB storer automatically, and the LCD will show
USB.
4. Take out USB equipment
Push the SRC button and switch to non USB mode, then take off the
USB storer, close the rubber cap.
USB/SD/MMC Notes
USBfunctions(ashmemorytype)MP3musicplay
1. SD/ MMC card support.
2. USBflashmemory2in1(SD/MMC)support.
3. Fat 12/fat 16/fat 32 is possible.
4. File name : 32 byte/dir name : 32 byte/tag name : 32 byte
5. Tag (ID3 tag ver 2.0)
- title/artist/album : 32 byte support.
6. USB 1.1 support, USB 2.0 support (It can not support USB 2.0 speed. Just, get the same
speed with USB 1.1).
Not all kinds of USB devices are compatible with the unit.
4. Turn the volume knob to select a track.
5. Press the volume knob to play.
* When play back MP3 / WMA file, this
function is performed in the current folder.
Top function
The top function resets the CD player to the
rst track of the disc. Press and hold the [ 4 ]
button (1 sec.) to play the rst track (track No. 1)
on the disc.
* IncaseofMP3/WMA,thersttrackofthe
current folder will be played.
Other various play functions
Scan play
This function allows you to locate and play the
rst10secondsofallthetracksrecordedona
disc.
Press the [ 1 ] button to perform scan play.
Repeat play
This function allows you to play the current
track repeatedly or play a track currently being
played in the MP3/WMA folder repeatedly.
CD:
1. Press the [ 2 ] button once or more until
“RPT ON” appears on the LCD to perform
repeat play.
2. Press [ 2 ] button repeatedly until “RPT
OFF” appears on the LCD to cancel repeat
playback.
USB/SD/MMC MP3 PLAYBACK
CD/MP3/WMA OPERATIONS
7
At all mode, press and hold [DISP] button to
enter system setup. Press [ ] or [ ]
button to select options, rotate the volume
knob to adjust.
CLOCK
Press the volume knob to enter clock setting
mode, rotate the volume knob to set clock,
press [ ] or [ ] button to select hour
or minute, press and hold the volume knob to
conrm.
DX/LO (RADIO mode)
Rotate the volume knob to choose radio local
or distant at RADIO mode.
• LO: Only stations with strong signal can be
received.
• DX: Stations with strong and weak signals
can be received.
STEREO/MONO mode
Rotate the volume knob to choose FM stereo or
mono.
SCROLL: ON/OFF
For track information that is longer than the
display panel:
When SCROLL is ON, the LCD will display
ID3 TAG information cyclely, e.g: TRACK-
>FOLDER->FILE->ALBUM->TITLE->ARTIST-
>TRACK->...
MENU FUNCTION
When SCROLL is OFF, the LCD will display
one of the ID3 TAG information, the default
is TRACK, but user can adjust it to other ID3
TAG information by press [DISP] button.
SUBWOOFER ON/OFF
Rotate the volume knob to choose Sub-woofer
on or off.
BEEP: ON/OFF
Rotate the volume knob to choose button
beep sound ON or OFF.
12/24H
Rotate the volume knob to choose time
format: 12 or 24 hour.
AUTO CON: ON/OFF
Automatically connects to the mobile phone
that was last connected.
Rotate the [VOLUME] knob to choose AUTO
CON ON or OFF.
Band
During radio play, press the [BAND] button to
choose between three FM, two AM bands.
The indication “AM”, “FM” appears on the
display panel according to your selection.
Up Tuning
Press the seek up [ ] button to tune
stations upward step-by-step. The current
frequency will be shown in digital format on
the display panel.
Press and hold the seek [ ] button to the
next available station.
Down Tuning
Press the seek down [ ] button to tune
stations downward step-by-step.
Press and hold the seek down [ ] button
to the previous available station.
Auto Store
Press the [PS/AS] button to scan preset
stations 1-6. Hold it to automatically select six
strong stations and store them in the current
band. The new stations replace stations
already stored in that band.
TUNER OPERATION

7
At all mode, press and hold [DISP] button to
enter system setup. Press [
] or [ ]
button to select options, rotate the volume
knob to adjust.
CLOCK
Press the volume knob to enter clock setting
mode, rotate the volume knob to set clock,
press [ ] or [ ] button to select hour
or minute, press and hold the volume knob to
conrm.
DX/LO (RADIO mode)
Rotate the volume knob to choose radio local
or distant at RADIO mode.
• LO: Only stations with strong signal can be
received.
• DX: Stations with strong and weak signals
can be received.
STEREO/MONO mode
Rotate the volume knob to choose FM stereo or
mono.
SCROLL: ON/OFF
For track information that is longer than the
display panel:
When SCROLL is ON, the LCD will display
ID3 TAG information cyclely, e.g: TRACK-
>FOLDER->FILE->ALBUM->TITLE->ARTIST-
>TRACK->...
MENU FUNCTION
When SCROLL is OFF, the LCD will display
one of the ID3 TAG information, the default
is TRACK, but user can adjust it to other ID3
TAG information by press [DISP] button.
SUBWOOFER ON/OFF
Rotate the volume knob to choose Sub-woofer
on or off.
BEEP: ON/OFF
Rotate the volume knob to choose button
beep sound ON or OFF.
12/24H
Rotate the volume knob to choose time
format: 12 or 24 hour.
AUTO CON: ON/OFF
Automatically connects to the mobile phone
that was last connected.
Rotate the [VOLUME] knob to choose AUTO
CON ON or OFF.
Band
During radio play, press the [BAND] button to
choose between three FM, two AM bands.
The indication “AM”, “FM” appears on the
display panel according to your selection.
Up Tuning
Press the seek up [ ] button to tune
stations upward step-by-step. The current
frequency will be shown in digital format on
the display panel.
Press and hold the seek [ ] button to the
next available station.
Down Tuning
Press the seek down [ ] button to tune
stations downward step-by-step.
Press and hold the seek down [ ] button
to the previous available station.
Auto Store
Press the [PS/AS] button to scan preset
stations 1-6. Hold it to automatically select six
strong stations and store them in the current
band. The new stations replace stations
already stored in that band.
TUNER OPERATION

8
BLUETOOTH OPERATIONS
The Bluetooth allows you to utilize your car’s
built-in audio system for wireless handsfree
mobile phone communication or streaming
music playback. Some Bluetooth mobile
phones have the audio features, and
some portable audio players support
Bluetooth feature. This system can play audio
data stored in a Bluetooth audio device. The
car stereo with Bluetooth will be able to
retrieve phonebook contacts, received call,
dialed call, missed call, incoming calls, outgoing
call and listen to music.
• Do not leave themicrophoneof Bluetooth
handsfree in the places with wind passing
such as air outlet of the air conditioner, etc.
This may cause a malfunction.
• If leave it in the places subjected to direct
sun, high temperature can cause distortion,
discoloration which may result in a
malfunction.
• Thissystem willnot operateormayoperate
improperly with some Bluetooth audio players.
• Cannot guarantee the compatibility of all
mobile phones together with unit.
• Audioplaybackwillbesettothesamevolume
level as set during telephone call. This might
cause problems, if extreme volume level is set
during telephone call.
Handsfree Operations
Pairing
1. Turn on Bluetooth function of your
mobile phone.
2. Enter mobile phone’s Bluetooth setup menu.
3. Search for new Bluetooth devices.
4.
5.
Select M9920 from the pairing list on the
mobile phone.
E n t er “0000” as the password ( The
password default setting is “ 0000 ”).
6. After pairing successfully, BT and HPF icons
will light up.
A2DP icon will light up after A2DP
connected.
Making a call
Operation from Bluetooth menu
Press the [SRC] button to switch the source to
“A2DP”. Press [MENU / ]button to select
“DIAL NUM” to make outgoing call:
• Dial Number
1. Press the [VOLUME ] knob to enter.
2. Rotate the [VOLUME] knob on the front
panel to switch: “DIAL NUMBER”.
3. Press the [VOLUME] knob to confirm the
selection.
4. Rotate the [VOLUME] knob to select a
number, press the knob to confirm and
ready to input the next digit. Repeat the
above until all numbers inputted.
5.Press the [BAND / ] button to dial.
6.Press [MENU / ] to terminate call.
• Transfer Call
You can switch Handsfree call and mobile
phone call.
Press the [BAND /
] button during call.
• Answering a call
You can answer an incoming call by pressing
the [BAND /
] button.
* Press the [MENU / ] button to reject an
incoming call.
Audio Streaming Operations
What is audio streaming?
Audio streaming is a technique for transferring
audio data such that it can be processed
as a steady and continuous stream. Users
can stream music from their external audio
player to their car stereo wirelessly and listen
to the tracks through the car’s speakers.
Please consult your nearest dealer for more
information on the product of wireless audio
streaming transmitter offered.
CAUTION
Please avoid operating your connected
mobile phone while audio streaming as
this may cause noise or sound choppy on
the song playback.
Audio streaming may or may not resume
after telephone interrupt as this is
dependent on mobile phone.
System will always return to Radio mode if
audio streaming is disconnected.
Note:
Be sure to read the chapter “Pairing” before
proceeding.
Notes:
9
Play / Pause a track
1. Push the [ 1 ] button to pause audio
playback.
2. To resume audio playback, push the [ 1 ]
knob again.
Selecting a track
Track-up
Press the [ ] button to move to the
beginning of the next track.
Track-down
Press the [ ] button to move to the
beginning of the previous track.
Note:
Playing order will depend on Bluetooth
audio
player. When [ ] button is pressed, some
A2DP devices will restart the current track
depends on the duration of playback.
During music streaming playback, “A2DP” will
be shown on the display. When A2DP device
is disconnected, “BT MUSIC” will be shown on
the display Some Bluetooth
audio players may
not have play / pause synchronized with this
unit. Please make sure both device and main
unit are in the same play / pause status in BT
MUSIC mode.
BLUETOOTH OPERATIONS

10
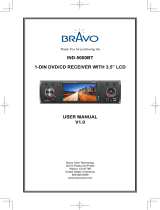
ELECTRICAL CONNECTIONS
Wiring Diagram
Location
Function
Location
Function
F1 ront Right (-) / Gray with Black Stripe7
Ground / Black
2
Front Right (+) / Gray
8
3
Rear Right (-) / Purple with Black Stripe
9
Battery 12V(+) / Yellow
4 Rear Right (+) / Purple 10
15 1
16 2
Rear Left (-) / Green with Black Stripe
ACC+ / Red
Illumination / Brown
Rear Left (+) / Green
Blue Wire - AMP/ANT Remote (+12 Volt Out)
Black Wire - Ground
Brown Wire - Illumination Input (+)
Yellow Wire - Battery 12V(+)
Red Wire - ACC+
Front Left
Speaker
White Wire
White/Black Wire
Green/Black Wire
Green Wire
Gray Wire
Gray/Black Wire
Purple Wire
Purple/Black Wire
Front Right
Speaker
Rear Left Speaker Rear Right Speaker
Front Left(-) / White with Black Stripe
Front Left(+) / White
SUB OUT(Green)
BT Mic Port
ANTENNA
Rear Left Line-out (White)
11
INSTALLATION GUIDE
Installation Opening
This unit can be installed in any dashboard
having an opening as shown below. The
dashboard should be 4.75mm - 5.56mm thick
in order to be able to support the unit.
If the opening is too small, carefully cut or
183mm (7 3/16”)
52mm (2”)
as necessary until the sleeve easily slides into
the opening. Do not force the sleeve into the
opening or cause it to bend or bow. Check for
space behind the dashboard for the
unit chassis.
Reset
Press the RESET button with a ball point pen
to reset the unit to the original status.
Note: Press the RESET button will erase the
clock setting and stored stations.
Installation Procedures
m e t sys o i dua r eh t o yna evom e r , t nave l e r f I . 1
from the car.
2. Insert the mounting sleeve into the
dashboard. Fix it
in place by folding
down the metal tabs.
3.
4.
5.
P e r f o r m t h e required elec t r ica l
connections.
Then check that everything works before
installing the main unit.
Remove the two screws on the top of the
unit, otherwise, the CD will not work.
gn i su d r aobhsad eh t n i o i da r r ac eh t l l a t sn I . 6
the supplied screws (M5x6mm).
7. Attach the outer trim frame.
fI y o u are not sure how to install this unit
correctly, contact a
technician.
Mounting sleeve
Main unit
Trim plate
Remove the
two screws
Mounting bolt
Rubber cushion
ANTI-THEFT SYSTEM
This unit is equipped with a detachable panel.
Removing this panel makes the radio totally
inoperable.
Remove the detachable panel
sse rP . 1 button.
2. Hold the part popped out
and pull the panel out.
G .3 ently press the button
of the case and open the
cover. Place the panel
into the case and take it
with you when you leave
the car.
Install detachable panel
F .1 i x right part of face
plate in the panel slot of
the unit.
ed i s t f e l eh t nwod sse rP . 2
of the face plate until it
clicks into the panel slot.
Remove the unit
. t inu eht fo rewop eht f fo hct iw S .1
2. Remove the panel and
the trim plate.
I .3 nsert both Removal
Keys into the hole on the
front of the set until they
lock.
4. Pull out the unit.
2
2
1
1
2
2
1
1
2
2
1
1

12
TROUBLESHOOTING
The following checklist can help you solve some problems which you may encounter when using the unit. Before consulting it, check the connections
and follow the instructions in the user manual. Do not use the unit in abnormal condition, for example without sound, or with smoke or foul smell can
causereorelectricshock,immediatelystopusingitandcallthestorewhereyoupurchasedit.
Problem Possible cause Solution
General
The unit will not switch on.
Car ignition is not on.
Cable is not properly connected.
Fuse is burnt.
Turn your car key in the ignition.
Check cable connection.
Replace fuse with a new fuse of the same capacity.
No sound
Volume is set at minimum or the mute
function is on.
Check the volume or switch the mute function off.
The unit or screen does not work normally. The unit system is unstable. Press the RESET button.
DISC mode
The appliance will not play discs.
The disc is inserted incorrectly.
The disc is dirty or damaged.
Disc must be inserted with the label side facing up. Clean
the disc and check for damage. Try another disc.
Sound skips due to vibration.
Mountingangleisover30˚.
Mounting is unstable.
Adjustmountingangletolessthan30˚.
Mount the unit securely with the supplied parts.
TUNER mode
Unable to receive stations. The antenna is not connected properly. Connect the antenna properly.
Poor quality reception of radio station.
The antenna is not fully extended or it is
broken.
Fully extend the antenna and if broken, replace it with a
new one.
Preset stations are lost. The battery cable is not properly connected.
Connect the permanent live on the unit to the permanent
live on the vehicle.
USB/SD/MMC mode
Unable to insert USB device or SD/MMC
card.
The memory card or USB device has been
inserted the wrong way round.
Insert it the other way around.
The USB device or SD/MMC card cannot
be read.
NTFS format is not supported.
CheckthatthelesystemisinFATorFAT32format.Due
to different formats, some models of storage devices or
MP3 players may not be read.
13
Disc Player
System: Disc digital audio system
Frequency response: 20Hz-20kHz
Signal/noise ratio: >80 dB
Total harmonic distortion: Less than 0.20% (1kHz)
Wowandutter: Below measurable limits
Channel separation: >55 dB
SPECIFICATION
General
Power supply:
12V DC (11V-16V)
Test voltage 14.4V, negative
ground
Maximum power output:
45Wx4 channels
Continuous power output: 20Wx4 channels (4
,10% T.H.D.)
Suitable speaker impedance: 4-8 ohm
Pre-Amp output voltage:
2.0V (CD play mode: 1KHz, 0 dB, 10 K
load)
Fuse: 15A
Dimensions(WxHxD): 178x50x166mm
Weight: 1.7kg
Aux-in: ≥300mV
FM Stereo Radio
Frequency range: 87.5-107.9MHz
Usable sensitivity: 8 dBμ
Quieting sensitivity(S/N=50dB): 12 dBμ
Frequency response: 30Hz-15kHz
Stereo separation: 30dB (1kHz)
Image response ratio: 50dB
IF response ratio: 70dB
Signal/noise ratio: 55dB
(AM) Radio
Frequency range: 530-1710 KHz
Usable sensitivity(S/N=20dB): 30 dBμ
Note:Specicationsandthedesignaresubjecttochangewithoutnotice
due to improvements in technology.

M9920_UM_IM_5-4-16
/