English Personal Audio System
Before operating the system, please read this guide thoroughly and retain it for
future reference.
Hereby, Sony Corp., declares that this equipment is in compliance with the
essential requirements and other relevant provisions of Directive 1999/5/EC.
For details, please access the following URL :
http://www.compliance.sony.de/
WARNING
To reduce the risk of fire, do not cover the ventilation opening of the apparatus
with newspapers, tablecloths, curtains, etc. Do not place the naked flame sources
such as lighted candles on the apparatus.
To reduce the risk of fire or electric shock, do not expose this apparatus to
dripping or splashing, and do not place objects filled with liquids, such as vases,
on the apparatus.
Do not install the appliance in a confined space, such as a bookcase or built-in
cabinet.
As the main plug is used to disconnect the system from the mains, connect the
system to an easily accessible AC outlet. Should you notice an abnormality in the
system, disconnect the main plug from the AC outlet immediately.
The system is not disconnected from the AC power source (mains) as long as it is
connected to the wall outlet, even if the system itself has been turned off.
Battery may explode if mistreated. Do not recharge, disassemble or dispose of in
fire.
On Copyrights and Licenses
The BLUETOOTH® word mark and logos are owned by the Bluetooth SIG, Inc. and
any use of such marks by Sony Corporation is under license.
The N Mark is a trademark or registered trademark of NFC Forum, Inc. in the
United States and in other countries.
Android and Google Play are trademarks of Google Inc.
iPad, iPhone, iPod, iPod classic, iPod nano, iPod touch and Mac are trademarks of
Apple Inc. registered in the U.S. and other countries.
Lightning is a trademark of Apple Inc.
“Made for iPod,” and “Made for iPhone” mean that an electronic accessory has
been designed to connect specifically to iPod or iPhone, respectively, and has
been certified by the developer to meet Apple performance standards. Apple is
not responsible for the operation of this device or its compliance with safety and
regulatory standards. Please note that the use of this accessory with iPod or
iPhone may affect wireless performance.
No Power No Problem is a trademark of Sony Corporation.
Auto Time Set is a trademark of Sony Corporation.
Other trademarks and trade names are those of their respective owners.
Notes
This system is not specified for use with an iPad via USB connection, and
malfunction may result if used with one.
In the Operating Instructions, “iPod” is used as a general reference to functions
on an iPhone, iPad or iPod, unless otherwise specified by the text or
illustrations.
CAUTION
Danger of explosion if battery is incorrectly replaced. Replace only with the same
or equivalent type.
To reduce the risk of fire or electric shock, do not expose this apparatus to rain or
moisture.
Precautions
Note when using with a mobile phone
For details on operation of your mobile phone when receiving a telephone call
while transmitting the sound using the BLUETOOTH connection, refer to the
operating instructions supplied with the mobile phone.
On safety
The nameplate indicating Sony trademark, model number and electrical rating is
located on the bottom exterior of this system.
Notes on the AC plug
Plug the AC plug into a nearby wall outlet. In the case of a problem, unplug it
from the wall outlet immediately.
Do not twist or place heavy objects on the AC plug cord.
To disconnect AC power, grasp the plug itself, not the cord.
On placement
Do not set the speaker in an inclined position.
Do not leave the system in a location near heat sources, or in a place subject to
direct sunlight, excessive dust, moisture, rain or mechanical shock.
Do not expose the battery to excessive heat such as direct sunlight, fire or the
like.
On operation
Do not insert any small objects, etc., into the jacks. The system may short out or
malfunction.
On cleaning
Do not use alcohol, benzine, or thinner to clean the cabinet.
Others
If you have any questions or problems concerning this system that are not
covered in this manual, please consult your nearest Sony dealer.
What is BLUETOOTH wireless
technology?
BLUETOOTH wireless technology is a short-range wireless technology that
enables wireless data communication between digital devices, such as a
computer and digital camera. BLUETOOTH wireless technology operates within a
range of about 10 m.
Connecting two devices as necessary is common, but some devices can be
connected to multiple devices at the same time.
You do not need to use a cable for connection, nor is it necessary for the devices
to face one another, such is the case with infrared technology. For example, you
can use such a device in a bag or pocket.
BLUETOOTH standard is an international standard supported by thousands of
companies all over the world, and employed by various companies worldwide.
Communication System and Compatible BLUETOOTH Profiles of
the system
Profile is standardisation of the function for each BLUETOOTH device specification.
The system supports the following BLUETOOTH version and profiles:
Communication System:
BLUETOOTH Specification version 3.0
Compatible BLUETOOTH Profiles:
A2DP (Advanced Audio Distribution Profile): Transmitting or receiving audio
content of high-quality.
AVRCP (Audio Video Remote Control Profile): Controlling A/V equipment;
pausing, stopping, or starting playback, etc.
HSP (Headset Profile): Talking on the phone/Operating the phone.
HFP (Hands-free Profile): Talking on the phone/Operating the phone by
hands-free.
SPP (Serial Port Profile): Establishing serial communication with BLUETOOTH
device.
Maximum communication range
Use BLUETOOTH devices within 10 m (line of sight) of the system.
Maximum communication range may shorten under the following conditions.
There is an obstacle such as a person, metal, or wall between the system and
BLUETOOTH device.
A wireless LAN device is in use near the system.
A microwave oven is in use near the system.
A device that generates electromagnetic radiation is in use near the system.
Interference from other devices
Because BLUETOOTH devices and wireless LAN (IEEE802.11b/g) use the same
frequency, microwave interference may occur and resulting in communication
speed deterioration, noise, or invalid connection if the system is used near a
wireless LAN device. In such a case, perform the following.
Use the system at least 10 m away from the wireless LAN device.
If the system is used within 10 m of a wireless LAN device, turn off the
wireless LAN device.
Interference to other devices
Microwaves emitting from a BLUETOOTH device may affect the operation of
electronic medical devices. Turn off the system and other BLUETOOTH devices in
the following locations, as it may cause an accident.
where inflammable gas is present, in a hospital, train, airplane, or a gas
station
near automatic doors or a fire alarm
Notes
To be able to use the BLUETOOTH function, the BLUETOOTH device to be
connected requires the same profile as the system’s.
Note also that even if the same profile exists, devices may vary in function
depending on their specifications.
Due to the characteristic of BLUETOOTH wireless technology, the sound played
on the system is slightly delayed from the sound played on the BLUETOOTH
device during talking on the telephone or listening to the music.
This system supports security capabilities that comply with the BLUETOOTH
standard to provide a secure connection when the BLUETOOTH wireless
technology is used, but security may not be enough depending on the setting.
Be careful when communicating using BLUETOOTH wireless technology.
We do not take any responsibility for the leakage of information during
BLUETOOTH communication.
A device featuring the BLUETOOTH function is required to conform to the
BLUETOOTH standard specified by Bluetooth SIG, and be authenticated. Even if
the connected device conforms to the above mentioned BLUETOOTH standard,
some devices may not be connected or work correctly, depending on the
features or specifications of the device.
Noise or sound skips may occur depending on the BLUETOOTH device
connected with the system, the communication environment or the usage
environment.
Getting Started
Connecting to a Power Source
1 Plug the AC plug into a wall outlet firmly.
About the battery as a backup power source
This system contains a CR2032 battery as a backup power source to keep the
clock and the alarm operating during a power interruption. (No Power No
Problem system)
CAUTION
When to replace the battery
When the battery becomes weak, “” lights up in the display.
If a power interruption occurs while the battery is weak, the current time and
alarm will be erased.
Replace the battery with a Sony CR2032 lithium battery. Use of another battery
may cause a fire or explosion.
To replace the battery, see “Replacing the Battery” for details.
Note
If “AM 12:00” flashes in the display when the system is connected to an AC outlet for the first
time, the battery may be weak. In this case, consult your nearest Sony dealer.
Setting the Clock
Right side of the system
Setting the clock for the first time
This system is preset to the current GST (Gulf Standard Time) at the factory, and is
powered by a backup battery. All you need to do the first time is just plug it in
and select your time zone.
1 Plug in the system.
The current GST (Gulf Standard Time) lights up in the display.
2 Press and hold OFF and CLOCK until area number “4”
begins to flash in the display.
3 Press ALARM TIME SET +/– to select the number as
follows:
Area number Time zone
0 Western European Time/Western European
Summer Time
1 Central European Time/Central European Summer
Time
2 Eastern European Time/Eastern European Summer
Time
3 Eastern Africa Time
4 (default setting) Gulf Standard Time
4 Press DISPLAY/ENTER to confirm.
Notes
To cancel the time zone setting, press OFF instead of DISPLAY/ENTER in step 4.
Though the clock is correctly set at the factory, discrepancies may arise during transport or
storage. If necessary, set the clock to the correct time by referring to “Setting the clock
manually.”
To activate/cancel Auto DST/summer time adjustment
When Auto DST/summer time adjustment is activated, this system automatically
adjusts for daylight saving time (summer time).
When Western European Time, Central European Time, or Eastern European Time
is set, Auto DST/summer time adjustment defaults to on.
To activate Auto DST/summer time adjustment, while the clock is displayed, press
and hold OFF and DISPLAY/ENTER until “
” and “On” light up in the
display. Auto DST/summer time adjustment has been activated, then the display
returns to the clock.
To cancel Auto DST/summer time adjustment, while the clock is displayed, press
and hold OFF and DISPLAY/ENTER until “
” and “OFF” light up in the
display.
Note
Changes to Auto DST/summer time adjustment by the system (see above) are subject to
circumstances and laws in each country/region. Should this interfere with desired
adjustment, cancel the Auto DST/summer time adjustment and set the DST display manually
as necessary.
When daylight saving time (DST/summer time) begins
When Auto DST/summer time adjustment is activated, this system automatically
adjusts for daylight saving time (summer time).
“
” lights up from the beginning of daylight saving time (summer time) and turns
off at the end of the daylight saving time (summer time) automatically.
Auto DST/summer time adjustment is based on GMT (Greenwich Mean Time).
Area number 0:
Daylight saving time (summer time) begins at: 1:00 AM on the final Sunday of
March.
Standard time begins at: 2:00 AM on the final Sunday of October.
Area number 1:
Daylight saving time (summer time) begins at: 2:00 AM on the final Sunday of
March.
Standard time begins at: 3:00 AM on the final Sunday of October.
Area number 2:
Daylight saving time (summer time) begins at: 3:00 AM on the final Sunday of
March.
Standard time begins at: 4:00 AM on the final Sunday of October.
When the system is set to Eastern Africa Time or Gulf Standard Time, the
beginning and the end of daylight saving time (summer time) will be the same as
area number 1.
Setting the clock manually
To change the clock setting manually, operate the system as follows.
1 Plug in the system.
2 Press and hold CLOCK until the year digits begin to flash
in the display.
3 Press ALARM TIME SET +/– to select the year, and then
press
CLOCK to confirm.
Press and hold ALARM TIME SET +/– to change the year digits quickly.
Once you confirm the setting by pressing CLOCK , the month digits begin
to flash.
4 Repeat step 3 to set the month, day, hour and minute.
The seconds start incrementing from zero.
Notes
If you do not press any button for about 1 minute while setting the clock, the clock setting will
be cancelled.
A 100-year calendar (2013 - 2112) is installed in the system. When the date is set, the day of
the week is automatically displayed.
MON = Monday, TUE = Tuesday, WED = Wednesday,
THU = Thursday, FRI = Friday, SAT = Saturday, SUN = Sunday
To change the time format
You can choose the displayed time format between the 12-hour system (default)
or the 24-hour system.
Press and hold OFF and SNOOZE/BRIGHTNESS for about 2 seconds.
The time format toggles between the 12-hour system (“AM 12:00” = midnight) and
the 24-hour system (“0:00” = midnight).
To display the year and date
While the clock is displayed, press CLOCK once to display the date and month,
and press again to display the year. To return to the current time display, press
CLOCK once again; or after a few seconds the display will return automatically.
Connecting the AM Loop Aerial
The shape and length of the aerial is designed to receive AM signals. Do not
dismantle or roll up the aerial.
1 Raise the plastic stand and fit the aerial into the slot of the
stand.
Press the aerial into the stand
until it clicks.
Plastic stand
2 Insert the AM aerial connector in the AM ANTENNA jack on
the rear of the system.
To remove the AM loop aerial
Push and hold down the tab of the aerial terminal clamp, and remove the AM
loop aerial.
How to Make Wireless Connection with
BLUETOOTH Devices
You can enjoy music and hands-free calling with the system wirelessly by using
your device’s BLUETOOTH function.
Choose one of the following three connection methods, best suited for the
BLUETOOTH device. For details on how to operate your device, refer to the
operating instructions supplied with the device.
Pairing with a BLUETOOTH device: see
Pattern A
BLUETOOTH devices need to be “paired” with each other beforehand.
Connecting with a paired device: see
Pattern B
To listen to music with a BLUETOOTH device that has been paired, see this
pattern.
One-touch connection with a smartphone (NFC):
see
Pattern C
Using an NFC compatible smartphone, you can establish BLUETOOTH connection
by just touching the system with it.
For details about NFC, see “About NFC” in
Pattern C
.
Check the following before operating the system.
Both the system and the device are placed within 1 m of each other.
The system is connected to a power source.
The operating instructions supplied with the device are kept at hand.
Pattern A
Pairing and connecting with a BLUETOOTH device
1 Set the BLUETOOTH function of the BLUETOOTH device to
on.
For details, refer to the operating instructions supplied with the device.
2 Press and hold BLUETOOTH PAIRING on the system
until beeps are heard and “
(BLUETOOTH)” begins to flash
quickly in the display.
Tip
From the factory, pairing information is not stored in the system. In this case, if you only
press
BLUETOOTH PAIRING , “ (BLUETOOTH)” starts flashing quickly in the
display.
(BLUETOOTH)
flashes quickly
3 Perform the pairing procedure on the BLUETOOTH device to
detect the system.
If “SONY: ICF-CS20BT” does not appear on the device’s display, repeat from
step 1.
Note
Some devices cannot display a list of detected devices.
4 Select “SONY: ICF-CS20BT” shown in the display of the
BLUETOOTH device.
5 If Passcode* input is required on the display of the
BLUETOOTH device, input “0000.”
The BLUETOOTH connection is established and “ (BLUETOOTH)” in the display
stays on.
* Passcode may be called “Passkey,” “PIN code,” “PIN number,” or “Password.”
Tip
To pair with other BLUETOOTH devices, repeat steps 1 to 5 for each device.
Notes
Pairing mode of the system is cancelled after about 5 minutes, and “ (BLUETOOTH)” in the
display flashes slowly. If the pairing mode is cancelled while performing this procedure, start
over from step 2.
Passcode of the system is fixed as “0000.” The system cannot be paired with a BLUETOOTH
device whose Passcode is not “0000.”
Once BLUETOOTH devices are paired, there is no need to pair those devices again. However,
in the following cases, you will need to perform the pairing procedure again.
Pairing information is deleted after repair, etc.
The system is paired with 5 or more devices.
The system can be paired with up to 4 BLUETOOTH devices. If a new device is paired after 4
devices have been paired, the device whose latest connection time is the oldest among the
4 paired devices is replaced by the new one.
More than one device can be paired with the system, but sound will be heard from just one
of those devices.
Pattern B
Connecting with a paired BLUETOOTH device
1 Set the BLUETOOTH function of the BLUETOOTH device to
on.
Tips
When BLUETOOTH is pressed, the system tries to establish BLUETOOTH connection
with the BLUETOOTH device connected to the system last time. The BLUETOOTH
connection is established and “
(BLUETOOTH)” in the display stays on.
When “
(BLUETOOTH)” lights up in the display, the system is connected to a BLUETOOTH
device. When you want to connect another BLUETOOTH device, terminate the current
BLUETOOTH connection first by operating the connected BLUETOOTH device.
2 Select “SONY: ICF-CS20BT” shown in the display of the
BLUETOOTH device.
If necessary, select a BLUETOOTH profile that the system supports from the
following: A2DP, HSP or HFP. For details on each profile, see “Listening to
Music by BLUETOOTH Connection with a Smartphone, etc.” or “Using
Hands-free Calling While Listening to Music.”
Note
This step may not be necessary for some devices.
The BLUETOOTH connection is established and “ (BLUETOOTH)” in the display
stays on.
Pattern C
Connecting with a smartphone by One touch (NFC)
By just touching the system with an NFC compatible smartphone, the system
pairs and connects with the smartphone. (After making the BLUETOOTH
connection, the system switches to the BLUETOOTH function automatically.)
Compatible smartphones
Smartphones with the NFC function built-in
(OS: Android 2.3.3 or later, excluding Android 3.x)
Customers in Asia
Access the following Web site for details:
http://www.sony-asia.com/section/support
About NFC
NFC (Near Field Communication) is a technology enabling short-range wireless
communication between various devices, such as mobile phones and IC tags.
Thanks to the NFC function, data communication can be achieved easily just by
touching the relevant symbol or designated location on NFC compatible devices.
1 Set the NFC function of the smartphone to on.
For details, refer to the operating instructions supplied with the smartphone.
If your smartphone OS is Android 2.3.3 or later, and less than Android 4.1:
proceed to step 2.
If your smartphone OS is Android 4.1 or later: proceed to step 4.
2 Download and install the app “NFC Easy Connect” on the
smartphone.
“NFC Easy Connect” is an original app by Sony for Android phones, and is
available at Google Play Store.
Search for “NFC Easy Connect” or scan the following two-dimensional code to
download and install the free app. Communication fees are required to
download the app.
The App may not be available in some countries and/or regions.
Tip
For some smartphones, One-touch connection may be available without downloading
the app “NFC Easy Connect.” In that case, the operation and specifications may be
different from the description here. For details, refer to the operating instructions
supplied with the smartphone.
By the two-dimensional code:
Use a two-dimensional code reader app.
3 Start the app “NFC Easy Connect” on the smartphone.
Make sure that the application screen is displayed.
4 Touch the system with the smartphone.
Keep touching the smartphone on the N marked part of the system until the
smartphone responds.
Note
If the screen of your smartphone is locked, the smartphone will not function. In this case,
release the lock, then touch the smartphone on the N marked part again.
Smartphone responds (system recognized)
(BLUETOOTH) lights up
Follow the on-screen instructions to establish the connection.
The BLUETOOTH connection is established and “
(BLUETOOTH)” in the display
stays on.
Tips
If it is difficult to establish the connection, try the following.
Activate the app “NFC Easy Connect” and move the smartphone slightly on the N
marked part of the system.
If the smartphone is in a case, remove it.
Touch the system with the smartphone again to disconnect.
If you have multiple NFC compatible devices, just touch the smartphone to a different
device to switch the connection to that device. For example, when your smartphone is
connected with NFC compatible headphones, just touch the smartphone to the system to
change the BLUETOOTH connection to the system.
Indications of the BLUETOOTH function
Status Display
BLUETOOTH function “BLUETOOTH” lights up
Pairing with a device
“
(BLUETOOTH)” flashes quickly
Searching for a device
“
(BLUETOOTH)” flashes
Connected to a device
“
(BLUETOOTH)” lights up
Listening to Music
Listening to Music by BLUETOOTH
Connection with a Smartphone, etc.
You can enjoy listening to music and basic remote control operation of a
BLUETOOTH device via BLUETOOTH connection. The BLUETOOTH device is
required to support the following BLUETOOTH profiles.
A2DP (Advanced Audio Distribution Profile): enables you to enjoy high-quality
audio content wirelessly.
AVRCP (Audio Video Remote Control Profile): enables you to enjoy basic remote
control operation (play, stop, etc.) of a BLUETOOTH device.
Operations may vary depending on the BLUETOOTH device. Refer also to the
operating instructions supplied with your BLUETOOTH device.
1 Make the BLUETOOTH connection between the system and
the device.
For details on the BLUETOOTH connection procedure, see “How to Make
Wireless Connection with BLUETOOTH Devices.” The BLUETOOTH connection is
established and “
(BLUETOOTH)” in the display stays on.
2 Start playback on the BLUETOOTH device, then adjust the
volume.
Set the volume of the BLUETOOTH device to a moderate level, and press
VOLUME –/+ on the system.
After use
Do any of the following to terminate the BLUETOOTH connection.
Set the BLUETOOTH function of the BLUETOOTH device to off. For details, refer
to the operating instructions supplied with the device.
Turn off the BLUETOOTH device.
Touch the system with the smartphone again to disconnect (NFC compatible
smartphones only).
System button functions during music playback
You can operate a BLUETOOTH device that supports AVRCP. Available functions
may vary depending on the BLUETOOTH device. Refer to the operating
instructions supplied with the BLUETOOTH device.
Buttons Functions
(play/pause)
Press once to pause/resume playback.
/ (forward/
rewind)
Press once to skip to the next/previous track.
VOLUME –/+
Press to adjust the volume.
Listening to Music by Wired Connection
Listening to Music via USB Connection with an
iPhone/iPod
You can enjoy listening to music and play back an iPhone/iPod connected to the
system via USB.
Update your device to the latest software version before use.
USB cable*
(not supplied)
(USB) port on the rear of the system
* USB cable: Use the Lightning to USB Cable or Dock Connector to USB Cable
supplied with your iPhone/iPod.
1 Connect the iPhone/iPod to the (USB) port on the rear of
the system.
2 Press FUNCTION to select “USB.”
Press FUNCTION repeatedly until “USB” lights up in the display.
3 Start playback on the connected iPhone/iPod, then adjust
the volume.
Set the volume of the connected iPhone/iPod to a moderate level, and press
the VOLUME –/+ on the system.
Notes
When a USB device other than an iPhone/iPod is connected to the system, only charging
begins automatically.
Do not connect the multiple devices to the (USB) port of the system.
After use
Press FUNCTION or OFF to deactivate the USB function.
System button functions during music playback
Buttons Functions
(play/pause)
Press once to pause/resume playback.
/ (forward/
rewind)
Press once to skip to the next/previous track.
Press and hold to fast-forward/fast-rewind.
VOLUME –/+
Press to adjust the volume.
Listening to Music by Wired Connection with a
Portable Audio Device, etc.
You can enjoy sound from the external device, such as a portable digital music
player, through the speaker of this system. Be sure to turn off the power of the
device before making any connections.
AUDIO IN jack (stereo mini jack)
on the rear of the system
Connecting cord
(not supplied)
1 Connect the device to the AUDIO IN jack on the rear of the
system.
2 Press FUNCTION to select “AUDIO IN.”
Press FUNCTION repeatedly until “AUDIO IN” lights up in the display.
3 Start playback on the connected device, then adjust the
volume.
Set the volume of the connected device to a moderate level, and press the
VOLUME –/+ on the system.
After use
Press FUNCTION or OFF to deactivate the AUDIO IN function. To stop
playback on the connected device, operate the connected device.
Notes when connecting the device by wired connection
The necessary type of cable or connecting cord depends on the device. Be sure to use the
correct type of cable or cord.
When you watching TV or listening to the radio with a device connected to the system, the
reception may be poor.
When you listen to the radio with a device connected, turn off the connected device to
prevent noise. If noise occurs, even when the device is turned off, disconnect and place the
device away from the system.
Tip
You can use hands-free calling while the cable or connecting cord is used with this system.
Listening to Radio
FM wire
aerial
Rear of the system
Right side of the system
Presetting the radio stations automatically - Auto
preset tuning
You can preset receivable radio stations in your area automatically by auto preset
tuning. You can preset up to 20 FM stations and 10 AM stations.
1 Press FUNCTION to select “FM” or “AM.”
Press FUNCTION repeatedly until “FM” or “AM” lights up in the display.
2 Press and hold FUNCTION AUTO PRESET until “AP”
begins to flash in the display.
3 Press DISPLAY/ENTER .
Receivable radio stations will be preset automatically in order of frequency.
Tip
To cancel auto preset tuning, press OFF .
Listening to the radio from preset radio stations
You can listen to the radio simply by selecting a preset number. Although radio
frequencies are preset at the factory, we recommend you to preset receivable
radio stations in your area by auto preset tuning.
1 Press FUNCTION to select “FM” or “AM.”
Press FUNCTION repeatedly until “FM” or “AM” lights up in the display.
2 Press MODE to select “PRESET.”
3 Press PRESET +/– to select the preset number for the
desired radio station.
4 Press VOLUME –/+ to adjust the volume.
To display the preset number and the frequency when listening
to radio
Press DISPLAY/ENTER once to display the preset number, and press again to
display the frequency of the current station. To return to the clock display, press
DISPLAY/ENTER once again; or after a few seconds the display will return
automatically.
After use
Press FUNCTION or OFF to deactivate the radio function.
To improve reception
For FM radio reception, extend the FM wire aerial fully to increase reception
sensitivity.
For AM radio reception, connect the supplied AM loop aerial to the system.
Rotate the aerial horizontally for optimum reception.
If stereo FM reception is noisy, press and hold MODE until “MONO” lights up
in the display. You will lose the stereo effect, but noise will be reduced.
Listening to the radio by manual tuning
1 Press FUNCTION to select “FM” or “AM.”
Press FUNCTION repeatedly until “FM” or “AM” lights up in the display.
2 Press MODE to select “TUNING.”
3 Press and hold TUNE +/– until the frequency digits begin
to change quickly in the display.
The system automatically scans the radio frequencies and stops when it finds
a clear station (automatic tuning mode).
If you cannot tune to a station using the automatic tuning mode, press TUNE
+/– repeatedly to change the frequency step by step.
When an FM stereo broadcast is received, “ST” lights up in the display.
4 Press VOLUME –/+ to adjust the volume.
Note
The frequency display is accurate to within 0.1 MHz. For example, 88.00 MHz or 88.05 MHz
will be displayed as “88.0 MHz.”
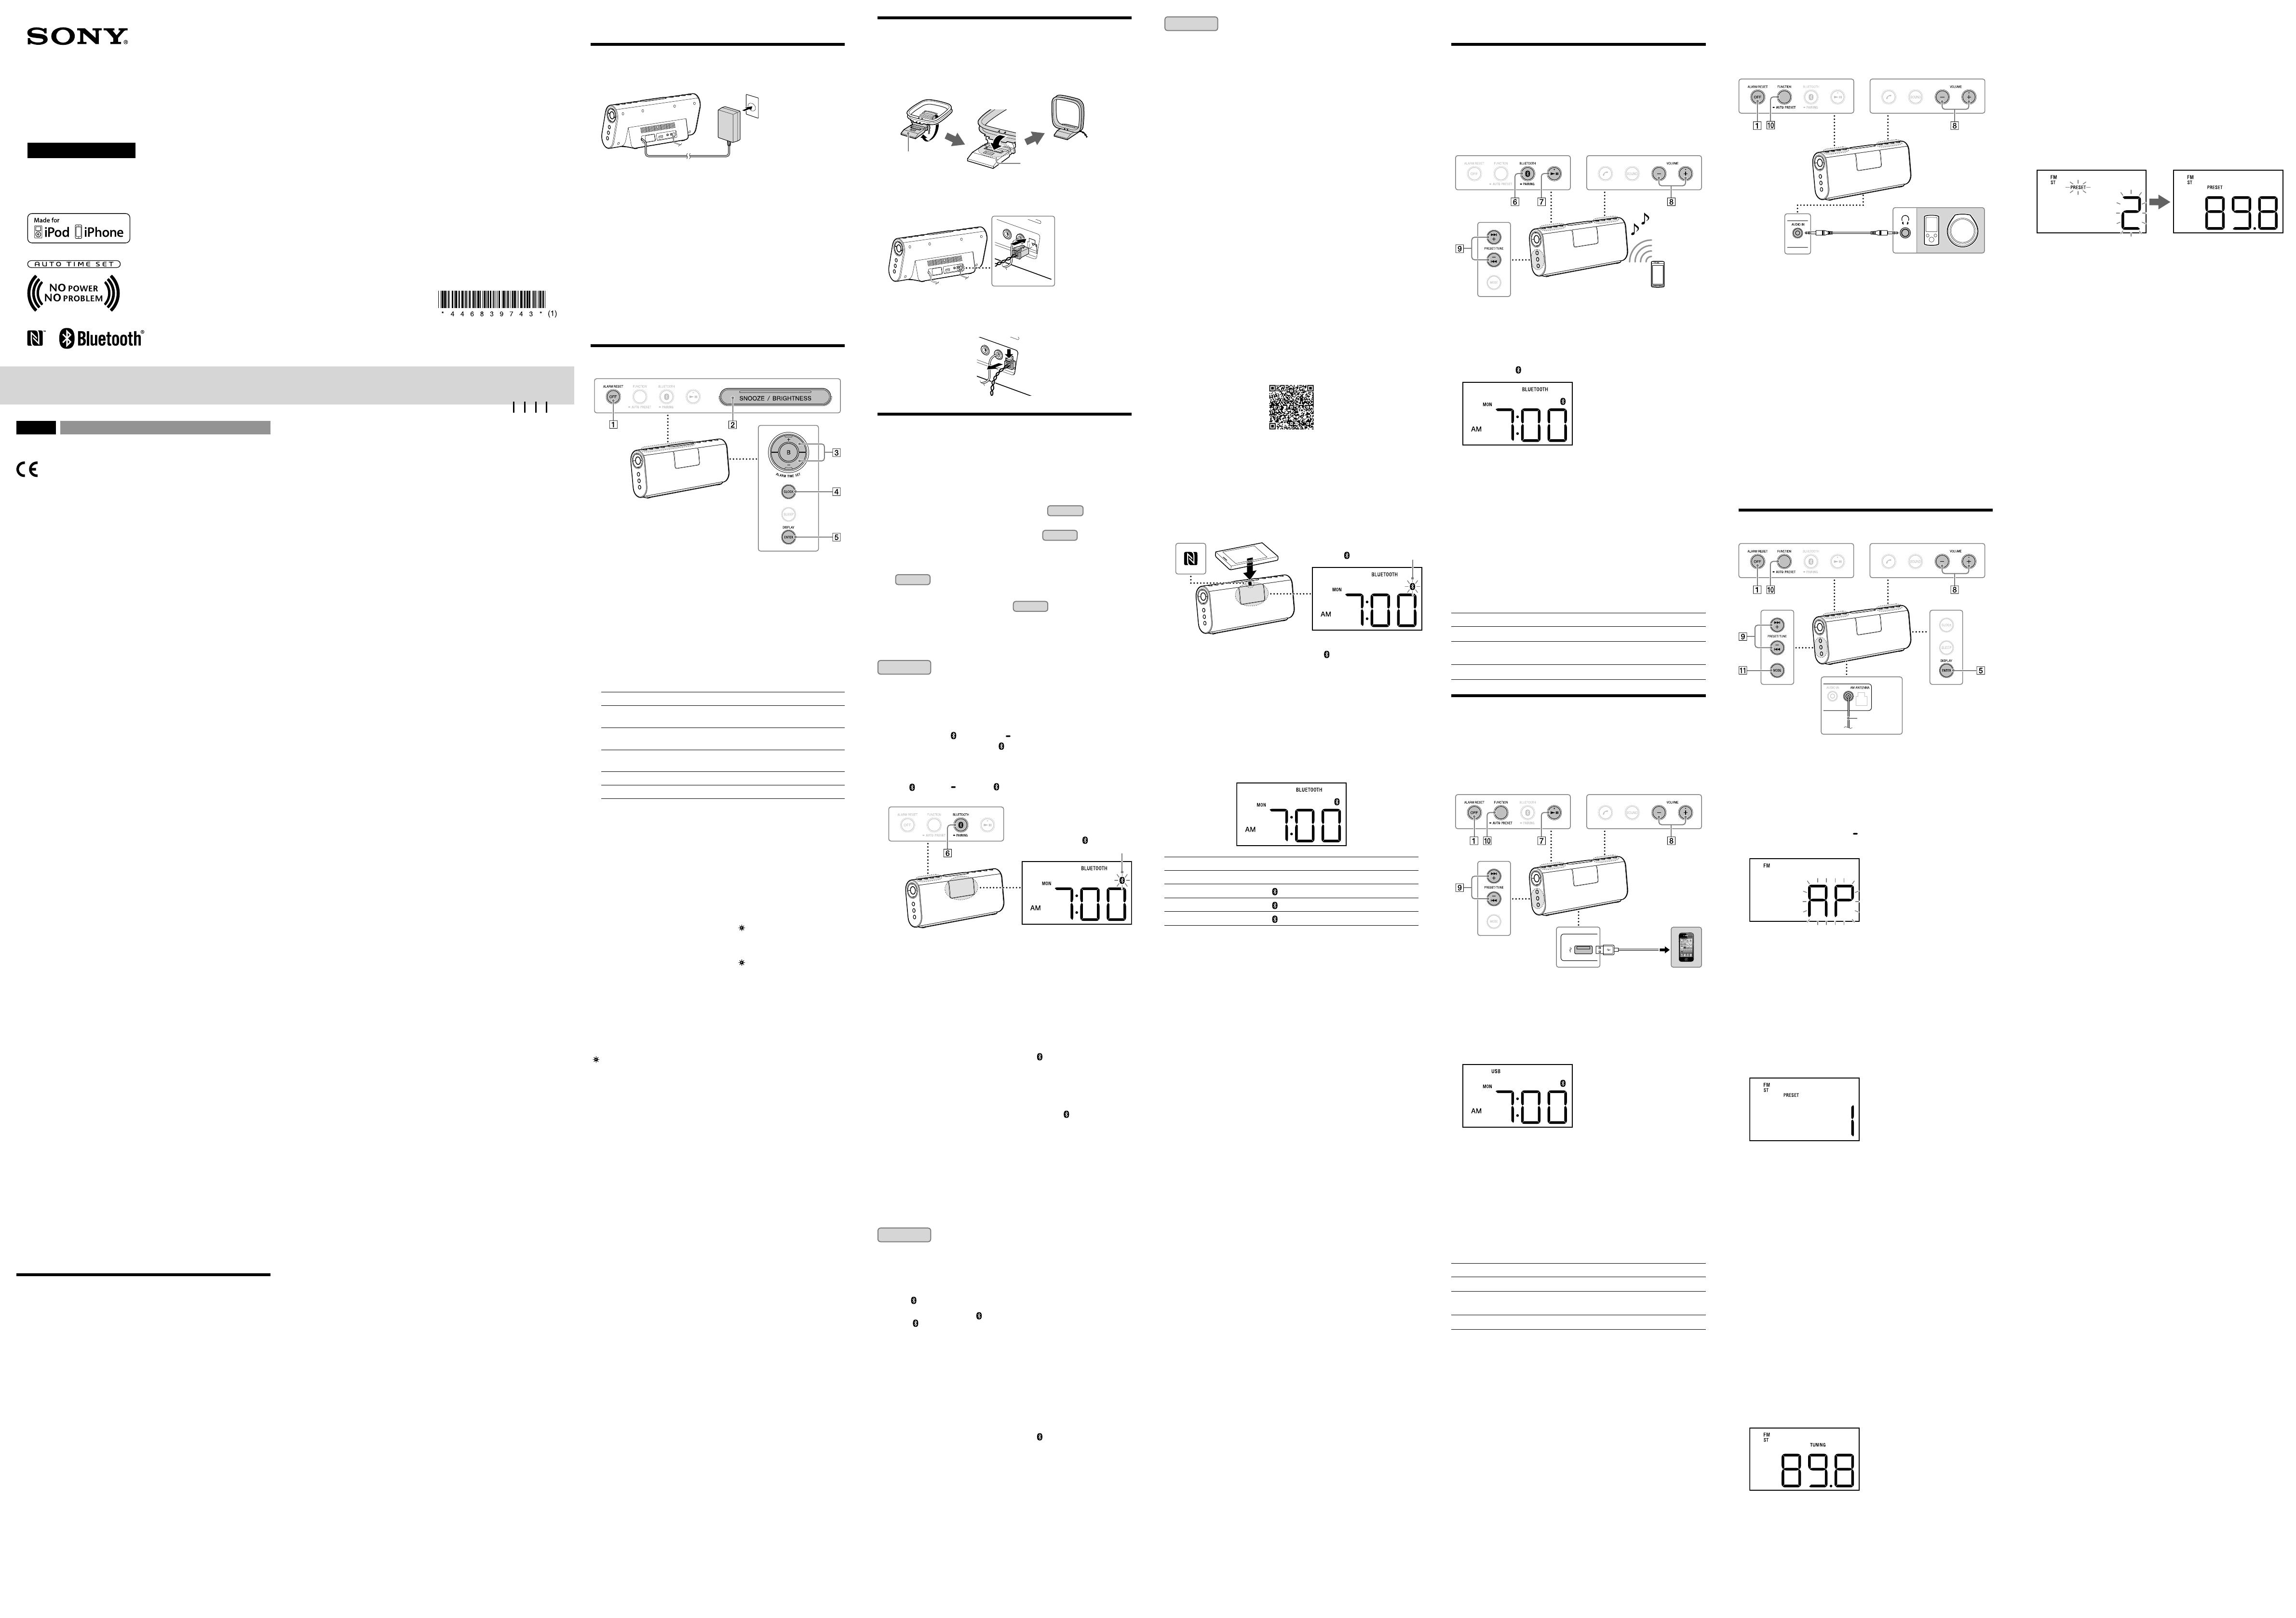
To preset radio stations manually
You can manually preset a radio station which cannot be preset automatically.
1 Tune to a station you want to preset.
2 Press and hold DISPLAY/ENTER until “PRESET” begins to
flash in the display.
3 Press PRESET +/– to select the preset number, and then
press
DISPLAY/ENTER to confirm.
The station is preset and assigned to the selected preset number.
Example: The following displays appear when you preset FM 89.8 MHz to
preset number 2 for FM.
Tip
To cancel the preset number, press OFF instead of DISPLAY/ENTER in step 3.
Notes on radio reception
Do not place the AM loop aerial near the system, power supply or other A/V equipment
during use, as noise may result.
Keep digital music players or mobile phones away from the AM loop aerial or the FM wire
aerial, as this may lead to reception interference.
When you are listening to radio with a BLUETOOTH device or USB device connected to the
system, interference with radio reception may occur. In this case, terminate BLUETOOTH
connection, or disconnect the USB device from the system.
Tip
You can use hands-free calling while listening to the radio on this system.
Personal Audio System
Operating Instructions
ICF-CS20BT
©2013 Sony Corporation Printed in China
4-468-397-43(1)


