Page is loading ...

r
Owner’s Manual
JM-5_US.book Page 1 Tuesday, December 14, 2010 10:29 AM
WARNING
This product contains chemicals known to cause cancer, birth defects and other reproductive harm, including lead.
For C.A. US
(
Proposition 65
)
For Canada
This Class B digital apparatus meets all requirements of the Canadian Interference-Causing Equipment Regulations.
NOTICE
AVIS
For the USA
FEDERAL COMMUNICATIONS COMMISSION
RADIO FREQUENCY INTERFERENCE STATEMENT
This equipment has been tested and found to comply with the limits for a Class B digital device, pursuant to Part 15 of the
FCC Rules. These limits are designed to provide reasonable protection against harmful interference in a residential
installation. This equipment generates, uses, and can radiate radio frequency energy and, if not installed and used in
accordance with the instructions, may cause harmful interference to radio communications. However, there is no guarantee
that interference will not occur in a particular installation. If this equipment does cause harmful interference to radio or
television reception, which can be determined by turning the equipment off and on, the user is encouraged to try to correct the
interference by one or more of the following measures:
— Reorient or relocate the receiving antenna.
— Increase the separation between the equipment and receiver.
— Connect the equipment into an outlet on a circuit different from that to which the receiver is connected.
— Consult the dealer or an experienced radio/TV technician for help.
This device complies with Part 15 of the FCC Rules. Operation is subject to the following two conditions:
(1) This device may not cause harmful interference, and
(2) This device must accept any interference received, including interference that may cause undesired operation.
Unauthorized changes or modification to this system can void the users authority to operate this equipment.
This equipment requires shielded interface cables in order to meet FCC class B Limit.
This product complies with the requirements of European Directive EMC 2004/108/EC.
For EU Countries
For the USA
DECLARATION OF CONFORMITY
Compliance Information Statement
VIMA JM-5
IMPORTANT: THE WIRES IN THIS MAINS LEAD ARE COLOURED IN ACCORDANCE WITH THE FOLLOWING CODE.
BLUE:
BROWN:
As the colours of the wires in the mains lead of this apparatus may not correspond with the coloured markings identifying
the terminals in your plug, proceed as follows:
The wire which is coloured BLUE must be connected to the terminal which is marked with the letter N or coloured BLACK.
The wire which is coloured BROWN must be connected to the terminal which is marked with the letter L or coloured RED.
Under no circumstances must either of the above wires be connected to the earth terminal of a three pin plug.
NEUTRAL
LIVE
For the U.K.
JM-5_US.book Page 2 Tuesday, December 14, 2010 10:29 AM

ENGLISH ENGLISH
ENGLISH ENGLISH
r
Owner’s Manual
Thank you and congratulations on your choice of the Roland VIMA JM-5.
To ensure that you obtain the maximum enjoyment and take full advantage of the JM-5’s functionality, please read
this owner’s manual carefully.
About this manual
You should first read the chapter “Before you start using the JM-5” on p. 14. It explains how to connect the AC adaptor
and turn on the power. This Owner’s Manual explains everything, from the JM-5’s basic operations to more advanced
functions.
Conventions in this manual
In order to explain the operations as clearly as possible, this manual uses the following conventions:
•Text enclosed in square brackets [ ] indicates the name of a button or knob. Example: the [PLAYLIST] button.
• Paragraphs that begin with “NOTE” are cautionary statements that you must read.
• Paragraphs that begin with “MEMO” contain useful information that may come in handy.
•The numbers of pages that you can turn to for additional or related information are given like this: (p. **).
The explanations in this manual include illustrations that depict what should typically be shown by the display. Note,
however, that your unit may incorporate a newer, enhanced version of the system (e.g., include newer sounds), so what
you actually see in the display may not always match what appears in the manual.
Before using this instrument, carefully read “Using the unit safely” on p. 4 and “Important notes” on p. 6. Those sec-
tions provide information concerning the proper operation of the JM-5. Additionally, in order to feel assured that
you have gained a good grasp of every feature provided by your new unit, the manual should be read in its entirety.
The manual should be saved and kept on hand as a convenient reference.
Copyright © 2011 ROLAND EUROPE. All rights reserved. No part of this publication may be reproduced in any form without the written permission of Roland Europe S.p.a.
Roland is either a registered trademark or a trademark of Roland Corporation in the United States and/or other countries.
JM-5_US.book Page 3 Tuesday, December 14, 2010 10:29 AM
4
r
VIMA
JM-5
Using the unit safely
• Do not open (or modify in any way) the unit or its AC
adaptor.
.................................................................................................
• Do not attempt to repair the unit, or replace parts within
it (except when this manual provides specific instructions
directing you to do so). Refer all servicing to your retailer,
the nearest Roland Service Center, or an authorized Roland dis-
tributor, as listed on the “Information” page.
.................................................................................................
• Never install the unit in any of the following locations.
• Subject to temperature extremes (e.g., direct sunlight
in an enclosed vehicle, near a heating duct, on top of
heat-generating equipment); or are
• Damp (e.g., baths, washrooms, on wet floors); or are
• Exposed to steam or smoke; or are
• Subject to salt exposure; or are
• Humid; or are
• Exposed to rain; or are
• Dusty or sandy; or are
• Subject to high levels of vibration and shakiness.
.................................................................................................
•Make sure you always have the unit placed so it is level
and sure to remain stable. Never place it on stands that
could wobble, or on inclined surfaces.
.................................................................................................
• Be sure to use only the AC adaptor supplied with the
unit. Also, make sure the line voltage at the installation
matches the input voltage specified on the AC adaptor's
body. Other AC adaptors may use a different polarity, or
be designed for a different voltage, so their use could result in
damage, malfunction, or electric shock.
.................................................................................................
• Use only the supplied power-supply cord. Also, the sup-
plied power cord must not be used with any other device.
.................................................................................................
• Do not excessively twist or bend the power cord, nor
place heavy objects on it. Doing so can damage the cord,
producing severed elements and short circuits. Damaged
cords are fire and shock hazards!
.................................................................................................
• This unit, in combination with an amplifier and head-
phones or speakers, may be capable of producing sound
levels that could cause permanent hearing loss. Do not
operate for a long period of time at a high volume level, or at a
level that is uncomfortable. If you experience any hearing loss or
ringing in the ears, you should immediately stop using the unit,
and consult an audiologist.
................................................................................................
• Do not allow any objects (e.g., flammable material, coins,
pins); or liquids of any kind (water, soft drinks, etc.) to
penetrate the unit.
................................................................................................
•Immediately turn the power off, remove the AC adaptor
from the outlet, and request servicing by your retailer,
the nearest Roland Service Center, or an authorized
Roland distributor, as listed on the “Information” page
when:
• The AC adaptor, the power-supply cord, or the plug has been
damaged; or
• If smoke or unusual odor occurs
• Objects have fallen into, or liquid has been spilled onto the unit;
or
• The unit has been exposed to rain (or otherwise has become
wet); or
• The unit does not appear to operate normally or exhibits a
marked change in performance.
................................................................................................
•In households with small children, an adult should pro-
vide supervision until the child is capable of following all
the rules essential for the safe operation of the unit.
................................................................................................
• Protect the unit from strong impact.
(Do not drop it!)
................................................................................................
Used for instructions intended to alert
the user to the risk of injury or material
damage should the unit be used
improperly.
* Material damage refers to damage or
other adverse effects caused with
respect to the home and all its
furnishings, as well to domestic
animals or pets.
Used for instructions intended to alert
the user to the risk of death or severe
injury should the unit be used
improperly.
The ● symbol alerts the user to things that must be
carried out. The specific thing that must be done is
indicated by the design contained within the circle. In
the case of the symbol at left, it means that the power-
cord plug must be unplugged from the outlet.
The symbol alerts the user to important instructions
or warnings.The specific meaning of the symbol is
determined by the design contained within the
triangle. In the case of the symbol at left, it is used for
general cautions, warnings, or alerts to danger.
The symbol alerts the user to items that must never
be carried out (are forbidden). The specific thing that
must not be done is indicated by the design contained
within the circle. In the case of the symbol at left, it
means that the unit must never be disassembled.
JM-5_US.book Page 4 Tuesday, December 14, 2010 10:29 AM

Using the unit safely
VIMA JM-5
r
5
• Do not force the unit's power-supply cord to share an
outlet with an unreasonable number of other devices. Be
especially careful when using extension cords—the total
power used by all devices you have connected to the extension
cord's outlet must never exceed the power rating (watts/amperes)
for the extension cord. Excessive loads can cause the insulation on
the cord to heat up and eventually melt through.
.................................................................................................
• Before using the unit in a foreign country, consult with
your retailer, the nearest Roland Service Center, or an
authorized Roland distributor, as listed on the “Informa-
tion” page.
.................................................................................................
• The unit and the AC adaptor should be located so their
location or position does not interfere with their proper
ventilation.
.................................................................................................
•Always grasp only the plug on the AC adaptor cord when
plugging into, or unplugging from, an outlet or this unit.
.................................................................................................
• At regular intervals, you should unplug the AC adaptor
and clean it by using a dry cloth to wipe all dust and
other accumulations away from its prongs. Also, discon-
nect the power plug from the power outlet whenever the
unit is to remain unused for an extended period of time.
Any accumulation of dust between the power plug and the power
outlet can result in poor insulation and lead to fire.
.................................................................................................
• Try to prevent cords and cables from becoming entan-
gled. Also, all cords and cables should be placed so they
are out of the reach of children.
.................................................................................................
• Never climb on top of, nor place heavy objects on the
unit.
.................................................................................................
• Never handle the AC adaptor or its plugs with wet hands
when plugging into, or unplugging from, an outlet or
this unit.
.................................................................................................
• Before moving the unit, disconnect the AC adaptor and
all cords coming from external devices.
.................................................................................................
• Before cleaning the unit, turn off the power and unplug
the AC adaptor from the outlet (see p. 17).
.................................................................................................
•Whenever you suspect the possibility of lightning in your
area, disconnect the AC adaptor from the outlet.
.................................................................................................
• Keep the included screw in a safe place out of children’s
reach, so there is no chance of them being swallowed
accidentally.
.................................................................................................
•Always turn the phantom power off when connecting
any device other than condenser microphones that
require phantom power. You risk causing damage if you
mistakenly supply phantom power to dynamic microphones, audio
playback devices, or other devices that don't require such power.
Be sure to check the specifications of any microphone you intend
to use by referring to the manual that came with it.
(This instrument's phantom power: 48V DC, 10mA Max)
JM-5_US.book Page 5 Tuesday, December 14, 2010 10:29 AM

Important notes
6
r
VIMA
JM-5
1. Important notes
In addition to the items listed under “Using the unit safely” on p. 4, please read and observe the following:
Power supply
• Do not connect this unit to same electrical outlet that is being
used by an electrical appliance that is controlled by an inverter
(such as a refrigerator, washing machine, microwave oven, or air
conditioner), or that contains a motor. Depending on the way in
which the electrical appliance is used, power supply noise may
cause this unit to malfunction or may produce audible noise. If it is
not practical to use a separate electrical outlet, connect a power
supply noise filter between this unit and the electrical outlet.
• The AC adaptor will begin to generate heat after long hours of
consecutive use. This is normal, and is not a cause for concern.
• Before connecting this unit to other devices, turn off the power to
all units. This will help prevent malfunctions and/or damage to
speakers or other devices.
Placement
• Using the JM-5 near power amplifiers (or other equipment con-
taining large power transformers) may induce hum. To alleviate
the problem, change the orientation of this instrument or move it
further away from the source of interference.
• This device may interfere with radio and television reception. Do
not use it in the vicinity of such receivers.
• Noise may be produced if wireless communications devices, such
as cell phones, are operated in the vicinity of this unit. Such noise
could occur when receiving or initiating a call, or while conversing.
Should you experience such problems, you should relocate such
wireless devices so they are at a greater distance from this unit, or
switch them off.
• Do not expose the unit to direct sunlight, place it near devices that
radiate heat, leave it inside an enclosed vehicle, or otherwise sub-
ject it to temperature extremes. Excessive heat can deform or dis-
color the unit.
•When moved from one location to another where the temperature
and/or humidity is very different, water droplets (condensation)
may form inside the JM-5. Damage or malfunction may result if
you attempt to use the unit in this condition. Therefore, before
using the unit, you must allow it to stand for several hours, until
the condensation has completely evaporated.
• Depending on the material and temperature of the surface on
which you place the unit, its rubber feet may discolor or mar the
surface.
You can place a piece of felt or cloth under the rubber feet to pre-
vent this from happening. If you do so, please make sure that the
unit will not slip or move accidentally.
• Do not put anything that contains water (e.g., flower vases) on this
unit. Also, avoid the use of insecticides, perfumes, alcohol, nail pol-
ish, spray cans, etc., near the unit. Swiftly wipe away any liquid
that spills on the unit using a dry, soft cloth.
Maintenance
• For everyday cleaning wipe the unit with a soft, dry cloth or one
that has been slightly dampened with water. To remove stubborn
dirt, use a cloth impregnated with a mild, nonabrasive detergent.
Afterwards, be sure to wipe the unit thoroughly with a soft, dry
cloth.
• Never use benzene, thinner, alcohol or solvents of any kind, to
avoid the possibility of discoloration and/or deformation.
Additional precautions
• Unfortunately, it may be impossible to restore the contents of data
that was stored on a USB storage device once it has been lost.
Roland Corporation assumes no liability concerning such loss of
data.
• Use a reasonable amount of care when using the JM-5’s buttons,
other controls and jacks/connectors. Rough handling can lead to
malfunctions.
• Never strike or apply strong pressure to the display.
•When connecting/disconnecting cables, grasp the connector
itself—never pull on the cable. This way you will avoid causing
shorts, or damage to the cable’s internal elements.
• To avoid disturbing your neighbors, try to keep the JM-5’s volume
at reasonable levels. You may prefer to use headphones, so you do
not need to be concerned about those around you (especially late
at night).
•When you need to transport the unit, package it in the box
(including padding) that it came in, if possible. Otherwise, you will
need to use equivalent packaging materials.
• Some connection cables contain resistors. Do not use cables that
incorporate resistors for connecting to this unit. The use of such
cables can cause the sound level to be extremely low, or impossible
to hear. For information on cable specifications, contact the man-
ufacturer of the cable.
About the MIDI IN/OUT socket
• The JM-5 is equipped with standard MIDI IN functionality. Since
the JM-5 can also transmit V-LINK messages, you can set this
socket to function as MIDI OUT. See “MIDI Direction” on p. 58 and
“V-LINK function” on p. 72 for details.
Storage devices that can be connected to the
JM-5’s USB port
• The JM-5 allows you to connect commercially available storage
devices, like USB Flash memory, CD-ROM drives, and hard disks.
You can purchase such devices at a computer store, a digital cam-
era dealer, etc.
• Though external hard disks with a capacity in excess of 2TB can be
used, please bear in mind that the JM-5 can manage a maximum
of 2TB. (FAT-32 formatted storage devices can be used right away.)
• Use USB memory sold by Roland. We cannot guarantee operation
if any other USB memory is used.
Before using external USB storage devices
•When connecting a USB storage device, firmly insert it all the way
into the JM-5’s USB port.
• Do not touch the pins of the USB memory port or allow them to
become dirty.
•While using an external USB storage device, please observe the
following points when handling it:
• To prevent damage from static electrical charges, discharge any
static electricity that might be present in your body before han-
dling a USB storage device.
• Do not touch the terminals with your fingers or any metal
object.
• Do not bend or drop a USB storage device, or subject it to
strong impact.
• Do not leave a USB storage device in direct sunlight or in loca-
tions such as a closed-up automobile.
• Do not allow a USB storage device to become wet.
• Do not disassemble or modify your external USB storage device.
JM-5_1_GB.fm Page 6 Tuesday, January 4, 2011 10:12 AM

Important notes
VIMA JM-5
r
7
•When connecting a USB storage device, position it horizontally
with the JM-5’s USB port and insert it without using excessive
force. The USB port may be damaged if you use excessive force
when inserting a USB storage device.
• Do not insert anything other than a USB storage device (e.g., wire,
coins, other types of device) into the JM-5’s USB port. Doing so
will damage the JM-5’s USB port.
• Carefully insert the USB storage device all the way into the port,
until it is firmly in place.
• Never connect your USB storage device to the JM-5 via a USB hub.
Liability and copyright
• Recording, duplication, distribution, sale, lease, performance, or
broadcast of copyrighted material (musical works, visual works,
broadcasts, live performances, etc.) belonging to a third party in
part or in whole without the permission of the copyright owner is
forbidden by law.
• Do not use this unit for purposes that could infringe on a copy-
right held by a third party. Roland assumes no responsibility what-
soever with regard to any infringements of third-party copyrights
arising through your use of this unit.
About supported picture files
•Picture files of the following formats can be loaded by the JM-5:
• JPG files with a maximum size of 4MB
•Max. width: 4096 pixels, max. height: 3072 pixels. Using 512 x
384 pixels, or 1024 x 768 pixels, is highly recommended.
• Do
not
save your pictures as “Progressive” JPG files if you want
to use them with the JM-5. Select the “Baseline” format.
• If pictures of different dimensions are displayed during a slide-
show, the final appearance may be disappointing.
About audio files
• Audio files in the following formats can be played back:
•WAV format
• 16-bit linear
• Sampling rate of 44.1kHz
• Stereo/mono
•mp3 files:
•MPEG-1 Audio Layer 3
• Sampling frequency: 8/11.025/12/16/22.05/24/32/44.1/48kHz
•Bit rate: 32/40/48/56/64/80/96/112/128/160/192/224/256/
320kbps, VBR (variable bit rate)
Supported Standard MIDI Files
• Format 0/1, .kar files
• GS ( ) is a registered trademark of Roland Corporation.
•All product names mentioned in this document are trademarks or registered trademarks of their respective owners.
•MPEG Layer-3 audio compression technology is licensed from Fraunhofer IIS Corporation and THOMSON Multimedia Corporation.
• This product uses certain software of the Independent JPEG group.
• Copyright © 2003 by Bitstream, Inc. All rights reserved. Bitstream Vera is a trademark of Bitstream, Inc.
JM-5_US.book Page 7 Tuesday, December 14, 2010 10:29 AM

Features
8
r
VIMA
JM-5
2. Features
Versatile player
The JM-5 can play back audio files (mp3 and WAV)
and SMF files from an external USB Memory.
Connect two microphones
The JM-5 is a professional vocal system with two
microphone inputs, vocal effects and a video output
for displaying the song lyrics and chords on an exter-
nal screen. It is perfect for karaoke applications in
stores, bars, schools, private homes, concert venues
and at parties.
Enjoy singing together
The JM-5 can be connected to a TV set, a monitor or a
projector and display the lyrics of the selected songs
as well as digital photos that to match the atmo-
sphere.
There is no need to buy dedicated “karaoke versions”
of the music you wish to perform: the JM-5 contains
a “Center Cancel” function that can attenuate the
vocal parts of most audio files.
Dedicated effects to enhance your vocal and
instrumental performances
The two microphone inputs allow you to perform
duets with someone else, and add other audio signals
by connecting the source in question to the AUDIO IN
socket.
You can also add automatic harmonies simply by
singing to a song, add a reverb and echo effect
(based on a model of the legendary Roland Space
Echo) to your voice and change your voice to pro-
duce a robot, animal or “gender transformation”
effect.
Playlist function
Thanks to the JM-5’s “Playlist” function, you can pro-
gram set lists for your performances or for back-
ground music in restaurants, bars, schools, hotel lob-
bies, concert halls, etc. This function is also conve-
nient for entertainers who cannot afford to load the
songs one after another while on stage.
Cover function for Standard MIDI Files
Simply by selecting one of 30 presets, you can cause
a Viennese waltz to be played back by a heavy metal
band, etc. Even though the arrangement (rhythm,
riffs) does not change, the songs’ character can be
modified beyond recognition.
Song Makeup Tools for Standard MIDI files
These tools allow you to modify songs in no time
without knowing the MIDI commands normally used
to perform such changes.
Multi-effects for Standard MIDI Files
With a view to obtaining the highest possible sound
quality, the JM-5 contains three dedicated multi-
effects processors (MFX A, B, and C) for Standard
MIDI Files.
USB-based Standard MIDI File and audio file
player
The JM-5 plays Standard MIDI Files (SMF), mp3 and
WAV files directly from a connected USB memory.
To get you started, the JM-5 is supplied with a
Roland M-UF2G USB memory (with a capacity of
2GB) where you can save your audio recordings and
the songs you wish to play back.
USB-based audio recorder
The JM-5 allows you to record your performances as
audio data. The resulting WAV files can be played
back on the JM-5 itself or transferred to a computer
via a USB storage device.
A powerful MIDI module
The JM-5’s internal sound source can also be con-
trolled via MIDI (from a MIDI-compatible keyboard
instrument, a computer, etc.). Three real-time parts
are available that can play different parts simulta-
neously, using different sounds. There is a second
MIDI mode (“Song Parts”) in which the is 16-part
multitimbral.
…and so much more!
JM-5_US.book Page 8 Tuesday, December 14, 2010 10:29 AM

VIMA JM-5
r
9
Contents
1. Important notes. . . . . . . . . . . . . . . . . . . . . . . . . . . . . 6
2. Features. . . . . . . . . . . . . . . . . . . . . . . . . . . . . . . . . . . . 8
3. Panel description . . . . . . . . . . . . . . . . . . . . . . . . . . . 11
Front Panel. . . . . . . . . . . . . . . . . . . . . . . . . . . . . . . . . . . . 11
Rear panel . . . . . . . . . . . . . . . . . . . . . . . . . . . . . . . . . . . . 12
4. Before you start using the JM-5 . . . . . . . . . . . . . . 14
Connecting the AC adaptor . . . . . . . . . . . . . . . . . . . . . 14
Connecting the JM-5 to an amplifier, mixer, etc.. . . 14
Connecting a microphone. . . . . . . . . . . . . . . . . . . . . . . 15
Connecting a television set. . . . . . . . . . . . . . . . . . . . . . 15
Connecting an external audio device . . . . . . . . . . . . . 15
Listening through headphones . . . . . . . . . . . . . . . . . . 16
Attaching the JM-5 to a stand. . . . . . . . . . . . . . . . . . . 16
Turning the power on/off . . . . . . . . . . . . . . . . . . . . . . . 17
Turning the power on. . . . . . . . . . . . . . . . . . . . . . . . . . . . . .17
Turning the power off . . . . . . . . . . . . . . . . . . . . . . . . . . . . .17
Demo of the JM-5 . . . . . . . . . . . . . . . . . . . . . . . . . . . . . 18
5. Basic operation of the JM-5. . . . . . . . . . . . . . . . . . 19
About the display and cursor operation. . . . . . . . . . . 19
Main page. . . . . . . . . . . . . . . . . . . . . . . . . . . . . . . . . . . . . . . .19
Moving between windows. . . . . . . . . . . . . . . . . . . . . . . . . .19
6. Playing back songs. . . . . . . . . . . . . . . . . . . . . . . . . . 20
Playing back songs on a USB storage device. . . . . . . 20
If you can’t see the song (or folder) you need. . . . . . . . .21
Supported song files . . . . . . . . . . . . . . . . . . . . . . . . . . . 21
7. Singing and playing along to a song. . . . . . . . . . . 22
Connection and basic settings . . . . . . . . . . . . . . . . . . . 22
Adding effects to the microphone signals . . . . . . . . . 23
Adding ambience to your vocal performance . . . . . . . . .23
Adding echo to your vocal performance . . . . . . . . . . . . .23
Talk. . . . . . . . . . . . . . . . . . . . . . . . . . . . . . . . . . . . . . . . . . . . . .25
Harmony and vocal effects. . . . . . . . . . . . . . . . . . . . . . 25
Changing your voice/adding harmonies . . . . . . . . . . . . . .25
Setting the microphone equalizers and phantom
power . . . . . . . . . . . . . . . . . . . . . . . . . . . . . . . . . . . . . . . . 27
Using ‘Melody Mute’ and ‘Center Cancel’. . . . . . . . . . 28
Selecting the track(s) to mute for SMF songs . . . . . . . . .28
8. Other important functions . . . . . . . . . . . . . . . . . . . 29
Singing or playing in a different key (Key). . . . . . . . . 29
Changing the tempo (playback speed) of a song . . . 29
Recording your performance as audio data . . . . . . . 30
Recording . . . . . . . . . . . . . . . . . . . . . . . . . . . . . . . . . . . . . . . .30
Listening to your recording. . . . . . . . . . . . . . . . . . . . . . . . .31
Saving your recording as an audio file . . . . . . . . . . . . . . .31
9. Adding pictures to the music . . . . . . . . . . . . . . . . . 32
Displaying photos automatically . . . . . . . . . . . . . . . . . 32
Enjoying a VIMA TUNES slide show . . . . . . . . . . . . . . . . . .32
Enjoying a slide show of your own pictures. . . . . . . . . . .32
Using one of your own pictures as background . . . . 33
10. Functions related to song playback. . . . . . . . . . . . 34
Using the Finder to locate songs or pictures. . . . . . . 34
Using ‘Next’ to create transitions . . . . . . . . . . . . . . . . 35
Using playlists. . . . . . . . . . . . . . . . . . . . . . . . . . . . . . . . . 36
Loading a playlist and playing back a song. . . . . . . . . . . 36
Renaming a playlist. . . . . . . . . . . . . . . . . . . . . . . . . . . . . . . 37
Deleting a playlist . . . . . . . . . . . . . . . . . . . . . . . . . . . . . . . . 38
Specifying the playlist behavior . . . . . . . . . . . . . . . . . . . . 38
Creating new playlists and adding songs . . . . . . . . . . . . 39
Quickly finding songs for your playlists. . . . . . . . . . . . . . 40
Deleting playlist steps. . . . . . . . . . . . . . . . . . . . . . . . . . . . . 41
Moving existing steps to a different position. . . . . . . . . 41
Transposing songs in the ‘Playlist’ environment . . . . . . 42
Saving an edited playlist . . . . . . . . . . . . . . . . . . . . . . . . . . 42
11. Playback functions for SMF songs. . . . . . . . . . . . . 43
SMF Cover: changing the orchestration . . . . . . . . . . 43
Saving your modified SMF song . . . . . . . . . . . . . . . . . 43
Using the SMF compressor and SMF equalizer. . . . . 44
SMF Compressor . . . . . . . . . . . . . . . . . . . . . . . . . . . . . . . . . 44
SMF Equalizer. . . . . . . . . . . . . . . . . . . . . . . . . . . . . . . . . . . . 46
Song (SMF) Makeup Tools . . . . . . . . . . . . . . . . . . . . . . 47
Using the SMF Makeup Tools. . . . . . . . . . . . . . . . . . . . . . . 47
Freeze Data . . . . . . . . . . . . . . . . . . . . . . . . . . . . . . . . . . . . . . 53
Saving your new song version. . . . . . . . . . . . . . . . . . . 53
12. Menu parameters. . . . . . . . . . . . . . . . . . . . . . . . . . . 55
General procedure. . . . . . . . . . . . . . . . . . . . . . . . . . . . . 55
‘Menu’ parameters. . . . . . . . . . . . . . . . . . . . . . . . . . . . . 55
Internal Lyrics. . . . . . . . . . . . . . . . . . . . . . . . . . . . . . . . . . . . 55
External Lyrics . . . . . . . . . . . . . . . . . . . . . . . . . . . . . . . . . . . 56
User Settings . . . . . . . . . . . . . . . . . . . . . . . . . . . . . . . . . . . . 56
Saving your ‘User’ settings. . . . . . . . . . . . . . . . . . . . . . 58
13. External Tone Parts (for MIDI module operation) 59
General procedure. . . . . . . . . . . . . . . . . . . . . . . . . . . . . 59
Operation details . . . . . . . . . . . . . . . . . . . . . . . . . . . . . . 60
Family and Tone selection . . . . . . . . . . . . . . . . . . . . . . . . . 60
Setting the remaining ‘External Tone Parts’ parameters 60
Saving your settings to a ‘User’ memory. . . . . . . . . . . . . 61
Loading the settings of an existing ‘User’ memory . . . . 61
14. Using the JM-5’s MIDI functions . . . . . . . . . . . . . . 62
About MIDI . . . . . . . . . . . . . . . . . . . . . . . . . . . . . . . . . . . 62
Using the JM-5 as a MIDI module . . . . . . . . . . . . . . . 62
Connections . . . . . . . . . . . . . . . . . . . . . . . . . . . . . . . . . . . . . 62
Setting MIDI channels on the external module for the
‘Tone Parts’ Preset . . . . . . . . . . . . . . . . . . . . . . . . . . . . . . . . 63
Setting MIDI channels and other MIDI parameters for the
‘Edit Tone Parts’ environment . . . . . . . . . . . . . . . . . . . . . . 64
MIDI parameters for the ‘Song Parts’. . . . . . . . . . . . . 65
Activating the ‘Song Parts’ section. . . . . . . . . . . . . . . . . . 65
Setting MIDI channels and other MIDI parameters for the
‘Edit Song Parts’ environment. . . . . . . . . . . . . . . . . . . . . . 65
MIDI synchronization (Edit Sync) . . . . . . . . . . . . . . . . 66
General MIDI parameters . . . . . . . . . . . . . . . . . . . . . . . 67
MIDI Sets. . . . . . . . . . . . . . . . . . . . . . . . . . . . . . . . . . . . . 68
Saving your settings to a MIDI Set. . . . . . . . . . . . . . . . . . 68
Loading a MIDI Set . . . . . . . . . . . . . . . . . . . . . . . . . . . . . . . 69
Connecting the JM-5 to your computer . . . . . . . . . . 69
If the computer doesn’t ‘see’ the JM-5 . . . . . . . . . . . . . . 69
15. Other useful operations . . . . . . . . . . . . . . . . . . . . . 70
Factory Reset . . . . . . . . . . . . . . . . . . . . . . . . . . . . . . . . . 70
Formatting a USB memory. . . . . . . . . . . . . . . . . . . . . . 70
JM-5_US.book Page 9 Tuesday, December 14, 2010 10:29 AM

10
r
VIMA JM-5
16. V-LINK function . . . . . . . . . . . . . . . . . . . . . . . . . . . .72
Turning V-LINK on/off . . . . . . . . . . . . . . . . . . . . . . . . . . 72
17. Troubleshooting . . . . . . . . . . . . . . . . . . . . . . . . . . . .73
18. Specifications . . . . . . . . . . . . . . . . . . . . . . . . . . . . . .75
19. Shortcut list . . . . . . . . . . . . . . . . . . . . . . . . . . . . . . .77
20. Song list. . . . . . . . . . . . . . . . . . . . . . . . . . . . . . . . . . .78
21. MIDI Implementation Chart . . . . . . . . . . . . . . . . . .79
22. Tone List. . . . . . . . . . . . . . . . . . . . . . . . . . . . . . . . . . .80
23. Drum Sets . . . . . . . . . . . . . . . . . . . . . . . . . . . . . . . . .85
24. MFX types and parameters . . . . . . . . . . . . . . . . . . .93
JM-5_US.book Page 10 Tuesday, December 14, 2010 10:29 AM
Panel description
VIMA JM-5
r
11
3. Panel description
Front Panel
A
USB memory port
Connect the supplied M-UF2G an optional USB mem-
ory here.
Note: Roland does not recommend using USB hubs, irre-
spective of whether they are active or passive. Please con-
nect only one USB storage device to this port.
NOTE
Use USB storage devices sold by Roland. We cannot guar-
antee operation if any other USB memory is used.
B
BACKING knob
This knob allows you to set the volume of the songs
(audio or MIDI) you play back.
C
MASTER VOL knob
Use this knob to set the JM-5’s global output volume
(all signals transmitted to the OUTPUT sockets). The
setting of this knob also determines the volume in
the headphones you may connect.
D
Headphone socket
This is where you can connect a pair of optional
headphones (Roland RH-series).
E
Display
This display shows information related to your opera-
tion and the lyrics of the songs you play back (if they
contain lyrics data).
F
USB MEMORY button
Press this button to call up a list of the files stored on
the USB memory connected to the JM-5‘s USB mem-
ory port.
G
MENU button
This button allows you to open the JM-5’s menu page
where you can view and select all available functions.
Press it together with the [EXIT] button to listen to
the JM-5’s demo songs.
H
EXIT button
This button is used to return to a higher menu level.
Press and hold it to return to the JM-5’s main display
page.
I
MIC1 and MIC2 knobs
The [MIC1] and [MIC2] knobs control the level of the
microphone connected to the MIC 1 or MIC 2 jack.
J
SPACE ECHO knob
Press this button to switch the echo effect for the
microphone signals on or off. Press and hold it if you
need to change the echo effect’s settings. Pressing
this button together with the [VOCAL EFFECT] button
will activate TALK mode (page 25).
B
C
I
E
FGH
J
D
L
M
NO
P
Q
R
S
T
UV W
A
K
JM-5_US.book Page 11 Tuesday, December 14, 2010 10:29 AM
Panel description
12
r
VIMA JM-5
K
VOCAL EFFECT button
The [VOCAL EFFECT] button activates the vocal effect.
Press and hold it to select the desired voice transfor-
mation or harmony effect (page 25). Pressing this
button together with the [SPACE ECHO] button will
activate TALK mode (page 25).
L
AMBIENCE knob
This knob controls the level of the reverb effect
(called “Ambience” on the JM-5) that is added to the
[MIC1] and [MIC2] signals.
M
CURSOR/VALUE dial
This dial can be used to move the cursor in the dis-
play, to select parameters and to set values. By press-
ing it, you can select items in the display (SELECT).
N
[ª] button (Stop)
Press this button to stop playback of the currently
selected song and to return to the beginning.
O
[®÷π] button (Play/Pause)
Pressing this button starts or temporarily halts play-
back of the currently selected song.
P
MELODY MUTE button
This button lets you mute the melody part of the
selected Standard MIDI File, or attenuate the vocal
part at the center of an audio file (WAV or mp3),
allowing you to sing or play that part yourself.
Pressing and holding this button opens the “Melody
Mute” page.
Q
[º] (Rewind) and [‰] (Fast-Forward) buttons
These buttons allow you to rewind or fast-forward
within the currently selected song.
R
REC button
This button allows you to activate audio recording on
the JM-5.
S
CONTROL KEY button
This button
selects the
JM-5
’s transpose function
whose
setting applies to MIDI and audio files as well
as the signals received via the AUDIO IN socket. If the
[KEY] button doesn’t light, the song (audio or MIDI)
and audio input signals use their original pitch.
T
CONTROL TEMPO button
Press this button to select the “Tempo” function and
to change a related setting.
U
PLAYLIST button
This button calls up the “Playlist” function (page 36).
V
NEXT button
This button selects the next song in the playlist and
starts a fade-out of the song that is currently playing
while the new song you selected is gradually faded
in. This also works for songs on the connected USB
memory (irrespective of whether or not you select
them by hand).
W
FINDER button
Press this button to select the JM-5’s convenient
“Finder” function that allows you to search for a song
or picture whose location you don’t remember.
Rear panel
A
POWER switch
Turns the power on/off (page 17).
B
DC IN socket
Connect the supplied AC adapter PSB-1U here
(page 14).
C
MIC2 socket
This is a combo socket to which you can connect
either a balanced XLR or an unbalanced 1/4” phone
jack.
D
MIC1 socket
This is a combo socket to which you can connect
either a balanced XLR or a balanced/unbalanced 1/4”
phone jack, depending on the cable that is connected
to your microphone. This is the main microphone
input whose signal can be processed with the JM-5’s
harmony function.
The JM-5 can provide phantom power to this socket,
allowing you to use a condenser microphone. See
(page 27) for details about phantom power.
NOTE
This instrument is equipped with balanced (XLR and 1/4”
phone) type jacks. Wiring diagrams for these jacks are
shown below. Make connections after first checking the
wiring diagrams of other equipment you intend to connect.
E
INPUT (STEREO) socket
This socket allows you to connect the audio outputs
of an external signal source (CD/mp3 player, synthe-
sizer, etc.). This is a stereo TRS socket to which you
AB C D
EFG
H
I
JM-5_US.book Page 12 Tuesday, December 14, 2010 10:29 AM

Rear panel
VIMA JM-5
r
13
can connect a cable with a stereo 1/8” plug at one
end (this ones needs to be connected to the JM-5)
and two 1/4” or RCA mono plugs, or a 1/8” stereo
plug that connect(s) to the external audio source.
NOTE
The audio in level can be set using the “Audio In Level”
function (page 57).
F
AUDIO OUTPUT R & L/MONO sockets
These sockets transmit all audio signals the JM-5
generates as well as the signals you input to the
JM-5.
NOTE
If you can/want to use only one channel on your external
amplifier, connect the L/MONO socket to its input. For opti-
mum sound quality, we recommend working in stereo,
though.
G
VIDEO OUTPUT socket
Connect this socket to the appropriate input of your
TV or external display.
NOTE
The signal format (PAL or NTSC) is selectable (page 56).
H
MIDI IN/OUT socket
This socket allows you to either transmit (OUT) or
receive (IN) MIDI messages to/from an external MIDI
device (page 62). It can also transmit V-LINK mes-
sages (page 72).
NOTE
See “MIDI Direction” on p. 58 for how to select the function
of this socket.
I
COMPUTER port
Use a USB cable to connect the JM-5 to your com-
puter via this port (page 69). This port only transmits
and receives MIDI messages.
JM-5_US.book Page 13 Tuesday, December 14, 2010 10:29 AM

Before you start using the JM-5
14
r
VIMA JM-5
4. Before you start using the JM-5
Connecting the AC adaptor
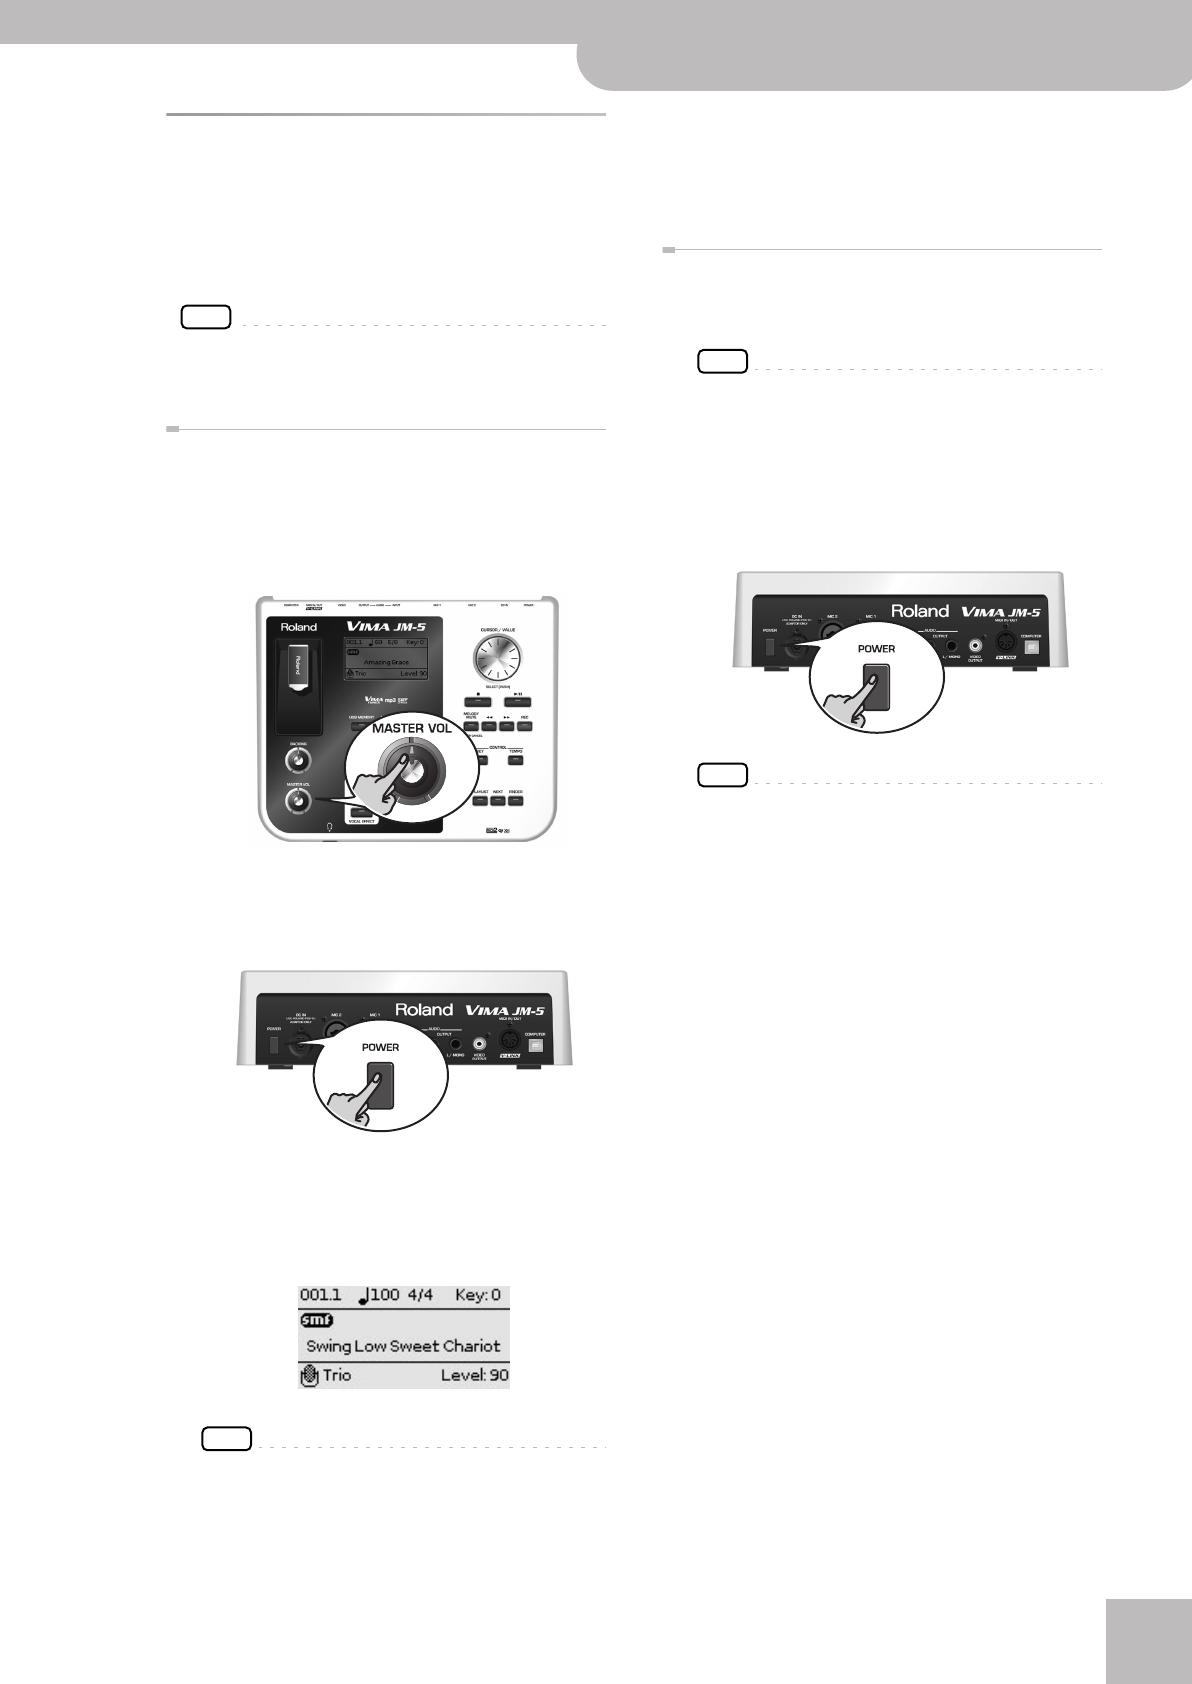
1.
Turn the [MASTER VOL] knob all the way to
the left to minimize the volume.
2.
Connect the included power cord to the AC
adapter.
The indicator will light once you plug the AC adaptor
into a wall outlet.
Place the AC adapter so the side with the indicator
(see illustration) faces upwards and the side with tex-
tual information faces downwards.
NOTE
Depending on your region, the included power cord may
differ from the one shown above.
3.
Connect the AC adaptor to the JM-5’s DC IN
jack.
4.
Plug the power cord into a power outlet.
Note: Be sure to use only the AC adapter supplied with the
unit (PSB-1U). Also, make sure the line voltage at the
installation matches the input voltage specified on the AC
adapter’s body. Other AC adapters may use a different
polarity, or be designed for a different voltage, so their use
could result in damage, malfunction, or electric shock.
NOTE
If you won’t be using the JM-5 for an extended period of
time, disconnect the power cord from the electrical outlet.
Connecting the JM-5 to an
amplifier, mixer, etc.
To use the JM-5, you need to connect it to a mixer or an
amplification system.
NOTE
To prevent malfunction and/or damage to speakers or other
devices, always turn down the volume, and turn off the power
on all devices before making any connections.
1.
Turn the [MASTER VOL] knob all the way to
the left to minimize the volume.
2.
Switch off all devices.
3.
Connect the JM-5’s OUTPUT jacks to the
inputs of your external device.
Connect the outputs of an external signal
source to the JM-5’s INPUT (STEREO) socket.
For the connection to an amplifier, please choose
unbalanced (mono) cables with 1/4” plugs at one end
(for the JM-5). The connectors at the other end need
to match the input sockets of the device to which
you are connecting the JM-5.
NOTE
When connection cables with resistors are used, the vol-
ume level of equipment connected to the audio inputs may
be low. If this happens, use connection cables that do not
contain resistors.
AC adapter Power cord
Indicator
to an AC outlet
JM-5’s rear panel
OUTPUT R + L/MONO
INPUT L + R
Connecting the JM-5 to an amplifier
JM-5_US.book Page 14 Tuesday, December 14, 2010 10:29 AM

Connecting a microphone
VIMA JM-5
r
15
Connecting a microphone
Connect your microphone to the MIC 1 or MIC 2
socket.
If you are using only one microphone, choose the
MIC 1 socket. This will allow you to take advantage of
the JM-5’s voice effects and harmony function.
NOTE
You can connect a condenser microphone to the MIC 1
socket, in which case you need to switch on phantom
power (page 27).
■ Cautions when using a microphone
•Lower the volume before you connect a microphone
to the JM-5. If the volume is raised when you con-
nect a microphone, noise may be output from the
connected speakers.
• Howling could be produced depending on the loca-
tion of microphones relative to speakers of your
amplification system. This can be remedied by:
(1) Changing the orientation of the microphones.
(2) Relocating the microphone(s) at a greater dis-
tance from speakers.
(3) Lowering volume levels.
Connecting a television set
NOTE
Before you make connections to other devices, you must
turn down the volume of all devices and turn off their
power to prevent malfunctions or damage to your speak-
ers.
1.
Switch off the JM-5 and the television set
you’ll be connecting.
2.
Connect the JM-5 to your television set.
Use a video cable (commercially available) to connect
the JM-5’s VIDEO OUTPUT jack to the television set.
3.
Switch on the JM-5 (see p. 17).
4.
Switch on your television set.
5.
(As necessary) Specify the television output
format (see p. 56).
6.
Specify the aspect ratio for your television
set.
The aspect ratio is the proportional relationship
between the width and height of the screen.
Connecting an external audio
device
You can also connect an external audio device to the
JM-5’s INPUT (STEREO) socket.
Microphone: Roland DR-series.
*Connect the microphone using either
an unbalanced mono 1/4” or a balanced
XLR plug.
Video cable
(Commercially available)
Television
Portable audio player
This connection requires a special
cable: 1/8” stereo mini phone plug
→ 1/8” stereo mini phone plug
Headphone
output
JM-5_US.book Page 15 Tuesday, December 14, 2010 10:29 AM

Before you start using the JM-5
16
r
VIMA JM-5
The “Audio In Level” parameter (see p. 57) allows you to
set the input level.
NOTE
Signals received via the INPUT (STEREO) socket can also be
processed by the “Center Cancel” function (see “Audio In
Center Canc” on p. 57) and transposed (see “Audio In
Transpose” on p. 57).
Listening through headphones
You can use headphones to enjoy the JM-5 without dis-
turbing those around you, such as at night.
1.
Plug the headphones into the headphone
() socket located at the JM-5’s front.
If you don’t want to disturb others, switch off the
external amplification system, because the JM-5’s
OUTPUT sockets remain active even when you con-
nect headphones.
2.
Use the JM-5’s [MASTER VOL] knob to
adjust the headphone volume.
■ Cautions when using headphones
•To prevent damage to the cord’s internal conductors,
avoid rough handling. When using headphones,
mainly try to handle either the plug or the headset.
• Your headphones may be damaged if the volume of a
device is already turned up when you plug them in.
Minimize the volume before you plug in the head-
phones.
• Excessive input will not only damage your hearing,
but may also strain the headphones. Please enjoy
music at a reasonable volume.
•Use headphones fitted with a stereo 1/8” phone plug.
Attaching the JM-5 to a stand
By using the separately sold PDS-10, you can attach the
JM-5 to a stand as shown in the illustration below.
NOTE
Use only the screws (M5x8) supplied with the JM-5 to attach
the unit to the Roland PDS-10 stand (sold separately). Other
screws or other usages of the screw holes may damage the
JM-5.
NOTE
Never insert the 4 screws supplied with the JM-5 without
attaching the JM-5 to the PDS-10 stand.
NOTE
When using the PDS-10, extend the legs to their maximum
spread. Do not allow the overall height including the JM-5 to
exceed 1 meter.
The assembly (JM-5 and
PDS-10) should look as
shown to the right.
• See the PDS-10’s owner’s
manual for details about how
to attach the JM-5 to it.
•For this procedure, turn the
JM-5 upside-down, and place
a bunch of newspapers or
magazines under the four
corners or at both ends to
prevent damage to the but-
tons and controls.
Also, you should try to orient
the JM-5 so no buttons or
controls get damaged.
NOTE
When turning the JM-5 upside-down, handle with care to
avoid dropping it, or allowing it to fall or tip over.
Headphones
JM-5 bottom plate
PSD-10 stand plate
Notes:
Be sure to use the screws supplied with the JM-5.
JM-5_US.book Page 16 Tuesday, December 14, 2010 10:29 AM
Turning the power on/off
VIMA JM-5
r
17
Turning the power on/off
Once the connections have been completed, turn on the
power to your various devices in the order specified. By
turning on devices in the wrong order, you risk causing
malfunction and/or damage to speakers and other
devices.
NOTE
Never remove the USB memory while playback or recording is
running or while data are being read from, or written to, an
external USB memory.
Turning the power on
1.
Switch off the external amplification sys-
tem.
2.
Turn the [MASTER VOL] knob all the way to
the left to minimize the volume.
3.
Press and hold the [POWER] switch until the
“Starting Up…” message appears in the dis-
play.
The power will turn on, an opening message will
appear in the JM-5’s screen, and then the main page
will appear.
After a brief interval, the JM-5 will be ready to pro-
duce sound.
NOTE
This unit is equipped with a protection circuit. A brief inter-
val (a few seconds) after power up is required before the
unit will operate normally.
4.
Switch on your amplification system or con-
nect a pair of headphones (see p. 16).
5.
Use the [MASTER VOL] knob to adjust the
volume.
Turning the power off
1.
Turn the [MASTER VOL] knob all the way to
the left to minimize the volume.
NOTE
Never switch off the JM-5 while playback or recording is
running or while data are being read from, or written to, an
external USB memory.
2.
Switch off your external amplification sys-
tem.
3.
Press the JM-5’s [POWER] switch.
The display will go dark and the power will turn off.
NOTE
If you need to turn off the power completely, first turn off
the [POWER] switch, then unplug the power cord from the
power outlet. Refer to “Connecting the AC adaptor” on
p. 14.
JM-5_US.book Page 17 Tuesday, December 14, 2010 10:29 AM
Before you start using the JM-5
18
r
VIMA JM-5
Demo of the JM-5
Your JM-5 contains a demo that introduces all of its
highlights. It might be a good idea to try it out now. The
demo is self-explanatory, so we’ll just show you how to
start and stop it.
NOTE
You will need to connect an external display to take advantage
of the JM-5’s demo function. See “Connecting a television set”
on p. 15.
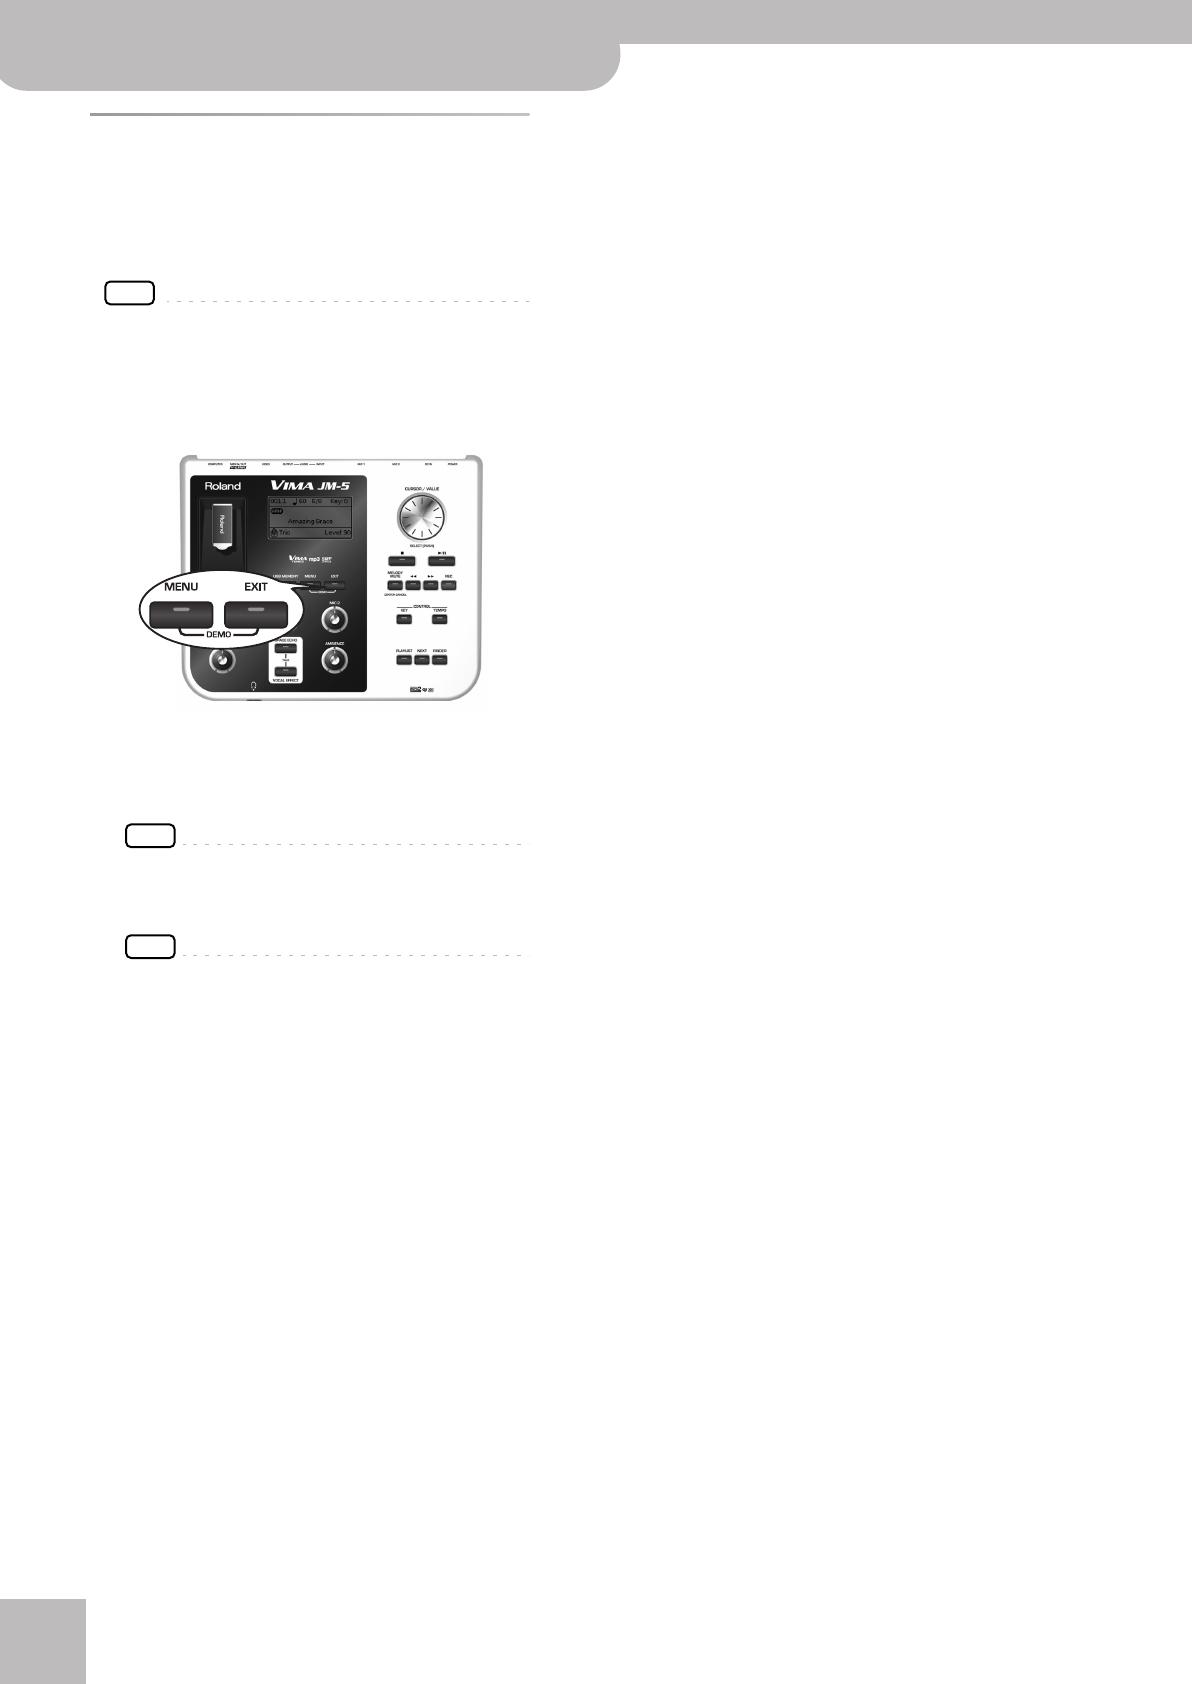
1.
Simultaneously press the [MENU] and [EXIT]
buttons.
2.
Enjoy the audio-visual demo.
3.
Press the [EXIT] button to leave the demo
function.
NOTE
All rights reserved. Unauthorized use of this material for
purposes other than private, personal enjoyment is a viola-
tion of applicable laws.
NOTE
No data for the music that is played back will be output
from USB–MIDI.
JM-5_US.book Page 18 Tuesday, December 14, 2010 10:29 AM
Basic operation of the JM-5
VIMA JM-5
r
19
5. Basic operation of the JM-5
About the display and cursor
operation
This section introduces the information that appears on
the main page in the JM-5’s display and how to navi-
gate the menu.
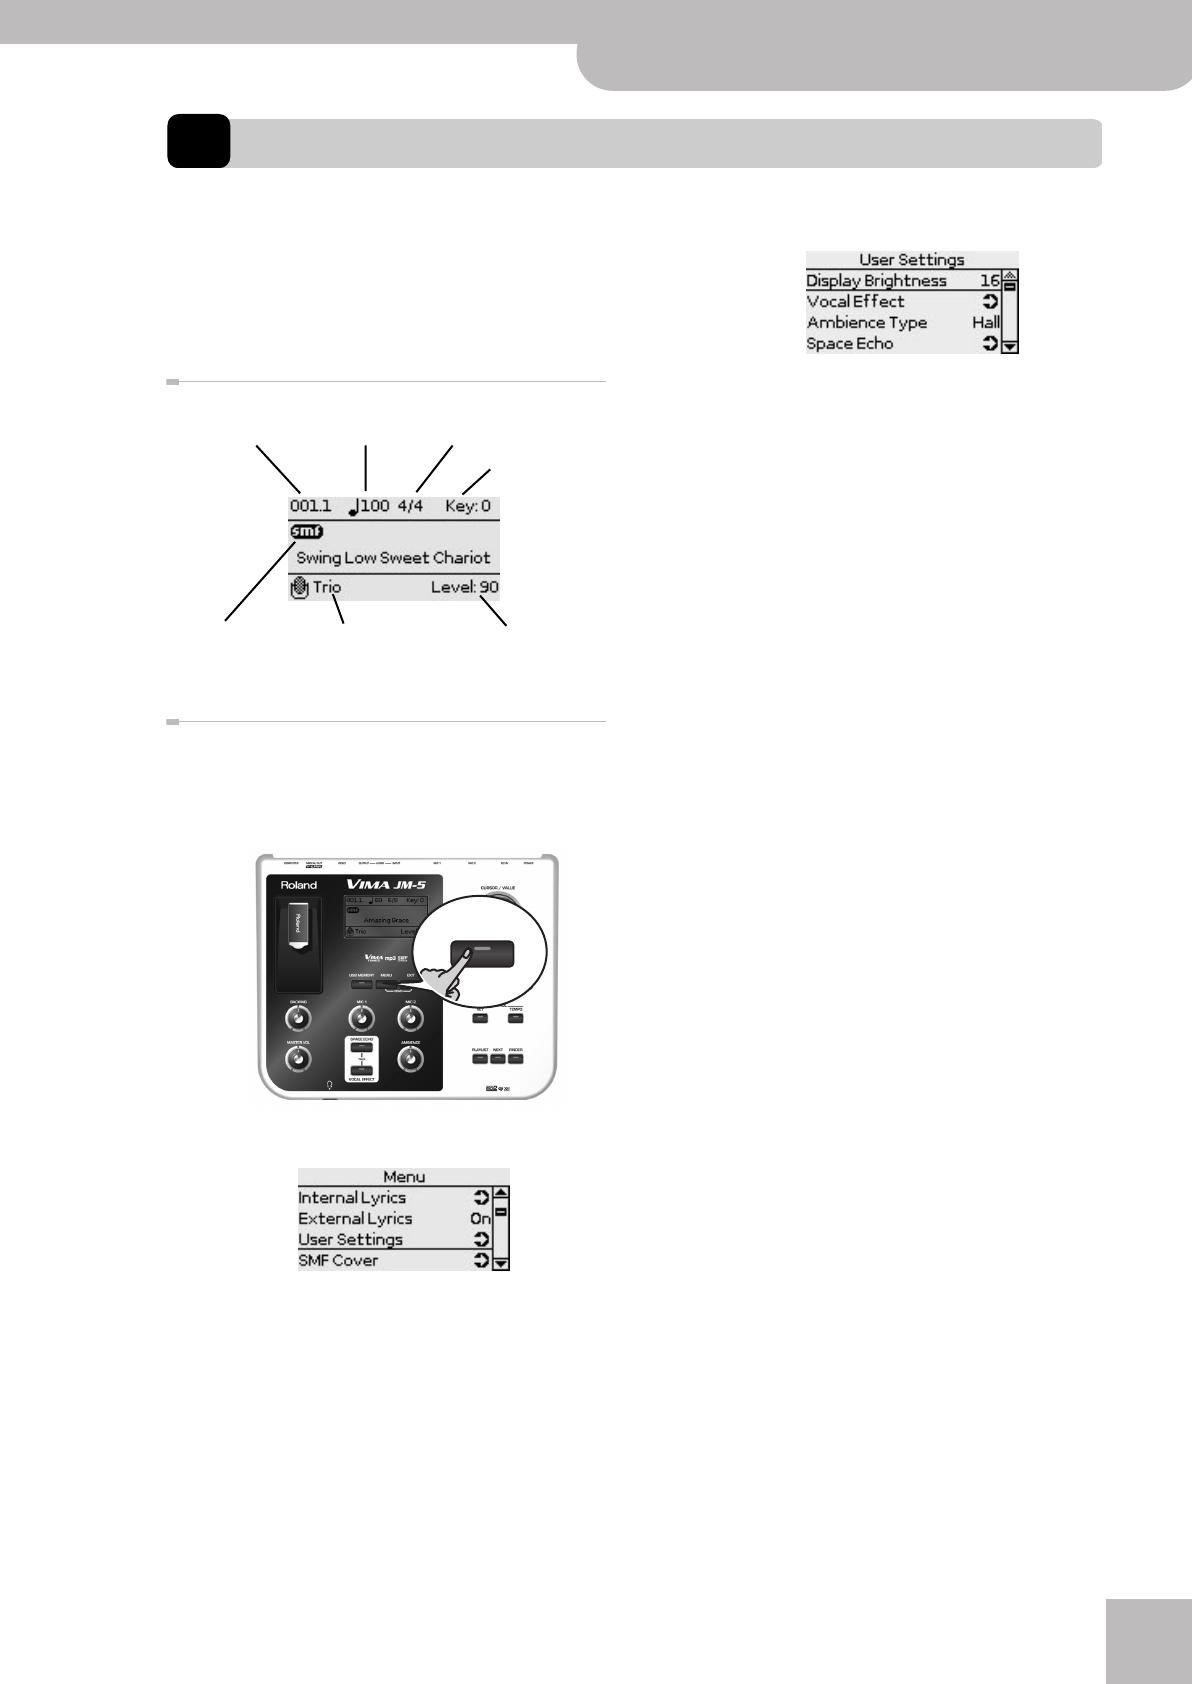
Main page
Moving between windows
Here is how to navigate the menu to select the setting
you want to change.
1.
Press [MENU] button.
The display changes to:
This page allows you to select the function group
that contains the setting you want to change (indica-
tions followed by an arrow mean that you can select
other display pages).
2.
Rotate the [CURSOR÷VALUE] dial to select
the entry of the desired function group.
For this example, we will select “User Settings”.
3.
Press the [CURSOR÷VALUE] dial (“PUSH”) to
go to the “User Settings” function group.
The display changes to:
On this display page, only one setting (“Display
Brightness”) can be changed directly. Some of the
remaining entries are followed by an arrow, meaning
that they provide access to additional display pages.
4.
Try to select other “Menu” functions by pro-
ceeding as follows:
(a) Press the [EXIT] button once to return to the
“Menu” page.
(b) Rotate the [CURSOR÷VALUE] dial to select an entry,
then press the dial to go to the corresponding
function group or setting.
(c) Press and hold the [EXIT] button (its indicator stops
flashing) to return to the JM-5’s main page.
Current measure Tempo setting Time signature
Transposition
interval (“Key”)
Selected song file
type: .SMF, .WAV,
.mp3
Level of the selected
vocal effect
Selected vocal
effect
MENU
JM-5_US.book Page 19 Tuesday, December 14, 2010 10:29 AM

Playing back songs
20
r
VIMA JM-5
6. Playing back songs
The JM-5 plays back songs stored on an external USB storage device (it doesn’t contain a hard disk). Be sure to prepare
one with the songs you intend to use. You can use your computer to prepare the USB storage device (a USB memory). We
recommend, however, to format the USB storage device with the JM-5 rather than your computer. See page 70 for how
to format your storage device. In addition, the JM-5’s demo songs can be played back if you select the corresponding
playlist.
On the JM-5, mp3, WAV and SMF files are considered
“songs”. Be aware, however, that mp3 and WAV files are
audio data (the ones you can burn onto a CD and play
back with almost any CD player). Standard MIDI Files, on
the other hand, contain MIDI data, i.e. instructions for a
tone generator. This is important to remember, because
it explains why some functions are only available for
Standard MIDI Files, while others only work with audio
files (WAV or mp3).
NOTE
See page 21 for the supported song files.
NOTE
Never remove the USB memory while playback or recording is
running or while data are being read from, or written to, an
external USB memory.
Playing back songs on a USB
storage device
Here’s how you can listen to songs that are saved on a
USB storage device (sold separately).
1.
Connect the JM-5 to an audio system (or
connect a pair of headphones) and switch it
on (see p. 17).
2.
Connect the USB memory containing the
song you want to play back to the USB
memory port on the front panel.
3.
If necessary, press the [USB MEMORY] but-
ton.
The display changes to:
(This is only an example of what may be displayed
after performing step (3).)
NOTE
When you first connect a USB memory to the JM-5, this
page appears automatically. In that case, you can skip step
(3).
4.
Select the file you want to play back by first
rotating the [CURSOR÷VALUE] dial and then
pressing it to confirm your selection.
The [USB MEMORY] button’s indicator lights.
USB MEMORY
JM-5_US.book Page 20 Tuesday, December 14, 2010 10:29 AM
/