Pour enregistrer ce produit, veuillez SVP aller à
www.samsung.com/register.
Guide d’installation rapide
Liste de pièces
1
2
3
4
Télécommande (AA59- 00817A)
et piles (AAA x 2)
Cordon d’alimentation
Guide de sécurité
Guide d’installation rapide
support porte-l
Licence
Fabriqué sous licence de Dolby Laboratories. Dolby et le symbole double D sont des marques de
commerce de Dolby Laboratories.
Manufactured under a license from U.S. Patent No’s: 5,956,674, 5,974,380, 5,978,762, 6,487,535,
6,226,616, 7,212,872, 7,003,467, 7,272,567, 7,668,723, 7,392,195, 7,930,184, 7,333,929 and
7,548,853. DTS, the Symbol, and DTS and the Symbol together are registered trademarks & DTS
Premium Sound is a trademark of DTS, Inc. ©2012 DTS, Inc. All Rights Reserved.
Manufactured under a license from U.S. Patent No’s: 6,285,767, 8,027,477, 5,319,713, 5,333,201,
5,638,452, 5,771,295, 5,970,152, 5,912,976, 7,200,236, 7,492,907, 8,050,434, 7,720,240,
7,031,474, 7,907,736 and 7,764,802. DTS, the Symbol, and DTS and the Symbol together are
registered trademarks & DTS Studio Sound is a trademark of DTS, Inc. ©2012 DTS, Inc. All Rights
Reserved.
HDMI, HDMI High Denition Multimedia Interface et le logo HDMI sont des marques de commerce
ou des marques déposées de HDMI Licensing LLC aux États-Unis et dans d’autres pays.
DivX Certied® to play DivX® video up to HD 1080p, including premium content.
ABOUT DIVX VIDEO: DivX® is a digital video format created by DivX, LLC, a subsidiary of Rovi Corporation. This is an ofcial
DivX Certied® device that has passed rigorous testing to verify that it plays DivX video. Visit divx.com for more information
and software tools to convert your les into DivX videos.
ABOUT DIVX VIDEO-ON-DEMAND: This DivX Certied® device must be registered in order to play purchased DivX Video-on-
Demand (VOD) movies.
To obtain your registration code, locate the DivX VOD section in your device setup menu. Go to vod.divx.com for more
information on how to complete your registration.
DivX®, DivX Certied® and associated logos are trademarks of Rovi Corporation or its subsidiaries and are used under
license.
Covered by one or more of the following U.S. patents: 7,295,673; 7,460,668; 7,515,710; 7,519,274
Avis sur les licences des logiciels ouverts
Le code source libre utilisé dans ce produit peut être consulté à la page Web indiquée ci-après. (http://opensource.samsung.com)
L’avis sur les licences des logiciels ouverts n’est valable que dans la version anglaise.
Spécications
Facteurs environnementaux
Température de fonctionnement
Niveau d’humidité en fonctionnement
Température d’entreposage
Niveau d’humidité en entreposage
50 °F à 104 °F (10 °C à 40 °C)
10 à 80 %. sans condensation
-4 °F à 113 °F (-20 °C à 45 °C)
5 à 95 %. sans condensation
Nom du modèle HG28ND460 HG40ND460
Résolution d’af chage 1366 x 768 1920 x 1080
Taille de l’écran
(diagonale)
28” Catégorie
(27.5” pouces en diagonale)
40” Catégorie
(39.5” pouces en diagonale)
Son (sortie) 5W x 2 10W x 2
Dimensions (L x P x H)
Boîtier
Avec support
643.4 x 62.9 x 396.5 mm
643.4 x 163.4 x 435.0 mm
905.2 x 91.1 x 525.4 mm
905.2 x 196.4 x 562.3 mm
Poids
Sans support
Avec support
3.80 kg
4.20 kg
6.40 kg
7.30 kg
➣ La conception et les spécications peuvent faire l’objet de modications sans préavis.
➣ Cet appareil est un appareil numérique de catégorie B.
AVERTISSEMENT : Cet appareil contient des produits chimiques reconnus par l’État de Californie pour causer le cancer et
une toxicité de la reproduction.
Mode hôtel - prêt à l’emploi
La fonction Mode hôtel - prêt à l’emploi effectue automatiquement la conguration du mode Hôtel, le réglage du pays, le réglage
de l’horloge et du mode d’image lorsque le téléviseur est allumé pour la première fois. Elle s’exécute automatiquement aussi
lorsque le téléviseur est allumé pour la première fois suite à une réinitialisation de service.
♦ Réglage local
– Mis en surbrillance initialement: US
– Si vous appuyez sur la touche Enter après avoir
sélectionné Modifier, vous pouvez modifier le pays.
– Si un autre pays est sélectionné, le téléviseur s’éteint
puis se rallume automatiquement.
– Si vous avez choisi un pays erroné, accédez de
nouveau à la section Service du menu hôtel et effectuez
de nouveau une réinitialisation du téléviseur.
♦ Conguration facile
– Mis en surbrillance initialement: Configuration
Standalone
– Si vous sélectionnez le bouton Hors ligne seulement,
le mode Hors ligne est réglé par défaut et l’option
« Mode hors ligne est fixé » s’affiche à l’écran pendant
3 secondes.
– Le téléviseur entre en mode RF automatiquement après
avoir affiché à l’écran durant 3 secondes le message
« Mode hors ligne est fixé ».
– Si vous sélectionnez le mode Hors ligne, l’option
« Sélectionner la langue du menu » s’affiche à l’écran.
♦ Afchage de sélection de la langue des menus
– Si vous sélectionnez « Hors ligne » à partir de l’option
« Sélectionner mode téléviseur hôtel », l’option
« Sélectionner la langue du menu » s’affiche.
– Mis en surbrillance initialement: English
– Durée de l’affichage: le délai OSD et l’utilisation de
l’écran sont les mêmes que ceux des téléviseurs que
Samsung offre aux consommateurs.
– Si vous appuyez sur la touche Enter, l’écran « Mode
d’image » s’affiche.
♦ Conguration du téléviseur
– Mis en surbrillance initialement: Standard.
– Le téléviseur affiche le Mode Image et vous pouvez
choisir les modes Dynamique ou Image standard.
♦ La fonction Programmation automatique démarre.
– Si vous appuyez sur la touche Enter, le téléviseur
recherche automatiquement les chaînes.
– Si vous appuyez sur la touche Enter, le téléviseur
recherche automatiquement les chaînes.
♦ Régler l’afchage du mode horloge, de l’heure
avancée et du fuseau horaire
– Mis en évidence initialement: Mode horloge: Auto, heure
avancée: désactivée, Fuseau hor.: Heure de l’Est
– Si le téléviseur a été réglé sur les chaînes de diffusion
numériques et que ces dernières transmettent
de l’information sur la date et l’heure, réglez la
mode horloge à Automatique. Le téléviseur réglera
automatiquement la date et l’heure.
– Si le téléviseur n’est pas réglé sur les chaînes de
diffusion numériques, réglez le mode horloge à Manuel,
et ensuite réglez manuellement la date et l’heure.
– Activez et désactivez la fonction Heure d’été pour
appliquer ou non l’heure avancée.
– Sélectionnez le fuseau horaire sur la carte qui s’affiche.
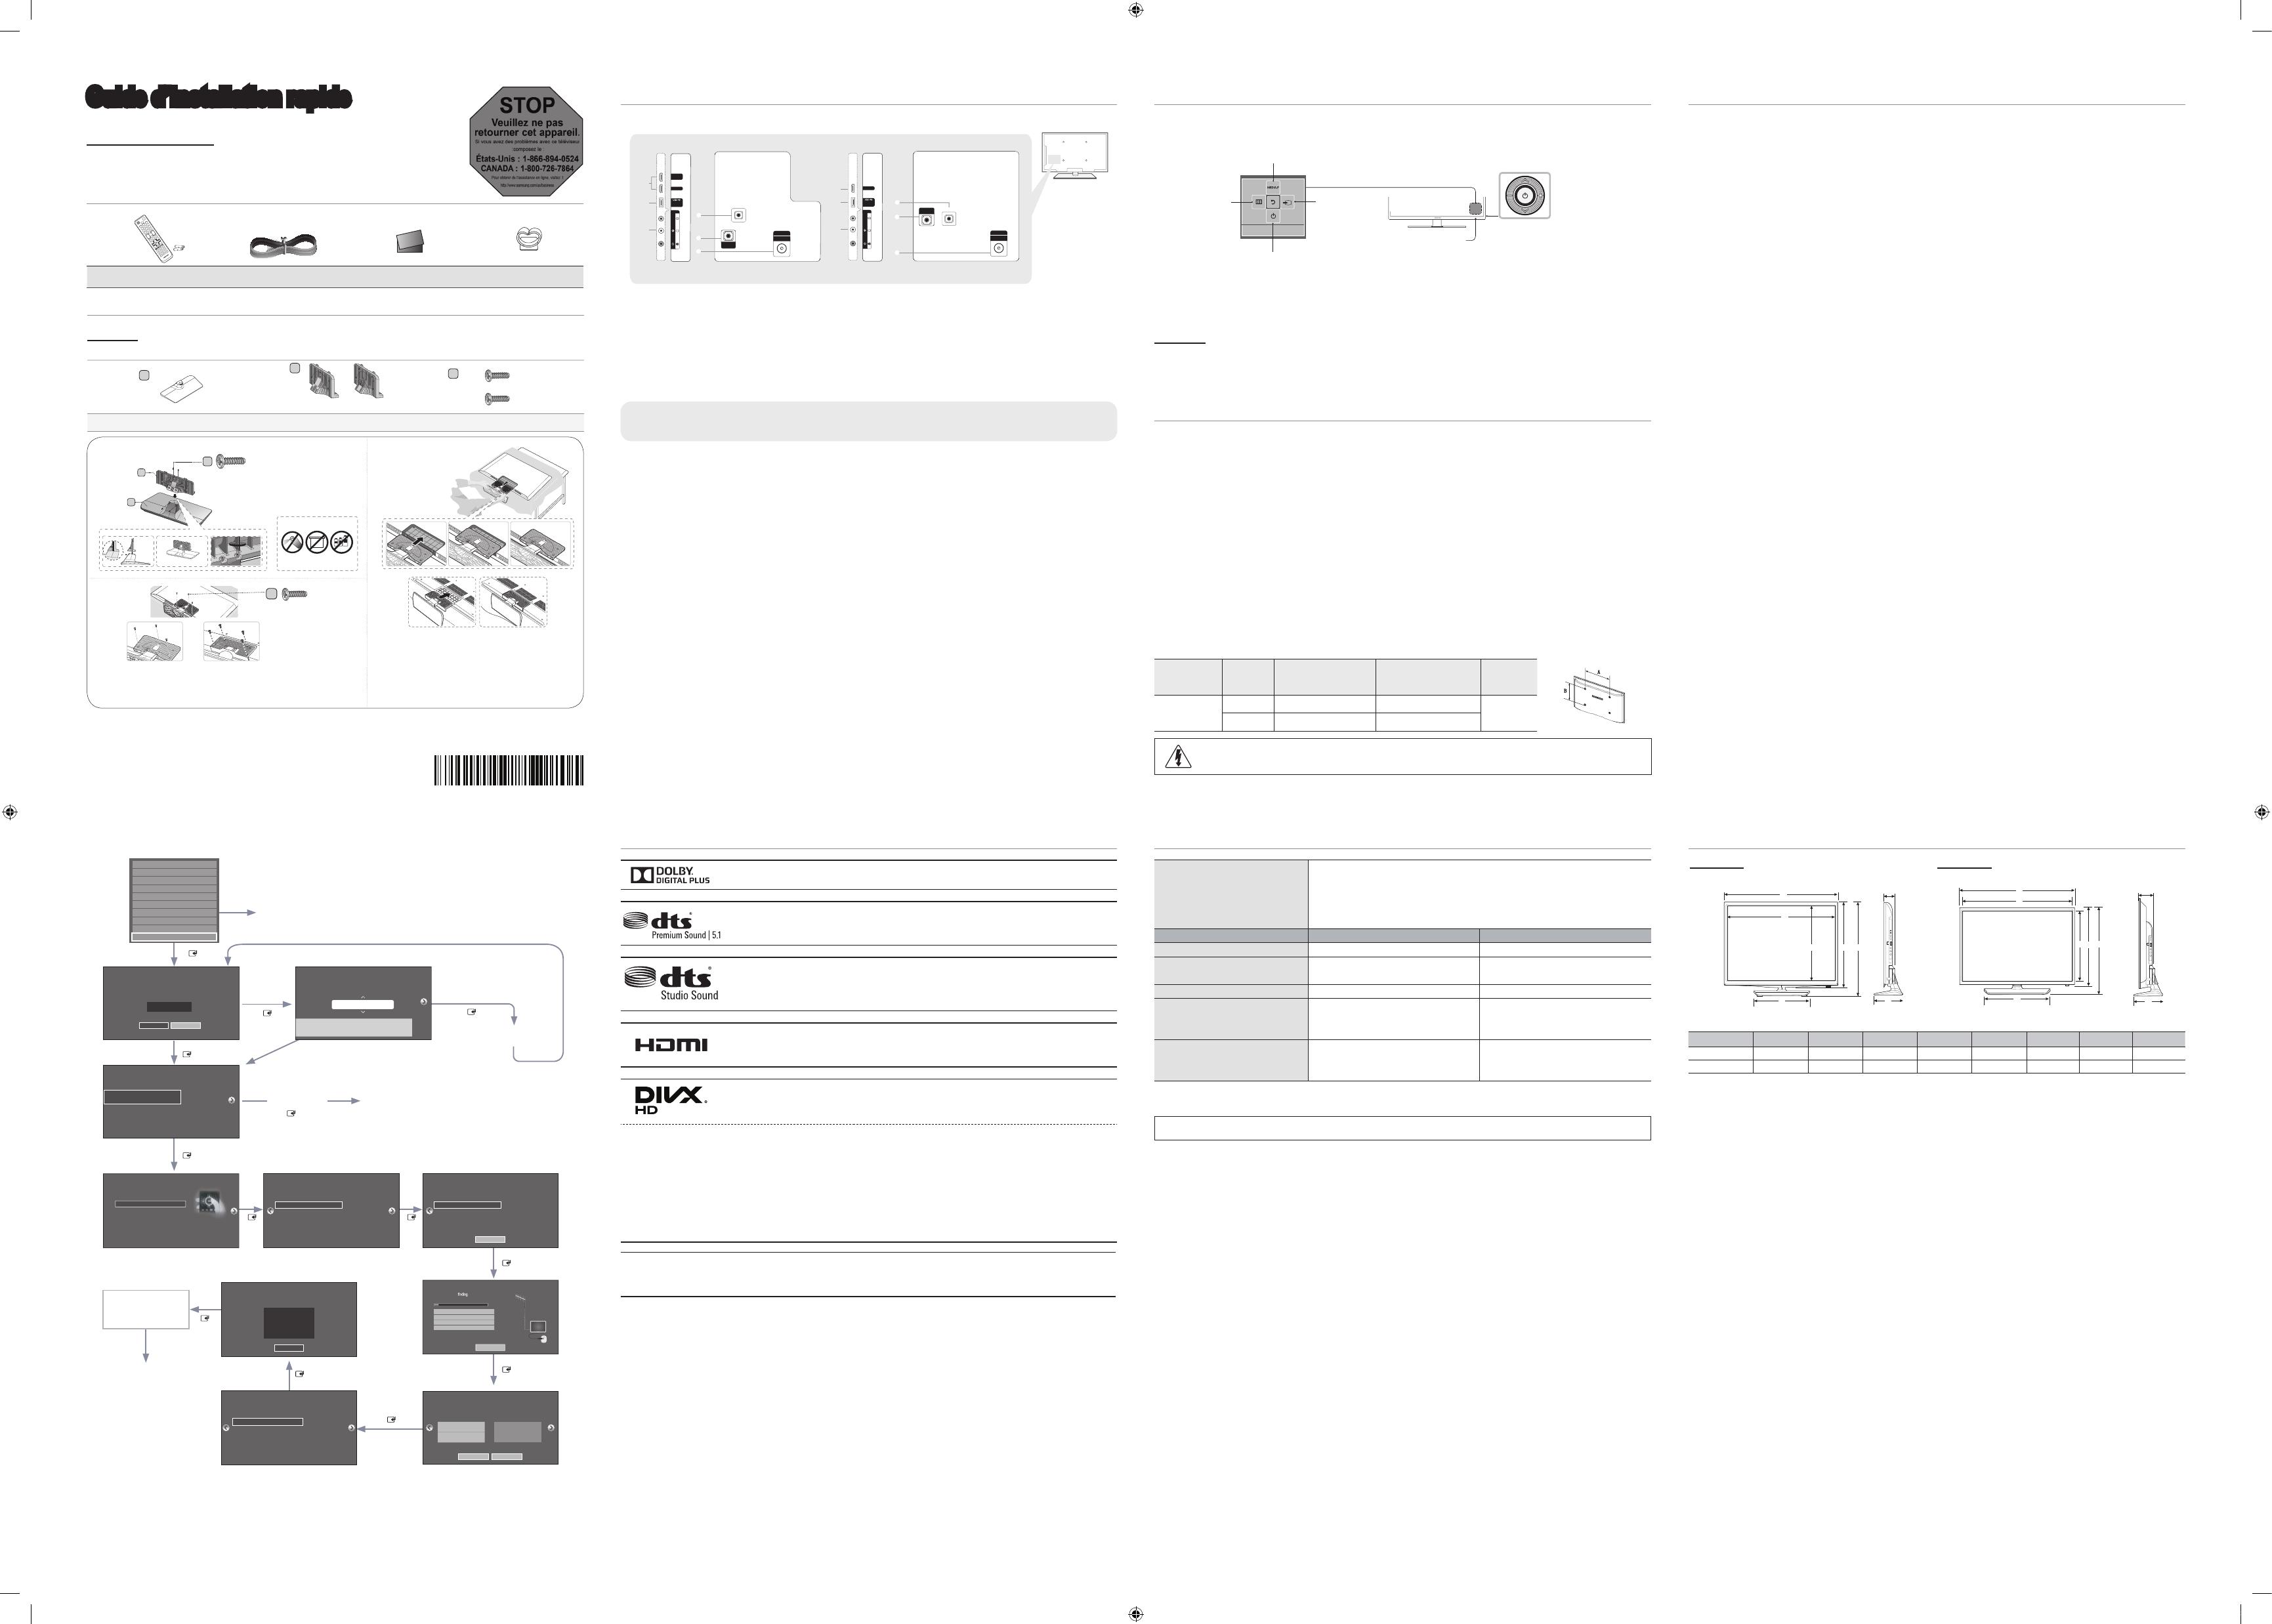
Télécommande du téléviseur
Le dispositif de commande du téléviseur, un petit bouton similaire à une manette de jeu situé dans la partie arrière droite de ce
dernier, permet de commander le téléviseur sans télécommande.
Télécommande du
téléviseur
L’image se dessine
lorsque vous vous mettez
en face du téléviseur.
Mise hors tension
Menu Fonction
Capteur pour la télécommande
Retour
Utilisation du
Media Play
Utilisation du Menu
Sélection d’une
Source
✎ La couleur et la forme du produit peuvent varier en fonction du modèle.
✎ Pour quitter le menu, appuyer sur la commande pendant plus d’une seconde.
✎ Lorsque vous déplacez la télécommande vers l’avant/arrière/gauche/droite pour sélectionner une fonction, assurez-vous de
ne pas pousser la télécommande vers le haut. Si vous poussez vers le haut en premier, vous n’obtiendrez pas le résultat
escompté.
Mode veille
Le téléviseur passe en mode veille lorsque vous l’éteignez et continue de consommer une petite quantité d’électricité. Par
mesure de sécurité et pour réduire votre consommation électrique, ne laissez pas votre téléviseur en mode veille durant de
longues périodes (par exemple lorsque vous partez en vacances). Il est conseillé de débrancher le cordon d’alimentation.
Spécications de l’ensemble de xation murale (VESA)
Installez le support mural sur un mur massif perpendiculaire au plancher. Si vous xez le support à un matériau de construction
autre que le placoplâtre, veuillez communiquer avec votre détaillant local. Si vous l’installez au plafond ou sur un mur incliné, il
risque de tomber et de causer des blessures.
➣ Les dimensions standard pour les ensembles de xation murale gurent dans le tableau ci-dessous.
➣ Les ensembles de xation murale de Samsung sont fournis avec un guide d’installation détaillé. Toutes les pièces
nécessaires à l’assemblage sont fournies.
➣ N’utilisez pas de vis non conformes aux spéci cations VESA relatives aux vis standard.
➣ N’utilisez pas de vis plus longues que les dimensions standard ou non conformes aux spéci cations VESA en la matière.
Des vis trop longues pourraient endommager l’intérieur du téléviseur.
➣ En ce qui a trait aux supports muraux non conformes aux spéci cations de la norme VESA relatives aux vis, la longueur
des vis peut différer selon les spéci cations du support mural.
➣ Ne serrez pas trop les vis; cela pourrait endommager le produit ou provoquer sa chute et causer des blessures. Samsung
décline toute responsabilité dans le cas où de tels accidents se produiraient.
➣ Samsung ne saurait être tenue responsable des dommages au produit ou des blessures occasionnés par l’utilisation
d’un support mural non conforme aux spéci cations VESA ou non recommandé, ou si le consommateur ne suit pas les
instructions d’installation du produit.
➣ N’installez pas le téléviseur à un angle d’inclinaison de plus de 15 degrés.
➣ Il faut deux personnes pour xer le téléviseur sur un mur.
Type de produit
Taille du
téléviseur en
pouces
Spéci cations VESA de l’ori
ce de passage des vis (A * B)
en millimètres
Vis standard Quantité
LED-TV
28 100 × 100 M4
4
40 200 × 200 M8
N’installez pas le support mural lorsque le téléviseur est sous tension. Il pourrait survenir des blessures causées
par un choc électrique.
♦ Scénario UI
Installation du support de téléviseur DEL
♦ HG28ND460 / HG40ND460
Composante
Utilisez les composants et pièces fournis pour l’installation du support.
A
B
28" 40"
C
X 7 (M4 X L12)
X 8 (M4 X L14)
28”
or
40”
• Support
(varie en fonction du modèle)
• Guide du support • Vis
C
28”:
X
4 (M4
X
L12)
40”:
X
4 (M4
X
L14)
B
A
NE PAS UTILISER DE
GRAISSE
Attention
NE PAS UTILISER
DE PRODUITS
CHIMIQUES
NE PAS UTILISER
D’HUILE
✎ Pour protéger le téléviseur, posez un tissu doux
sur la table et placez le téléviseur écran vers le
bas sur ce dernier.
✎ Insérez le guide du support dans la fente située
sur la partie inférieure du téléviseur.
✎ Glissez-le jusqu’au bout de la ligne, dans la
direction de la èche, puis assemblez-le.
1 2
3
C
28”:
X3 (M4 X L12)
40”:
X
4 (M4
X
L14)
✎ Insérez la vis pointe en premier, et vissez jusqu’à ce que
la partie supérieure touche la paroi.
✎ Serrez les vis dans l’ordre indiqué dans le manuel.
28”
28”
40”
40”
✎ Assurez-vous de bien distinguer le devant et l’arrière du support et du guide de celui-ci à l’assemblage.
✎ Assurez-vous qu’au moins deux personnes soulèvent et déplacent le téléviseur.
✎ Pour le xer sur le pied, placez l’appareil à plat (l’écran vers le haut) sur une surface, puis vissez les vis.
✎ Le nombre de vis peut varier en fonction du modèle.
Vue du panneau de connexion
3
4
HDMI IN 1
HDMI IN 2
(DVI)
2
(5V 0.5A)
/CLONING
1
AV IN
AUDIO
VIDEIO
EX-LINK
AUDIO
OUT
5
6
ANT IN
AIR/CABLE
3
4
HDMI IN
2
(5V 0.5A)
/CLONING
1
AV IN
AUDIO
VIDEO
EX-LINK
5
6
ANT IN
AIR/CABLE
AUDIO
OUT
➣ La couleur et la forme du produit peuvent varier en fonction du modèle.
1 HDMI IN
2 USB (5V 0.5A)/CLONING
3 VIDEO / L-AUDIO-R
4 EX-LINK
5 AUDIO OUT
6 ANT IN (AIR/CABLE)
En mode Hôtel (Hors ligne), tous les éléments du menu des chaînes dans l’affichage des menus, sont désactivés,
à l’exception de la liste des chaînes. Si vous devez changer l’attribution des chaînes, utilisez l’option Réglage des
chaînes dans le menu d’options Hôtel.
Avis
BN68-07039A-01
STOP
Veuillez ne pas
retourner cet appareil.
Si vous avez des problèmes avec ce téléviseur
:composez le :
États-Unis : 1-866-894-0524
CANADA : 1-800-726-7864
Pour obtenir de l’assistance en ligne, visitez :t
http://www.samsung.com/us/business
- Côté - - Côté -
HD460 28” HD460 40”
Auto Program
Auto Program is incomplete.
0 channels are memorized
Change Settings Scan Again
DTV Air0
Air
DTV Cable
Cable
0
0
0
Si vous
sélectionnez
Change
Si vous sélectionnez
Standalone Only
Le téléviseur entre en mode RF.
Si vous ne changez pas le pays de votre localisation actuelle
Si vous
sélectionnez
Skip
Si vous sélectionnez
Standalone Setup
Sélectionner votre langue
Appuyez sur la touche de
mise hors tension pour sortir
du menu.
Sélectionnez le mode Image.
Sélectionner le mode d’horloge, l’heure avancée et
votre fuseau horaire
Sélectionnez la bande de
chaînes à utiliser pour la
programmation automatique
Après une recherche
de chaînes.
Si vous sélectionnez TV Reset, le téléviseur réinitialise les valeurs aux
valeurs factory par défaut et affiche ensuite le menu Hospital Plug & Play.
Allez au premier écran Hospital Plug & Play ci-dessous.
Le téléviseur est mis hors tension et
sous tension automatiquement.
Si vous modifiez le pays de
votre localisation actuelle
Local Set
Change Locat Set if Located in North America, Latin America and Europe.
In other regions, Please press SKIP button move to the next step.
Current Localset : US
Change Skip
Local Set
Change Locat Set if Located in North America, Latin America and Europe.
In other regions, Please press SKIP button move to the next step.
Current Localset : US
Change Skip
Easy Set up
Standalone Setup
(Continue Setup)
Standalone Only
(End Setup)
If you select this, Easy
setup will be started.
There are Essential
Details, Channel Scan,
Clock and Terms in Easy
setup.
c
Select your Language
Select your language to start the on screen setup.
The Language Setting will be applied to Main Menu and not Plug and Play.
Press the arrow buttons
to move around the
screen.
Press the Enter button to
select.
English
Español
Français
c
Configure your TV
Picture Mode Standard
Choose a picture mode
that best suits your
viewing enviroment.
Select your information in all of the categories
below.
TV Setup Complete!
Your TV is now ready to use
OK
Auto Program
Antenna Both
Digital Cable System STD
Analog Cable System STD
Select current connected
antenna.
To get channels, set the options below then select
Scan.
Scan
Auto Program
Auto Program is channels for you...
Air 21
6%
Stop
DTV Air0
Air
DTV Cable
Cable
0
0
0
Clock
-- : -- --
You can adjust your time to set DST, Time Zone and
clock mode
Set current date and time
Clock Mode Auto
Date
-- / -- / ----
Time
-- : -- --
DST Off
Time Zone Eastern
Local Set
Warning! TV might not function if local set is not correctly configured.
When Local set is changed, TV will turn off automatically to apply it.
US
Countries List
USA
Le menu hors-ligne des options
de l’hôtel s’affiche.
Self Diagnosis for TV
Self Diagnosis for HTV
SW Update
Service Pattern
ATV cable AGC Gain
OFF
DTV OpenCable AGC Gain
Sound Bar Out
OFF
Contact Samsung
Standby LED
ON
Default
Default
TV Reset
P
w
Dimensions
HG28ND460 HG40ND460
(Unité : pouce)
1 2 3 4 5 6 7 8
HG28ND460 643.4 609.5 347.0 311.4 396.5 435.0 62.9 163.4
HG40ND460 905.2 879.5 486.3 535.5 525.4 562.3 91.1 196.4
[HD460-ZC-QSG]BN68-07039A-01L02.indd 2 2015-04-14 �� 1:05:38

