To register this product please visit
www.samsung.com/register.
Quick Setup Guide
List of Parts
Remote Control (AA59-00817A) &
Batteries (AAA x 2)
Power Cord
Owner’s Instructions
Safety Guide
Holder-Wire stand 1(EA)
Data Cable (BN39-00865B, BN3
9-01011C)
Hotel Mount Kit
Installing the LED TV Stand
♦ HG28NC670/HG28NC677/HG40NC670/HG40NC677/HG48NC670/HG48NC677
Components
When installing the stand, use the provided components and parts.
28”
A
1 EA
40” 48”
B
1 EA
x8 (M4 X L12, for 40”
and above models)
C
x7 (M4 X L12)
or
D
•
Stand (differs, depending on the model)
•
Guide Stand
•
Screws
•
Security Screws (3EA)
(4EA, for 40” and above models)
✎ P
lace a soft cloth over the table to
protect the TV, and then place the
TV on the cloth screen-side down.
✎ Insert the Stand Guide into the
slot on the bottom on the botton
of the TV.
B
A
Front
1
2 3
C
(M4 X L12)
x4
TOP View
Side
C
(M4 X L12)
x3
C
(M4 X L12, for 40”
and above models)
x4
or
(only for 40"&48"model)
DO NOT USE
OIL
DO NOT USE
GREASE
DO NOT USE
CHEMICALS
✎ Make sure to distinguish between the front and back of the Stand and Stand Guide when connecting them.
✎ Make sure that at least two people lift and move the LED TV.
✎ When connecting the stand, lay the product down on a soft surface, with the screen facing down, and then fasten the screws.
✎ The number of screws may differ depending on the model.
- The item of Sound bar Out in Hospitality Option Menu makes you control to where the TV sound is outputted when the TV
is turned on.
If Sound bar Out is On, the TV sound is automatically outputted in the Sound Bar device only whenever TV is turned on.
If Sound bar Out is Off, the TV sound is automatically outputted in the TV speaker only whenever TV is turned on.
- Models supporting the ARC function are listed below:
• Sound-Bars: HW-E350/E450/E550
HW-F350/F355/FM35/F450/FM45/FM45C/ F550/F551/FM55/FM55C/F750/F75
♦ Setting the Sound-Bar to Hotel Mode.
- Set the following Hotel menu options:
• Hotel option > System > Sound Bar Out = On.
• Hotel option > Power On > Power On Volume = User Defined.
• Hotel option > Power On > Power On Volume Num > Set greater than 0.
• Hotel option > Power On > Max Volume > Set greater than 0.
- Connect an HDMI cable from the HDMI OUT jack at the back of the Sound-Bar to the HDMI3 port (supporting ARC) on the
hospitality TV.
- After the Sound-Bar is connected to the hospitality TV, when the TV turns on, the Sound-Bar automatically detects the TV,
and then automatically switches to Hotel Mode.
Sound Bar Hotel mode functional characteristics:
• Power On/Off is synchronized with the TV
• HDMI_CEC defaults to On
• Functions through the “HDMI OUT” port only
• Disables the “Input mode” key on the VFD to prevent unexpected audio-source changes.
• Acquires adjustable Power On and Max Volume settings from the TV’s Hotel option menu. The Sound-Bar’s Power On
Volume and Max Volume values, however, are ½ of the Power On Volume and Max Volume settings in the TV’s Hotel
options menu.
Example: If the TV’s Power On Volume=20 and Max Volume=90, then the Sound Bar’s Power On Volume=10 and Max
Volume=45.
Wall Mount Kit Specifi cations (VESA)
Install your wall mount on a solid wall perpendicular to the fl oor. If you are attaching the wall mount to building
materials other than plaster board, contact your nearest dealer. If installed on a ceiling or slanted wall, the TV may fall
and cause severe personal injury.
➣ Standard dimensions for wall mount kits are shown in the table below.
➣ Samsung wall mount kits contain a detailed installation manual. All parts necessary for assembly are provided.
➣ Do not use screws that do not comply with the VESA standard screw specifi cations.
➣ Do not use screws that are longer than the standard dimension or do not comply with the VESA standard screw
specifi cations. Screws that are too long may cause damage to the inside of the TV set.
➣ For wall mounts that do not comply with the VESA standard screw specifi cations, the length of the screws may differ
depending on the wall mount specifi cations.
➣ Do not fasten the screws too fi rmly. This may damage the product or cause the product to fall, leading to personal
injury. Samsung is not liable for these kinds of accidents.
➣ Samsung is not liable for product damage or personal injury when a non-VESA or non-specifi ed wall mount is used or
the consumer fails to follow the product installation instructions.
➣ Do not mount the TV at more than a 15 degree tilt.
➣ Always have two people mount the TV onto a wall.
Product Family
TV size in
inches
VESA screw hole
specs (A * B) in
millimeters
Standard Screw
(Length*
Pitch in mm)
Quantity
LED-TV
28 100 X 100
M4
4
40 200 X 200
M8
48 400 X 400
Do not install your Wall Mount Kit while your TV is turned on. This may result in personal injury due to
electric shock.
STOP
Please do not return
this unit
If you are having problems operating this TV,
Please call;
US : 1-866-894-0524
CANADA : 1-800-726-7864
For web support please visit
http://www.samsung.com/us/business
BN68-05850P-03
6
♦ Assembling the swivel
The 40” and larger LED TVs have swivel stands. You can set these stands so that the TV swivels 20 degrees left and right,
60 degrees left and right, or 90 degrees left and right.
20° swivel
To confi gure the TV so that it swivels 20° left and right, insert the prong on the bottom of the stand through the curved hole in the Bracket
Holder Swivel marked 20°. Then, fi x the Bracket Holder Swivel to the stand using the three supplied screws as shown to the left.
60° swivel
To confi gure the TV so that it swivels 60° left and right, insert the prong on the bottom of the stand through the curved hole in the Bracket
Holder Swivel marked 60°. Then, fi x the Bracket Holder Swivel to the stand using the three supplied screws as shown to the left.
90° swivel
To confi gure the TV so that it swivels 90° left and right, remove the Bracket Holder Swivel, and then screw the three supplied screws into
the stand as shown to the left.
♦ Hotel Mount Kit
Short Bolt (2EA) Long Bolt (2EA)
Nut (2EA) Washer (2EA)
Viewing the Connection Panel
3
4
- SIDE -
HDMI IN 1
HDMI IN 2
(DVI)
2
(5V 0.5A)
/CLONING
1
AV IN
AUDIO
VIDEIO
HDMI IN
3 (ARC)
EX-LINK
AUDIO OUT
5
ANT IN
AIR/CABLE
1
6
3
4
- SIDE -
HDMI IN 1
HDMI IN 2
(DVI)
2
(5V 0.5A)
/CLONING
1
AV IN
AUDIO
VIDEO
7
HDMI IN
3 (ARC)
1
7
EX-LINK
AUDIO OUT
5
ANT IN
AIR/CABLE
6
40"/48"Model use
28" Model use
➣ The product color and shape may vary depending on the model.
1 HDMI IN 1, 2(DVI), 3(ARC)
2 USB (5V 0.5A) / CLONING
3 VIDEO / L-AUDIO-R
4 EX-LINK
5 AUDIO OUT
6 ANT IN (AIR/CABLE)
7 DATA
When in Hotel mode (Interactive or Standalone), all Channel menu items in the Menu OSD except for the
Channel List are deactivated. If you need to change the channel line up, use the Channel Setup item in the
Hotel options menu.
Notice
Bolt + Nut
Top
Bottom
Affi x the stand to a
fl at surface such as a
dresser top, desk top, or
entertainment center as
shown.
WARNING: To prevent injury, you must attach this
TV securely to the fl oor, a table, a dresser top, etc.
with the Hotel Mount Kit as described in these
instructions.
Licence
Manufactured under license from Dolby Laboratories. Dolby and the double-D symbol are trademarks of Dolby
Laboratories.
Manufactured under a license from U.S. Patent No’s: 5,956,674, 5,974,380, 5,978,762, 6,487,535, 6,226,616,
7,212,872, 7,003,467, 7,272,567, 7,668,723, 7,392,195, 7,930,184, 7,333,929 and 7,548,853. DTS, the
Symbol, and DTS and the Symbol together are registered trademarks & DTS Premium Sound is a trademark
of DTS, Inc. ©2012 DTS, Inc. All Rights Reserved.
Manufactured under a license from U.S. Patent No’s: 6,285,767, 8,027,477, 5,319,713, 5,333,201, 5,638,452,
5,771,295, 5,970,152, 5,912,976, 7,200,236, 7,492,907, 8,050,434, 7,720,240, 7,031,474, 7,907,736 and
7,764,802. DTS, the Symbol, and DTS and the Symbol together are registered trademarks & DTS Studio
Sound is a trademark of DTS, Inc. ©2012 DTS, Inc. All Rights Reserved.
The terms HDMI and HDMI High-Defi nition Multimedia Interface, and the HDMI Logo are trademarks or
registered trademarks of HDMI Licensing LLC in the United States and other countries.
DivX Certified® to play DivX® video up to HD 1080p, including premium content.
ABOUT DIVX VIDEO: DivX® is a digital video format created by DivX, LLC, a subsidiary of Rovi Corporation. This is an official DivX Certified®
device that has passed rigorous testing to verify that it plays DivX video. Visit divx.com for more information and software tools to convert your
files into DivX videos.
ABOUT DIVX VIDEO-ON-DEMAND: This DivX Certified® device must be registered in order to play purchased DivX Video-on-Demand (VOD)
movies.
To obtain your registration code, locate the DivX VOD section in your device setup menu. Go to vod.divx.com for more information on how to
complete your registration.
DivX®, DivX Certified® and associated logos are trademarks of Rovi Corporation or its subsidiaries and are used under license.
Covered by one or more of the following U.S. patents: 7,295,673; 7,460,668; 7,515,710; 7,519,274
Open Source License Notice
In the case of using open source software, Open Source Licenses are available on the product menu.
Open Source License Notice is written only English.
Specifi cations
Environmental onsiderations
Operating Temperature
Operating Humidity
Storage Temperature
Storage Humidity
50°F to 104°F (10°C to 40°C)
10% to 80%, non-condensing
-4°F to 113°F (-20°C to 45°C)
5% to 95%, non-condensing
Model Name
HG28NC670
HG28NC677
Display Resolution
1366 x 768
Screen Size
(Diagonal)
28” Class
(28.0” measured diagonally)
Sound (Output)
5W x 2
Dimensions (WxDxH)
Body
With stand
25.3 x 15.6 x 2.5 inches
(643.4 x 396.5 x 62.9 (mm))
25.3 x 17.1 x 6.4 inches
(643.4 x 435.0 x 163.4(mm))
Weight
Without Stand
With Stand
8.6 lbs (3.9 kg)
9.5 lbs (4.3 kg)
Stand Swivel (Left / Right)
0˚
Model Name
HG40NC670
HG40NC677
HG48NC670
HG48NC677
Display Resolution
1920 x 1080
Screen Size
(Diagonal)
40" Class
(40.0" measured diagonally)
48" Class
(47.6" measured diagonally)
Sound (Output)
10W x 2
Dimensions (WxDxH)
Body
With stand
35.7 x 21.0 x 2.6 inches
(906.6 x 532.9 x 65.1 (mm))
35.7 x 22.7 x 8.9 inches
(906.6 x 577.6 x 226.5 (mm))
42.3 x 24.7 x 2.6 inches
(1075.1 x 627.5 x 65.5 (mm))
42.3 x 26.5 x 8.9 inches
(1075.1 x 673.5 x 226.5 (mm))
Weight
Without Stand
With Stand
16.8lbs (7.6kg)
23.1lbs (10.5kg)
24.0lbs (10.9kg)
30.6lbs (13.9kg)
Stand Swivel (Left / Right)
20° / 60° / 90°
➣ Design and specifi cations are subject to change without prior notice.
➣ This device is a Class B digital apparatus.
WARNING: This product contains chemicals known to the State of California to cause cancer and reproductive toxicity.
Dimensions
HG28NC670 / HG28NC677
(unit: inches)
1 2 3 4 5 6 7
HG28NC670
HG28NC677
25.3 24 13.7 15.6 17.1 6.4 2.5
HG40NC670 / HG40NC677 / HG48NC670 / HG48NC677
1
2
4
3 5
7
6
(unit: inches)
1 2 3 4 5 6 7
HG40NC670
HG40NC677
35.7 34.9 19.7 21 22.7 8.9 2.6
HG48NC670
HG48NC677
42.3 41.6 23.4 24.7 26.5 8.9 2.6
4
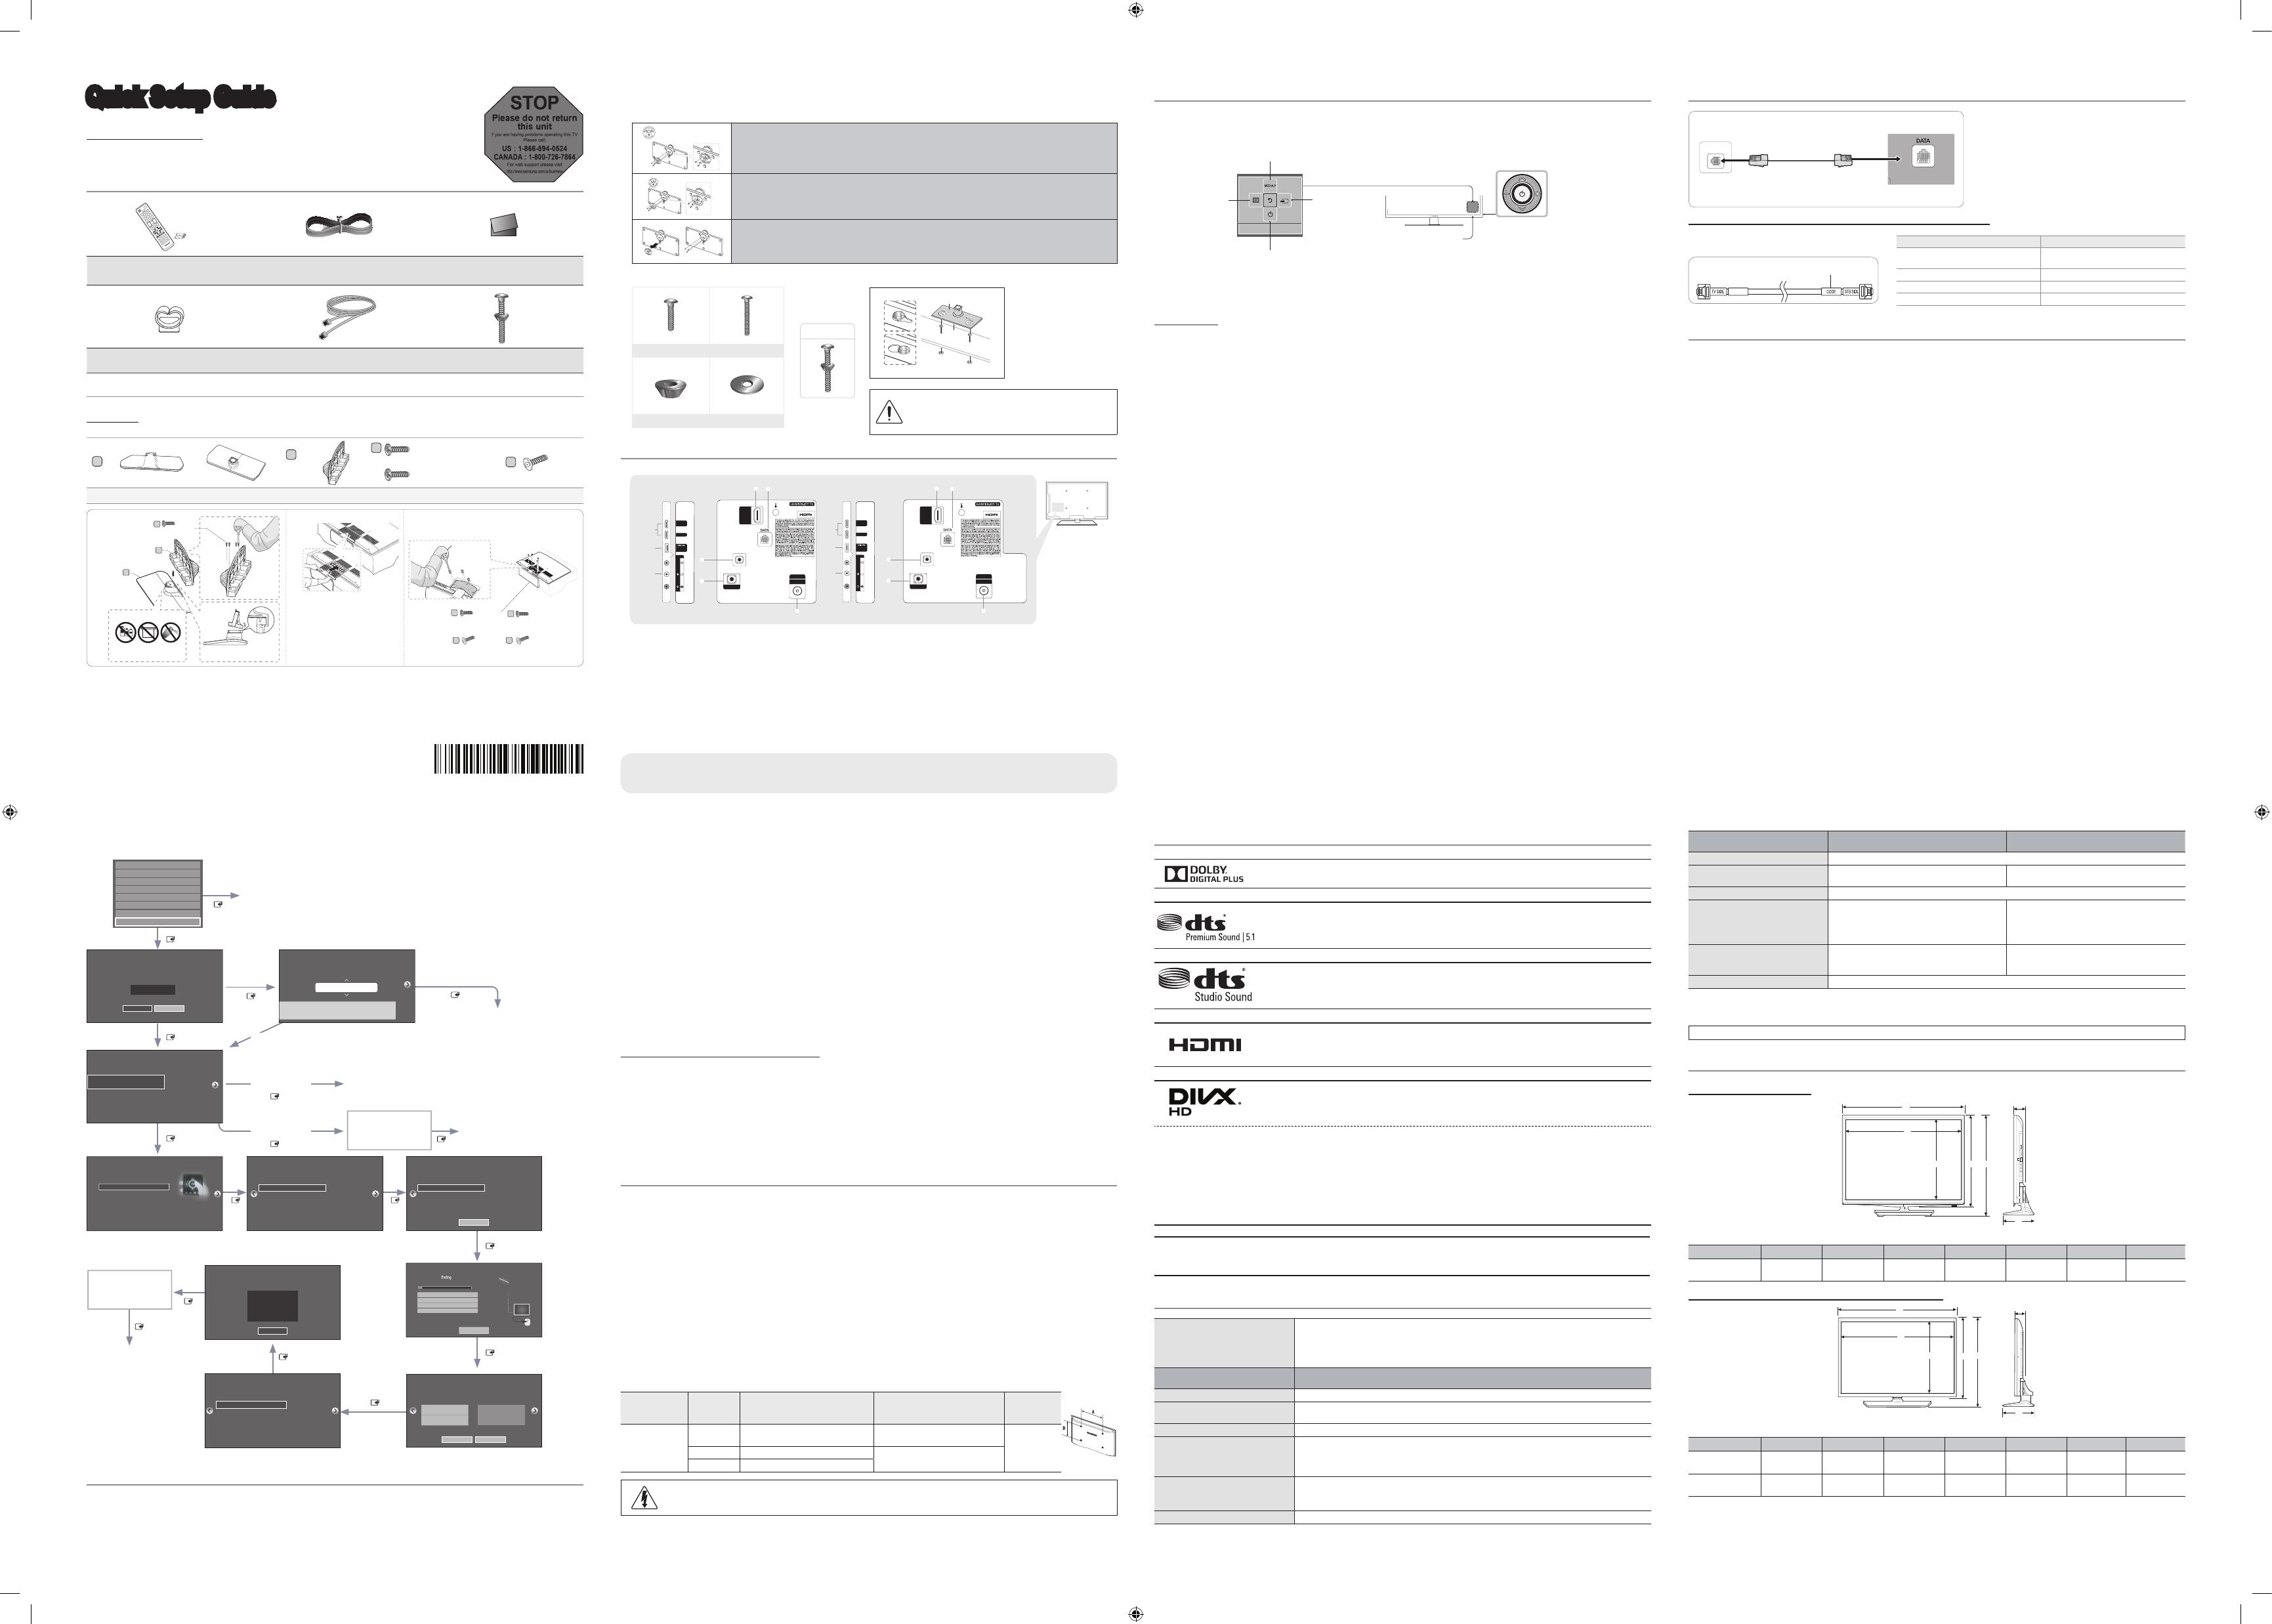
Connecting the TV with an SBB or STB
ETH MODEM
1.
C
onnect the [DATA] jack of the TV to the [ETH MODEM]
jack of the STB (SBB) with the data cable.
✎ The “ETH MODEM” jack name that you connect
the Data Cable to may differ depending on the
SBB or STB type.
List of Vendors and Compatible Data Cables Supplied with the TV
♦ Refer to the code label on the data cable.
Note the
labeled end.
Confirm the code
on the Code Label
Note the
labeled end.
Vendor Cable code
Samsung OCC
Enseo Guest-Tek
BN39-00865B
NXTV BN39-01011B
nStreams BN39-01110A
MTI BN39-01011C
Hotel Plug & Play
The Hospital Plug & Play function, which automatically performs the Hospital Mode selection, Country Setup, Clock
Setup, and Picture Mode Setup, runs once when power is fi rst turned ON. Setup also runs automatically after you
have executed a Service Reset.
♦ Hospital Plug & Play OSD
- Initially highlighted: Interactive
- If you select the Standalone Only button, Standalone
hospital mode is set by default and the “Standalone
mode is set” OSD appears for 3 seconds.
- TV enters into RF mode automatically after displaying
the “Standalone mode is set” OSD for 3 seconds.
- If you select Interactive mode, the Interactive Setup
Menu is displayed. Press the power off key to exit the
Interactive menu.
- If you select Standalone Plug & Play mode, the “Select
Menu Language” OSD appears.
♦ Local Set
- Initially highlighted: US
- If you press the Enter key after selecting Change, you
can change the country.
- If the country is changed, the TV automatically turns off
and on.
- If you select Interactive mode, the Interactive Setup
Menu is displayed. Press the power off key to exit the
Interactive menu.
- If you select the incorrect country, execute TV Reset
again after entering the Service section of the Hospital
Menu.
♦ Select Menu Language OSD
- If you select Standalone from the “Select Hospital
TV Mode” OSD, the “Select Menu Language” OSD
appears.
- Initially highlighted: English
- Display time: OSD time out and operation are the same
as Samsung’s consumer TV models.
- If you press the Enter key, the “Picture Mode” OSD
appears
♦ Picture Mode OSD
- Initially highlighted: Standard.
- The TV displays the Picture Mode OSD where you can
choose Dynamic or Standard Picture mode.
♦ Auto Search Mode OSD
- If you press the Enter key, the TV automatically searches
for channels.
- The OSD Display time, which starts when the Auto Store
operation is completed and continues until the Auto
Sort function starts, is 30 seconds.
♦ Set Clock Mode, DST(Daylight saving time), and
Time Zone OSD
- Initially highlighted: Clock Mode : Auto, DST : Off, Time
Zone : Eastern
- If the TV will be tuned to digital broadcast channels, and
these channels transmit date and time information, set
the Clock Mode to Auto. The TV will set the date and
time automatically.
- If the TV will not be tuned to digital broadcast channels,
set the Clock Mode to Manual, and then set the date
and time on the TV manually.
- Set DST On or Off to apply or not apply daylight saving
time to the TV.- - Select your time zone on the map
appears.
DATA Cable
[TV Rear Panel]
21 3
5
TV Controller
The TV’s Controller, a small joy stick like button on the rear right side of the TV, lets you control the TV without the
remote control.
TV Controller
The image is drawn
as if you are facing the
front side of the TV.
Power off
Function menu
Remote control sensor
Return
Selecting the
Media Play
Selecting the
Menu
Select a source.
✎ The product color and shape may vary depending on the model.
✎ To exit the menu, press the Controller for more than 1 second.
✎ When selecting a function by moving the controller backwards/forwards/left/right, be sure not to press up on the controller. If you press up first, it will not
operate correctly.
Standby mode
Your TV enters Standby mode when you turn it off and continues to consume a small amount of electric power. To be
safe and to decrease power consumption, do not leave your TV in standby mode for long periods of time (when you
are away on vacation, for example). It is best to unplug the power cord.
♦ UI Scenario
Attention
or
Auto Program
Auto Program is incomplete.
0 channels are memorized
Change Settings Scan Again
DTV Air0
Air
DTV Cable
Cable
0
0
0
Self Diagnosis for TV
Self Diagnosis for HTV
SW Update
Service Pattern
ATV cable AGC Gain
OFF
DTV OpenCable AGC Gain
Sound Bar Out
OFF
Default
Default
TV Reset
If you select
Change
If you select
Standalone Only
If you select
Interactive
TV will enter the RF mode.
Press Power OFF to exit.
Interactive
Hospitality Option Menu
appears.
If you don’t change the country of the Current Location
If you select Skip
If you select
Standalone Setup
Select your language
Press Power OFF to exit.
Select Picture mode
Select Clock Mode, DST, and your Time Zone
Select the channel
band to use for
Auto Program
After Searching
channels.
If you select Factory Reset, the TV resets all values to their factory
defaults and then displays the Hospital Plug & Play menu. Go to the
fi rst Hospital Plug & Play screen below.
The TV is automatically
turned off and on.
If you change the country
of the Current Location
Local Set
Change Locat Set if Located in North America, Latin America and Europe.
In other regions, Please press SKIP button move to the next step.
Current Localset : US
Change Skip
Local Set
Change Locat Set if Located in North America, Latin America and Europe.
In other regions, Please press SKIP button move to the next step.
Current Localset : US
Change Skip
Easy Set up
Intertactive
(Hotel Menu)
Standalone Setup
(Continue Setup)
Standalone Only
(End Setup)
If you select this, the
setup process will be
completed and go to
hotel menu
c
Select your Language
Select your language to start the on screen setup.
The Language Setting will be applied to Main Menu and not Plug and Play.
Press the ▲▼◄►
buttons to move the
highlight.
Press the enter button to
select.
English
Español
Français
c
Configure your TV
Picture Mode Standard
Choose a picture mode
that best suits your
viewing enviroment.
Select your information in all of the categories
below.
TV Setup Complete!
Your TV is now ready to use
OK
Auto Program
Antenna Both
Digital Cable System STD
Analog Cable System STD
Select current connected
antenna.
To get channels, set the options below then select
Scan.
Scan
Auto Program
Auto Program is channels for you...
Air 21
6%
Stop
DTV Air0
Air
DTV Cable
Cable
0
0
0
Clock
-- : -- --
You can adjust your time to set DST, Time Zone and
clock mode
Set current date and time
Clock Mode Auto
Date
-- / -- / ----
Time
-- : -- --
DST Off
Time Zone Eastern
Local Set
Warning! TV might not function if local set is not correctly configured.
When Local set is changed, TV will turn off automatically to apply it.
US
Countries List
USA
Standalone
Hospitality Option Menu
appears.
Sound Bar
♦ Samsung Sound-Bars and Hotel TVs in 2014
- Samsung Sound-Bars and hospitality TVs support the ARC feature in HDMI 1.4. If you connect a compatible Samsung
Sound-Bar to a compatible Samsung hospitality TV using a single HDMI cable, guests can listen to the TV’s sound
through the Sound-Bar.
D
(Security Screw, for 40”
and above models)
x4
D
(Security Screw)
x3
or
or
[HG670677-ZC-QSG]BN68-05850P-03L02.indd 1 2014-04-16 5:29:27
