Page is loading ...

INSTALLATION INSTRUCTIONS
For Outdoor Lantern
Model # 23001
W ARNING! SHUT POWER OFF AT FUSE OR CIRCUIT BREAKER.
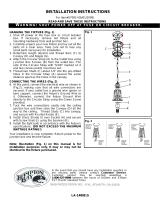
Fig. 2
1.
Shut off power at the circuit breaker and remove old fixture
including mounting hardware.
2. Carefully
unpack your new fixture and lay out all the parts on
a clear area. Take care not to misplace any small parts
necessary for installation.
3.
Removing the top roof by unscrewing two screws <A>
(Fig.3), and then unfixed the glass clasp, after open the glass
pac
kage softly, insert the glass panel <B> carefully into the
cage downwards in proper sequence then fixed them by glass
clasp <H> (Fig.4.5). Make sure all glass panels are secure
d
well, at last assemble the top roof to the cage using the two
screws <A>.
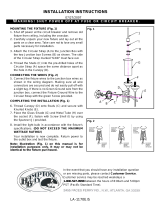
4. Pull black and white wires out of electrical outlet box.
5. Mount cross bar to outlet box. (Fig.1.)
6.
Connect electrical wires as shown making sure all wire
connectors are secured. If your outlet has a ground wire (green
or bare copper), connect the fixture ground
wire to it, if not,
connect fixture ground wire to the green screw on cross bar
.
After wires are connected, tuck them carefully insid
e junction
box. (Fig.2.)
7. To prevent moisture f
rom entering the outlet box and causing
a short, use clear caulking (ie, Indoor/ outdoor Silicone
Sealant) to outline the outside of fixture back plate where it
meets the wall leaving a space at bottom to allow moisture a
means to escape. (Fig.1.)
8. Align fixture to stud screws on cross bar
and attach fixture
with knurled knobs. (Fig.1.)
9. NOTE: Install the light bulbs in accordance with
the fixture
specification.
DO NOT EXCEED THE MAXIMUM
WATTAGE RATING
Your installation is now complete. Return power to the ju
nction
box and test the fixture.
FOR SUPPLY CONNECTIONS, USE WIRE RATED FOR AT
LEAST 90℃.
In the event that you should have any
installation question or are missing parts,
please contact Customer Service. Customer
service may be reached weekdays at
1-877-527-0313
between the hours of 8:00am
and 5:00pm PST (Pacific Standard Time).
FIXTURE
WIRES
Black or
Smooth
HOUSE
WIRES
Black
(Hot)
FIXTURE
WIRES
White or
Ribbed
HOUSE
WIRES
White
(Neutral)
FIXTURE
WIRES
Bare
Copper
(Ground)
HOUSE
WIRES
Green
(Ground)
“
WARNING: Risk of Fire, Most Dwellings
Built Before 1985 Have Supply Wire Rated
60℃, Consult A Qualified Electrician Before
Installing.”
Fig 1
FIG.2
B
H
FIG.3
TOP VIEW
H
FIG.1
A
Fig.3
Fig.4
Fig.5 Top View
2455 PACES FERRY RD.,N.W.,ATLANTA. GA 30339

INSTRUCCIONES PARA LA INSTALACION
DE FAROL EXTERIOR
Modelo # 23001
iADVERTENCIA! CORTE LA ENERGIA ELECTRICA EN LOS FUSIBLES O EN EL CIRCUITO PRINCIPAL.
ALAMBRES
DE LA
CASA
ALAMBRES
DE LA
LAMPARA
BLANCO O
CON MARCA
ALAMBRES
DE LA
LAMPARA
VERDE O DE
COBRE
(A TIERRA)
ALAMBRES
DE LA
LAMPARA
NEGRO O
SIN MARCA
ALAMBRES
DE LA
CASA
BLANCO
(NEUTRAL)
ALAMBRES
DE LA
CASA
s
1. Corte la energla ele
•
ctrica en el circuito pr ncip
al y saque la
lampara vieja, incluyendo todo el montaje.
2. Desempaque cuidadosamente la nueva la
•
mpara y ponga todas
las partes en un a
•
rea desnejada. Tome cuidado de no perder
ninguna parte pequena que sea necesaria para la instalacio
•
n.
3. Quitando la azotea sup
erior desatornillando dos tornillos
<A>(véase el higo 3), y entonces desmontado el corchete de
crystal, despues de abierto el paquete de crystal suavemente,
inserte el panel de cristal <B> cuidadosamente, en la jaula
hacia abajo en secuencia apropiada ento
nces los fij ó por el
corchete de cristal <H> (véase el higo 4, 5). Cerciórese de que
sea todo el panel de crystal asegure bien, en el último monte la
azotea superior la jaula usando los dos tornillos <A>.
4. Saque los alambres negro y blanco a la naja de salida
5. Monte la abrazadera circular a la caja de sallda. (Fig.1)
6. Conecte los alambras ele
•
tricos como se muestra en la Figura
3, asegura
•
ndose que todas las tuarcas este
•
n firmes. Si la caja
de sallda tiene un alambre a derra (verde o de cobre), conscte
el alambre a tierra de la la
•
mpara a este alambre (verde o de
cobre); si no lo tiene. Conecte el alambre a tierra de la
lampara directamunte la abrazadera circular usando los
tornillos verdes que vienen con el paqueta. Despue
•
s de
conectar los alambres, metealos cuid
adosamente en la caja de
salida mientras sujata la la
•
mpara hicia el techo.(Fig 2 )
7.
Para prenenir que la humedad entre a la caja de selida y cause
un corto circuito, use un sellador transparente (por ejemplo:
sellador de sillcona para interior o exterior) p
ara delinear la
parto exterior de la placa de montaje que va crntra la pared,
dejando un espacio en la parte de abajo para permitir que
salga la numedad. (Fig.1)
8. Allnis la la
•
mpara a los tornillos fijos de la sbrazadera circular
y coloque la la
•
mpara con las tuercas grafiladas.(Fig 1)
9.
NOTA: Install los focus de acuergo con las especilicaciones
de la lampara.
NO EXCEDA LAS CLASIFICACIONES
DE WATAJE MAXIMO!
Su instalacion esta terminada. Conecte la energla electrica en
la caja de union y pruebe la lampara.
PARA LAS CONEXIONES ELECTRICAS, USE ALAMBRE
CLASIFICADO AL MENOS PARA 90.℃
En caso de preguntas sobre la instalacion o le
faltaron parts, porfavor hablar al departamento
de servicio al clienteal 1-877-527-0313
de Lunes
a Viernes de 8:
00am a 5:00pm PST (tiempo del
pacifico).
2455 PACES FERRY RD.,N.W.,ATLANTA.GA 30339
CUIDADO: Riesgo de Incendio, la Mayoria
de Edificios Contruidos Antes de1985
Tienen el Alambre de Alimentacion
Clasificado Para 60℃. Consulte a un
Electricista Calificado Antes de Comenzar
la Instalacion.”
Fig .1
FIG.1
A
FIG.2
B
H
FIG.3
TOP VIEW
H
Fig.3
Fig.4
Fig.5 VisionSuperior
ALAMBRES
DE LA
CASA
ALAMBRES
DE LA
LAMPARA
BLANCO O
CON MARCA
ALAMBRES
DE LA
LAMPARA
VERDE O DE
COBRE
(A TIERRA)
ALAMBRES
DE LA
LAMPARA
NEGRO O
SIN MARCA
ALAMBRES
DE LA
CASA
BLANCO
(NEUTRAL
)
ALAMBRES
DE LA
CASA
Fig.2
/