Toro 22in Recycler Lawn Mower User manual
- Category
- Lawnmowers
- Type
- User manual
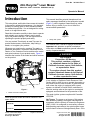
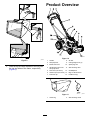
Toro 22in Recycler Lawn Mower is a powerful and versatile machine designed to make lawn care a breeze. Ideal for residential properties, this mower features a durable 22-inch steel deck that can withstand tough conditions. With its efficient recycling system, you can cut and mulch grass clippings, returning nutrients to your lawn for a healthier, greener look. The mower also offers side-discharge and bagging capabilities, providing you with multiple options for managing your clippings.
Toro 22in Recycler Lawn Mower is a powerful and versatile machine designed to make lawn care a breeze. Ideal for residential properties, this mower features a durable 22-inch steel deck that can withstand tough conditions. With its efficient recycling system, you can cut and mulch grass clippings, returning nutrients to your lawn for a healthier, greener look. The mower also offers side-discharge and bagging capabilities, providing you with multiple options for managing your clippings.


-
 1
1
-
 2
2
-
 3
3
-
 4
4
-
 5
5
-
 6
6
-
 7
7
-
 8
8
-
 9
9
-
 10
10
-
 11
11
-
 12
12
-
 13
13
-
 14
14
-
 15
15
-
 16
16
-
 17
17
-
 18
18
-
 19
19
-
 20
20
-
 21
21
-
 22
22
-
 23
23
-
 24
24


Toro 22in Recycler Lawn Mower User manual
- Category
- Lawnmowers
- Type
- User manual
Toro 22in Recycler Lawn Mower is a powerful and versatile machine designed to make lawn care a breeze. Ideal for residential properties, this mower features a durable 22-inch steel deck that can withstand tough conditions. With its efficient recycling system, you can cut and mulch grass clippings, returning nutrients to your lawn for a healthier, greener look. The mower also offers side-discharge and bagging capabilities, providing you with multiple options for managing your clippings.
Ask a question and I''ll find the answer in the document
Finding information in a document is now easier with AI
Related papers
-
Toro 22in Recycler Lawn Mower User manual
-
Toro 48cm Super Recycler User manual
-
-
Toro 20836 User manual
-
Toro 48cm Super Recycler Lawn Mower User manual
-
-
-
-
-
Toro 55cm Recycler Lawn Mower User manual