Page is loading ...

Patriot II
®
Braking System
Owner’s Manual & Installation Instructions
405-0600 Page 1 of 12 12/27/16
Please visit www.blueox.com for the latest version of these installation instructions.
THANK YOU
for purchasing a Patriot II
®
braking system from Blue Ox
®
. We’ve organized this manual to make your
installation simple and as trouble-free as possible. Please read before operating the brake. Keep your
sales receipt and this manual in a safe place so that both are available for future use if needed.
Warning: Changes or modications to this device not expressly approved could void the user’s authority to
operate the equipment.
This device complies with Industry Canada licence-exempt RSS standard(s). Operation is subject to the
following two conditions: (1) this device may not cause interference, and (2) this device must accept any
interference, including interference that may cause undesired operation of the device
Le présent appareil est conforme aux CNR d’Industrie Canada applicables aux appareils radio exempts
de licence. L’exploitation est autorisée aux deux conditions suivantes : (1) l’appareil ne doit pas produire
de brouillage, et (2) l’utilisateur de l’appareil doit accepter tout brouillage radioélectrique subi, même si le
brouillage est susceptible d’en compromettre le fonctionnement.
“Cet équipement est conforme aux limites d’exposition aux radiations dans un environnement non con-
trôlé. Cet équipement doit être installé et utilisé à distance minimum de 20 cm entre le radiateur et votre
corps. Cet émetteur ne doit pas être co-localisées ou opérant en conjunction avec tout autre antenne ou
transmetteur. “

Patriot II
®
Braking System
405-0600 Page 2 of 12 12/27/16
!
Fully understand these instructions before
installing. Improper installation and/or operation
can create a hazard which can cause serious
injury, property damage or death. Improper
installation and/or operation will void the warranty.
WARNING
DEALERS AND DISTRIBUTORS:
PLEASE give these instructions to the customer so they fully understand the set-up,
operation, and safety precautions of this braking system.
Welcome to the Blue Ox
®
Experience
Congratulations! You are now the proud owner of a Patriot II
®
braking system.
Welcome to the Blue Ox
®
Family. The inertia based braking system that you have purchased combines
quality components with the latest in technology and style. We are condent that these design features
will provide you with the conveniences you expect during your travels. After you understand how to
properly and safely operate and care for your Patriot II
®
, expect years of trouble-free operation and service
backed by a two year limited warranty.
Please read all of the technical documents, warnings, cautions, tips, and notes in this manual before
attempting to operate your Patriot II
®
for the rst time. Improper installation, use or maintenance may
result in malfunction causing personal injury or property damage. Please ll out and return your warranty
card or register via our web site at www.blueox.com within ten days of delivery. For future reference, your
serial number is located on the outside of the manual packaging and is also located on the bottom of your
Patriot
®
unit.
Equipment Information Record
Customer Name: ______________________________________
Date Purchased: _______________________________________
Purchased From: ______________________________________
Address: _____________________________________________
City:____________________ State: ___ Zip Code: _________
Phone Number of Dealership: ____________________________
Installed By: __________________________________________
Service #: _____________________________________________
Model #: _____________________________________________
Serial #: ______________________________________________
Notes: ________________________________________________
______________________________________________________
!
Always follow the towing procedures in your
vehicle’s owners manual.
Do NOT modify your Patriot II
®
in any way
NOT authorized by Blue Ox
®
, as it will void the
warranty.
WARNING

Patriot II
®
Braking System
405-0600 Page 3 of 12 12/27/16
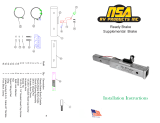
Unpacking your Patriot II
®
Remove the Patriot II
®
and accessories from the shipping carton, review parts list and diagram below.
Make sure that you have the appropriate items shown below. If NOT, please contact a Blue Ox® Dealer or
Distributor, or call a member of the Technical Service Team at (402) 385-3051 to order replacement parts.
Please charge the Patriot II
®
at least 8 hours prior to using.
Contents:
1. Patriot II
®
Unit
2. 2-Way RF In-Coach Controller
3. Rubber Stand for RF Controller
4. (2) Brake Feet
5. Breakaway Switch
6. Breakaway Lanyard
7. Breakaway Cable
8. XL Top Fangs
Important:
USE ONLY GENUINE FACTORY REPLACEMENT PARTS. Do NOT substitute homemade or non-typical parts. This
may cause your brake to fail and result in injury or death. If repair parts or components are needed, you may order them
through your nearest Blue Ox
®
Dealer or Distributor, or call our Technical Service Team at (402) 385-3051.
1
2
3
4
5
To satisfy FCC RF exposure requirements for mobile and base station transmission devices, a separation distance
of 20 cm or more should be maintained between the antenna of this device and persons during operation. To
ensure compliance, operation at closer than this distance is not recommended. The antenna(s) used for this
transmitter must not be co-located or operating in conjunction with any other antenna or transmitter.
Safety & Compliance
This equipment has been tested and found to comply with the limits for a Class B digital device, pursuant to part
15 of the FCC Rules. These limits are designed to provide reasonable protection against harmful interference in a
residential installation. This equipment generates, uses and can radiate radio frequency energy, and if not installed
and used in accordance with the instructions, may cause harmful interference to radio communications. However,
there is no guarantee that interference will not occur in a particular installation. If this equipment does cause
harmful interference to radio or television reception, which can be determined by turning the equipment off and on,
the user is encouraged to try to correct the interference by one or more of the following measures:
• Reorient or relocate the receiving antenna.
• Increase the separation between the equipment and receiver.
• Connect the equipment into an outlet on a circuit different from that to which the receiver is connected.
• Consult the dealer or an experienced radio/TV technician for help
6
7
8

Patriot II
®
Braking System
405-0600 Page 4 of 12 12/27/16
Carrying Handle
One-button Set-up
Adjustable
Push Pad
12 Volt Plugin
(2 Amp Max)
On/Off Switch
Brake “Claw”
Actuator Arm
Information
Display
RF Controller
Patriot II
®
Brake Unit
Breakaway Port

Patriot II
®
Braking System
405-0600 Page 5 of 12 12/27/16
Patriot II
®
Accessories
If you would like to order any of these accessory parts for your Patriot
®
, please contact a Blue Ox
®
Dealer
or Distributor, or call a member of the Technical Service Team at (402) 385-3051 to order these parts.
BRK2502: If the driver seat does not move far enough
forward to touch the back of the brake, this brake rod
extension can be inserted between the brake claw
and the actuator arm. This extender should also be
used if there is a low steering column/dashboard which
touches and interferes with the brake.
BRK2503: The seat stiffener works with any drop in
tow brake on the market. It provides a larger surface
area on the seat for the brake system to push against.
This means you get better, more responsive braking.
BRK2505: There is one (1) breakaway switch included
with your Patriot II®. An additional switch for a second
vehicle can be purchased.

Patriot II
®
Braking System
405-0600 Page 6 of 12 12/27/16
Towed Vehicle Set-Up
In Towed Vehicle
1. Open the driver side door of the towed vehicle and push
the driver seat back as far as possible.
2. Place the Patriot II
®
unit on the oor.
3. Open the brake claw and secure it on the brake
pedal.
4. The Patriot II can be used without the feet. If needed
the feet can be attached and adjusted for proper height
position for uneven oorboards.
5. Slide the driver seat forward against the push pads.
Adjust the push pad up or down for proper height
position in relationship to the seat.
Note: The seat should not put any pressure on the
back of the brake unit.
6. Plug in the power cord into a constant 12 volt power
source. The indicator light on the cord will glow.
Note: If constant 12V source is not used the brake could
experience a low battery error
7. Press the power button. The indicator lights above power
and setup will blink in a repeating sequence.
Note: Make sure tow brake is in Hybrid mode for any
continuous power assist brakes or hybrid vehicles. (see
Page 9)
8. Check to make sure the tow vehicle is not running.
Note: Any time the towed vehicle is started up, the
brake needs to be reset.
9. Push the “SET-UP” button. The brake will stroke ve (5)
times then remain in the ready position.
Note: The power light will illuminate green if the brake
is set up properly. Refer to remote for any errors
encountered during setup.
In the Motor Coach
Find a sturdy, easy-to-reach location to mount the RF in-coach
controller. The dashboard is the suggested mounting point, but
anywhere that is secure and accessible to the driver will work.
Using the Velcro provided, attach one side to the desired mount-
ing point, and the other side to the controller.
You can also place the remote in the rubber stand provided and
rest it on a at section of the dashboard. Make sure both the dash
and the stand are clean and dust free before use.
Note: The Patriot II® Brake should be used with the RF controller.
We recommend using the controller for the operational feedback,
however, if necessary, the brake can be used without the RF con-
troller present.
Figure 2
Figure 1
Figure 3
Figure 4

Patriot II
®
Braking System
405-0600 Page 7 of 12 12/27/16
To Open:
1. Place your thumb on top of the claw and place your pointer nger under the back ledge (right).
Pinch your ngers together until the claw locks in place (left).
To Close:
2. Position the claw onto the brake pedal.
NOTE: You can adjust the size of the claw by changing
where the top fangs are mounted or by switching out the
top fangs for the XL fangs.
3. Press the button on top of the claw to close the claw or
push the front button against the brake pedal.
Caution: Make sure your ngers are not between the
upper and lower half of the claw when you press the
button.
To Lock:
4. If the claw is open, you can turn the knob one quarter
turn to the left to lock it open.
If the claw is closed, you can turn the knob one
quarter turn to the left to prevent it from locking open.
If the claw is locked, turn the knob one quarter turn to
the right to unlock it.
Locking Brake Claw Operating Instructions

Patriot II
®
Braking System
405-0600 Page 8 of 12 12/27/16
Breakaway Installation
The Breakaway system automatically activates the Patriot
®
to apply the brakes on your towed vehicle in the
event the motor home separates from the towed vehicle. This type of emergency system is required by most
states and provinces.
Mounting the Breakaway Switch
1. With the pin facing the motor home, secure the breakaway switch onto the front of the towed vehicle in a sturdy
location. This should be a convenient location which can be easily reached, and if possible, on the driver side.
Note: The breakaway switch must be mounted directly on the towed vehicle and not to be installed on the tow
bar or bracket. The surface must be strong enough to hold the breakaway switch and allow for the pin to be
pulled out cleanly.
2. Make certain that the switch is securely attached, and that the pin can be removed from the switch without any
interference. Plug the cable into the breakaway switch.
3. Install the breakaway switch using a bolt and lock nut. Do not use a self tapping screw.
Connecting the Breakaway Switch to the Patriot II
®
Brake
There are two different ways to attach the break-away device to the Patriot
®
Brake. Use the method which is most
convenient for you.
Method 1: Through the rewall
1. Look for a pre-existing hole in the rewall, if no hole exists, drill a ½” diameter hole. Insert a grommet into hole.
Note: Make sure not to damage any components on either side of the rewall while drilling.
2. Find a path for the cable through the engine compartment to the rewall. Use wire ties to secure the cable.
Make sure to avoid any hot or moving engine parts.
3. Insert the cable into the grommet and pull the excess slack into the driver’s compartment. Seal around and
inside of the grommet with silicone sealant.
4. Plug the cable into the Patriot II
®
Brake.
Note: When not in use, the cable can be tucked away .
Method 2: Feeding the cable through the door/window
1. Find a path for the cable through the engine compartment to the rear of the hood/base of the windshield, on the
driver’s side. Use nylon ties to secure the cable so that it is avoiding any hot or moving engine parts.
2. Either roll down the window and thread the cable through, or open the door and thread the cable through. Make
sure excess slack is safely coiled inside the driver’s cockpit. Once the cable is through and connected, close the
door/window.
!
Be sure the breakaway cable is kept
clear of the tow bar, safety cables,
electrical cord or any moving parts.
WARNING

Patriot II
®
Braking System
405-0600 Page 9 of 12 12/27/16
Operating Instructions
1. Plug the 2-Way RF In-Coach Controller into an available 12 volt outlet.
2. The large number on the display represents the FORCE setting of the Patriot II
®
Brake; it will automatically be
set to 5 when activated. In order to adjust how much force the Patriot II
®
will put on your vehicles brakes you can
adjust the “FORCE” setting.
3. Select the “FORCE” button on the display
“0” should only be used if you want the brake to activate in a breakaway event
“1” may be used for lighter vehicles (under 3000 GVWR) behind a large motor home (more than 25K GVWR)
“3” may be used for lighter vehicles (under 3000 GVWR) behind a smaller motor home (under than 25K GVWR)
or a mid sized vehicle (under 4000 GVWR) behind a class A motor home
“5” (standard setting) may be used for mid sized vehicles (under 5000 GVWR) behind a mid sized motor home
“7” may be used for large vehicles (over 5000 GVWR) behind any size motor home
“9” may be used if you are having great difculty stopping the towed vehicle and should used if setting 7 or 8 is
not applying enough braking pressure
4. On the bottom of the RF Controller there is a “MANUAL BRAKE OVERRIDE” button. Pressing on this button will
cause the Patriot II
®
to press down on the brake pedal.
Note: This acts like a trailer brake and is useful in wet weather to keep the towed vehicle in line.
5. If the screen on the remote changes color to either yellow or red, an error has occurred. Check the display screen
on the Patriot II
®
remote to see what has happened. Errors with a yellow screen will prevent the brake from working
properly, but do not require you to immediately pull over. Errors in red require you to immediately pull over and
address them.
6. Insure the Patriot II
®
is plugged into a constant 12V power source.
7. If a breakaway switch is installed and plugged in, the “BRK/AWAY READY” message will appear on the remote.
Follow the instructions provided.
8. Anytime the towed vehicle is started up, the Patriot II
®
needs to be reset.
9. Go through the set-up procedure again if the unit is shut off for any period of time.
Installation Notes
When installing the Patriot II
®
on hybrids/vehicles with continuous power assist brakes you must do the following:
1. With the brake plugged in and turned on, use the remote to access the “SETUP” menu.
2. Access the hybrid vehicle menu option with the up & down arrows, and select it.
3. Change the Hybrid Vehicle mode to ON
Disconnecting
Perform these steps each time you remove the Patriot II
®
.
1. Turn off the Patriot II
®
. Unplug the Patriot II
®
power cord from the 12-volt accessory outlet.
2. Adjust the driver’s seat as far back as possible.
3. Unhook the brake bracket from the brake pedal. Unplug the breakaway cable from the Patriot II
®
control
panel (if applicable).
4. Lift the Patriot II
®
out of the vehicle.
CAUTION: Shut off the unit and unplug the RF when you stop driving for the day. Don’t leave the unit plugged in
all night.

Patriot II
®
Braking System
405-0600 Page 10 of 12 12/27/16
PAIRING A REMOTE
Issue: If your remote is not receiving a signal or to pair a new or unpaired remote module.
On the Remote:
Press the “SETUP” button to access the setup menu.
Press the “DOWN” to choose the PAIR REMOTE option.
Press the “OK” button to select the PAIR REMOTE option.
Press the “START” button and leave the remote on this screen.
On the Brake Unit:
Hook up the brake in the towed vehicle, and follow the instruction manual to set it up. Once the brake
is on and setup, hold the “SETUP” button for 1 second. Return to the remote to ensure the devices
have been paired.
If paired successfully, the 4 digit code after “PAIR ACTIVE” will have updated to the new brake ID.
Press the “OK” button to return to the SETUP menu.
Press the “OK” button again to return to the main screen.

Patriot II
®
Braking System
405-0600 Page 11 of 12 12/27/16
Error messages DO NOT show up on the brake itself. Errors are listed on the remote. Errors
will change the color of the RF controller screen. If the screen turns yellow, you do not need to
immediately address the issues, however, the brake will not function fully until you do. If the screen
turns RED, you need to immediately pull over and address the issue. Failure to do so may cause
brake damage. Please contact a customer care representative at (402) 385-3051 if you require
assistance.
Error Codes
CHECK POWER CONNECTION
This message will appear when the brake reads an input voltage below 10V. This means that the brake has
detected that the towed car’s battery is very low (OR the brake is no longer receiving power from the car
receptacle) The brake will go into an idle state and not work for normal braking. It will work in the event of a
breakaway!
When it is safe to do so, pull over and inspect the towed vehicle. Check the indicator light on the power cord to
see if the brake is receiving power. If this is the case, check the towed vehicles car battery voltage. If power is
restored, the status light will change back to green, and you are OK to resume your trip.
Anytime the towed vehicle is started up, the Patriot II
®
needs to be reset.
REPOSITION BRAKE
If the unit fails to successfully setup twice in a row, the following should be done:
• Adjust the push pads up or down to get better contact with the drivers seat
• Make sure the back of the brake unit is resting against the front of the drivers seat.
Note: The seat should not put any pressure on the back of the brake unit.
• Ensure the brake “Claw” is securely attached to the brake pedal
• A seat stiffener can be used to provide a larger surface area for the brake to push against.
BREAKAWAY
The unit has entered a BREAKAWAY state and the brake is being fully applied. If you believe the vehicle is still
rmly attached to the RV and are unable to pull over, you can deactivate the breakaway by holding down both
the left and right buttons on the remote.
As soon as it is safe to do so:
Pull over, secure the car, check all breakaway connections. If the error is cleared then you may continue
driving.
BRAKE NOT FOUND
The 2 way RF in coach controller is no longer communicating with the Patriot II
®
Brake. If you are using a new
remote, you will need to pair your remote with the brake unit. This may be due to the position of the controller,
if the problem persists contact Blue Ox
®
customer care.
RESET TOW BRAKE
The brake has detected an error and will not activate until you reset the brake. If this error persists, contact
customer support.

Patriot II
®
Braking System
405-0600 Page 12 of 12 12/27/16
CUSTOMER SERVICE COMMITMENT
Blue Ox® is committed to providing you with exceptional customer care throughout your lifetime
with our products. Our team is here to assist you with any questions you may have regarding the
performance of your product. Simply call (402) 385-3051 and you can speak with our technical
service team.
Additionally, please visit our website to see which rallies our Destination America team will be
attending. For a nominal fee, our service technician will service your towing system to ensure it’s in
proper working condition. Also, as a commitment to our customers, should you visit our factory, you
can stay at our full service Blue Ox® campground at no charge along with enjoying a factory tour.
Again, thank you for being our customer and for the condence you have shown in the performance
of our products. It is because of customers like you we enjoy the success we have today.
© 2015 Blue Ox
One Mill Road, Industrial Park
Pender, Nebraska 68047
Phone: (402) 385-3051
Fax: (402) 385-3360
www.blueox.com
Care
Do NOT use any type of solvent or spray cleaner on the Patriot II
®
braking system. The recommended
cleaning procedures for the Patriot II
®
are to wipe down the exterior with a damp cloth. Wipe down
with a dry cloth.
Store in a clean, dry place.
Maintenance
It may be necessary to occasionally lubricate the brake bracket with silicone spray.
Care and Maintenance of your Patriot II® Braking System
Your Patriot II
®
unit requires a minimal amount of care and maintenance. If you do not feel condent
in your ability to perform the occasional maintenance, consult your Blue Ox
®
Dealer or Professional
Installer, or see a Blue Ox
®
representative at a rally or race that you plan to attend. The following
will inform you of the areas of your Patriot II
®
that will need periodic inspection and/or care and
maintenance.
- REMINDER -
Operating temperature of the Patriot II
®
is
between -20ºF and 120ºF
/