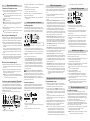
Korg minilogue xd PW Quick start guide
- Category
- Synthesizer
- Type
- Quick start guide
This manual is also suitable for

21
EFGSJ 3
En Introduction
Thank you for purchasing the Korg minilogue xd/minilogue xd
module polyphonic analogue synthesizer. To help you get the most
out of your new instrument, please read this manual carefully.
This manual refers to both the minilogue xd and the minilogue xd
module collectively as the “minilogue xd”. When referring to a
specific device, “
xd
” is used to indicate the minilogue xd only,
and “
xd-m
” is used to indicate the minilogue xd module only.
About the owner’s manual
The documentation for this product consists of the following:
•Precautions (Exhibit)
•Quick Start Guide (what you’re reading)
•Owner’s Manual (PDF) (you can download it from the Korg
website. www.korg.com )
Main Features
•The minilogue xd features an analog signal path with four voices
that takes after the Korg prologue analog synthesizer.
•Each voice includes a MULTI ENGINE providing a noise
generator, a VPM oscillator, and the possibility to load user
programmed oscillators. This instrument combines two VCOs,
making it possible to create a wide variety of sounds.
•The FX section is equipped with high quality digital effects
(MODULATION, REVERB, DELAY).
•500 programs (200 preset programs and 300 user programs as the
factory-set default) can be called up and saved in an instant.
•The minilogue xd has a powerful 16-step polyphonic sequencer.
•Real-time oscilloscope provides visual feedback of parameter
changes.
•SYNC IN and SYNC OUT jacks allow you to expand your session setup.
•Two CV IN jacks are available, letting you control the parameters
of this instrument using a modular synthesizer or other device.
•
xd-m
In Keyboard mode, you can play or input sequence data
using buttons 1–16.
Specications
Keyboard
xd
: 37 keys (slim keyboard, velocity sensitive)
Maximum Polyphony: 4 voices
Sound generating system: 2 VCO (square wave, triangle wave,
sawtooth wave), MULTI ENGINE (noise generator, VPM oscillator,
user oscillator), 1 VCF, 2 EG, 1 LFO, 1 VCA
Programs: 500 (200 preset programs and 300 user programs as the
factory-set default)
Effects: Modulation (Chorus, Ensemble, Phaser, Flanger, User),
Reverb, Delay
Input/output jacks
: Headphones jack, OUTPUT L/MONO and R
jacks, DAMPER jack (half-damper not supported), SYNC IN and OUT
jacks, CV IN 1 and 2 jacks, MIDI IN and OUT connectors, USB B port
Power supply: AC adapter (DC9V, )
Power consumption: 8 W
Dimensions (W × D × H):
xd
500 × 300 × 85 mm/19.69” × 11.81” ×
3.35”,
xd-m
500 × 179 × 85 mm/19.69” × 7.05” × 3.35”
Weight:
xd
2.8 kg/6.17 lbs.,
xd-m
2.6 kg/5.73 lbs.
Included items: AC adapter, Precautions, Quick Start Guide
Accessories (sold separately): DS-1H damper pedal, PS-1 pedal
switch, PS-3 pedal switch
De Einleitung
Vielen Dank, dass Sie sich für ein minilogue xd/minilogue xd mod-
ule polyphonic analogue synthesizer von Korg entschieden haben.
Bitte lesen Sie sich diese Anleitung vollständig durch, um bei der
Bedienung alles richtig zu machen.
Dieses Handbuch gilt sowohl für den minilogue xd als auch den
minilogue xd module, die hierin vereinheitlichend als „minilogue
xd“ bezeichnet werden. Bei Verweisen zu einem bestimmten Gerät
kennzeichnet „
xd
“ den minilogue xd und „
xd-m
“ den mini-
logue xd module.
Hinweise zur Bedienungsanleitung
Für dieses Produkt existieren folgende Dokumente:
•Vorsichtsmaßnahmen (Zeigen)
•Blitzstart (die halten Sie gerade in der Hand)
•Bedienungsanleitung (PDF) (als Download von der Korg-Website
erhältlich. www.korg.com )
Die wichtigsten Funktionen
•Der minilogue xd verfügt über einen analogen Signalweg mit
vier Stimmen, der dem des analogen Synthesizers Korg prologue
nachempfunden ist.
•Hinter jeder Stimme steht eine MULTI ENGINE mit einem Rausch-
generator, einem VPM-Oszillator und der Option, nutzerprogram-
mierte Oszillatoren zu laden. Das Instrument kombiniert zwei VCOs
und bietet somit vielfältige Möglichkeiten zur Soundgestaltung.
•Die FX-Sektion ist mit hochwertigen digitalen Effekten bestückt
(MODULATION, REVERB, DELAY).
•500 Programme (200 Preset- und 300 Nutzer-Programme als
Werkseinstellung), die im Nu aufgerufen und gespeichert wer-
den können.
•Der minilogue xd verfügt über einen leistungsstarken polypho-
nen Sequenzer mit 16 Schritten.
•Echtzeit-Oszilloskop für visuelle Rückmeldung der Änderungen
von Parametern.
•SYNC IN- und SYNC OUT- Buchsen zum Erweitern Ihres Gerä-
tesetups.
•Über zwei CV IN-Buchsen können Sie zudem die Parameter
dieses Instruments mit einem modularen Synthesizer oder einem
anderen Gerät steuern.
•
xd-m
Im Keyboard-Modus können Sie mit den Tasten 1–16
Sequenzdaten wiedergeben oder eingeben.
Technische Daten
Tastatur
xd
: 37 Noten (Slimkey, Anschlagdynamisch)
Maximale: 4 Stimmen
Klangerzeugung: 2 VCO (Rechteck-, Dreieck- und Sägezahnwelle),
MULTI ENGINE (Rauschgenerator, VPM-Oszillator, Nutzer- Os-
zillator), 1 VCF, 2 Hüllkurvengeneratoren, 1 LFO, 1 VCA
Fr Avant-propos
Merci d’avoir choisi le synthétiseur analogique polyphonique mini-
logue xd/minilogue xd module de Korg. Afin de pouvoir exploiter
au mieux toutes les possibilités offertes par l’instrument, veuillez
lire attentivement ce manuel.
Dans ce manuel, l’appellation “minilogue xd” est utilisée pour
désigner à la fois le minilogue xd et le minilogue xd module.
Les sections portant uniquement sur un modèle particulier sont
identifiées par “
xd
” (pour le minilogue xd) et “
xd-m
” (pour le
minilogue xd module).
À propos du manuel d’utilisation
La documentation pour ce produit comprend les manuels suivants:
•Précautions (Exposition)
•Guide de prise en main (ce que vous lisez)
•Manuel d’utilisation (fichier PDF) (que vous pouvez télécharger
sur le site internet de Korg. www.korg.com ).
Principales fonctions
•Le minilogue xd est doté d’un circuit de synthé analogique à quatre
voix inspiré du prologue, un synthétiseur analogique de Korg.
•Chaque voix intègre un MULTI ENGINE proposant un générateur
de bruit, un oscillateur VPM et la possibilité de charger des oscilla-
teurs programmés par l’utilisateur. Cet instrument combine deux
oscillateurs VCO qui permettent de créer une grande variété de sons.
•La section FX offre des effets numériques de haute qualité
(MODULATION, REVERB, DELAY).
•500 programmes (200 programmes d’usine et 300 programmes
utilisateur à la sortie d’usine) peuvent être rappelés et sauvegar-
dés instantanément.
•Le minilogue xd possède un séquenceur polyphonique puissant
à 16 pas.
•Oscilloscope en temps réel offrant un contrôle visuel des change-
ments de paramètres.
•Prises SYNC IN et SYNC OUT fournissant davantage d’options
de configuration.
•Deux prises CV IN permettent de contrôler les paramètres de cet
instrument avec un synthé modulaire ou un autre dispositif.
•
xd-m
En mode Keyboard, vous pouvez jouer ou produire des
données de séquence avec les boutons 1–16.
Caractéristiques techniques
Clavier
xd
: 37 notes (de type “Slimkey”, sensible au toucher)
Polyphonie: 4 voix
Système de génération de son: 2 VCO (onde carrée, onde triangu-
laire, onde en dents de scie), MULTI ENGINE (générateur de bruit,
oscillateur VPM, oscillateur utilisateur), 1 VCF, 2 EG, 1 LFO, 1 VCA
Programmes: 500 (200 programmes Preset d’usine et 300 pro-
grammes utilisateur à la sortie d’usine)
Published 4/2019 Printed in Vietnam
© 2019 KORG INC. www.korg.com
Quick Start Guide (En) ................. p. 1, 4, 5, 7
Guide de prise en main (Fr) ........ p. 1, 4, 5, 9
Blitzstart (De)................................ S. 2, 4, 6, 11
Guía de inicio rápido (Es) ............ p. 2, 4, 6, 13
クイック・スタート・ガイド
(Ja) ......... p. 3, 4, 6, 15
* Specifications and appearance are subject to change without notice for
improvement.
*
Since the instrument uses natural wood, there will be individual differ
-
ences in the wood grain, surface texture and color.
*
All product names and company names are the trademarks or registered
trademarks of their respective owners.
Effets: Modulation (chorus, ensemble, phaser, flanger, user),
Réverbération, Retard
Prises d’entrée/de sortie: Prise casque, Prises OUTPUT L/MONO et R,
Prise DAMPER (pédale progressive pas prise en charge), Prises SYNC
IN et OUT, Prises CV IN 1 et 2, Prises MIDI IN et OUT, Port USB B
Alimentation: Adaptateur secteur (DC9V, )
Consommation électrique: 8 W
Dimensions
(L × P × H)
:
xd
500 × 300 × 85 mm,
xd-m
500 ×
179 × 85 mm
Poids:
xd
2,8 kg,
xd-m
2,6 kg
Accessoires fournis: Adaptateur secteur, Précautions, Guide de
prise en main
Accessoires (vendue séparément): Pédale forte DS-1H (prenant en
charge la fonction demi-pédale), pédale commutateur PS-1, pédale
commutateur PS-3
* Les caractéristiques et l’aspect du produit sont susceptibles d’être modifiés
sans avis préalable en vue d’une amélioration.
*
Vu que cet instrument comporte du bois naturel, des différences de grain, de
texture et de couleur du bois sont observables entre chaque exemplaire produit.
* Tous les noms de produits et de sociétés sont des marques commerciales
ou déposées de leur détenteur respectif.
Programme: 500 (200 Preset- und 300 Nutzer-Programme als
Werkseinstellung)
Effekte: Modulierende (Chorus, Ensemble, Phaser, Flanger, User),
Reverb, Delay
Eingangs-/Ausgangsbuchsen: Kopfhörerbuchse, OUTPUT L/
MONO und R-Buchsen, DAMPER-Buchse (nicht Halbdämpferfä-
hig), SYNC IN- und OUTBuchsen, CV IN 1- und 2-Buchsen, MIDI
IN- und OUT-Anschlüsse, USB B-Port
Stromversorgung: Netzteil (DC9V, )
Leistungsaufnahme: 8 W
Abmessungen (B × T × H):
xd
500 × 300 × 85 mm,
xd-m
500 ×
179 × 85 mm
Gewicht:
xd
2,8 kg,
xd-m
2,6 kg
Lieferumfang: Netzteil, Vorsichtsmaßnahmen, Blitzstart
Zubehör (separat erhältlich): DS-1H Dämpferpedal, PS-1 Fußschal-
ter, PS-3 Fußschalter
* Änderungen der technischen Daten und des Designs ohne vorherige
Ankündigung vorbehalten.
*
Da Teile des Instruments aus natürlichem Holz bestehen, können Unter
-
schiede in Maserung, Oberflächenbeschaffenheit und Farbe auftreten.
*
Alle Produkt- und Firmennamen sind Warenzeichen oder eingetragene
Warenzeichen der betreffenden Eigentümer.
Es Introducción
Gracias por comprar el minilogue xd/minilogue xd module sinte-
tizador analógico polifónico de Korg. Por favor, lea este manual
atentamente y guárdelo para futuras consultas.
Este manual se refiere tanto al minilogue xd como al minilogue
xd module de manera unificada como “minilogue xd”. Cuando se
hace referencia a uno de los dispositivos específicamente, se utiliza
“
xd
” para indicar solo el minilogue xd y “
xd-m
” para indicar
solo el minilogue xd module.
Acerca del manual del usuario
La documentación de este producto incluye lo siguiente:
•Precauciones (Exposición)
•Guía de inicio rápido (el que está leyendo en este momento)
•Manual del usuario (PDF) (puede descargarla del sitio web de
Korg. www.korg.com )
Funciones principales
•El minilogue xd presenta un recorrido de señal analógico con cua-
tro voces semejante al del sintetizador analógico prologue de Korg.
•Cada voz incluye un motor múltiple denominado MULTI ENGI-
NE que cuenta con un generador de ruido, un oscilador VPM y
la posibilidad de cargar osciladores programados por el usuario.
Este instrumento combina dos VCO, lo que hace posible crear
una amplia variedad de sonidos.
•La sección de efectos (EFFECTS) está equipada con efectos digita-
les de alta calidad (MODULATION, REVERB, DELAY).
•500 programas (200 programas predefinidos y 300 programas
de usuario cuando sale de fábrica) que pueden recuperarse y
guardarse en un instante.
•El minilogue xd tiene un potente secuenciador polifónico de 16
pasos.
•El osciloscopio en tiempo real proporciona información visual de
los cambios de parámetros.
•Los jacks SYNC IN y SYNC OUT le permiten ampliar la configu-
ración de la sesión.
•Cuenta con dos jacks CV IN, lo que permite controlar los paráme-
tros de este instrumento mediante un sintetizador modular u otro
dispositivo.
•
xd-m
En el modo de teclado, puede tocar o introducir datos de
secuencia utilizando los botones 1–16.
Page is loading ...

65
Ja
接続
お使いのシステムに応じて、適切に接続してください。
接続するときは、すべての機器の電源をオフにした状態で行っ
てください。電源をオンのまま接続すると、スピーカー ・システ
ムなどを破損したり、誤動作を起こしたりする原因となります。
DC9V端子: 付属のACアダプターのDCプラグを接続します。
OUTPUT
L
/MONO、R端子: パワード・モニター・スピーカーなど
を接続します。音量はMASTERノブで調節します。
ヘッドホン端子: ヘッドホンを接続します。OUTPUT端子からの出
力と同じ信号を出力します。
DAMPER端子: 別売のコルグDS-1Hダンパー・ペダル、PS-1、PS-3
ペダル・スイッチを接続し、ダンパー機能をコントロールします。
NOTE:
minilogue xdはハーフ・ダンパー機能に対応していません。
MIDIIN、OUT端子: 外部MIDI機器を接続し、MIDIデータを送受信し
ます。
TIP:
外部MIDI機器を使用するときは、外部機器の送信MIDIチャン
ネルとminilogue xdのMIDIチャンネルを合わせます。
USBB端子: コンピューター等を接続し、MIDIデータを送受信しま
す。
SYNC
I
N、OUT端子: コルグvolcaシリーズのSYNC IN、OUT端
子などと接続すると、出力されるパルスとステップで同期します。
SYNC OUT端子はステップのはじめに15msのパルスを5Vで出力
します。ステレオ・ミニ・ケーブルを使用します。
CV
IN1
、2端子: CV出力が可能な機器を接続し、minilogue xdのパ
ラメーターをコントロールします。電圧レベルは-5V~+5Vです。
モ ノ ラ ル・ミ ニ・ケ ー ブ ル を 使 用 し ま す( ス テ レ オ・ミ ニ・ケ ー ブ ル も 使
用 可 )。
部件名称
有毒有害物质或元素
铅
(Pb)
汞
(Hg)
镉
(Cd)
六价铬
(Cr(VI))
多溴联苯
(PBB)
多溴二苯
醚(PBDE)
电路板
× ○ ○ ○ ○ ○
壳体
× ○ ○ ○ ○ ○
键盘
○ ○ ○ ○ ○ ○
AC 转换器
× ○ ○ ○ ○ ○
○:表示该有毒有害物质或元素在该部件所有均质材料中的含量
均在 GB/T 26572 标准规定的限量要求以下。
×:
表示该有毒有害物质或元素至少在该部件的某一均质材料中
的含量超出 GB/T 26572 标准规定的限量要求。
此标记适用于中华人民共和国销售的电子信息产品,
标记中央的数字表示环境保护使用期限的年数。
自制造日算起的此年月内,产品中的指定 6 物质不会
向外部泄漏或发生突变,不会产生环境污染或者对人
体或财产带来深刻的影响。此环境保护使用期限并不
表示产品保证期限。
Jacks SYNC IN, OUT: Conecte estos jacks a los jacks SYNC IN,
OUT de la serie volca de Korg para la sincronización con los impul-
sos y pasos emitidos. El jack SYNC OUT emite un impulso de 5 V
y 15 ms de duración al principio de cada paso. Utilice un cable con
minijacks estéreo para esta conexión.
Jack CV IN 1, 2: Conecte aquí un dispositivo que pueda emitir
señales CV, que serán utilizadas para controlar los parámetros de
este instrumento. El rango de voltaje es de –5 V a +5 V. Utilice un
cable con minijacks monoaurales (o un cable con minijacks estéreo).
Es Hacer las conexiones
Conecte el minilogue xd como sea apropiado para su sistema de
sonido.
Asegúrese de que todos los demás dispositivos del sistema de
sonido están apagados antes de hacer las conexiones. Si algu-
no está encendido al hacer las conexiones, pueden producirse
averías o daños en los altavoces y en los demás componentes.
Jack DC 9V: Conecte el conector del adaptador de corriente inclui-
do a este jack.
Jacks OUTPUT L/MONO, R: Conecte estas salidas a monitores
autoamplificados o dispositivos similares. Ajuste el volumen utili-
zando el mando MASTER.
Jack de auriculares
: Conecte aquí los auriculares. Este jack emite la
misma señal que los jacks OUTPUT.
Jack DAMPER: Conecte aquí un pedal de resonancia Korg DS-1H
(se vende por separado) o una pedalera Korg PS-1/PS-3 (se vende
por separado) para controlar la función de resonancia (apagador).
Nota: Este instrumento no dispone de función de medio recorri-
do del apagador (half-damper).
Conectores MIDI IN, OUT: Utilice estos conectores para conectar
el minilogue xd a un dispositivo MIDI externo para intercambiar
mensajes MIDI.
Consejo: Para intercambiar datos con un dispositivo MIDI
externo conectado, ajuste el canal MIDI del minilogue xd de
manera que sea el mismo que el canal de transmisión MIDI
del dispositivo MIDI externo.
Puerto USB B: Conecte este conector a un ordenador con el fin de
intercambiar mensajes MIDI.
De Anschlüsse vornehmen
Der minilogue xd lässt sich einfach in Ihr bereits vorhandenes
Soundsystem integrieren.
Achten Sie darauf, dass alle Geräte ausgeschaltet sind, bevor
Sie Anschlüsse vornehmen. Falls Anschlüsse bei eingeschal-
teten Geräten erfolgen, kann es zu Fehlfunktionen oder gar
Schäden an Verstärkern oder anderen Komponenten kommen.
DC 9V-Buchse: Schließen Sie hier den Gleichstromstecker des im
Lieferumfang enthaltenen Netzteils an.
OUTPUT L/MONO, R-Buchsen: Buchsen zum Anschluss von
Aktivmonitoren oder ähnlichen Geräten. Regeln Sie die Lautstärke
mit dem MASTER-Regler.
Kopfhörerbuchse: Hier kann ein Kopfhörer angeschlossen werden.
Hier liegt dasselbe Signal an wie an der OUTPUT-Buchse.
DAMPER-Buchse: Hier kann ein (als Zubehör erhältliches) DS-1H
Dämpfer-/Haltepedal oder ein (als Zubehör erhältlicher) PS-1/
PS-3 Pedalschalter von Korg zur Steuerung der Dämpferfunktion
angeschlossen werden.
Hinweis: Dieses Instrument bietet keine Halb-Dämpfungsfunktion.
MIDI IN, OUT-Anschlüsse: Hierüber können Sie den minilogue
xd mit einem externen MIDI-Gerät verbinden, um MIDI-Nachrich-
ten zu übertragen.
Tipp: Um einen Datenaustausch mit einem externen MIDI-Gerät
zu gewährleisten, stellen Sie am minilogue xd denselben
MIDI-Kanal ein wie am externen MIDI-Gerät.
USB B-Port: Hier können Sie einen Computer anschließen, um
MIDI-Nachrichten zu übertragen.
SYNC IN, OUT-Buchsen: Buchsen zum Anschluss an SYNC IN,
OUT-Buchsen von Geräten der Korg volca Reihe, um diese zu
synchronisieren. Die SYNC OUT-Buchse gibt zu Beginn eines jeden
Schritts einen 15 ms langen 5 V-Impuls aus. Verwenden Sie hierzu
ein Stereo-Miniklinkenkabel.
CV IN 1, 2-Buchse: Buchse zum Anschluss von Geräten, die ein
CV-Signal ausgeben, mit dem die Parameter dieses Instruments
gesteuert werden können. Der Spannungsbereich beträgt –5 V bis
+5 V. Verwenden Sie ein Mono- oder Stereo-Miniklinkenkabel.
Fr Connexions
Branchez le minilogue xd à votre système de production musicale
en choisissant les connexions optimales.
Veillez à ce que tous les dispositifs soient hors tension avant
d’effectuer toute connexion. Effectuer des connexions en
laissant des dispositifs sous tension peut causer des dys-
fonctionnements ou endommager vos enceintes ou d’autres
composants.
Prise DC 9V: Branchez la prise CC de l’adaptateur secteur fourni à
cette prise.
Prises OUTPUT L/MONO, R: Branchez ces prises à une paire de
moniteurs actifs ou à un dispositif similaire. Réglez le niveau de
volume avec la commande MASTER.
Prise casque: Vous pouvez y brancher un casque. Cette prise pro
-
duit le même signal que la prise OUTPUT.
Prise DAMPER
: Branchez une pédale forte Korg DS-1H (dispo-
nible en option) ou une pédale interrupteur PS-1/PS-3 (disponible
en option) pour contrôler la fonction de pédale forte.
Remarque: Cet instrument ne dispose pas de la fonction ‘half-
damper’ (effet demi-pédale).
Prises MIDI IN, OUT: Utilisez ces prises pour brancher le
minilogue xd à un dispositif MIDI externe afin d’échanger des
messages MIDI.
Astuce: Pour pouvoir échanger des données avec un dispositif
MIDI externe connecté, réglez le minilogue xd sur le même
canal MIDI que le dispositif de transmission externe.
Port USB B: Reliez ce port à un ordinateur pour pouvoir échanger
des messages MIDI.
Prises SYNC IN, OUT: Reliez ces prises aux prises SYNC IN, OUT
d’un instrument de la série volca de Korg afin de synchroniser les
instruments via les pulsations et les pas produits. La prise SYNC
OUT produit une pulsation de 5V et de 15 ms au début de chaque
pas. Effectuez cette connexion avec un câble minijack stéréo.
Prise CV IN 1, 2: Branchez un dispositif capable de produire un
signal CV qui sera utilisé pour contrôler les paramètres de cet
instrument. La plage de tension s’étend de –5 V à +5 V. Effectuez la
connexion avec un câble minijack mono (ou un câble minijack stéréo).
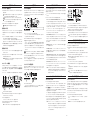
MIDI IN, OUT connectors
SYNC IN, OUT jacks
CV IN 1, 2 jacks
OUTPUT L/MONO, R jacks
DC 9V jack
Headphones
INPUT
INPUT
Powered monitor speaker
Damper pedal,
Pedal switch, etc.
DAMPER jack
Cord hook
CV OUT
(Headphones) jack
(Power) switch
(USB B) port
MIDI keyboard, rhythm machine, etc.
MIDI OUT
Sound module, rhythm machine, etc.
Computer
USB
AC adapter
(included)
Groove machine
SYNC IN
MIDI cable
MIDI IN
Step sequencer,
Modular Synthesizer, etc.
Stereo mini cable
Monaural mini cable
USB cable
MIDI cable
xd
En Making connections
Connect the minilogue xd as appropriate for your own sound
system.
Be sure that the power on all of your devices is turned off
before you make connections. Leaving the power on when
you make connections may cause malfunctions, or damage
your speaker system and other components.
DC 9V jack: Connect the DC plug of the included AC adapter to
this jack.
OUTPUT L/MONO, R jacks: Connect these jacks to a powered
monitor speaker or similar device. Adjust the volume level using
the MASTER knob.
Headphones jack: Connect the headphones here. This jack outputs
the same signal as that of the OUTPUT jack.
DAMPER jack: Connect a Korg DS-1H damper pedal (sold sepa
-
rately) or a PS-1/PS-3 pedal switch (sold separately) to control the
damper function.
NOTE: The minilogue xd does not feature a half-damper func-
tion.
MIDI IN, OUT connectors: Use these connectors to connect the
minilogue xd to an external MIDI device for exchanging MIDI
messages.
Tip: To exchange data with a connected external MIDI device,
set the minilogue xd’s MIDI channel to match the MIDI
transmission channel of the external MIDI device.
USB B port: Connect this connector to a computer, in order to
exchange MIDI messages.
SYNC IN, OUT jacks: Connect these jacks to the SYNC IN, OUT
jacks on the Korg volca series, to synchronize with the pulses and
steps that are outputted. The SYNC OUT jack outputs a 5 V pulse,
15 ms long at the beginning of each step. Use a stereo mini-cable
for this connection.
CV IN 1, 2 jack: Connect a device that can output a CV signal,
which will be used to control the parameters of the minilogue xd.
The voltage range is from –5 V to +5 V. Use a monaural mini cable
(or a stereo mini-cable).

87
Saving a Program
1.
In Play mode, press the WRITE button.
The minilogue xd will enter the Write standby mode, and the
WRITE button will blink.
2.
Turn the PROGRAM/VALUE knob to select the Program num-
ber where your new sound will be saved.
Tip: To cancel, press the EXIT button.
3.
Press the WRITE button once more.
The Program will be saved in internal memory, and the message
“Complete” will appear in the display.
Never turn off the power while Programs are being saved.
Doing so may destroy the internal data.
Restoring the Factory settings
You can restore the minilogue xd’s preset Programs and global set-
tings to their original factory-set state at any time.
1.
Begin with the minilogue xd turned Off.
2.
While holding down the WRITE button and the EXIT button,
turn the minilogue xd On.
“FACTORY RESET” will be indicated in the display.
3.
Use the PROGRAM/VALUE knob to choose the settings you
wish to reset (PRESET, GLOBAL, ALL).
If you select “ALL” and execute, all user progras will be
erased.
4.
Press the WRITE button.
The display will indicate the message “Are you sure?”.
5.
Turn the PROGRAM/VALUE knob to select “Yes”, and press the
WRITE button.
The factory-set default data will be reloaded, and the minilogue
xd will be restored to its factory default state.
Never turn off the minilogue xd while data is being loaded.
Doing so might damage the internal data.
Analog Circuitry and Tuning
Tuning Operation
As with all analog instruments, the minilogue xd’s circuitry can
drift over time during performance due to changes in environment
and temperature. The minilogue xd provides an auto-tuning func-
tion that automatically tunes the instrument’s analog circuits on
demand, to correct for any analog drift.
As you continue to play the minilogue xd for a while right after
you’ve turned it on, the pitch and tone may gradually drift. If the
pitch drift becomes noticeable, use the steps below to tune the
minilogue xd.
1.
Hold down the SHIFT button and press the EXIT button.
Tuning will begin, and the display will indicate “Tuning...”.
The tuning will take about 15 seconds.
NOTE: During tuning, you will temporarily be unable to play the
minilogue xd.
1, 3
2
Editing a Program
The basic parameters that make up a program are assigned to the
knobs and switches on the front panel. Listen to how the sound
changes when you operate the controls.
1.
Turn the PROGRAM/VALUE knob to select a program in Play
mode.
2.
Use the knobs and switches on the front panel.
VCO 1/VCO 2/MULTI ENGINE section: You can select dif-
ferent VCO waveforms for the VCO 1/VCO 2, and change the
waveforms using the SHAPE knob. You can also set the pitch
and octave here. You can apply oscillator sync, a ring modulator
and cross modulation to VCO 2. For the MULTI ENGINE, you
can select either a noise generator, VPM oscillator or user oscil-
lator. You can load a custom oscillator program into the user
oscillator using librarian software.
VOICE MODE section
: Switches between Voice modes. In
Voice mode, you can combine the voices of the minilogue xd’s
four-voice analog synthesizer, and play the instrument in differ-
ent ways. Turn the VOICE MODE DEPTH knob to get different
effects for each Voice mode.
MIXER section
: Adjusts the volume balance between the VCO 1,
VCO 2 and the MULTI ENGINE.
FILTER section: This section includes a low-pass filter for
removing or emphasizing specific frequency regions of the oscil-
lator’s sound, making the sound brighter or darker or giving it
more character.
AMP EG/EG/LFO section
: The AMP EG controls the volume
over time. With the EG, you can select PITCH, PITCH 2 or
CUTOFF to change the pitch or apply time-based changes to the
sound. The LFO makes cyclical changes to the PITCH, SHAPE
and CUTOFF of the sound.
EFFECTS section: The MOD effect is used to apply modulation-
type effects like chorus, phaser and flanger to the sound, and
REVERB and DELAY are used for spatial effects.
Tip: We recommend that you save the programs you have edited
on the minilogue xd. Any edits that you make will be lost if
you turn off the power or recall a different program.
Recording Sequence data
Step Recording
1.
Select a program and press the REC button.
“STEP REC” and “STEP 1” will be indicated in the display.
If the sequence has already been recorded, the note names will
be indicated in the display.
2.
The notes you play on the keyboard (
xd-m
or by using but-
tons 1–16 when Keyboard mode is ON) will be recorded. Press
the REST button to record a rest. After recording an event, the
display will automatically move to the next step.
Press the REST button while holding down a key to record a tie.
The note recorded will be tied to the next step.
3.
When the set number of steps have finished recording, step
recording will automatically end (the REC button will go dark).
Press the REC button during recording to stop recording mid-
way.
Tip: We recommend that you save your sequences to internal
memory after step recording ends. If you select another
program before saving your edited program, the sequence
data in the newly selected program will be recalled, and the
sequence data you were editing will be lost.
Playing Programs & Sequences
Playing a Program
The minilogue xd features 500 program memories. When the
unit is shipped from the factory, preset programs are assigned to
program numbers 1–200. Programs 201–500 contain init programs
(programs that have been initialized).
1.
Check that the minilogue xd is in Play mode.
In Play mode, verify that the EDIT MODE button on the front
panel are unlit. If the EDIT MODE button is lit, press the EXIT
button.
2.
Turn the PROGRAM/VALUE knob to select a Program.
3.
Play the keyboard to hear the sound.
Use the OCTAVE switch (MASTER controls) to change the tonal
range of the keyboard. The joystick mainly controls the pitch
when moved from left to right, and changes parameters such
as the cutoff frequency and vibrato depth when moved up and
down. You can also change which parameters are controlled by
the joystick by changing the assignment in the menu.
xd-m
Flip the KEYBOARD switch up to turn Keyboard mode on.
In this mode, buttons 1–16 can be used instead of the keyboard to
play the instrument. Buttons 1–16 will light to indicate the black
and white keys. Buttons 1–16 can be used for both step and real-
time recording.
Flip the KEYBOARD switch off (down) when you do not want to
use buttons 1–16 instead of the keyboard.
Playing the Sequencer
The polyphonic sequencer in the minilogue xd can record up to 16
steps. In addition to note data, the sequencer can play back motion
sequences (record the sound changes using the knobs or switches).
1.
Press the PLAY button.
The sequence data recorded for each program will play.
2.
Press the PLAY button to stop playing.
2
Make sure EDIT MODE button is unlit.
1
1, 2
En Turning the power on/o
Connecting the AC adapter
1.
Connect the DC plug of the included AC adapter to the DC 9V
jack located on the rear panel of the minilogue xd.
Be sure to use only the included AC adapter. Using any other
AC adapter may cause malfunctions.
xd
Hook the AC adapter cord onto the cord hook.
Do not use excessive force when pulling the cord off the
hook. Doing so may damage the plug.
2.
Connect the plug of the AC adapter to an AC outlet.
Be sure to use an AC outlet of the correct voltage for your AC
adapter.
Turning the minilogue xd On
Make sure that both the minilogue xd and any external output
devices such as powered monitor speakers are turned off, and turn
the volume of all devices all the way down.
1.
Hold down the Power switch on the rear panel of the minilogue
xd; once the “minilogue xd” logo appears in the display, take
your finger off the Power switch.
The word “Tuning...” will appear on the display, and the instru-
ment will enter Tuning mode for the analog synthesizer circuit,
for around 15 seconds. After this, the minilogue xd will enter to
Play mode.
2.
Turn on any external output devices such as powered monitor
speakers. Adjust the volume of your external output equipment,
and adjust the minilogue xd’s volume using the MASTER knob.
Turning the minilogue xd O
1.
Lower the volume of your powered monitors or external output
system, and turn them off.
2.
Hold down the Power switch on the rear panel of the minilogue
xd; to turn off the power after the display goes blank, take your
finger off the power switch.
NOTE: Once you have turned the minilogue xd off, wait about 10
seconds before turning the minilogue xd on again.
Auto Power O Feature
The minilogue xd features an Auto Power Off feature that can
automatically turn the minilogue xd off after 4 hours have elapsed
with no operation of the knobs, switches, buttons, or keyboard
of the minilogue xd. By default, the factory setting for the Auto
Power Off is enabled.
The Auto Power Off can be disabled using the steps below.
1.
Press the EDIT MODE button.
2.
Turn the PROGRAM/VALUE knob, and select “GLOBAL EDIT.”
The minilogue xd will enter GLOBAL Edit mode.
3.
Press button 8 three times.
“Auto Power Off” will be indicated on the display.
4.
Turn the PROGRAM/VALUE knob, and select “Off”.
5.
Press the EXIT button.
Tip: Settings in GLOBAL EDIT are saved automatically.
81110 12913141516
3
1
2, 4
5
Page is loading ...
Page is loading ...
Page is loading ...
Page is loading ...
-
 1
1
-
 2
2
-
 3
3
-
 4
4
-
 5
5
-
 6
6
-
 7
7
-
 8
8


Korg minilogue xd PW Quick start guide
- Category
- Synthesizer
- Type
- Quick start guide
- This manual is also suitable for
Ask a question and I''ll find the answer in the document
Finding information in a document is now easier with AI
in other languages
Related papers
-
Korg minilogue bass Quick start guide
-
Korg minilogue xd PW Owner's manual
-
-
Korg MINILOGUE Owner's manual
-
-
Korg MS-20FS Owner's manual
-
-
-
-
Korg NTS-1 digital kit Owner's manual
Other documents
-
Microlife AD-1024A User manual
-
Yamaha CS-30 User manual
-
-
Roland SYSTEM-1 Owner's manual
-
-
Yamaha PLG150-AN Owner's manual
-
Behringer MS-1-BK Quick start guide
-
-
Behringer POLY D Quick start guide
-
 Analogue Solutions Leipzig-SK User manual
