Page is loading ...

Air Powered Rivet Driver
Assembly/Operation
1. Place drive rod through retaining chuck. 2. Place drive rod into Air Powered
Rivet Driver.
3. Screw retaining chuck onto Air Powered
Rivet Driver. Make sure set-screw is turned
out and will allow chuck to be screwed on.
X2147
Assembly: Steps 1 thru 4 are required if not assembled.
4. Using included allen wrench tighten
set screw.
5. Load single Rivets into Guide Block.
If using single rivets skip to Step 7.
6a. Load Rapid Loader Rivets (if available)
intoGuide Block.
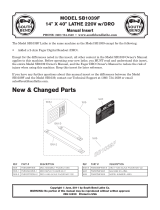
Operation
!WARNING
• Never actuate tool unless Drive Rod is inside Guide
Block and contacting a Rivet, personal injury or damage
to tool could occur.
• Always use clean, dry, regulated compressed air.
• Do not operate tool with air pressure greater than 90 psi.
• Keep tool clean and dry.
• Lubricate tool with Air Tool Oil daily.
• Always disconnect from air supply before servicing.
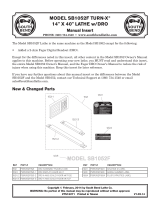
Replacement Parts
1. Air Powered Rivet Driver−#41834
2. Retaining Chuck−#41987
3. Drive Rod with Hold Down
Spring and Washer−#41777
4. Hold Down Spring and Washer−#41836
1
4
2
3

2525 Wisconsin Avenue • Downers Grove, IL 60515-4200 U.S.A.
Telephone: 1-630-971-0150 • Fax: 1-630-971-1180 • E-mail: info@exco.com • Web: www.flexco.com
Visit www.flexco.com for other Flexco locations and products.
©2011 Flexible Steel Lacing Company. 12-13. For Reorder: X2147
6b. Release Rivets from plastic strip by
hammering on top of strip.
6c. Remove detached plastic strip. 7. Insert drive rod into guide block.
8. Actuate trigger on tool to drive rivet.
Drive rivet into belt. Do not overdrive.
Operation (cont’d)
1. Loosen set-screw withallen wrench. 2. Unscrew retaining chuck.
3. Remove old drive rod and replace with
new drive rod.
4. Screw retaining chuck onto Air
Powered Rivet Driver. Make sure set-
screw is turned out and will allow chuck
to be screwed on.
5. Using included allen wrench tighten
set screw.
Drive Rod Replacement
/